
Editor’s note: This article was last updated 14 June 2022 to reflect changes made in Flutter 3 and React Native v0.68, as well as to compare device compatibility and availability of documentation for Flutter vs. React Native.
The two most popular cross-platform mobile app development frameworks available at the moment are Flutter and React Native. These juggernauts are backed by two of the largest tech companies in the world: Google and Facebook, respectively.
In this guide, we’ll compare Flutter vs. React Native, explore what makes each framework so special, and discover why they’re so highly sought-after.
Here’s what we’ll cover:
The Replay is a weekly newsletter for dev and engineering leaders.
Delivered once a week, it's your curated guide to the most important conversations around frontend dev, emerging AI tools, and the state of modern software.
Flutter is a cross-platform UI framework developed by Google. First released in May 2017, Flutter has grown steadily in popularity over the years.
One of Flutter’s main selling points is that it enables you to create cross-platform applications using a single codebase. Traditionally, a company would need multiple tools and developers to create an application that was available on the web, mobile, and desktop.
For example, you might need:
This approach would require a whole team of developers, not to mention a ton of meetings to make sure the design and branding are consistent across all platforms. You also have to factor in testing for each platform and addressing their respective bugs and quirks.
With Flutter, companies can hire one developer to create apps across platforms with just one codebase to manage. This significantly reduces the time and resources required to launch and maintain an application.
Flutter 3 introduced fairly substantial changes. While the API for writing mobile and web applications hasn’t changed much, you can now use the same codebase to create iPhone, Android, Web, Windows, Mac, and Linux applications using the Flutter Compiler.
In addition, Flutter 3 provides better support for Firebase along with a Casual Games Toolkit for creating games with Flutter.
React Native is a cross-platform framework created by Facebook. With a codebase written in JavaScript, React Native makes it fairly simple to create cross-platform applications, lowering the barrier to entry for JavaScript developers.
Web development has been around for many years, and most web developers have been using JavaScript for much of their careers. Mobile development is still fairly new, but the ecosystem has matured quite a bit over the past few years.
If you already know JavaScript, the learning curve for mobile app development using React Native won’t be as steep.
These days, many companies are using React Native for app development. Microsoft recently developed its new Xbox store app using React Native, for one prominent example. Like Flutter, React Native makes it possible to create apps across various platforms using one codebase.
React Native v0.68, which was recently released at the time of writing, offers opt-in support for the new React Native architecture using the Fabric Renderer and TurboModule system. All libraries have not yet migrated to this new architecture, which is why it’s opt-in only.
The Fabric Renderer brings concurrency, React Suspense, and server-side rendering to React Native, along with a faster and more interoperable toolset.
Flutter and React Native share a lot of similarities, but they are also quite different in a handful of key ways.
For starters, Flutter uses the Dart programming language in its codebase, whereas React Native uses JSX.
Both languages are based on the C-style type of syntax and follow object-orientated principles. With this commonality, Flutter and React Native are fundamentally alike in terms of design, and the code is very similar as well.
Flutter and React Native both have excellent documentation guides. These guides make it easy for programmers to start developing apps.
Flutter’s documentation is easy to read because it is nicely formatted, structured, and detailed. In comparison, React Native’s documentation is not straightforward.
React Native also heavily depends on community-developed dependency libraries, so its documentation is not as well-organized.
When it comes to the core programming language, there is a significant difference between Flutter and React Native.
JavaScript is dynamic by nature. This means you can change the values of various data types, which makes it very versatile. Dart is both dynamic and static, which allows it to have the best of both worlds.
A statically typed language is generally considered much safer since it forces you to declare and use the correct data type. For example, you can’t assign a number to a string without returning an error.
You can enforce more type safety and error checking with JavaScript if you opt to use TypeScript instead, a strict syntactical superset of JavaScript.
React Native applications have a JavaScript runtime environment. While they usually have a bigger build size, this size can be reduced in React Native by enabling Hermes and ProGuard.
On another hand, Flutter apps tend to have larger file sizes. Inevitably, Flutter apps will take up more space with their larger build sizes.
Flutter uses a widget style for constructing the user interface, whereas React Native uses JavaScript and JSX.
Flutter widgets are pre-made, so you don’t need to create your own custom widgets unless you want to. Since the widgets were created and tested by Google, you don’t need to worry about compatibility issues.
If you’re using a programming language like Swift for mobile app development, you typically can’t see the code that Apple used to create UI components, like buttons. By contrast, you can see the code for Flutter widgets to see how Google developers created them.
Both Flutter and React Native use CSS Flexbox for constructing layouts. The way each framework implements it is different, but as long as you know Flexbox, you shouldn’t have any problems building the layout for your app.
The team that worked on Flutter also worked on the developer tools for the Google Chrome browser, which makes for a quick transition since the debug tools are quite similar.
The field of mobile app development has grown steadily over the past few years. Almost everyone on the planet has a mobile phone, so the user base is massive. These days, you can find an app for almost anything.
There are quite a few paths you can take if you want to create a mobile app.
You could choose to go down the native route, which would mean using Swift to create mobile apps or Kotlin to create Android apps. These are the official programming languages Apple and Google use, respectively, so you can expect first-party support and frequent updates.
Alternatively, you could choose to go down the cross-platform path and use Flutter or React Native. Typically, a native developer would use Xcode and Swift to build iOS apps and Android Studio and Kotlin for Android apps. These tools are applicable for cross-platform work.
It’s also quite common for developers to use an integrated development environment (IDE) such as Visual Studio Code.
In most cases, developers tend to use an IDE, Android Studio, or Xcode when building apps with Flutter and React Native. My preference is to use Visual Studio Code for React Native apps and Android Studio for Flutter apps.
At the time of this writing, React Native is slightly more popular than Flutter, thanks in part to React Native’s association with the popular web framework React. React Native has also been around for longer, so its user base is larger.
As such, there is currently higher demand for React Native developers than for Flutter developers. However, that doesn’t mean Flutter is unpopular; in fact, Flutter continues to gain popularity over time.
Android Studio has a Flutter plugin with code helpers, which makes it much easier to write and debug your code. As of this writing, this plugin has about 12 million downloads, which goes to show just how popular Flutter is.
It’s hard to decide whether a Flutter or React Native app has better performance. It won’t be the same for every app; there are many factors to consider, like the type of app, codebase, animations, transitions, app size, layout, data passing, end user’s phone, and more.
Both Flutter and React Native are open source and free to use. Both are well-maintained — as you would expect, considering they’re created by Google and Facebook.
You can test apps created using both frameworks either virtually, using a built-in simulator on your computer for iOS and Android, or natively, on your phone.
If you intend to develop on iOS, the SDK is only available on Apple computers, so Windows users and Linux users are out of luck. However, you can develop Android development apps on any platform.
Both frameworks use hot reloading, making development more efficient since you can instantly see the changes made.
There is some debate as to whether Flutter and React Native are truly native. To be considered 100 percent native, they would need to be written in the language they were designed for; namely, Swift for iOS and Kotlin or Java for Android.
The experience you get when using an app that was written in React Native and Flutter is, for the most part, a native experience. However, React Native uses JavaScript bridges to communicate with the native code, and bridges can slow app performance down.
In comparison, the Dart code that Flutter uses compiles directly to C, which is about as close to native as you can expect. Flutter code does not require any bridges to communicate with native code. You can safely assume that would make for better performance.
To solve the performance issue, React Native’s new architecture replaced JavaScript bridges with JavaScript Interface (JSI). JSI allows developers to directly invoke the native module without using bridges.
The new React Native architecture also allows developers to lazy-load native modules via TurboModules, which can help improve the application startup time.
Both Flutter and React Native are continuing to improve their performance with their developer and community support. But as of now, Flutter slightly wins on performance.
Flutter developers tend to refer to the official documentation. However, React Native has several options; for one, the official documentation, or a different platform, the most popular being Expo.
Expo offers more features and customizations, including an integrated icon library, whereas the official React Native docs are more bare-bones.
The React Native ecosystem is more mature and has more users since JavaScript has been around since 1995. Flutter, by contrast, was released in 2017.
React Native has a very active community across social media, but Flutter is no slouch. At the time of this writing, Flutter has more stars than React Native on GitHub.
The numbers are fairly similar across social media, too. Flutter has more Twitter followers than React Native, and while the numbers are close, there are more active Flutter devs on Reddit than active React Native devs.
Both Flutter and React Native have been used in popular commercial applications. Flutter was used to create the apps for Baidu, Groupon, and eBay, to name a few. Meanwhile, the apps for Facebook, Instagram, Shopify, and Discord were built with React Native.
Flutter and React Native both support Android devices with ARM processors and Apple devices from iPhone 4s and onward. Both also support Android and iOS simulators for developing apps.
Apple devices require iOS 9 and above for Flutter apps, and iOS 11 and above for React Native apps. Android devices require API level 19 (Android 4.4) and above for Flutter apps, and API level 23 (Android 6.0) for React Native apps.
The minimum supported version for Expo-based React Native apps is Android 5 or iOS 10 and above.
To demonstrate building an app using Flutter and React Native, we’ll run through an example.
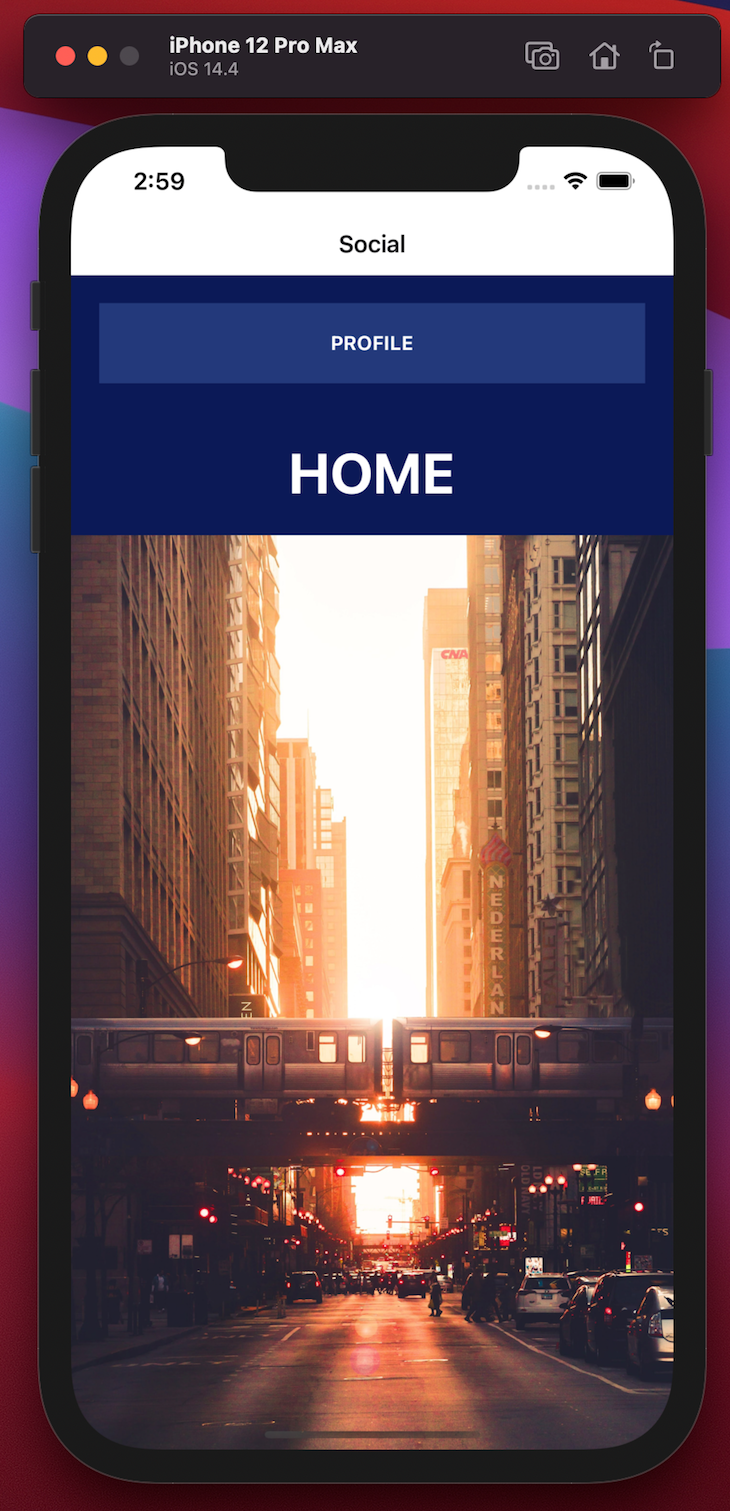
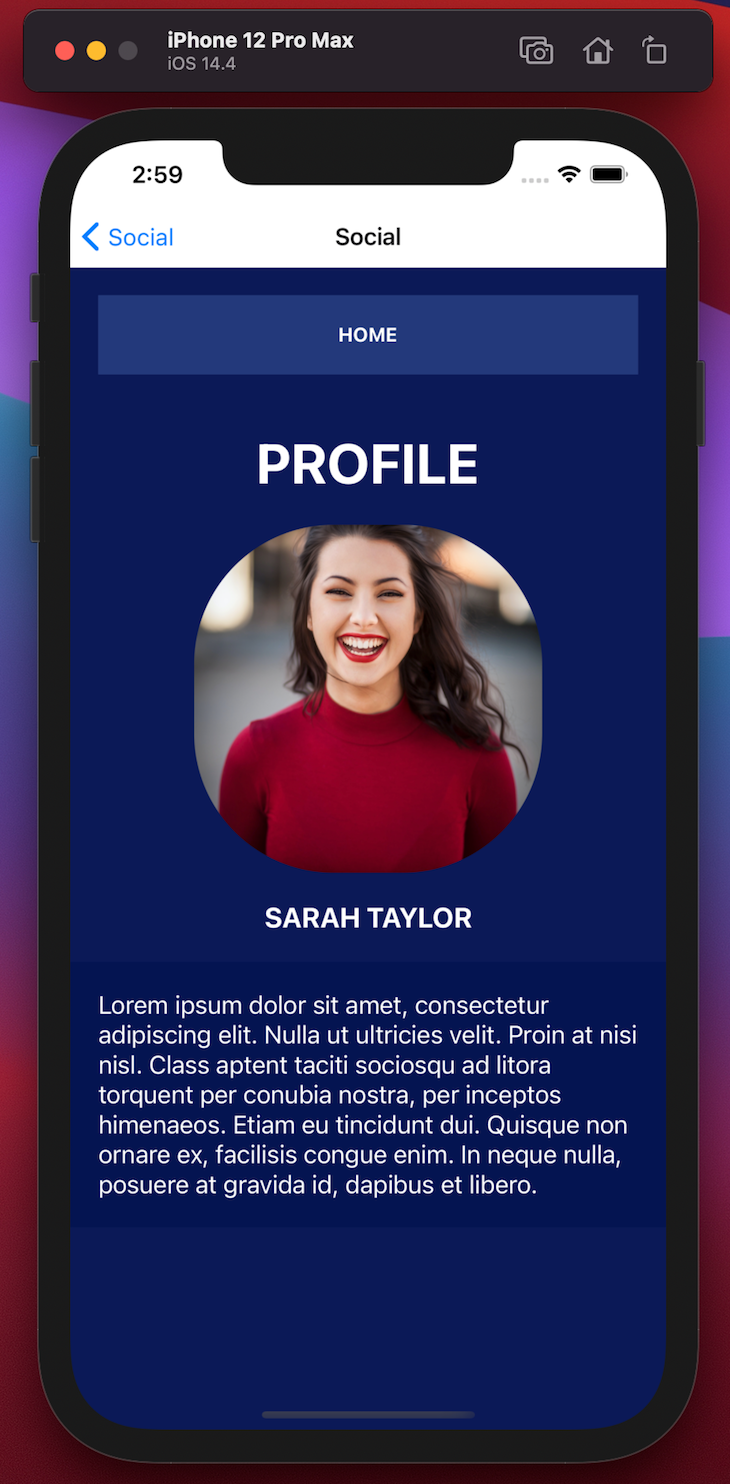
Our example app is called Social and has two screens. The iOS and Android versions look identical. The images below show how it looks on an iPhone:
Flutter’s widget-based architecture is quite unique compared to traditional programming methodologies. Once you understand how it works, it becomes second nature.
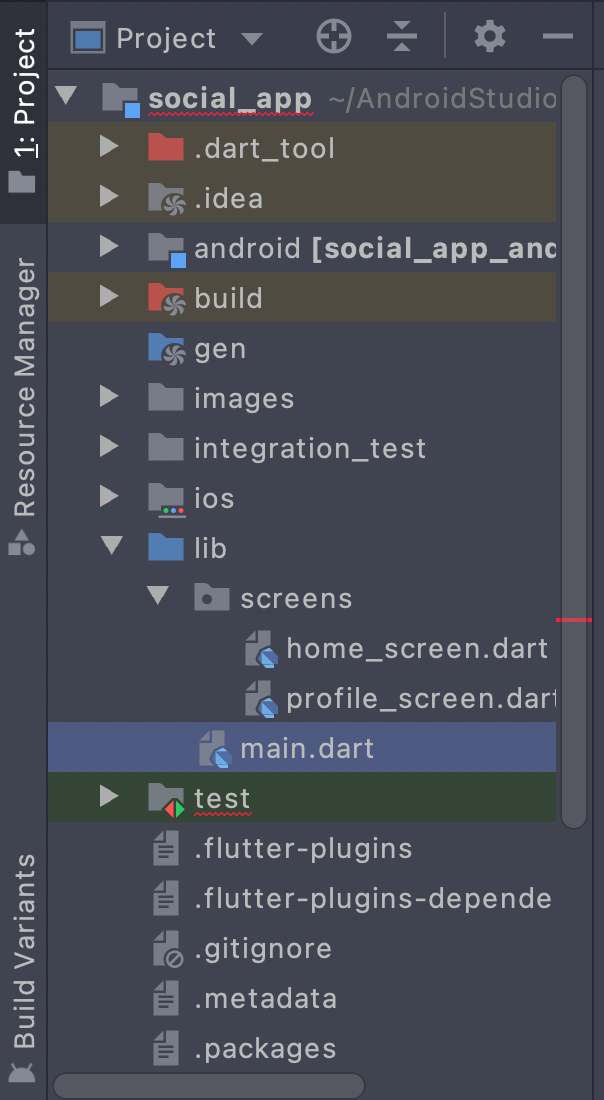
main.dart fileThe main.dart file is the primary file for our application, which will determine the different routes for the different views of the application. We specify the initial view of the application at the HomeScreen widget with another route called ProfileScreen, which we can trigger based on user actions:
import 'package:flutter/material.dart';
import 'package:social_app/screens/home_screen.dart';
import 'package:social_app/screens/profile_screen.dart';

void main() {
  runApp(Social());
}

class Social extends StatelessWidget {
  @override
  Widget build(BuildContext context) {
    return MaterialApp(
      initialRoute: HomeScreen.id,
      routes: {
        HomeScreen.id: (context) => HomeScreen(),
        ProfileScreen.id: (context) => ProfileScreen(),
      },
    );
  }
}
home_screen.dart widgetThe home_screen.dart widget represents the initial view of our application, which also lays out the styling and content of the application bar and body of the view:
import 'package:flutter/material.dart';
import 'package:social_app/screens/profile_screen.dart';

class HomeScreen extends StatelessWidget {
  static String id = 'home_screen';

  @override
  Widget build(BuildContext context) {
    return Scaffold(
      backgroundColor: Color(0xffb0c1957),
      appBar: AppBar(
        toolbarHeight: 40,
        title: Text(
          'Social',
          style: TextStyle(
              color: Colors.black, fontSize: 16, fontWeight: FontWeight.bold),
        ),
        backgroundColor: Colors.white,
      ),
      body: Column(
        mainAxisAlignment: MainAxisAlignment.spaceBetween,
        children: [
          Container(
            width: 400,
            margin: EdgeInsets.only(top: 20),
            child: RaisedButton(
              color: Color(0xff23397B),
              padding: EdgeInsets.all(20),
              onPressed: () {
                Navigator.push(context,
                    MaterialPageRoute(builder: (context) => ProfileScreen()));
              },
              child: Text(
                'PROFILE',
                style:
                    TextStyle(color: Colors.white, fontWeight: FontWeight.bold),
              ),
            ),
          ),
          SizedBox(
            height: 1,
          ),
          Container(
            child: Center(
              child: Text(
                'HOME',
                style: TextStyle(
                    fontSize: 40,
                    color: Colors.white,
                    fontWeight: FontWeight.bold),
              ),
            ),
          ),
          Container(
            child: Image(
              image: AssetImage('images/home-bg.jpg'),
            ),
          ),
        ],
      ),
    );
  }
}
profile_screen.dart fileThe profile_screen.dart file contains our second view ProfileScreen, which displays the user profile information of the user using the app in the content of the widget body:
import 'package:flutter/material.dart';
import 'package:social_app/screens/home_screen.dart';

class ProfileScreen extends StatelessWidget {
  static String id = 'profile_screen';

  @override
  Widget build(BuildContext context) {
    return Scaffold(
      backgroundColor: Color(0xffb0c1957),
      appBar: AppBar(
        toolbarHeight: 40,
        title: Text(
          'Social',
          style: TextStyle(
              color: Colors.black, fontSize: 16, fontWeight: FontWeight.bold),
        ),
        backgroundColor: Colors.white,
      ),
      body: Column(
        mainAxisAlignment: MainAxisAlignment.start,
        children: [
          Container(
            width: 400,
            margin: EdgeInsets.only(top: 20),
            child: RaisedButton(
              color: Color(0xff23397B),
              padding: EdgeInsets.all(20),
              onPressed: () {
                Navigator.push(context,
                    MaterialPageRoute(builder: (context) => HomeScreen()));
              },
              child: Text(
                'HOME',
                style:
                    TextStyle(color: Colors.white, fontWeight: FontWeight.bold),
              ),
            ),
          ),
          SizedBox(
            height: 50,
          ),
          Container(
            child: Center(
              child: Text(
                'PROFILE',
                style: TextStyle(
                    fontSize: 40,
                    color: Colors.white,
                    fontWeight: FontWeight.bold),
              ),
            ),
          ),
          SizedBox(
            height: 20,
          ),
          Container(
              child: CircleAvatar(
            radius: 130.0,
            backgroundImage: AssetImage('images/profile-image.jpg'),
          )),
          SizedBox(
            height: 20,
          ),
          Container(
            child: Text(
              'SARAH TAYLOR',
              style: TextStyle(
                  color: Colors.white,
                  fontSize: 20,
                  fontWeight: FontWeight.bold),
            ),
          ),
          SizedBox(
            height: 20,
          ),
          Container(
            color: Color(0xff000d4a),
            padding: EdgeInsets.all(18.0),
            child: Container(
              child: Text(
                "Lorem ipsum dolor sit amet, consectetur adipiscing elit. Nulla ut ultricies velit. Proin at nisi nisl. Class aptent taciti sociosqu ad litora torquent per conubia nostra, per inceptos himenaeos. Etiam eu tincidunt dui. Quisque non ornare ex, facilisis congue enim. In neque nulla, posuere at gravida id, dapibus et libero.",
                style: TextStyle(
                  color: Colors.white,
                  fontSize: 17,
                ),
              ),
            ),
          )
        ],
      ),
    );
  }
}
If you already know React for the web, the code in this section should look very familiar. The architecture for setting up a React Native project is almost the same as in React:

App.js componentLike any React application, the App.js component is our entrypoint, defining our routes and views, HomeScreen and ProfileScreen. Just like in our Flutter app, HomeScreen is the initial route that the user will see:
// Import statements for the components used in the app and the navigation
import React from 'react';
import { NavigationContainer } from '@react-navigation/native';
import { createStackNavigator } from '@react-navigation/stack';
const Stack = createStackNavigator();
import HomeScreen from './src/screens/HomeScreen';
import ProfileScreen from './src/screens/ProfileScreen';
// The main component with all of the screen routing business logic
const App = () => {
    return (
        <NavigationContainer>
            <Stack.Navigator initialRouteName="HomeScreen" screenOptions={{ gestureEnabled: false }}>
                <Stack.Screen name="HomeScreen" component={HomeScreen} options={{ title: 'Social' }} />
                <Stack.Screen name="ProfileScreen" component={ProfileScreen} options={{ title: 'Social' }} />
            </Stack.Navigator>
        </NavigationContainer>
    );
};
export default App;
Home.js componentThe Home.js component describes our HomeScreen view. Essentially, the View component is a building block of a UI just like a div is in HTML. In React Native, styling is provided in CSS using the StyleSheet.create function:
// Import statements for the components used in the app
import React from 'react';
import { View, Text, StyleSheet, TouchableOpacity, Image } from 'react-native';
import HomeBG from '../../assets/home-bg.jpg';
// The main component for the HomeScreen
const HomeScreen = ({ navigation }) => {
    return (
        <View style={styles.appStyle}>;
            <TouchableOpacity
                style={styles.btnContainer}
                title="Profile"
                onPress={() => navigation.navigate('ProfileScreen')}
            >
                <Text style={styles.btnText}>;Profile</Text>
            </TouchableOpacity>
            <Text style={styles.heading}>Home</Text>
            <View>
                <Image style={styles.homeBG} source={HomeBG} />
            </View>
        </View>
    );
};
// The component specific styles for the HomeScreen
const styles = StyleSheet.create({
    appStyle: {
        backgroundColor: 'rgb(12,25,87)',
        height: '100%',
    },
    btnContainer: {
        backgroundColor: '#23397B',
        padding: 20,
        justifyContent: 'center',
        alignItems: 'center',
        marginHorizontal: 20,
        marginVertical: 20,
    },
    btnText: {
        color: '#ffffff',
        fontWeight: 'bold',
        textTransform: 'uppercase',
    },
    heading: {
        fontSize: 40,
        color: '#ffffff',
        textAlign: 'center',
        margin: 20,
        fontWeight: 'bold',
        textTransform: 'uppercase',
    },
    homeBG: {
        height: '100%',
        width: '100%',
    },
});
export default HomeScreen;
ProfileScreen.js componentThe ProfileScreen.js component defines the ProfileScreen, displaying the user information:
// Import statements for the components used in the app
import React from 'react';
import { View, Text, StyleSheet, TouchableOpacity, Image } from 'react-native';
import ProfileImage from '../../assets/profile-image.jpg';
// The main component for the ProfileScreen
const ProfileScreen = ({ navigation }) => {
return (
<View style={styles.appStyle}>
{/* TouchableOpacity is basically a more customizable button component */}
<TouchableOpacity style={styles.btnContainer} title="Profile" onPress={() => navigation.navigate('HomeScreen')}>
<Text style={styles.btnText}>Home</Text>
</TouchableOpacity>
<Text style={styles.heading}>Profile</Text>
<View style={styles.profileContainer}>
<Image style={styles.profileImage} source={ProfileImage} />
</View>
<View>
<Text style={styles.profileName}>Sarah Taylor</Text>
</View>
<View style={styles.profileBioContainer}>
<Text style={styles.profileBio}>
Lorem ipsum dolor sit amet, consectetur adipiscing elit. Nulla ut ultricies velit. Proin at nisi nisl. Class
aptent taciti sociosqu ad litora torquent per conubia nostra, per inceptos himenaeos. Etiam eu tincidunt dui.
Quisque non ornare ex, facilisis congue enim. In neque nulla, posuere at gravida id, dapibus et libero.
</Text>
</View>
</View>
);
};
// The component specific styles for the ProfileScreen
const styles = StyleSheet.create({
appStyle: {
backgroundColor: 'rgb(12,25,87)',
height: '100%',
},
btnContainer: {
backgroundColor: '#23397B',
padding: 20,
justifyContent: 'center',
alignItems: 'center',
marginHorizontal: 20,
marginVertical: 20,
},
btnText: {
color: '#ffffff',
fontWeight: 'bold',
textTransform: 'uppercase',
},
heading: {
fontSize: 40,
color: '#ffffff',
textAlign: 'center',
margin: 20,
fontWeight: 'bold',
textTransform: 'uppercase',
},
profileContainer: {
alignItems: 'center',
},
profileImage: {
borderRadius: 100,
height: 250,
width: 250,
},
profileName: {
color: '#ffffff',
fontSize: 20,
textAlign: 'center',
fontWeight: 'bold',
margin: 20,
textTransform: 'uppercase',
},
profileBioContainer: {
backgroundColor: 'rgba(0,13,74,0.4234068627450981)',
},
profileBio: {
marginHorizontal: 20,
marginVertical: 20,
color: '#ffffff',
fontSize: 18,
},
});
export default ProfileScreen;
There is no clear winner here; both Flutter and React have their pros and cons, and the right choice will depend on your experience and the goals and requirements of your project.
If you already know JavaScript, writing mobile apps in React Native is a no-brainer. However, if you’re looking for better performance, stability, and a more cohesive environment between ecosystems, you should consider giving Flutter a try.
To see how React Native stacks up against Xamarin, another popular cross-platform mobile framework, check out Xamarin vs. React Native.

LogRocket's Galileo AI watches sessions for you and and surfaces the technical and usability issues holding back your React Native apps.
LogRocket also helps you increase conversion rates and product usage by showing you exactly how users are interacting with your app. LogRocket's product analytics features surface the reasons why users don't complete a particular flow or don't adopt a new feature.
Start proactively monitoring your React Native apps — try LogRocket for free.

AI agents don’t have to live in chat bubbles. This guide shows how A2UI lets agents generate real, interactive UIs, and walks through building a working React demo using Gemini and a2ui-bridge.

Learn how LLM routing works in production, when it’s worth the complexity, and how teams choose the right model for each request.

Compare key features of popular meta-frameworks Remix, Next.js, and SvelteKit, from project setup to styling.

Discover what’s new in The Replay, LogRocket’s newsletter for dev and engineering leaders, in the February 4th issue.
Would you be interested in joining LogRocket's developer community?
Join LogRocket’s Content Advisory Board. You’ll help inform the type of content we create and get access to exclusive meetups, social accreditation, and swag.
Sign up now
5 Replies to "Flutter vs. React Native"
Thank you for your comparison! I’ve seen lots of articles about Flutter vs React Native, for example https://surf.dev/flutter-vs-react-native-comparison-what-to-choose-to-build-a-mobile-app/, the author there says there are no clear winner, for many characteristics Flutter & RN are quite equal, and some characteristics just depend on your goals & projects. But what is your favourite, if I can put it this way? Which one do you use?
Hey I would have to say that React Native is my favorite at the moment. I am more familiar with the codebase and the ecosystem is more mature. However I see Flutter becoming more dominant in the future.
Of course React Native
Artigo bastante interessante!
Just a quick note: The React Native example seems to be more complicated, because it’s defining all the styles manually. But if we use an UI component library (like the Flutter example was using Material), it will be simpler.