Editor’s note: This post was updated on 9 September 2022 to include information about React Native 0.70, why Hermes works well with React Native, and how and why Hermes makes React Native faster.

The release of React Native 0.64 introduced full opt-in support for Hermes on iOS. This promises to be a major shift in the React Native mobile app development ecosystem.
In this tutorial, we’ll explore the benefits of using Hermes as the JavaScript engine for your React Native application and demonstrate how to build and run a React Native application using Hermes. We’ll walk you through the necessary steps to get your React Native application up and running with Hermes as the JavaScript engine.
Here’s what we’ll cover:
Hermes is an open source JavaScript engine designed to optimize performance by reducing app launch time and precompiling JavaScript into efficient bytecode.
The release of React Native 0.64’s announcement came with drop-in support for Android API levels 16–20 due to low usage. Hermes is the headline feature that is shipped with this release. Other changes include enabling inline require for Metro bundler, Hermes traces with Google Chrome, Hermes with proxy support, and other changes for React 17. Let’s explore a few of these changes that may affect how mobile applications are built in React Native going forward.
Hermes support for Android has been active for a while. With the opt-in support for iOS in React Native 0.64, you can now build a fast, efficient, and performant proof application.
According to a blog post on the React Native website, starting from React Native 0.70, Hermes will be the default engine. What this means for React Native developers could be a paradigm shift in how they’ll build and test mobile applications. With a strong focus on performance optimization, it is pretty clear that developers will save a lot of development time shipping new software.
Here is a list of break-in changes for Hemes in React Native 0.70:
You can read more about what’s new in Hermes: Reactive 0.70 in this announcement.
After the introduction Hermes as an opt-in JavaScript compiling engine in React Native 0.64, the JavaScript engine has seen tremendous support from the React Native developers ecosystem, mostly due to how performant it has been.
Hermes is not just good for React Native applications, but contributes a considerable reduction in bundle size, load time, and consumption size with a GUI to visualize the performance metrics of your application during development. This feature is really helpful for developers to learn how applications will perform after release and to production.
The short answer is yes, and the long answer is that Hermes is the most performant JavaScript engine for building React Native applications (according to research conducted by maintainers of React Native). The research was conducted on three metrics that developers deem important: Time to Interactive (TTI), binary size, and consumption size.
Here is a link to the complete article covering the research.
Building an application with Hermes is pretty straightforward — it only requires three lines of code to configure Hermes and get up and running:
use_react_native!(
   :path => config[:reactNativePath],
   :hermes_enabled => true
)
Note that Hermes on iOS is still in its infant stage and has yet to gain full stability. If you run into bugs, you can visit the official React Native GitHub repo to raise an issue.
Whether your app is still in development or deployed to production, performance is one of the key attributes to look out for when building a mobile application. Hermes bridges the performance gap in React Native.
Before considering Hermes as the JavaScript engine for your React Native application, let’s work through the benefits of choosing Hermes as your default compiling engine:
Here’s how Hermes works behind the scenes:
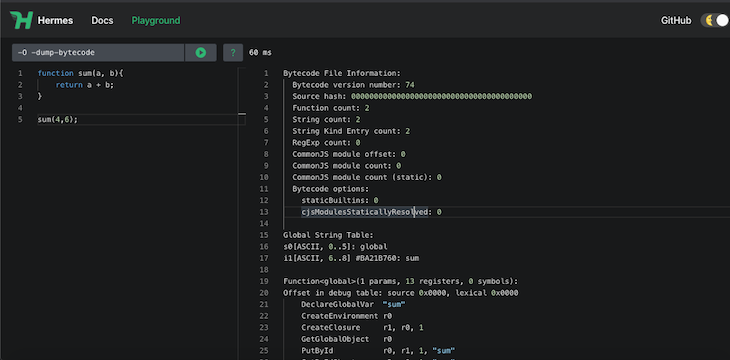
The left pane consists of code input on the Hermes playground, while the right pane displays the output as bytecode. The load time is shown as well. In this case, the sum function took 60ms to compile and run.
As we’ve discussed, Hermes is a JavaScript engine for React Native that precompiles JavaScript into efficient bytecode to reduce build time. Hermes has proven to be small in APK size, reduced in memory, and starts instantly, resulting in a better user experience.
To better understand how Hermes works with React Native, you can follow the tutorial in the subsequent sections to configure Herms as your app engine. However, if you are on React Native 0.70, Hermes will be your default so you can skip to the debugging section of this blog.
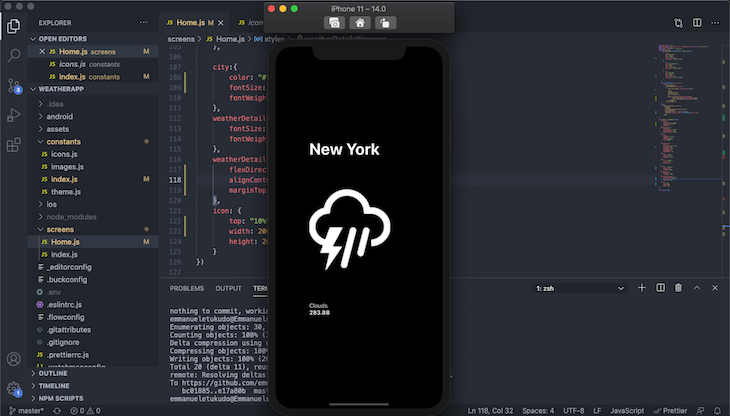
For this tutorial, we’ll show you how to build a fairly simple React Native application that displays weather information from mock data. The app will display current weather forecasts in the US.
The finished application should look like this:
Before you begin, ensure that you’re using React Native ≥0.64.
To create a new React Native project, navigate to your working directory via the terminal and copy/paste the code below:
npx react-native init WeatherApp
To enable Hermes on Android, open your newly create project in you preferred code editor and update your android/app/build.gradle file to look like this:
   project.ext.react = [
      entryFile: "index.js",
      enableHermes: true
  ]
Next, run the project on Android with the code below:
$ npx react-native run-android
To enable Hermes on iOS, open your newly created project in your preferred code editor and update your Podfile, set hermes_enabled. See code snippet below:
 use_react_native!(
     :path => config[:reactNativePath],
     :hermes_enabled => true
   )
Next, run pod install.
$ cd ios && pod install
Finally, run your iOS app with the code below:
>$ npx react-native run-ios
Your app should look like this:
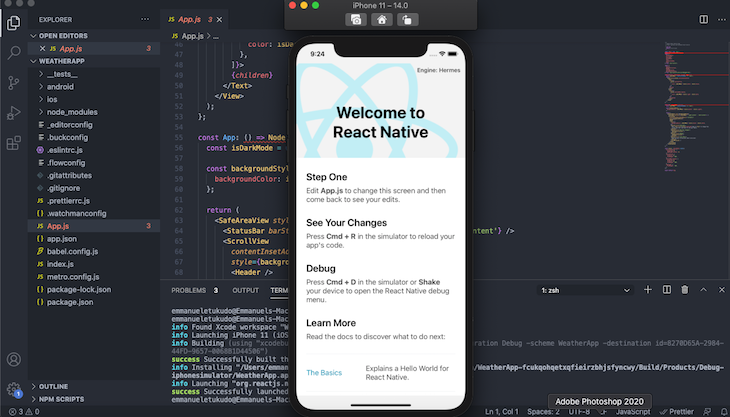
You’ll notice that Hermes is identified as the app’s engine in the top-right. This indicates that Hermes is actively running.
Now that we’re done with the Hermes setup, let’s proceed to build our application.
First, clone the starter file from Github:
$ git clone https://github.com/emmanueletukudo/herms-starter.git
Replace the content in the Home screen with the code below:
import React from "react";
import {StyleSheet, Text, Image, View, TouchableOpacity, FlatList} from "react-native";
import axios from "axios";
import {data, icons} from "../constants/"
const Home = () => {
    const [weatherData, setWeatherData] = React.useState([
        {
            id: 0,
            city: "New York",
            temp: 283.88,
            main: "Clouds",
            icon: icons.thunder,
            description: "overcast clouds",
        },
        {
            id: 1,
            city: "San Francisco",
            temp: 285.52,
            main: "Rain",
            icon: icons.rainy,
            description: "broken clouds",
        },
        {
            id: 2,
            city: "Chicago",
            temp: 283.88,
            main: "Rain",
            icon: icons.metro,
            description: "overcast clouds",
        },
    ]);
    function renderWeather(item, index){
        return(

                {item.city}


                        {item.main}
                        {item.temp}


        )
    }
    return(

            item.id.toString()}
           renderItem ={({item, index}) => renderWeather(item, index)}
           />

    )
}
const styles =  StyleSheet.create({
    constainer: {
        flex: 1,
        backgroundColor: "#000",
        alignItems: "center",
        padding: 70,
    },
    weatherContainer: {
        width: 350,
        justifyContent: "center",
        marginHorizontal: 14,
        backgroundColor: "#000",
    },
    hello:{
        flex: 1,
        alignItems: "center",
        fontSize: 12,
        fontWeight: "700",
        color: "#000"
    },
    weatherDtails1:{
        flex: 1,
        justifyContent: "center",
        marginTop: "20%",
        borderRadius: 10,
        marginRight: 15,
        paddingRight: 12,
        paddingBottom: 12,
    },
    temp: {
        color: "#ffffff",
        fontSize: 14,
        fontWeight: "700",
    },
    main:{
        color: "#ffffff",
        fontSize: 14,
        marginTop: 15
    },
    city:{
        color: "#ffffff",
        fontSize: 40,
        fontWeight:"700"
    },
    weatherDetails: {
        fontSize: 17,
        fontWeight: "400",
    },
    weatherDetailsWrapper: {
        flexDirection: "column",
        alignContent: "center",
        marginTop: "40%",
    },
    icon: {
        top: "10%",
        width: 200,
        height: 200,
    }
})
export default Home;
The code is self-explanatory. We have three segments: the mocked data with the React useState hook, the function that renders the data into a React component, and code that renders the data in the Home component using React Native FlatList. You could take the same approach to get actual data from an API, but that’s beyond the scope of this tutorial.
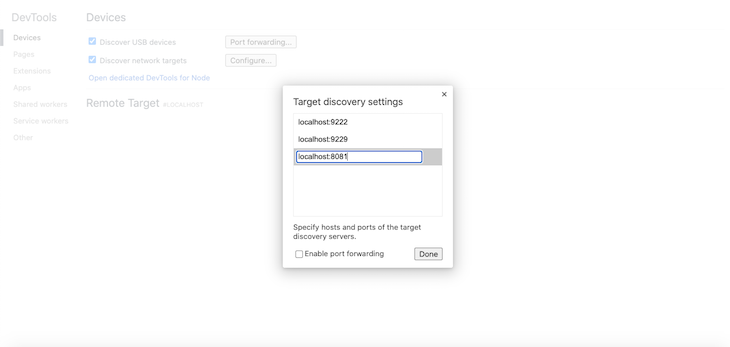
Hermes has support for debugging JavaScript via Chrome DevTools by implementing the Chrome inspector protocol. Chrome connects to Metro through the port it is currently listening to, so you need to know the port where Metro is listening. Metro listens on port 8181 by default, so you can access your app via the browser using http://localhost:8081.
Once you figure out the port your app is running on, open a new tap on Chrome and type chrome://inspect. Click the Configure… button to add your app Metro server address (e.g., http://localhost:8081).
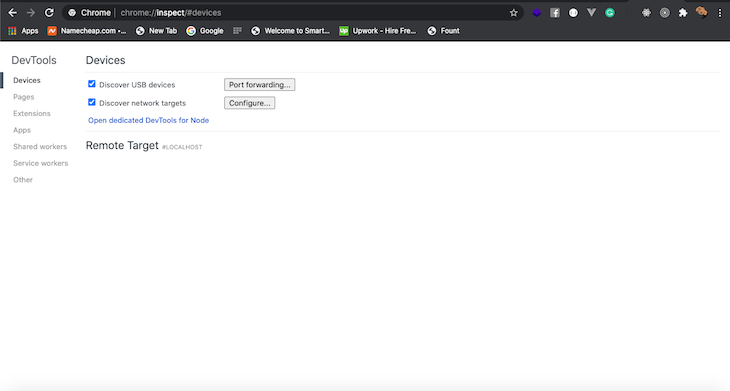
Add the address on the modal that pops up:
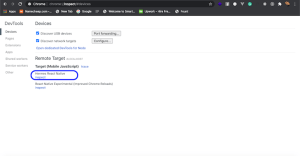
You should now be able to debug your React Native app using Chrome DevTools. To access the debugger, click Inspect.
Performance optimization for mobile apps just got a lot easier in React Native, thanks to the lightweight JavaScript engine Hermes. You can read more about Hermes in the official documentation.

LogRocket's Galileo AI watches sessions for you and and surfaces the technical and usability issues holding back your React Native apps.
LogRocket also helps you increase conversion rates and product usage by showing you exactly how users are interacting with your app. LogRocket's product analytics features surface the reasons why users don't complete a particular flow or don't adopt a new feature.
Start proactively monitoring your React Native apps — try LogRocket for free.
Would you be interested in joining LogRocket's developer community?
Join LogRocket’s Content Advisory Board. You’ll help inform the type of content we create and get access to exclusive meetups, social accreditation, and swag.
Sign up now
Discover how to use Gemini CLI, Google’s new open-source AI agent that brings Gemini directly to your terminal.

This article explores several proven patterns for writing safer, cleaner, and more readable code in React and TypeScript.

A breakdown of the wrapper and container CSS classes, how they’re used in real-world code, and when it makes sense to use one over the other.

This guide walks you through creating a web UI for an AI agent that browses, clicks, and extracts info from websites powered by Stagehand and Gemini.


One Reply to "Using Hermes in React Native"
Hi, thanks so much for this article. Really clean and helpful. We are trying to use this technique in our app, but for some reason regardless of the configuration, the code does not compile into bytecode when hermes is enabled. Any idea why that might be?