Today, we will create a straightforward yet complex chat application in Flutter with Firebase at its backend. Our primary focus is on working the application and connecting it with Firebase services like Cloud Firestore, Firebase Storage, and Firebase Authentication.
What are we going to cover in the article?
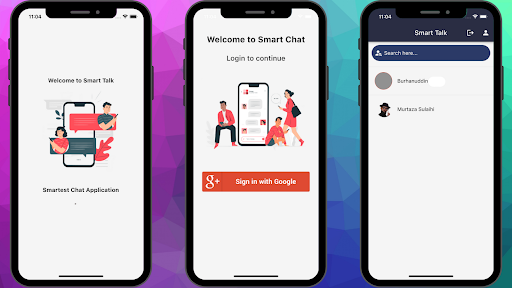
We will understand the basic functionality of a chat application so that enthusiasts like you and me can learn from it. Of course, this demo app is not as complex as WhatsApp or Telegram, but after reading this article, you will understand how other famous chat applications work.
Android Studio has been updated to Bumblebee, and it’s pretty colorful now on its main screen. Just click on the New Flutter Project button, and it will confirm the Flutter SDK path; click Next.
Then, enter your desired project name — make sure that it is in small letters. Choose your directory correctly and make sure you have selected all the desired platforms like Android, iOS, and the web.
With that done, you will have your Flutter starter project, famously known as the counter application, created.
If you plan to use Firebase as your backend, I recommend connecting your project to Firebase before programming your application any further.
Go to firebase.google.com and create a new Firebase project. Enter your project name, disable Google Analytics for now, and click on the Create Project button.
According to the Flutter Fire documentation, you can now initialize Firebase directly from Dart. It’s straightforward, so cheers to the Flutter team.
Run this command from the root of your project in the terminal window to add the Firebase core plugin:
flutter pub add firebase_core
Next, you have to run the FlutterFire CLI command, which depends on the Firebase CLI command. If you are not familiar with the Firebase CLI command, please go through this document to understand and install it on your system.
Run this command to activate FlutterFire CLI:
dart pub global activate flutterfire_cli
Next, run this command and choose the Firebase project you just created:
flutterfire configure
After running this command and connecting to your Firebase project, you will see that the firebase_options.dart file has been created in your project structure, containing all the necessary information.
N.B., now you no longer need to manually add the google-services.json file to Android and the GoogleService-Info.plist file to the iOS runner directory.
In your main.dart file, you need to edit the main() function and ensure WidgetFlutterBinding is initialized and then initialize Firebase like this:
void main() async {
  WidgetsFlutterBinding.ensureInitialized();
  await Firebase.initializeApp(
    options: DefaultFirebaseOptions.currentPlatform,
  );
  runApp(MyApp());
}
Once initialized, you are now ready to use Flutter Fire and all its services.
Since we will use Google Sign-In for our chat application, Firebase requires SHA-1 and SHA-256 certificates to be added to our Android app inside the Firebase project. Again, you can go through this document to read all about it.
In Android Studio, right click on /gradlew and open with the terminal. Then run this command:
./gradlew signingReport
With this, the signing report generates for your application. Copy the SHA-1 and SHA-256 certificate fingerprints and add them to the project settings inside your Firebase project, under Android App.
Inside your Firebase project, click on the Authentication tab, click on the Sign-in method, and under Sign-in providers, add Google.

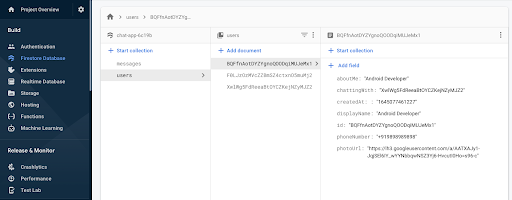
Click on the Firestore Database and Create a database under Test mode.
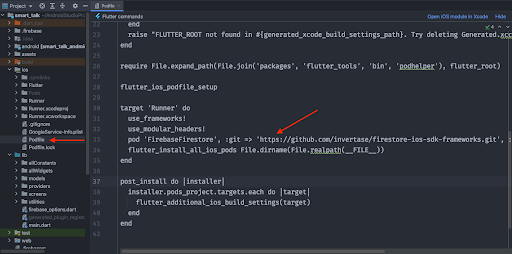
This is optional, but recommended: to improve iOS and Mac build time, add this line to your iOS/Podfile under Runner:
pod 'FirebaseFirestore', :git => 'https://github.com/invertase/firestore-ios-sdk-frameworks.git', :tag => '8.11.0'
N.B., here it is assumed you have CocoaPods installed on your system.
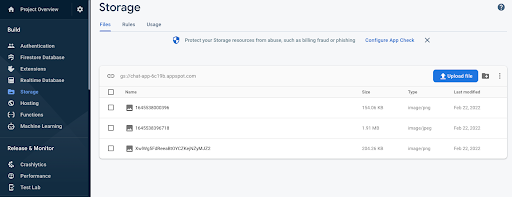
Click on Firebase Storage and Create new storage under Test Mode.
Go to Firebase project settings, click on Apple Apps, and download the GoogleServices-Info.plist file.
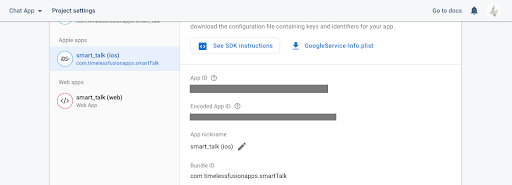
I know I mentioned earlier that you do not need to add the GoogleServices file to the iOS app. But since we will use the Google Sign-In package, iOS integration documentation on the pub.dev website says otherwise. You have to add CFBundleURLTypes attributes given below in the ios/Runner/Info.plist file:
!-- Put me in the [my_project]/ios/Runner/Info.plist file -->
<!-- Google Sign-in Section -->
<key>CFBundleURLTypes</key>
<array>
    <dict>
        <key>CFBundleTypeRole</key>
        <string>Editor</string>
        <key>CFBundleURLSchemes</key>
        <array>
            <!-- TODO Replace this value: -->
            <!-- Copied from GoogleService-Info.plist key REVERSED_CLIENT_ID -->
            <string>com.googleusercontent.apps.861823949799-vc35cprkp249096uujjn0vvnmcvjppkn</string>
        </array>
    </dict>
</array>
<!-- End of the Google Sign-in Section -->
Now you have successfully configured your Android and iOS application with Firebase. We are creating a Flutter chat application, but platform-specific integrations are required for the Google Sign-In to work correctly.
Let’s talk about web integration before uploading our completed application to Firebase Hosting.
We have a total of five screens given below in order.
I’m not going into too many details about each screen because that is unimportant. So instead, I will give an overview for each screen.
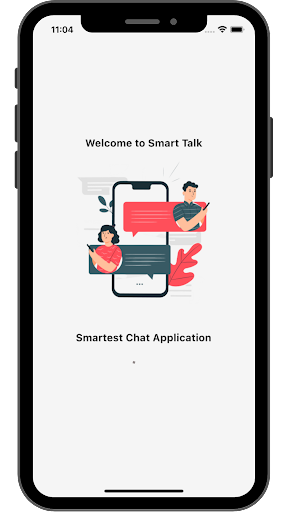
Splash Page: It has two text widgets and an image at its center
Login Page: Two text widgets again, an image, and a Google Sign-In button
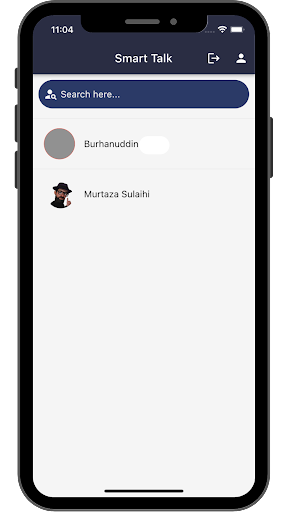
Home Page: Scaffold, AppBar with two action buttons for a profile page and logging out. It has a search bar for searching users. ListTile consists of the user’s name and Google profile image
Profile Page: Here, users can change their display name and add a few details of themselves. Also, upload an image of themselves
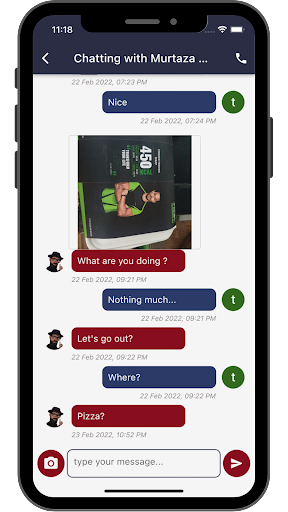
Chat Page: A very similar screen to most prominent chat applications. Message portion at the top of the screen and text field with image and send button at the bottom of the screen
Now, let us start programming the application. I will post only the vital parts of the application code, and the rest is available on the GitHub repository, for which I will leave links as we move along further in this article.
pubspec.yaml filefirebase_core: ^1.12.0 firebase_auth: ^3.3.7 cloud_firestore: ^3.1.8 firebase_storage: ^10.2.7 google_sign_in: ^5.2.4 fluttertoast: ^8.0.8 image_picker: ^0.8.4+9 shared_preferences: ^2.0.13 intl: ^0.17.0 photo_view: ^0.13.0 provider: ^6.0.2 country_code_picker: ^2.0.2 url_launcher: ^6.0.20 equatable: ^2.0.3 google_sign_in_web: ^0.10.0+5
Please check for the latest versions on the pub.dev website.
Uncomment assets to add images to the assets of the application:
- assets/images/
ChatUser modelBefore we get into the authentication part, we need a user model class. I have named it as ChatUser, which has five string variables: id, photoURL, displayName, phoneNumber, and aboutMe.
Our two functions inside our ChatUser class toJson() consist of a Map and a factory method to read data from the snapshot that Firebase Firestore returns:
class ChatUser extends Equatable {
 final String id;
 final String photoUrl;
 final String displayName;
 final String phoneNumber;
 final String aboutMe;

 const ChatUser(
     {required this.id,
     required this.photoUrl,
     required this.displayName,
     required this.phoneNumber,
     required this.aboutMe});
AuthProvider classNext, we will add an AuthProvider class to our project to handle Google sign-in and sign-out methods. This is also to check whether the user is logged in or not:
class AuthProvider extends ChangeNotifier {
 final GoogleSignIn googleSignIn;
 final FirebaseAuth firebaseAuth;
 final FirebaseFirestore firebaseFirestore;
 final SharedPreferences prefs;

 Status _status = Status.uninitialized;

 Status get status => _status;

 AuthProvider(
     {required this.googleSignIn,
     required this.firebaseAuth,
     required this.firebaseFirestore,
     required this.prefs});

 String? getFirebaseUserId() {
   return prefs.getString(FirestoreConstants.id);
 }

 Future<bool> isLoggedIn() async {
   bool isLoggedIn = await googleSignIn.isSignedIn();
   if (isLoggedIn &&
       prefs.getString(FirestoreConstants.id)?.isNotEmpty == true) {
     return true;
   } else {
     return false;
   }
 }

 Future<bool> handleGoogleSignIn() async {
   _status = Status.authenticating;
   notifyListeners();

   GoogleSignInAccount? googleUser = await googleSignIn.signIn();
   if (googleUser != null) {
     GoogleSignInAuthentication? googleAuth = await googleUser.authentication;
     final AuthCredential credential = GoogleAuthProvider.credential(
       accessToken: googleAuth.accessToken,
       idToken: googleAuth.idToken,
     );

     User? firebaseUser =
         (await firebaseAuth.signInWithCredential(credential)).user;

     if (firebaseUser != null) {
       final QuerySnapshot result = await firebaseFirestore
           .collection(FirestoreConstants.pathUserCollection)
           .where(FirestoreConstants.id, isEqualTo: firebaseUser.uid)
           .get();
       final List<DocumentSnapshot> document = result.docs;
       if (document.isEmpty) {
         firebaseFirestore
             .collection(FirestoreConstants.pathUserCollection)
             .doc(firebaseUser.uid)
             .set({
           FirestoreConstants.displayName: firebaseUser.displayName,
           FirestoreConstants.photoUrl: firebaseUser.photoURL,
           FirestoreConstants.id: firebaseUser.uid,
           "createdAt: ": DateTime.now().millisecondsSinceEpoch.toString(),
           FirestoreConstants.chattingWith: null
         });}
We will create the splash page and check whether the user is logged in using our method from the authProvider class.
If the user has already signed in with the Google Sign-In method, the user will be redirected to the home page. Otherwise, the user will be directed to the login page.
Next, we will now create our login page.
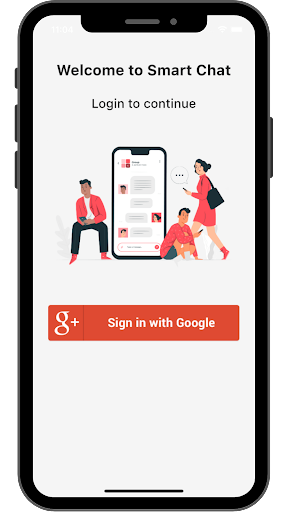
Since we are using Provider state management in our application, we are going to create an instance of our authProvider like this:
final authProvider = Provider.of<AuthProvider>(context);
Next, we will check the status of our application if it is authenticated:
class _LoginPageState extends State<LoginPage> {
 @override
 Widget build(BuildContext context) {
   final authProvider = Provider.of<AuthProvider>(context);

   switch (authProvider.status) {
     case Status.authenticateError:
       Fluttertoast.showToast(msg: 'Sign in failed');
       break;
     case Status.authenticateCanceled:
       Fluttertoast.showToast(msg: 'Sign in cancelled');
       break;
     case Status.authenticated:
       Fluttertoast.showToast(msg: 'Sign in successful');
       break;
     default:
       break;
   }
We will now add our Google Sign-In method to our onTap function for the Google Sign-In button:
GestureDetector(
 onTap: () async {
   bool isSuccess = await authProvider.handleGoogleSignIn();
   if (isSuccess) {
     Navigator.pushReplacement(
         context,
         MaterialPageRoute(
             builder: (context) => const HomePage()));
   }
 },
 child: Image.asset('assets/images/google_login.jpg'),
),
HomeProvider classThis class contains two functions:
To update data on the Cloud Firestore database:
Future<void> updateFirestoreData(
   String collectionPath, String path, Map<String, dynamic> updateData) {
 return firebaseFirestore
     .collection(collectionPath)
     .doc(path)
     .update(updateData);
}
To receive a snapshot of data from the Cloud Firestore database:
Stream<QuerySnapshot> getFirestoreData(
   String collectionPath, int limit, String? textSearch) {
 if (textSearch?.isNotEmpty == true) {
   return firebaseFirestore
       .collection(collectionPath)
       .limit(limit)
       .where(FirestoreConstants.displayName, isEqualTo: textSearch)
       .snapshots();
 } else {
   return firebaseFirestore
       .collection(collectionPath)
       .limit(limit)
       .snapshots();
 }
}
The homepage is divided into three sections.
Scaffold(
   appBar: AppBar(
       centerTitle: true,
       title: const Text('Smart Talk'),
       actions: [
         IconButton(
             onPressed: () => googleSignOut(),
             icon: const Icon(Icons.logout)),
         IconButton(
             onPressed: () {
               Navigator.push(
                   context,
                   MaterialPageRoute(
                       builder: (context) => const ProfilePage()));
             },
             icon: const Icon(Icons.person)),
       ]),);
StreamBuilder to build our search bar like this:
Widget buildSearchBar() {
 return Container(
   margin: const EdgeInsets.all(Sizes.dimen_10),
   height: Sizes.dimen_50,
   child: Row(
     crossAxisAlignment: CrossAxisAlignment.center,
     children: [
       const SizedBox(
         width: Sizes.dimen_10,
       ),
       const Icon(
         Icons.person_search,
         color: AppColors.white,
         size: Sizes.dimen_24,
       ),
       const SizedBox(
         width: 5,
       ),
       Expanded(
         child: TextFormField(
           textInputAction: TextInputAction.search,
           controller: searchTextEditingController,
           onChanged: (value) {
             if (value.isNotEmpty) {
               buttonClearController.add(true);
               setState(() {
                 _textSearch = value;
               });
             } else {
               buttonClearController.add(false);
               setState(() {
                 _textSearch = "";
               });
             }
           },
           decoration: const InputDecoration.collapsed(
             hintText: 'Search here...',
             hintStyle: TextStyle(color: AppColors.white),
           ),
         ),
       ),
       StreamBuilder(
           stream: buttonClearController.stream,
           builder: (context, snapshot) {
             return snapshot.data == true
                 ? GestureDetector(
                     onTap: () {
                       searchTextEditingController.clear();
                       buttonClearController.add(false);
                       setState(() {
                         _textSearch = '';
                       });
                     },
                     child: const Icon(
                       Icons.clear_rounded,
                       color: AppColors.greyColor,
                       size: 20,
                     ),
                   )
                 : const SizedBox.shrink();
           })
     ],
   ),
   decoration: BoxDecoration(
     borderRadius: BorderRadius.circular(Sizes.dimen_30),
     color: AppColors.spaceLight,
   ),
 );
}
StreamBuilder, we will show all logged-in users here. Using the ListTile widget inside the ListView separated builder method, we display the user’s profile image and the user’s name:
Widget buildItem(BuildContext context, DocumentSnapshot? documentSnapshot) {
 final firebaseAuth = FirebaseAuth.instance;
 if (documentSnapshot != null) {
   ChatUser userChat = ChatUser.fromDocument(documentSnapshot);
   if (userChat.id == currentUserId) {
     return const SizedBox.shrink();
   } else {
     return TextButton(
       onPressed: () {
         if (KeyboardUtils.isKeyboardShowing()) {
           KeyboardUtils.closeKeyboard(context);
         }
         Navigator.push(
             context,
             MaterialPageRoute(
                 builder: (context) => ChatPage(
                       peerId: userChat.id,
                       peerAvatar: userChat.photoUrl,
                       peerNickname: userChat.displayName,
                       userAvatar: firebaseAuth.currentUser!.photoURL!,
                     )));
       },
       child: ListTile(
         leading: userChat.photoUrl.isNotEmpty
             ? ClipRRect(
                 borderRadius: BorderRadius.circular(Sizes.dimen_30),
                 child: Image.network(
                   userChat.photoUrl,
                   fit: BoxFit.cover,
                   width: 50,
                   height: 50,
                   loadingBuilder: (BuildContext ctx, Widget child,
                       ImageChunkEvent? loadingProgress) {
                     if (loadingProgress == null) {
                       return child;
                     } else {
                       return SizedBox(
                         width: 50,
                         height: 50,
                         child: CircularProgressIndicator(
                             color: Colors.grey,
                             value: loadingProgress.expectedTotalBytes !=
                                     null
                                 ? loadingProgress.cumulativeBytesLoaded /
                                     loadingProgress.expectedTotalBytes!
                                 : null),
                       );
                     }
                   },
                   errorBuilder: (context, object, stackTrace) {
                     return const Icon(Icons.account_circle, size: 50);
                   },
                 ),
               )
             : const Icon(
                 Icons.account_circle,
                 size: 50,
               ),
         title: Text(
           userChat.displayName,
           style: const TextStyle(color: Colors.black),
         ),
       ),
     );
   }
 } else {
   return const SizedBox.shrink();
 }
}
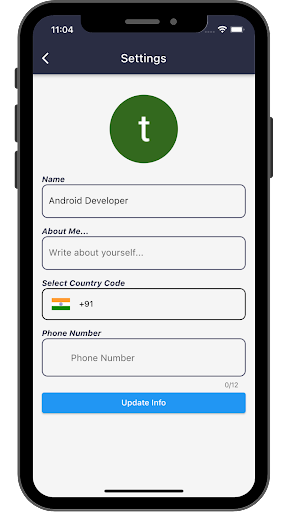
Here, users can change their display names, write something about themselves, and add their contact information.
There are three TextFields and a dropdown to select a country code before entering the mobile number. Next, users click on the profile picture and choose another to replace it, then there’s a button to update the information onto the Firebase Firestore database. Let’s get to it.
ProfileProvider classWe will add another class to our project structure and call it ProfileProvider. There are two main functions inside this class.
To upload the image file to Firebase Storage:
UploadTask uploadImageFile(File image, String fileName) {
 Reference reference = firebaseStorage.ref().child(fileName);
 UploadTask uploadTask = reference.putFile(image);
 return uploadTask;
}
To upload updated information regarding the user to the Firestore database:
Future<void> updateFirestoreData(String collectionPath, String path,
   Map<String, dynamic> dataUpdateNeeded) {
 return firebaseFirestore
     .collection(collectionPath)
     .doc(path)
     .update(dataUpdateNeeded);
}
There are three main methods inside this ProfilePage stateful widget.
Future getImage() async {
 ImagePicker imagePicker = ImagePicker();
 // PickedFile is not supported
 // Now use XFile?
 XFile? pickedFile = await imagePicker
     .pickImage(source: ImageSource.gallery)
     .catchError((onError) {
   Fluttertoast.showToast(msg: onError.toString())
 });
 File? image;
 if (pickedFile != null) {
   image = File(pickedFile.path);
 }
 if (image != null) {
   setState(() {
     avatarImageFile = image;
     isLoading = true;
   });
   uploadFile();
 }
}
Future uploadFile() async {
 String fileName = id;
 UploadTask uploadTask = profileProvider.uploadImageFile(avatarImageFile!, fileName);
 try {
   TaskSnapshot snapshot = await uploadTask;
   photoUrl = await snapshot.ref.getDownloadURL();
   ChatUser updateInfo = ChatUser(id: id,
       photoUrl: photoUrl,
       displayName: displayName,
       phoneNumber: phoneNumber,
       aboutMe: aboutMe);
   profileProvider.updateFirestoreData(
       FirestoreConstants.pathUserCollection, id, updateInfo.toJson())
       .then((value) async {
     await profileProvider.setPrefs(FirestoreConstants.photoUrl, photoUrl);
     setState(() {
       isLoading = false;
     });
   });
 } on FirebaseException catch (e) {
   setState(() {
     isLoading = false;
   });
   Fluttertoast.showToast(msg: e.toString());
 }
}
void updateFirestoreData() {
 focusNodeNickname.unfocus();
 setState(() {
   isLoading = true;
   if (dialCodeDigits != "+00" && _phoneController.text != "") {
     phoneNumber = dialCodeDigits + _phoneController.text.toString();
   }
 });
 ChatUser updateInfo = ChatUser(id: id,
     photoUrl: photoUrl,
     displayName: displayName,
     phoneNumber: phoneNumber,
     aboutMe: aboutMe);
 profileProvider.updateFirestoreData(
     FirestoreConstants.pathUserCollection, id, updateInfo.toJson())
     .then((value) async {
   await profileProvider.setPrefs(
       FirestoreConstants.displayName, displayName);
   await profileProvider.setPrefs(
       FirestoreConstants.phoneNumber, phoneNumber);
   await profileProvider.setPrefs(
     FirestoreConstants.photoUrl, photoUrl,);
   await profileProvider.setPrefs(
       FirestoreConstants.aboutMe,aboutMe );

   setState(() {
     isLoading = false;
   });
   Fluttertoast.showToast(msg: 'UpdateSuccess');
 }).catchError((onError) {
   Fluttertoast.showToast(msg: onError.toString());
 });
}
Let’s talk about the chat page’s functionalities step by step to better understand how this section will work.
First, we will create a new model class for ChatMessages, consisting of four string variables: idFrom, idTo, timestamp, content, and an integer type. Then, again, similar to our ChatUser model, we will add two functions to Json consisting of a Map and a factory method that returns DocumentSnapshot from the Firestore database. That’s it for our model class:
class ChatMessages {
 String idFrom;
 String idTo;
 String timestamp;
 String content;
 int type;

 ChatMessages(
     {required this.idFrom,
     required this.idTo,
     required this.timestamp,
     required this.content,
     required this.type});

 Map<String, dynamic> toJson() {
   return {
     FirestoreConstants.idFrom: idFrom,
     FirestoreConstants.idTo: idTo,
     FirestoreConstants.timestamp: timestamp,
     FirestoreConstants.content: content,
     FirestoreConstants.type: type,
   };
 }

 factory ChatMessages.fromDocument(DocumentSnapshot documentSnapshot) {
   String idFrom = documentSnapshot.get(FirestoreConstants.idFrom);
   String idTo = documentSnapshot.get(FirestoreConstants.idTo);
   String timestamp = documentSnapshot.get(FirestoreConstants.timestamp);
   String content = documentSnapshot.get(FirestoreConstants.content);
   int type = documentSnapshot.get(FirestoreConstants.type);

   return ChatMessages(
       idFrom: idFrom,
       idTo: idTo,
       timestamp: timestamp,
       content: content,
       type: type);
 }
}
ChatProvider ClassThere are four main methods inside our ChatProvider class for sending and receiving text messages and images.
UploadTask uploadImageFile(File image, String filename) {
 Reference reference = firebaseStorage.ref().child(filename);
 UploadTask uploadTask = reference.putFile(image);
 return uploadTask;
}
Future<void> updateFirestoreData(
   String collectionPath, String docPath, Map<String, dynamic> dataUpdate) {
 return firebaseFirestore
     .collection(collectionPath)
     .doc(docPath)
     .update(dataUpdate);
}
Stream<QuerySnapshot> getChatMessage(String groupChatId, int limit) {
 return firebaseFirestore
     .collection(FirestoreConstants.pathMessageCollection)
     .doc(groupChatId)
     .collection(groupChatId)
     .orderBy(FirestoreConstants.timestamp, descending: true)
     .limit(limit)
     .snapshots();
}
void sendChatMessage(String content, int type, String groupChatId,
   String currentUserId, String peerId) {
 DocumentReference documentReference = firebaseFirestore
     .collection(FirestoreConstants.pathMessageCollection)
     .doc(groupChatId)
     .collection(groupChatId)
     .doc(DateTime.now().millisecondsSinceEpoch.toString());
 ChatMessages chatMessages = ChatMessages(
     idFrom: currentUserId,
     idTo: peerId,
     timestamp: DateTime.now().millisecondsSinceEpoch.toString(),
     content: content,
     type: type);

 FirebaseFirestore.instance.runTransaction((transaction) async {
   transaction.set(documentReference, chatMessages.toJson());
 });
}
First, we need to create two methods to check if:
// checking if sent message
bool isMessageSent(int index) {
 if ((index > 0 &&
         listMessages[index - 1].get(FirestoreConstants.idFrom) !=
             currentUserId) ||  index == 0) {
   return true;
 } else {
   return false;
 }
}
// checking if received message
bool isMessageReceived(int index) {
 if ((index > 0 &&
         listMessages[index - 1].get(FirestoreConstants.idFrom) ==
             currentUserId) ||  index == 0) {
   return true;
 } else {
   return false;
 }
}
Second, we will create a method to send chat messages and execute our sendChatMessage function from our ChatProvider class:
void onSendMessage(String content, int type) {
 if (content.trim().isNotEmpty) {
   textEditingController.clear();
   chatProvider.sendChatMessage(
       content, type, groupChatId, currentUserId, widget.peerId);
   scrollController.animateTo(0,
       duration: const Duration(milliseconds: 300), curve: Curves.easeOut);
 } else {
   Fluttertoast.showToast(
       msg: 'Nothing to send', backgroundColor: Colors.grey);
 }
}
Third, we need two more methods to pick an image from the device folder and send that image to the user.
Future getImage() async {
 ImagePicker imagePicker = ImagePicker();
 XFile? pickedFile;
 pickedFile = await imagePicker.pickImage(source: ImageSource.gallery);
 if (pickedFile != null) {
   imageFile = File(pickedFile.path);
   if (imageFile != null) {
     setState(() {
       isLoading = true;
     });
     uploadImageFile();
   }
 }
}
void uploadImageFile() async {
 String fileName = DateTime.now().millisecondsSinceEpoch.toString();
 UploadTask uploadTask = chatProvider.uploadImageFile(imageFile!, fileName);
 try {
   TaskSnapshot snapshot = await uploadTask;
   imageUrl = await snapshot.ref.getDownloadURL();
   setState(() {
     isLoading = false;
     onSendMessage(imageUrl, MessageType.image);
   });
 } on FirebaseException catch (e) {
   setState(() {
     isLoading = false;
   });
   Fluttertoast.showToast(msg: e.message ?? e.toString());
 }
}
Fourth, we need to create an input field where the user will type the text message and click on the Send button to send the message. Also, an image picker button so that when the user clicks on it, the file picker from the device will open up to pick an image and send it to the user:
Widget buildMessageInput() {
 return SizedBox(
   width: double.infinity,
   height: 50,
   child: Row(
     children: [
       Container(
         margin: const EdgeInsets.only(right: Sizes.dimen_4),
         decoration: BoxDecoration(
           color: AppColors.burgundy,
           borderRadius: BorderRadius.circular(Sizes.dimen_30),
         ),
         child: IconButton(
           onPressed: getImage,
           icon: const Icon(
             Icons.camera_alt,
             size: Sizes.dimen_28,
           ),
           color: AppColors.white,
         ),
       ),
       Flexible(
           child: TextField(
         focusNode: focusNode,
         textInputAction: TextInputAction.send,
         keyboardType: TextInputType.text,
         textCapitalization: TextCapitalization.sentences,
         controller: textEditingController,
         decoration:
             kTextInputDecoration.copyWith(hintText: 'write here...'),
         onSubmitted: (value) {
           onSendMessage(textEditingController.text, MessageType.text);
         },
       )),
       Container(
         margin: const EdgeInsets.only(left: Sizes.dimen_4),
         decoration: BoxDecoration(
           color: AppColors.burgundy,
           borderRadius: BorderRadius.circular(Sizes.dimen_30),
         ),
         child: IconButton(
           onPressed: () {
             onSendMessage(textEditingController.text, MessageType.text);
           },
           icon: const Icon(Icons.send_rounded),
           color: AppColors.white,
         ),
       ),
     ],
   ),
 );
}
Fifth, we will create chat bubbles for the sent and received text messages with profile photos.
Widget buildItem(int index, DocumentSnapshot? documentSnapshot) {
 if (documentSnapshot != null) {
   ChatMessages chatMessages = ChatMessages.fromDocument(documentSnapshot);
   if (chatMessages.idFrom == currentUserId) {
     // right side (my message)
     return Column(
       crossAxisAlignment: CrossAxisAlignment.end,
       children: [
         Row(
           mainAxisAlignment: MainAxisAlignment.end,
           children: [
             chatMessages.type == MessageType.text
                 ? messageBubble(
                     chatContent: chatMessages.content,
                     color: AppColors.spaceLight,
                     textColor: AppColors.white,
                     margin: const EdgeInsets.only(right: Sizes.dimen_10),
                   )
                 : chatMessages.type == MessageType.image
                     ? Container(
                         margin: const EdgeInsets.only(
                             right: Sizes.dimen_10, top: Sizes.dimen_10),
                         child: chatImage(
                             imageSrc: chatMessages.content, onTap: () {}),
                       )
                     : const SizedBox.shrink(),
             isMessageSent(index)
                 ? Container(
                     clipBehavior: Clip.hardEdge,
                     decoration: BoxDecoration(
                       borderRadius: BorderRadius.circular(Sizes.dimen_20),
                     ),
                     child: Image.network(
                       widget.userAvatar,
                       width: Sizes.dimen_40,
                       height: Sizes.dimen_40,
                       fit: BoxFit.cover,
                       loadingBuilder: (BuildContext ctx, Widget child,
                           ImageChunkEvent? loadingProgress) {
                         if (loadingProgress == null) return child;
                         return Center(
                           child: CircularProgressIndicator(
                             color: AppColors.burgundy,
                             value: loadingProgress.expectedTotalBytes !=
                                         null &&
                                     loadingProgress.expectedTotalBytes !=
                                         null
                                 ? loadingProgress.cumulativeBytesLoaded /
                                     loadingProgress.expectedTotalBytes!
                                 : null,
                           ),
                         );
                       },
                       errorBuilder: (context, object, stackTrace) {
                         return const Icon(
                           Icons.account_circle,
                           size: 35,
                           color: AppColors.greyColor,
                         );
                       },
                     ),
                   )
                 : Container(
                     width: 35,
                   ),
           ],
         ),
         isMessageSent(index)
             ? Container(
                 margin: const EdgeInsets.only(
                     right: Sizes.dimen_50,
                     top: Sizes.dimen_6,
                     bottom: Sizes.dimen_8),
                 child: Text(
                   DateFormat('dd MMM yyyy, hh:mm a').format(
                     DateTime.fromMillisecondsSinceEpoch(
                       int.parse(chatMessages.timestamp),
                     ),
                   ),
                   style: const TextStyle(
                       color: AppColors.lightGrey,
                       fontSize: Sizes.dimen_12,
                       fontStyle: FontStyle.italic),
                 ),
               )
             : const SizedBox.shrink(),
       ],
     );
   } else {
     return Column(
       crossAxisAlignment: CrossAxisAlignment.start,
       children: [
         Row(
           mainAxisAlignment: MainAxisAlignment.start,
           children: [
             isMessageReceived(index)
                 // left side (received message)
                 ? Container(
                     clipBehavior: Clip.hardEdge,
                     decoration: BoxDecoration(
                       borderRadius: BorderRadius.circular(Sizes.dimen_20),
                     ),
                     child: Image.network(
                       widget.peerAvatar,
                       width: Sizes.dimen_40,
                       height: Sizes.dimen_40,
                       fit: BoxFit.cover,
                       loadingBuilder: (BuildContext ctx, Widget child,
                           ImageChunkEvent? loadingProgress) {
                         if (loadingProgress == null) return child;
                         return Center(
                           child: CircularProgressIndicator(
                             color: AppColors.burgundy,
                             value: loadingProgress.expectedTotalBytes !=
                                         null &&
                                     loadingProgress.expectedTotalBytes !=
                                         null
                                 ? loadingProgress.cumulativeBytesLoaded /
                                     loadingProgress.expectedTotalBytes!
                                 : null,
                           ),
                         );
                       },
                       errorBuilder: (context, object, stackTrace) {
                         return const Icon(
                           Icons.account_circle,
                           size: 35,
                           color: AppColors.greyColor,
                         );
                       },
                     ),
                   )
                 : Container(
                     width: 35,
                   ),
             chatMessages.type == MessageType.text
                 ? messageBubble(
                     color: AppColors.burgundy,
                     textColor: AppColors.white,
                     chatContent: chatMessages.content,
                     margin: const EdgeInsets.only(left: Sizes.dimen_10),
                   )
                 : chatMessages.type == MessageType.image
                     ? Container(
                         margin: const EdgeInsets.only(
                             left: Sizes.dimen_10, top: Sizes.dimen_10),
                         child: chatImage(
                             imageSrc: chatMessages.content, onTap: () {}),
                       )
                     : const SizedBox.shrink(),
           ],
         ),
         isMessageReceived(index)
             ? Container(
                 margin: const EdgeInsets.only(
                     left: Sizes.dimen_50,
                     top: Sizes.dimen_6,
                     bottom: Sizes.dimen_8),
                 child: Text(
                   DateFormat('dd MMM yyyy, hh:mm a').format(
                     DateTime.fromMillisecondsSinceEpoch(
                       int.parse(chatMessages.timestamp),
                     ),
                   ),
                   style: const TextStyle(
                       color: AppColors.lightGrey,
                       fontSize: Sizes.dimen_12,
                       fontStyle: FontStyle.italic),
                 ),
               )
             : const SizedBox.shrink(),
       ],
     );
   }
 } else {
   return const SizedBox.shrink();
 }
}
Sixth, we will create a view where all the text messages and images will be shown separately for sender and receiver.
Widget buildListMessage() {
   return Flexible(
     child: groupChatId.isNotEmpty
         ? StreamBuilder<QuerySnapshot>(
             stream: chatProvider.getChatMessage(groupChatId, _limit),
             builder: (BuildContext context,
                 AsyncSnapshot<QuerySnapshot> snapshot) {
               if (snapshot.hasData) {
                 listMessages = snapshot.data!.docs;
                 if (listMessages.isNotEmpty) {
                   return ListView.builder(
                       padding: const EdgeInsets.all(10),
                       itemCount: snapshot.data?.docs.length,
                       reverse: true,
                       controller: scrollController,
                       itemBuilder: (context, index) =>
                           buildItem(index, snapshot.data?.docs[index]));
                 } else {
                   return const Center(
                     child: Text('No messages...'),
                   );
                 }
               } else {
                 return const Center(
                   child: CircularProgressIndicator(
                     color: AppColors.burgundy,
                   ),
                 );
               }
             })
         : const Center(
             child: CircularProgressIndicator(
               color: AppColors.burgundy,
             ),
           ),
   );
 }
}
We have finished creating our chat application in Flutter with Firebase at its backend. There are still a lot of other Dart files and code involved in programming this application that I haven’t posted here in this article, but I have linked each page with GitHub links to view the complete code.
Now, let us configure our completed application for uploading to Firebase Hosting so that everyone can experience it without the need to install it on any device.
Please go through this documentation to create authorization credentials. Any application that uses OAuth 2.0 to access Google APIs must have authorization credentials to identify the application to the Google server.
After running this command, flutterfire configure, Google will configure OAuth 2.0 credentials for Android, iOS, and web. You can go to this credentials page, and you should see something like the image given below.
Next, copy the Client ID for the web application and save it somewhere before going to the next step.

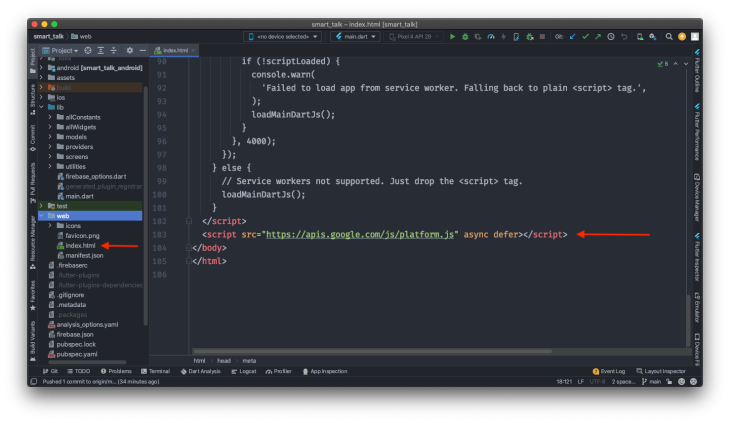
A web folder is created by default in your project structure when creating a new Flutter application. Open the index.html file and add this script to load the Google Platform library inside the web folder.
<script src="https://apis.google.com/js/platform.js" async defer></script>
Please look at the image for further clarity.
In the same file, index.html, add the Client ID you just copied from the credentials page.
<meta name="google-signin-client_id" content="YOUR_CLIENT_ID.apps.googleusercontent.com">
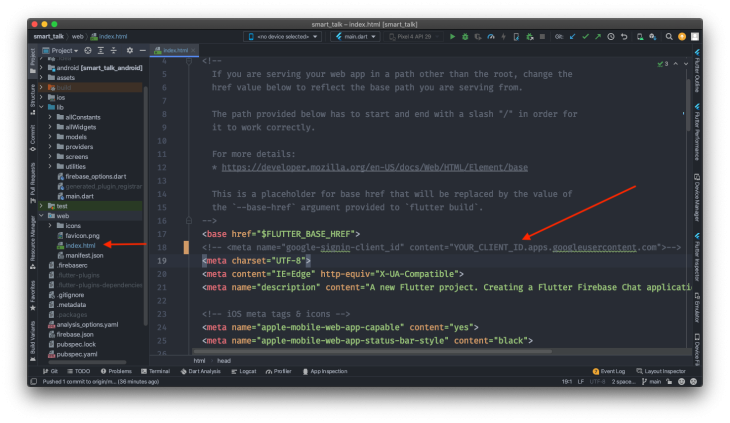
Since we had already configured Firebase CLI commands when we initialized our project and were authenticated into Firebase, we can run this command directly in the Android Studio terminal from the root of our project.
$ Firebase init hosting
This command will ask you to select your Firebase project when you run it. Use arrow keys to select it.
You will see two files created in your project, known as firebase.json and .firebaserc.
Run this command in your terminal window from the root of your project structure. It will add all the necessary files to the build/web inside the root directory:
$ flutter build web
Finally, run this command to upload all the files to Firebase Hosting, and it will generate a web URL for anyone to access:
$ Firebase deploy
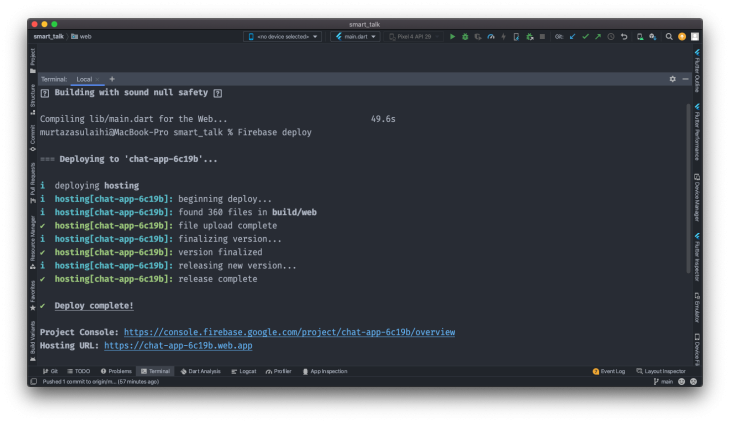
That is it! We are all done. Hope you enjoyed reading this as much as I did writing. I learned a lot when I created this application for the very first time. With FlutterFire and Dart CLI, things have become much easier to configure Flutter applications with Firebase services.
You can read this handy blog if you’d like to learn more about configuring the app as a PWA. Here is a link to the PWA for this demo project, and a link to the whole project on GitHub for you to experiment.
Install LogRocket via npm or script tag. LogRocket.init() must be called client-side, not
server-side
$ npm i --save logrocket

// Code:

import LogRocket from 'logrocket';
LogRocket.init('app/id');
// Add to your HTML:

<script src="https://cdn.lr-ingest.com/LogRocket.min.js"></script>
<script>window.LogRocket && window.LogRocket.init('app/id');</script>
Would you be interested in joining LogRocket's developer community?
Join LogRocket’s Content Advisory Board. You’ll help inform the type of content we create and get access to exclusive meetups, social accreditation, and swag.
Sign up now
A breakdown of the wrapper and container CSS classes, how they’re used in real-world code, and when it makes sense to use one over the other.

This guide walks you through creating a web UI for an AI agent that browses, clicks, and extracts info from websites powered by Stagehand and Gemini.

This guide explores how to use Anthropic’s Claude 4 models, including Opus 4 and Sonnet 4, to build AI-powered applications.

Which AI frontend dev tool reigns supreme in July 2025? Check out our power rankings and use our interactive comparison tool to find out.
4 Replies to "How to build a chat application in Flutter with Firebase"
Can i use realtime database instead of Firestone ?
Yes you can use real time database. But Firestore is a recommended option.
What about passwordless email signin?
It can be implemented, Google has extensive documentation on it which can referred to for its implementation.