According to the 2020 Stack Overflow developer study, React is ranked as the second most used web development framework behind Node.js. Because of React’s popularity, many libraries have been developed for React.

In this article, we’ll learn about the Reapop API and build a simple React app to implement notifications with Reapop. To get the most out of this article, you will need Node.js installed in your system and a basic knowledge of JavaScript and React. Let’s get started!
Jump ahead:
In this article, we will learn about Reapop, a simple and customizable system for React. And, as mentioned above, while there are other React notification libraries, Reapop shines because it is easy to use, feature-packed, and customizable. Additionally, Reapop is built with TypeScript, Redux, and Redux thunk. And, as expected, its API has built-in support for Redux. Reapop also provides Hooks and Context API if you use it without any state management.
The Reapop API consists of six APIs. Each API exposes a collection of properties or functions for building Reapop notifications. Let’s take a look at these APIs in more detail.
This API exposes the Notification object, representing a notification as the name suggests. This API contains several properties and functions, such as:
ID of the Notification — if providedNotification titleNotificationNotificationNotificationonAdd function: The method executed when the notification is displayedonDismiss function: The method executed right before the notification is dismissedThe complete list of the properties of the Notification object is seen from the object signature specified by the Notification interface below:
{
    id: string
    title?: string
    message?: string
    status: Status
    position: Position
    buttons: NotificationButton[]
    image?: string
    dismissAfter?: number
    dismissible?: boolean
    onAdd?: (...args: any[]) => void
    onDismiss?: (...args: any[]) => void
    showDismissButton?: boolean
    allowHTML?: boolean
    [index: string]: any
}
As you can see in the code above, the NotificationButton is an object that represents the button clicked to fire a notification. It is an object with three properties: Name, Primary, and onClick. The onClick function is fired when the NotificationButton is clicked and has the following interface:
{
    name: string
    primary?: boolean
    onClick?: (...args: any[]) => void
}
This API exposes three functions, notify, dismissNotification, and dismissNotifications. The notify action is used to create or update a notification with the following signature:
notify(notification: Partial<Notification>)
notify(message: string, options?: Partial<Notification>)
notify(message: string, status: Status, options?: Partial<Notification>)
The dismissNotification action is used to dismiss a notification and has the following function signature:
dismissNotification(id: string)
The dismissNofications action is used to dismiss all notifications and has the following function signature:
dismissNotifications()
The Hooks API requires React v16.8.0 or above and is meant to be used when you are not using another state manager. That being said, Reapop provides the useNotification Hook for building Notifications with the following syntax:
const {notifications, notify, dismissNotification, dismissNotifications} =
useNotifications()
Other Hooks provided by Reapop are the useTheme and the useComponentsContext.
This API exposes several components, including the NotificationSystem component responsible for displaying notifications. A list of other components can be found here.
This API exposes a set of helper functions. One of these functions, setUpNotifications, is used to define default properties, custom functions that modify notifications, and the function used to generate notification IDs. The function has the following signature:
type NotificationConfig = {
    defaultProps: Partial<Notification>
    customizeNotification: ((notification: NewNotification) => void) | null
    generateId: ((notification: NewNotification) => string) | null
}

setUpNotifications(NotificationConfig)
You can set default notifications properties using this function, as seen below:
import {setUpNotifications} from 'reapop'

// run this function when your application starts before creating any notifications
setUpNotifications({
    defaultProps: {
        position: 'top-right',
        dismissible: true
    }
})
You can also define a custom function to modify notifications, as shown below:
const ATopLevelComponent = () => {
    return (
        <div>
            <NotificationsSystem
                smallScreenBreakpoint={500}
                {...otherProps}
            />
        </div>
    )
}
In the code above, the ATopLevelComponent function specifies when to display notifications — at the top-center of the screen. This is done by customizing the smallScreenBreakpoint property of the NotificationsSystem component. The resetNotificationsConfig function is used to reset the values of custom notification configurations back to default.
This API provides three built-in themes: atalhoTheme, wyboTheme, and bootstrapTheme. You can import and use them with the code below:
import {atalhoTheme, wyboTheme, bootstrapTheme} from 'reapop'

const ATopLevelComponent = () => {
    return (
        <div>
            <NotificationsSystem
                theme={atalhoTheme}
                {...otherProps}
            />
        </div>
    )
}
In the previous section, we learned about Reapop’s notifications API and how to implement notifications.
As stated before, Reapop is built with Redux, so the API works with Redux out of the box. However, it also provides API for React Hooks and Context API. In this article, we will implement our notifications using the React Hooks and Context API.
First, clone the starter app from this GitHub repository, then install dependencies by running npm install. The starter app is a simple Create React App and Tailwind CSS application boilerplate. You can test your installation by running the dev server with npm start.
If everything is successful, you should see the following:
NotificationsProvider Context APIBefore working with Reapop API, install the package by running npm i reapop. Then, in the index.js file, import the NotificationsProvider with this line of code:
import { NotificationsProvider } from 'reapop'
Now, wrap the App component with the NotificationProvider as shown below:
...
const root = ReactDOM.createRoot(document.getElementById('root'));
root.render(
  <React.StrictMode>
    <NotificationsProvider>
      <App />
    </NotificationsProvider>
  </React.StrictMode>
);
...
This component must wrap all the components you want to access and work with notifications.
notification componentTo create this custom component, create a components folder in the src folder and create two components: Notification.js and NotificationButtons.js. Then, add the following code to the NotificationButtons.js:
import React from "react";
import { useNotifications } from 'reapop'
const NotificationButtons = () => {
    const { notify } = useNotifications()

    const notification1 = {
        id: '1',
        title: 'Notification 1!',
        message: 'Lorem Ipsum is simply dummy text of the printing and typesetting industry.',
        dismissible: true,
        dismissAfter: 3,
    }
    const notification2 = {
        id: '2',
        title: 'NOficaition 2!',
        message: 'Lorem Ipsum is simply dummy text of the printing and typesetting industry.',
        dismissible: true,
        dismissAfter: 2,
    }
    const notification3 = {
        id: '3',
        title: 'Notification 3!',
        message: 'Lorem Ipsum is simply dummy text of the printing and typesetting industry.',
        dismissible: true,
        dismissAfter: 1,
    }

    return (
        <div className="grid h-screen place-items-center">
            <div className="flex gap-x-8">
                <button
                    className="focus:outline-none text-white bg-green-700 hover:bg-green-800 focus:ring-4 focus:ring-green-300 font-medium rounded-lg text-sm px-5 py-2.5 mr-2 mb-2 dark:bg-green-600 dark:hover:bg-green-700 dark:focus:ring-green-800"
                    onClick={() => notify(notification1)}>
                    Alert Green!
                </button>
                <button
                    className="focus:outline-none text-white bg-red-700 hover:bg-red-800 focus:ring-4 focus:ring-red-300 font-medium rounded-lg text-sm px-5 py-2.5 mr-2 mb-2 dark:bg-red-600 dark:hover:bg-red-700 dark:focus:ring-red-800"
                    onClick={() => notify(notification2)}>
                    Alert Red!
                </button>

                <button
                    className="focus:outline-none text-white bg-yellow-700 hover:bg-yellow-800 focus:ring-4 focus:ring-yellow-300 font-medium rounded-lg text-sm px-5 py-2.5 mr-2 mb-2 dark:bg-yellow-600 dark:hover:bg-yellow-700 dark:focus:ring-yellow-800"
                    onClick={() => notify(notification3)} >
                    Alert yellow!
                </button>
            </div>
        </div>
    );
}
export default NotificationButtons;
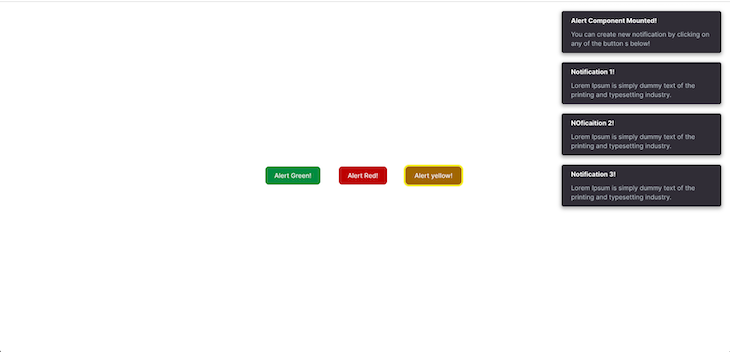
We created three notification objects in the code above: notification1, notification2, and notification3. We also created three buttons: Alert Green!, Alert Red!, and Alert Yellow!.
When clicking a button, we create a new notification by calling notify. Next, add the following code to the Notification.js component:
import React, { useState, useEffect } from "react";
import NotificationsSystem, { atalhoTheme, setUpNotifications, useNotifications } from 'reapop'
import NotificationButtons from "./NotificationBottons";
const Notification = () => {
    const [transitionName, setTransitionName] = useState('Slide')
    // 1. Retrieve the notifications to display, and the function used to dismiss a notification.
    const { notifications, dismissNotification, notify } = useNotifications()
    useEffect(() => {
        const notification = {
            id: '4',
            title: 'Alert Component Mounted!',
            message: 'You can create new notification by clicking on any of the button s below!',
            dismissible: true,
            dismissAfter: 2,
        }
        // 2. Create a notification.
        notify(notification)
    }, [])
    return (
        <section>
            <NotificationButtons />
            <NotificationsSystem
                // 2. Pass the notifications you want Reapop to display.
                notifications={notifications}
                // 4. Pass a builtIn theme or a custom theme.
                theme={atalhoTheme}
                components={{
                    Transition: transitionName,
                }}
            />
        </section>
    );
}
export default Notification;
The code above creates a new notification once the Notification component mounts. This is set up in the useEffect Hook. Also, the NotificationSystem component is set up, and the theme is set to altalhoTheme.
To set up the default notification behavior, update the App component as seen below:
import React from 'react';
import { setUpNotifications } from 'reapop'
import Notification from './components/Notification';

setUpNotifications({
  defaultProps: {
    position: 'top-right',
    dismissible: true
  }
})

function App() {
  return (
    <div>
      <Notification />
    </div>
  )
}

export default App;
The setUpNotifications function is called early to set the default notification behavior in the code above. Additionally, the notification component is passed to the App component.
To test the React application, start the dev server by running npm start. Once the server starts and the Notification component mounts, we get the following:
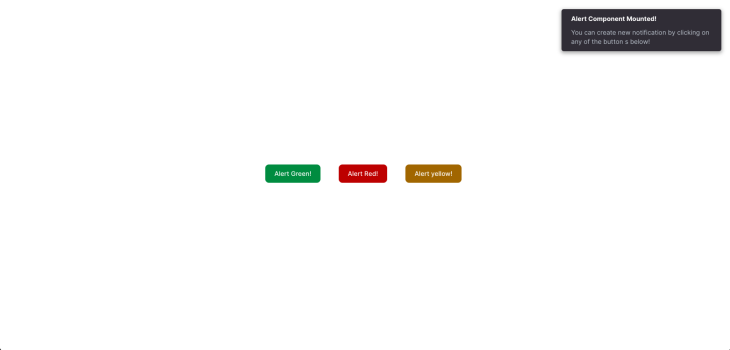
Finally, we can create other notifications by clicking any of the displayed buttons. The created notification will be displayed like this:
In the article, we learned about Reapop, a simple, well-thought-out React notification library built with TypeScript, Redux, and Redux thunk.
We also learned about the Reapop notification API and built a simple React app where we implemented a notification system using Reapop’s Hooks and Context API. While we worked with the Hooks and Context API in this article, we mentioned that Reopop also provides API for Redux.
After going through this article, I hope you have learned enough to start implementing notifications with Reapop in your next React project.
Install LogRocket via npm or script tag. LogRocket.init() must be called client-side, not
server-side
$ npm i --save logrocket

// Code:

import LogRocket from 'logrocket';
LogRocket.init('app/id');
// Add to your HTML:

<script src="https://cdn.lr-ingest.com/LogRocket.min.js"></script>
<script>window.LogRocket && window.LogRocket.init('app/id');</script>

Learn how to set up Meilisearch, index documents, and build keyword, semantic, and hybrid search with AI-powered retrieval.

Compare pnpm and npm across security defaults, disk usage, dependency strictness, and workspace policy to decide which package manager fits your project.

I migrated 20 production-style components from Tailwind to StyleX. Here’s what the data showed about LOC, CSS bundle size, build time, and type safety.

A guide for using JWT authentication to prevent basic security issues while understanding the shortcomings of JWTs.
Hey there, want to help make our blog better?
Join LogRocket’s Content Advisory Board. You’ll help inform the type of content we create and get access to exclusive meetups, social accreditation, and swag.
Sign up now
