In this guide, we’ll compare Flutter, a cross-platform, open-source toolkit for building UIs, to Swift, the primary language for building apps across iOS and macOS. We’ll evaluate each programming language in terms of features, ease of use, and overall developer experience for building iOS apps. We’ll also offer some guidance to help you choose which language to learn or use for a given iOS app development project.

The Replay is a weekly newsletter for dev and engineering leaders.
Delivered once a week, it's your curated guide to the most important conversations around frontend dev, emerging AI tools, and the state of modern software.
Swift is an open-source, general-purpose programming language built by Apple for iOS, macOS, watchOS, and tvOS app development. It’s a modern, fast, safe, and interactive language that is easy for beginners to pick up.
For example, to output (print) a message to the console, you simply use the print() method:
print("Hello World!")
// outputs the characters "Hello World!"
And then there’s Flutter, Google’s open-source UI toolkit for building cross-platform native user interfaces from a single codebase. Flutter now supports the development of apps that can also run on the web and desktop.
The Flutter framework is built with Dart. To build apps in Flutter, you must have some knowledge of the Dart programming language.
Dart is a client-optimized language for developing apps on any platform. It’s terse, strongly typed, and object-oriented and supports sound null safety.
Before you start building an iOS app, the initial setup includes adding basic tooling such as system and IDEs to get up and running. Let’s walk through how to set up your system for iOS development using both Flutter and native (Swift) tooling.
To build an iOS app using Flutter, the first step is to download the installation bundle and extract the file to the desired location. Next, install Xcode. You can then use any IDE of your choice to build your Flutter iOS app.
To set up your system for building iOS apps natively using Swift, all you need is a macOS and Xcode. This makes it a bit easier to set up an iOS development environment in Swift than in Flutter.
Now that we’re set up, it’s time to get our hands dirty and start building the starter file for a new project with both Flutter and Swift iOS.
Create a new Flutter iOS app by running the following on the command line in the directory where you want to place the project:
flutter create demo_flutter_app
// this creates a new called demo_flutter_app, containing the Flutter's starter app.
cd demo_flutter_app
// enter the demo_flutter_app directory
flutter run
// to launch the app in a simulator
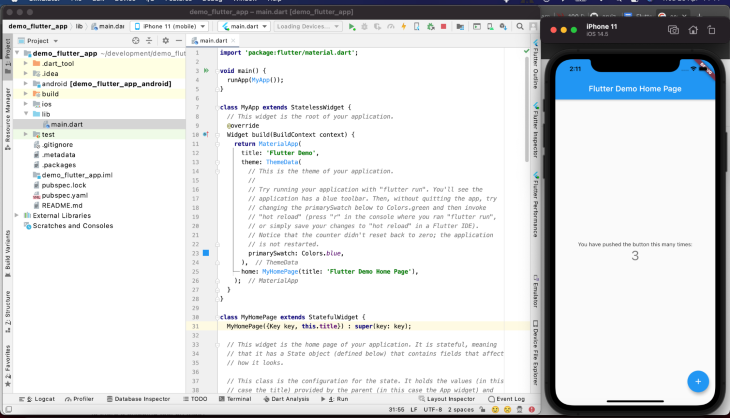
For my demo, I used the Android Studio IDE. You can start a new iOS Flutter project using the Android Studio IDE like so:
File → New Flutter Project, then select Flutter Application, input name of the project, and create the project.
Flutter will create a Flutter starter app, as shown below:

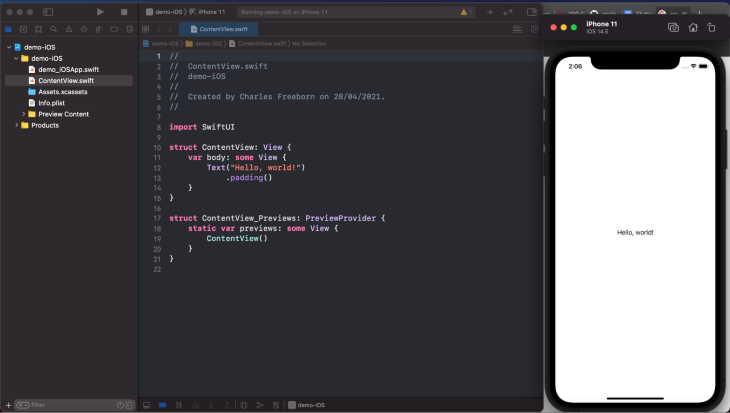
To start a new iOS project using Xcode, click Create a new Xcode Project, then select App, then input the project name. Click Next and create a project in your chosen directory.
Xcode will create an iOS Starter App that displays “Hello World” when run in a simulator, as shown below:

Now that we’ve built our basic example iOS apps with both Flutter and Swift, let’s compare the learning curve, development time, UI creation process, and overall developer experience associated with each.
Unlike Flutter, once you create a project in Xcode, Swift’s iOS starter app is light and easy to get up to speed. This is because you only need to get comfortable with the Swift programming language, whereas Flutter requires an understanding of how to write in Dart.
What’s more, Apple designed Swift to be “anyone’s first programming language.” You can also take advantage of SwiftUI to build iOS apps.
The main entry point for Swift’s iOS app is Content.swift; for Flutter it’s main.dart under the lib directory.
Flutter has extensive documentation, which is all you really need to start building iOS apps with the toolkit. Google Flutter codelabs is another great resource that enables you to get your hands dirty with Flutter.
But before you can build any kind of app with Flutter, you need to learn the Dart programming language. Fortunately, there is a growing and supportive community of developers creating new learning resources all the time to help new Flutter developers get oriented with Dart.
Similar to Flutter, the official Apple docs are the perfect place to get started learning to build native iOS apps using Swift. The docs also include instructions and guides for using SwiftUI, a declarative framework for building user interfaces for any Apple platform.
When it comes to learning curve and approachability, Swift has an edge over Flutter because, as mentioned previously, you don’t need to learn a new programming language to build native iOS apps. That said, thanks to their rich documentation and community support, both Flutter and Swift are relatively easy to learn.
In this section, we’ll evaluate the time it takes to develop a fairly standard iOS app using Flutter compared to Swift. We’ll consider things like debugging and testing in our analysis. Of course, the time it takes to deliver an app also depends on the complexity of the project, the developer’s skill level and working style, etc.
Dart has support for just-in-time and ahead-of-time compilation, which is why Flutter supports stateful hot-reload — instant updating of UIs when changes are made to the code while the app is still running. This invariably leads to high developer velocity.
With Flutter’s single codebase for all (Android and iOS), teams can release cross-platform apps on time, reducing the cost of developing apps on different platforms and accelerating the time to release a minimum viable product (MVP).
Even though Swift is the native language for iOS app development, when changes are made to an app, you’ll need to reload the app to see the changes.
Flutter app’s reloading is faster thanks to hot-reload, giving it the edge over Swift when it comes to developer velocity and the time it takes to deliver an iOS app development project.
Next we’ll examine the process of creating a user interface for an iOS app using Flutter and Swift. We’ll wrap up the comparison by building a simple app using Swift and Flutter to demonstrate the process associated with each.
At the core of Flutter app development is widgets. A widget is a description of a part of a user interface.
Flutter comes with customizable widgets, such as the Text() widget, which you can use to create UIs. Widgets also have properties, such as background, width, height, etc. There are two types of widgets: stateful and stateless.
With widgets, you don’t need to bother creating UIs from the ground up. You can simply take advantage of the customizable widgets that Flutter provides.
Below is an example of using Flutter to write a Hello World program:
import 'package:flutter/material.dart';

void main() {
runApp(MyApp());
}

class MyApp extends StatelessWidget {
@override
Widget build(BuildContext context) {
return MaterialApp(
title: 'Hello World Demo',
home: Scaffold(
appBar: AppBar(
title: Text('Hi there'),
),
body: Center(
child: Text('Hello World'),
),
),
),
}
}
With SwiftUI, you can create UIs for all Apple platforms. SwiftUI takes a declarative syntax approach that’s easy to read and natural to write.
Below is an example of using SwiftUI to write a Hello World program:
import SwiftUI

struct ContentView: View{
var body: some View{
Text("Hello World!")
}
}
At the end of the day, it’s possible to create beautiful and engaging UIs for iOS apps using both Flutter and Swift, and both enjoy amazing community support. That said, Swift stands out for its brevity of code compared to Flutter.
According to the Flutter docs, it’s possible to add Flutter to an existing iOS application. In this section, we’ll show you how to port a native iOS app to Flutter.
To add Flutter to an iOS app, first create a Flutter module in the root directory of your project.
cd rootdir
flutter create --template module my_flutter
Running the above command in the terminal causes Flutter to automatically run the flutter pub get, which adds the Flutter dependencies to the my_flutter/pubspec.yaml file.

Note that I named the flutter module my_flutter1 for the demonstration above.
Here’s the structure of the my_flutter module directory via the docs:
my_flutter/
├── .ios/
│   ├── Runner.xcworkspace
│   └── Flutter/podhelper.rb
├── lib/
│   └── main.dart
├── test/
└── pubspec.yaml
Note that the .ios/ directory is a hidden subfolder.
The next step is to embed the Flutter module into the iOS app. The docs outline two ways to embed Flutter in an iOS app:
The recommended method is to use the CocoaPods dependency manager, so we’ll proceed accordingly.
Assuming you’ve installed the Flutter SDK, add a Podfile to the application. A Podfile is a specification that describes the dependencies of the target of one or more Xcode project.
To create a Podfile, open the terminal and CD into the iOS project directory. Then, run $ pod init in the project directory.
Open the Podfile using an editor (I recommend VS Code) and paste the code below:
flutter_application_path = '../my_flutter'
load File.join(flutter_application_path, '.ios', 'Flutter', 'podhelper.rb')
On the Podfile target, between the do and end, add the following to embed Flutter:
install_all_flutter_pods(flutter_application_path)
Next, run $ pod install on the terminal. Now your iOS app is embedded with Flutter.
You can now build your project in Xcode using the build and run play icon or command + B. But first, exit Xcode, launch it again, and open the project’s .xcworkspace.
Your iOS is now ported to Flutter and you are ready to start building.
In this guide, we compared the developer experience associated with the Swift programming language for building native iOS against that of Flutter, a UI toolkit, for building cross-platform (specifically iOS) apps.
In my opinion, the choice of whether to build your next iOS app with Flutter or Swift depends on your preference for and comfort level writing in Dart vs. Swift. The obvious advantage of building an iOS app with Swift stems from the native Swift programming language and Apple’s SwiftUI framework. Building iOS apps with Flutter, on the other hand, enables you to build iOS and Android apps with a single codebase. For more information about building cross-platform apps with Flutter, check out “Pros and cons of Flutter app development.”
In closing, let’s summarize a few key takeaways from our comparison of Flutter vs. Swift for iOS development:
Install LogRocket via npm or script tag. LogRocket.init() must be called client-side, not
server-side
$ npm i --save logrocket

// Code:

import LogRocket from 'logrocket';
LogRocket.init('app/id');
// Add to your HTML:

<script src="https://cdn.lr-ingest.com/LogRocket.min.js"></script>
<script>window.LogRocket && window.LogRocket.init('app/id');</script>

@container scroll-state: Replace JS scroll listeners nowCSS @container scroll-state lets you build sticky headers, snapping carousels, and scroll indicators without JavaScript. Here’s how to replace scroll listeners with clean, declarative state queries.

Explore 10 Web APIs that replace common JavaScript libraries and reduce npm dependencies, bundle size, and performance overhead.

Russ Miles, a software development expert and educator, joins the show to unpack why “developer productivity” platforms so often disappoint.

Discover what’s new in The Replay, LogRocket’s newsletter for dev and engineering leaders, in the February 18th issue.
Hey there, want to help make our blog better?
Join LogRocket’s Content Advisory Board. You’ll help inform the type of content we create and get access to exclusive meetups, social accreditation, and swag.
Sign up now
2 Replies to "Flutter vs. Swift for iOS development"
Awesome
You choose flutter if you are going to build cross platform app. It’s a no brainer to choose swift if you are targeting only iOS.