Editor’s note: This article was last updated by Carlos Mucuho on 4 November 2024 to introduce role-based dynamic header injection, as well as how to handle insecure requests with Axios.

HTTP request headers are essential components of web communications, carrying crucial metadata about the request being made. They provide information about the requested resources, the client making the request, and authentication details. When making API calls, properly configured request headers ensure secure and efficient communication between the client and server.
HTTP response headers, returned by the server, contain important information about the response, such as content type, caching directives, and security policies. They help clients understand how to process the received data and maintain secure connections.
In this article, we will dive into setting request headers with Axios, a powerful HTTP client for both browser and Node.js environments. We will explore various approaches to configure headers, from simple one-off requests to complex dynamic header management, ensuring your applications communicate effectively with backend services.
You can install Axios with popular Node package managers, including the following:
// via npm
npm install axios

// via yarn
yarn add axios

// via bower
bower install axios

// via pnpm
pnpm add axios
It’s also possible to load Axios directly to the browser via the jsDelivr and unpkg CDNs:
// via jsdelivr
<script src="https://cdn.jsdelivr.net/npm/axios/dist/axios.min.js"></script>

// via unpkg
<script src="https://unpkg.com/axios/dist/axios.min.js"></script>
Once you install Axios, you can import it into your app as follows:
import axios from 'axios';
Due to the stateless behavior of the HTTP protocol, headers are typically sent for each HTTP message. So, Axios offers you a way to set headers per request when you make a new request using its API.
For example, if you send a new GET request to the /users endpoint, you can set a custom header only for that particular request. If you send another GET request to /users/101, Axios won’t automatically add the custom header that you sent for the /users endpoint. We can refer to these as per-request headers because they are added only for one particular request.
Axios global headers are sent for multiple requests even though you don’t explicitly mention them in each request. For example, you can configure Axios to set up a custom global header for all GET endpoints. Attaching the Authorization header to all outgoing requests is a popular usage of global headers.
We can use Axios request configuration to set per-request headers, and Axios global configuration, instances, and interceptors to set global headers, as explained in the following sections.
Axios methods such as post(), get(), put(), etc., enable us to attach headers to a specific request by attaching a headers object in the Axios request configuration. For example, you can set custom headers for a single GET request using the following approach:
axios.get('/users', {
    headers: {
        'MyCustomHeader1': '1',
        'MyCustomHeader2': '2'
    }
})
.then((res) => console.log(res.data))
.catch((err) => console.error(err));
In the above example, we passed the API endpoint string to the first parameter and the Axios configuration object to the second parameter.
With POST requests, we need to pass data using the second parameter, so we should send the headers object from the third configuration parameter, as shown here:
const data = {
    customerId: 100,
    items: []
};

axios.post('/invoices', data, {
    headers: {
        'MyCustomHeader1': '1',
        'MyCustomHeader2': '2'
    }
})
.then((res) => console.log(res.data))
.catch((err) => console.error(err));
In the above example, we passed the API endpoint string with the first parameter, the data object via the second parameter, and the Axios configuration object with custom headers via the third parameter.
Sometimes, headers may need to be set automatically for multiple or subsequent requests. For example, you may need to send a specific configuration property from all React Native mobile API clients via a custom header. Adding this custom header to all places where you call Axios functions may add repetitive code segments to your codebase.
We can address this by setting global headers and updating the default configuration. This code sets a global authorization header for all requests:
axios.defaults.headers.common['Authorization'] = `Bearer ${localStorage.getItem('access_token')}`;
This code sets authorization headers for all POST requests:
axios.defaults.headers.post['Authorization'] = `Bearer ${localStorage.getItem('access_token')}`;
Similarly, it’s also possible to set global headers for other HTTP methods.
We typically work with web apps that have one RESTful API URL, but some large-scale apps can connect with multiple RESTful URLs. If we set headers in the Axios default global configuration, all RESTful backends will receive those headers. To prevent this situation, Axios offers a way to create several Axios instances with isolated global configurations. We can also set request headers for API calls by creating a specific instance of Axios.
To correctly set up headers for each request, we can create an instance of Axios using axios.create and then set a custom configuration on that instance, as shown here:
const instance = axios.create({
    baseURL: 'http://localhost:3000',
    headers: {
        'MyCustomHeader1': '1',
        'MyCustomHeader2': '2'
    }
});
We can reuse this configuration each time we send a new request using this particular Axios instance.
When we use the instance object to make a request, the authorization header will be attached automatically:
instance.get('/users')
    .then((res) => console.log(res.data))
    .catch((err) => console.error(err));
As you normally expect, if you create a new Axios instance for another RESTful API, it won’t inherit these global headers from the previous instance because those are two separate instances.
We can also use Axios interceptors — functions that are called by Axios — to set request headers for API calls. Interceptors may be used to alter a request before it is transmitted or to modify a response before it is delivered to callbacks. They are essentially equivalent to middleware from Express or Mongoose.
I previously worked on a project that required an authorization header, containing the user access token, to be appended to every request. It was a financial application, and the system needed to verify user identity for every request. This is an example in which it would have been preferable to automatically attach the authorization header to every request, rather than setting them individually.
Authentication is one of the most common applications for interceptors. A client app often verifies user identity to the server by submitting a secret access token in the authorization header.
We can use Axios interceptors to automatically set the Authorization header for all requests:
axios.interceptors.request.use(
  config => {
    config.headers['Authorization'] = `Bearer ${localStorage.getItem('access_token')}`;
        return config;
    },
    error => {
        return Promise.reject(error);
    }
);
In this example, we used the axios.interceptors.request.use method to update each request header and set the access token in the Authorization HTTP header.
We target the Authorization header from the config.headers object and set a Bearer token, which is stored in localStorage, as its value.
In previous code examples, I showed you several approaches to set headers without conditional statements — those headers contain some fixed, hardcoded values and an access token from localStorage.
In some scenarios, we have to conditionally change headers based on environment variables, request details, and other configuration or application runtime values. Axios is flexible and lets you change global headers at any time:
axios.defaults.headers.common['MyGlobalHeader'] = `1`;

setTimeout(() => {
    axios.defaults.headers.common['MyGlobalHeader'] = `2`;
}, 5000);
So, we can conditionally change global headers based on various factors. For example, the following code segment conditionally adds some internal debugging headers based on an environment variable:
function setHeaders(options = {}) {
  if(process.env.DEBUG_MODE) {
    axios.defaults.headers.common['Debug-Mode'] = `1`;
    axios.defaults.headers.common['Debug-Extras'] = getDebugExtras();
  }
}
Similarly, you can use the instance.defaults.headers property to conditionally change the headers of an Axios instance.
If you need to set conditional headers based on incoming requests, you can use a request interceptor as follows:
axios.interceptors.request.use(
    config => {
        if(config.url.includes('/users')) {
            config.headers['MyCustomHeader1'] = 1;
        }
        return config;
    }
);
The above sample interceptor sets a custom header only for user endpoint requests by comparing the request URL. Similarly, you can set conditional headers based on other request details, such as the HTTP method, JSON payload, etc.
Axios response interceptors are useful for monitoring access tokens for impending token renewal. A refreshToken() function can be used to update a token before it expires:
const refreshToken = async () => {
    // gets new token
}
We can also call the axios.interceptors.response.use() method to get a new access token whenever a response returns a 401 error, meaning the existing token has expired:
axios.interceptors.response.use(
    response => {
        return response;
    },
    async error => {
        if(error.response.status == 401) {
            let token = await refreshToken();
            axios.defaults.headers.common['Authorization'] = 'Bearer ' + token;
        }
    }
);
In this example, the axios.interceptors.response.use method intercepts all incoming responses and then checks the status of response. If the request that triggered response is not authenticated, then the token is expired. In that case, we conditionally call for the refreshToken() function to obtain a new access token and use it with new outgoing requests by updating the global authorization header. This flow is now pre-developed in the axios-auth-refresh interceptor library.
Modern web applications often require dynamic header management based on user roles, sessions, or application state. Axios interceptors provide a powerful way to implement this functionality.
Here’s a comprehensive approach to dynamic header injection using a header management system:
const headerManager = {
    getUserRole: () => localStorage.getItem('userRole'),
    getSessionData: () => localStorage.getItem('sessionData'),
    getCustomHeaders: function() {
        const role = this.getUserRole();
        const session = this.getSessionData();

        const headers = {};

        if (role === 'admin') {
            headers['Admin-Access'] = 'true';
            headers['Admin-Level'] = '1';
        }

        if (session) {
            headers['Session-Data'] = session;
        }

        return headers;
    }
};

// Implement dynamic header injection using interceptors
axios.interceptors.request.use(config => {
    const dynamicHeaders = headerManager.getCustomHeaders();

    // Merge dynamic headers with existing config
    config.headers = {
        ...config.headers,
        ...dynamicHeaders
    };

    return config;
});
This implementation creates a reusable header management system that centralizes header logic. The headerManager object handles the responsibility of determining which headers should be included based on the current application state, while the interceptor ensures these headers are automatically added to every request.
For more granular control, you can implement role-based header injection that varies header content based on user roles:
axios.interceptors.request.use(config => {
    const userRole = localStorage.getItem('userRole');
    const roleHeaders = {
        admin: {
            'Admin-Access': 'true',
            'Admin-Level': '1'
        },
        manager: {
            'Manager-Access': 'true',
            'Department': localStorage.getItem('department')
        },
        user: {
            'User-Type': 'standard'
        }
    };

    if (roleHeaders[userRole]) {
        config.headers = {
            ...config.headers,
            ...roleHeaders[userRole]
        };
    }

    return config;
});
This approach maps specific headers to different user roles, allowing for fine-grained control over what information is sent with requests based on the user’s permissions level. The interceptor automatically applies the appropriate headers based on the current user’s role, which is particularly useful in applications with complex authorization requirements.
By implementing dynamic header injection, you can maintain cleaner code while ensuring that all requests include the necessary headers based on your application’s current state and security requirements.
When working with development environments or testing scenarios, you might need to handle insecure HTTPS connections or self-signed certificates. Axios provides several options to manage these situations securely.
To handle self-signed certificates or skip SSL verification (not recommended for production), you can create an Axios instance with a custom HTTPS agent:
import * as https from 'https';

const instance = axios.create({
    httpsAgent: new https.Agent({
        rejectUnauthorized: false
    })
});
In this example, we create an Axios instance that accepts self-signed certificates by setting rejectUnauthorized to false. This configuration is particularly useful during development when working with locally-hosted services that use self-signed certificates.
For Node.js environments, you can also provide custom certificates for more secure handling:
import * as https from 'https';

const instance = axios.create({
    httpsAgent: new https.Agent({
        ca: fs.readFileSync('/path/to/certificate.pem'),
    })
});
This configuration allows you to specify your own certificate, which is a more secure approach than disabling SSL verification entirely.
A production-safe approach is to use environment variables to manage security configurations:
import * as https from 'https';

const instance = axios.create({
    httpsAgent: new https.Agent({
        rejectUnauthorized: process.env.NODE_ENV === 'production'
    })
});
This code ensures SSL verification is always enabled in production while allowing flexibility in development environments.
When implementing these security configurations, keep in mind some key considerations for production and development environments:
Here are solutions for some common HTTP headers-related issues that you may face while using Axios:
According to RFCs, every HTTP header should be meaningful, readable, and case-insensitive. Developers may try to access headers directly with uppercase and lowercase mixed keys and might write the wrong header names.
Look at the following examples:
console.log(res.headers['Content-Length']);   // undefined
console.log(res.headers['content_length']);   // undefined
To fix this issue, make sure to access headers with valid lowercase keys:
console.log(res.headers['content-length']); // 100
As a general practice, developers typically use title case header names, i.e., Authorization, Content-Type, etc. But make sure to use lowercase names to access them in Axios.
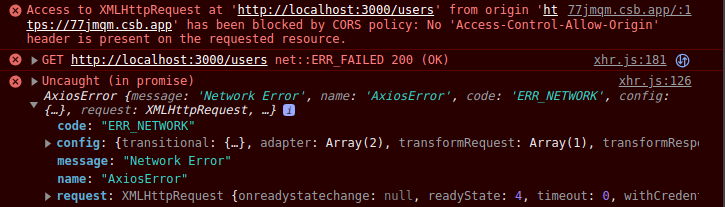
CORS (Cross-Origin Resource Sharing) is an HTTP header-based security mechanism to let web app frontends use resources from different domains securely. The browser won’t let apps access backend resources if the required CORS headers are not present in the backend HTTP responses.
This error is common with Axios, too. I got the following errors when I tried to connect to my local Node.js test server from a CodeSandbox React app:
To fix this, if you own the server or you can configure it, you can add CORS headers to server responses. For example, the following Express.js setup accepts any HTTP method from any domain:
import express from 'express';
import cors from 'cors';
const app = express();
const port = 3000;

app.use(cors());
If you have no control over the server, you can implement a proxy server with cors-anywhere. Learn more in this comprehensive guide to CORS.
Content-Type headerAxios automatically sets the Content-Type header based on the payload format. For example, the following POST request’s content type becomes application/json:
const data = {
    customerId: 100,
    items: []
};

axios.post('/invoices', data)
    .then((res) => console.log(res.data))
    .catch((err) => console.error(err));
If the above data object is null or undefined, Axios can’t determine the payload type as JSON, so we can fix it by sending an empty JavaScript object as follows:
axios.post('/invoices', {})
    .then((res) => console.log(res.data))
    .catch((err) => console.error(err));
Alternatively, you also can set the Content-Type header explicitly. If you are stuck with a unique headers-related error apart from these, you can find answers by opening a new discussion thread on the Axios GitHub repository.
In this article, we examined how to set HTTP request headers with Axios by passing the headers object, updating the default global configuration, creating a specific Axios instance, and using Axios interceptors. We also discussed how to conditionally set headers, and found solutions for common HTTP headers-related issues that many web developers face with Axios. Finally, we covered handling insecure HTTPS connections and other insecure requests in Axios.
For information about additional features of the Axios HTTP client, check out “How to make HTTP requests with Axios.”
There’s no doubt that frontends are getting more complex. As you add new JavaScript libraries and other dependencies to your app, you’ll need more visibility to ensure your users don’t run into unknown issues.
LogRocket is a frontend application monitoring solution that lets you replay JavaScript errors as if they happened in your own browser so you can react to bugs more effectively.

LogRocket works perfectly with any app, regardless of framework, and has plugins to log additional context from Redux, Vuex, and @ngrx/store. Instead of guessing why problems happen, you can aggregate and report on what state your application was in when an issue occurred. LogRocket also monitors your app’s performance, reporting metrics like client CPU load, client memory usage, and more.
Build confidently — start monitoring for free.

Learn how contrast-color() automatically picks accessible text colors using native CSS, without JavaScript.

Learn how to build smooth staggered animations in CSS using modern features like sibling-index(), complete with practical examples, fallbacks, and accessibility tips.

Compare the top AI development tools and models of July 2026. View updated rankings, feature breakdowns, and find the best fit for you.

Learn how to detect unused and ghost dependencies in JavaScript projects using Knip, a project-level linter that keeps your dependency graph accurate.
Hey there, want to help make our blog better?
Join LogRocket’s Content Advisory Board. You’ll help inform the type of content we create and get access to exclusive meetups, social accreditation, and swag.
Sign up now

