Editor’s note: This post was last updated on 18 November 2022 to answer additional queries about using TypeScript with GraphQL and to provide information on more GraphQL features, including aliases and date scalars. For more content on using GraphQL with TypeScript, check out our post “Building GraphQL APIs with TypeGraphQL and TypeORM.”
TypeScript is a typed superset of JavaScript that was designed to solve many of the pain points of writing applications in JavaScript.
GraphQL is a query language for APIs that uses its type system to describe data fields, preventing over and under-fetching. Additionally, GraphQL can greatly help in API versioning.
In this tutorial, we’ll build an API to integrate TypeScript with GraphQL using the TypeGraphQL library, which simplifies the process of creating GraphQL APIs in Node.js.
We will cover:
The Replay is a weekly newsletter for dev and engineering leaders.
Delivered once a week, it's your curated guide to the most important conversations around frontend dev, emerging AI tools, and the state of modern software.
GraphQL operates with two core components:
The Schema objects define what properties can be queried in the API, but the resolvers do not understand the Schema types. This is where TypeScript comes in! By using TypeScript, which compiles to JavaScript, we can define types for our resolvers that match our Schema, preventing mismatches.
Earlier, we discussed how TypeScript solves the problem of making resolvers aware in a way of the Schema definitions. Well, the TypeGraphQL library makes that even easier!
TypeGraphQL automatically creates GraphQL schema definitions from TypeScript classes with decorators, which were introduced along with reflection to avoid the need for schema definition files. This way, we only need to define the resolver types and our GraphQL schema will be generated.
Although we could write custom decorators to suit our specific needs based on a project’s requirements, for this tutorial, the decorators provided for TypeGraphQL will suffice.
To follow along with this tutorial, you’ll need:
To install TypeScript, you can run the following command using either npm or Yarn on your terminal or your command prompt:
npm install -g typescript
The command above installs the latest TypeScript compiler, tsc, on our system path, which will be useful when we compile and run our code. tsc takes a TypeScript file ending with the .ts extension and returns an equivalent JavaScript file with the .js extension. We’ll learn more about this command later on.
You can access the full code for this tutorial on the GitHub repo.
Let’s get started!
First, let’s create a new directory and name it. We can then initialize a new package.json file with the npm init command. Next, we will install our project dependencies.
Now, let’s install our project’s required dependencies. Run the following command in your terminal:
npm install type-graphql reflect-metadata graphql express class-validator apollo-server-express apollo-server-core mongoose @typegoose/typegoose --save
Let’s explain a few of these required dependencies and why we need them.
As previously mentioned, we’ll use the type-graphql framework to build our API with TypeScript and GraphQL:
💡 TypeGraphQL includes advanced features like automatic validation, dependency injection, authorization, and inheritance, and it allows us to define our GraphQL schema types and interfaces using TypeScript classes and decorators.
The reflect-metadata package adds a polyfill for the experimental Metadata API support for TypeScript. Currently, TypeScript includes experimental support for emitting certain types of metadata for declarations that have decorators, meaning we’ll need to enable support for this library in our tsconfig.json file.
apollo-server-express is the express and connect integration of a GraphQL server, which we’ll use to bootstrap a simple GraphQL server with Express.
The class-validator library allows the use of decorator and non decorator-based validation with TypeGraphQL to validate our schema fields.
The mongoose package is the MongoDB object data mapper (ODM), while @typegoose/typegoose allows us to define Mongoose models using TypeScript classes.
Now, let’s install the following TypeScript types as dev dependencies: types/express, and @types/node. Additionally, we should add typescript, nodemon, and ts-node, a TypeScript execution environment for Node.js.
Run the following command:
npm install types/express @types/node typescript ts-node nodemon --save-dev
When we’re done installing our project’s dependencies, our package.json file will look like the code block below:
{
  "name": "typscript-graphql-logrocket-tutorial",
  "version": "1.0.0",
  "description": "A typscript and graphql Tutorial",
  "main": "server.js",
  "scripts": {
    "start": "npm run serve",
    "serve": "node dist/server.js",
    "watch-node": "nodemon dist/server.js",
    "build-ts": "tsc",
    "watch-ts": "tsc -w",
    "test": "echo \"Error: no test specified\" && exit 1"
  },
  "keywords": [
    "TypeScript",
    "GraphQL",
    "NodeJS",
    "JavaScript"
  ],
  "author": "Alexander Nnakwue",
  "license": "MIT",
  "devDependencies": {
    "@types/express": "^4.17.3",
    "@types/graphql": "^14.5.0",
    "@types/node": "^13.9.0",
    "nodemon": "^2.0.2",
    "ts-node": "^8.6.2",
    "typescript": "^3.8.3"
  },
  "dependencies": {
    "@typegoose/typegoose": "^6.4.0",
    "apollo-server-express": "^2.11.0",
    "class-validator": "^0.11.0",
    "express": "^4.17.1",
    "graphql": "^14.6.0",
    "reflect-metadata": "^0.1.13",
    "type-graphql": "^0.17.6"
  }
}
Next, we’ll need to set up our tsconfig.json file, which provides instructions on how our TypeScript project should be configured. You can access the required TypeScript configuration for TypeGraphQL.
In tsconfig.json, we can specify options to compile our .ts files as well as the root files for our project. Whenever we run the tsc command, in our case npm run build runs it, the compiler will check this file first for special instructions, then proceed with compilation.
To create our tsconfig.json file, we can run the tsc --init command, which creates a new config file with many defaults and comments, which we’ve left out for brevity. Now, our tsconfig file looks like the following code block:
  {
    "compilerOptions": {
        "module": "commonjs",
        "esModuleInterop": true,
        "allowSyntheticDefaultImports": true,
        "target": "es2016",  // or newer if your node.js version supports this
        "strictNullChecks": true,
        "strictFunctionTypes": true,
        "noImplicitThis": true,
        "noUnusedLocals": true,
        "noUnusedParameters": true,
        "noImplicitReturns": true,
        "skipLibCheck": true,
        "declaration": false,
        "noFallthroughCasesInSwitch": true,
        "composite": false,
        "noImplicitAny": true,
        "moduleResolution": "node",
        "lib": ["dom", "es2016", "esnext.asynciterable"],
        "sourceMap": true,
        "emitDecoratorMetadata": true,
        "strict": false,
        "experimentalDecorators": true,
        "outDir": "dist",
        "rootDir": "app",
        "baseUrl": ".",
        "paths": {
            "*": [
                "node_modules/*",
                "app/types/*"
            ]
        }
    },
    "include": [
        "app/**/*", "./app/**/*.ts", "./app/**/*.tsx"
    ]
}
N.B., detailed interpretations and meanings of these configuration options can be found in the documentation.
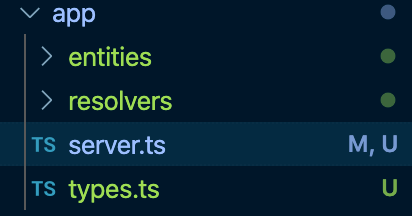
Now that we have installed our dependencies, we will set up our Apollo Server with the apollo-server-express package we installed earlier. Before doing so, we’ll create a new app directory in our project directory. The contents of the directory should look like the image below:
In our server.ts file, we’ll set up our Apollo Server with Express. The contents of the file with all the imports should look like this:
// server.ts

import { ApolloServer } from 'apollo-server-express';
import { ApolloServerPluginLandingPageGraphQLPlayground } from 'apollo-server-core';
import Express from 'express';
import 'reflect-metadata';
import { buildSchema } from 'type-graphql';
import { connect } from 'mongoose';

import { UserResolver } from './resolvers/User';
import { ProductResolver } from './resolvers/Product';
import { CategoriesResolver } from './resolvers/Categories';
import { CartResolver } from './resolvers/Cart';
import { OrderResolver } from './resolvers/Order';

const main = async () => {
  const schema = await buildSchema({
    resolvers: [
      CategoriesResolver,
      ProductResolver,
      UserResolver,
      CartResolver,
      OrderResolver,
    ],
    emitSchemaFile: true,
    validate: false,
  });

  // create mongoose connection
  const mongoose = await connect('mongodb://localhost:27017/test');
  await mongoose.connection;

  const server = new ApolloServer({
    schema,
    plugins: [ ApolloServerPluginLandingPageGraphQLPlayground ],
  });

  const app = Express();

  await server.start();

  server.applyMiddleware({ app });

  app.listen({ port: 3333 }, () =>
    console.log(
      `🚀 Server ready and listening at ==> http://localhost:3333${server.graphqlPath}`
    )
  );
};

main().catch((error) => {
  console.log(error, 'error');
});
💡 It is important that we import
reflect-metadatabefore we importtype-graphql.
The buildSchema package from TypeGraphQL allows us to build our schema from TypeGraphQL’s definition. The usual signature of the buildSchema method is as follows:
const schema = await buildSchema({
  resolvers: [Resolver],
});
In the code above, we’re importing our resolvers from the app/resolver folder and passing them into the array of the resolvers field inside the function definition.
The emitSchemaFile field allows us to spit out our GraphQL schema into a schema.gql file when we run the npm run build-ts command.
schema.gql, when generated, will look like:
# -----------------------------------------------
# !!! THIS FILE WAS GENERATED BY TYPE-GRAPHQL !!!
# !!!   DO NOT MODIFY THIS FILE BY YOURSELF   !!!
# -----------------------------------------------

"""The  Cart model"""
type Cart {
  id: ID!
  products: String!
  product: Product!
}

input CartInput {
  products: ID!
}

"""The Categories model"""
type Categories {
  id: ID!
  name: String!
  description: String!
}

input CategoriesInput {
  name: String!
  description: String!
}

"""
The javascript `Date` as string. Type represents date and time as the ISO Date string.
"""
scalar DateTime

type Mutation {
  createUser(data: UserInput!): User!
  deleteUser(id: String!): Boolean!
  createProduct(data: ProductInput!): Product!
  deleteProduct(id: String!): Boolean!
  createCategory(data: CategoriesInput!): Categories!
  deleteCategory(id: String!): Boolean!
  createCart(data: CartInput!): Cart!
  deleteCart(id: String!): Boolean!
  createOrder(data: OrderInput!): Order!
  deleteOrder(id: String!): Boolean!
}

"""The Order model"""
type Order {
  id: ID!
  user_id: String!
  payde: Boolean!
  date: DateTime!
  products: Product!
}

input OrderInput {
  user_id: String!
  payde: Boolean!
  date: DateTime!
}

"""The Product model"""
type Product {
  id: ID!
  name: String!
  description: String!
  color: String!
  stock: Int!
  price: Int!
  category_id: String!
  category: Categories!
}

input ProductInput {
  name: String!
  description: String!
  color: String!
  stock: Float!
  price: Float!
  category_id: String!
}

type Query {
  returnSingleUser(id: String!): User!
  returnAllUsers: [User!]!
  returnSingleProduct(id: String!): Order!
  returnAllProduct: [Product!]!
  returnSingleCategory(id: String!): Categories!
  returnAllCategories: [Categories!]!
  returnSingleCart(id: String!): Cart!
  returnAllCart: [Cart!]!
  returnAllOrder: [Order!]!
}

"""The User model"""
type User {
  id: ID!
  username: String!
  email: String!
  cart_id: String!
  cart: Cart!
}

input UserInput {
  username: String!
  email: String!
  cart_id: ID!
}
The content inside of our schema.gql file is based on the schema fields for our different database entities, stored in the entities folder.
Let’s look at the contents of these files:
// app/entities/Categories.ts
import { ObjectType, Field, ID } from 'type-graphql';
import { prop as Property, getModelForClass } from '@typegoose/typegoose';

@ObjectType({ description: 'The Categories model' })
export class Categories {
  @Field(() => ID)
  id: string;

  @Field()
  @Property()
  name: String;

  @Field()
  @Property()
  description: String;
}

export const CategoriesModel = getModelForClass(Categories);


// app/entities/Product.ts
import { ObjectType, Field, ID, Int } from 'type-graphql';
import { prop as Property, getModelForClass } from '@typegoose/typegoose';
import { Ref } from '../types';
import { Categories } from './Categories';
import { __Type } from 'graphql';

@ObjectType({ description: 'The Product model' })
export class Product {
  @Field(() => ID)
  id: String;

  @Field()
  @Property()
  name: String;

  @Field()
  @Property()
  description: String;

  @Field()
  @Property()
  color: String;

  @Field((_type) => Int)
  @Property()
  stock: number;

  @Field((_type) => Int)
  @Property()
  price: number;

  @Field((_type) => String)
  @Property({ ref: Categories })
  category_id: Ref<Categories>;
  _doc: any;
}

export const ProductModel = getModelForClass(Product);


// app/entities/Cart.ts
import { ObjectType, Field, ID } from 'type-graphql';
import { prop as Property, getModelForClass } from '@typegoose/typegoose';

import { Ref } from '../types';

import { Product } from './Product';

@ObjectType({ description: 'The  Cart model' })
export class Cart {
  @Field(() => ID)
  id: string;

  @Field((_type) => String)
  @Property({ ref: Product, required: true })
  products: Ref<Product>;
  _doc: any;
}

export const CartModel = getModelForClass(Cart);


// app/entities/User.ts
import { ObjectType, Field, ID } from 'type-graphql';
import { prop as Property, getModelForClass } from '@typegoose/typegoose';

import { Ref } from '../types';

import { Cart } from './Cart';

@ObjectType({ description: 'The User model' })
export class User {
  [x: string]: any;
  @Field(() => ID)
  id: number;

  @Field()
  @Property({ required: true })
  username: String;

  @Field()
  @Property({ required: true })
  email: String;

  @Field((_type) => String)
  @Property({ ref: Cart, required: true })
  cart_id: Ref<Cart>;
}

export const UserModel = getModelForClass(User);


// app/entities/Order.ts
import { ObjectType, Field, ID } from 'type-graphql';
import { prop as Property, getModelForClass } from '@typegoose/typegoose';

import { Ref } from '../types';

import { Product } from './Product';

@ObjectType({ description: 'The Order model' })
export class Order {
  @Field(() => ID)
  id: String;

  @Field()
  @Property({ nullable: true })
  user_id: String;

  @Field()
  @Property({ required: true })
  payde: Boolean;

  @Field()
  @Property({ default: new Date(), required: true, nullable: true })
  date: Date;

  // @Field(_type => Product)
  @Property({ ref: Product, required: true })
  products: Ref<Product>;
  _doc: any;
}

export const OrderModel = getModelForClass(Order);
In the files above, we import ObjectType, Field, ID, and Int from type-graphql.
The Field decorator is used to declare the class properties that should be mapped to the GraphQL fields. It is also used to collect metadata from the TypeScript reflection system.
The ObjectType decorator marks the class as the GraphQLObjectType from graphql-js.
Additionally, we’re importing both the Property decorator and the getModelForClass method from the @typegoose/typegoose package.
The PropertyDecorator is used for setting properties in a class, without which it is just a type and will not be in the final model.
Int and ID are aliases for three basic GraphQL scalars, and the getModelForClass method is used to get a model for a given class.
Lastly, we import Refs from the types.ts file in the app folder and ObjectId from MongoDB:
// app/types.ts
import { ObjectId } from 'mongodb';

export type Ref<T> = T | ObjectId;
The type Ref<T> is the type used for references. It also comes with typeguards for validating these references.
Create a new folder called resolver, which will contain another folder called types. In types, we’ll add the types for our different resolver inputs.
The input types define the data required to create entries for GraphQL mutations.
The input files are shown below:
// app/resolvers/types/category-input.ts
import { InputType, Field } from 'type-graphql';
import { Length } from 'class-validator';
import { Categories } from '../../entities/Categories';

@InputType()
export class CategoriesInput implements Partial<Categories> {
  @Field()
  name: string;

  @Field()
  @Length(1, 255)
  description: String;
}


// app/resolvers/types/product-input.ts
import { InputType, Field } from 'type-graphql';
import { Length } from 'class-validator';
import { Product } from '../../entities/Product';
import { ObjectId } from 'mongodb';

@InputType()
export class ProductInput implements Partial<Product> {
  @Field()
  name: String;

  @Field()
  @Length(1, 255)
  description: String;

  @Field()
  color: String;

  @Field()
  stock: number;

  @Field()
  price: number;

  @Field(() => String)
  category_id: ObjectId;
}


// app/resolvers/types/cart-input.ts
import { InputType, Field, ID } from 'type-graphql';
import { Cart } from '../../entities/Cart';

import { ObjectId } from 'mongodb';

@InputType()
export class CartInput implements Partial<Cart> {
  @Field(() => ID)
  products: ObjectId;
}


// app/resolvers/types/user-input.ts
import { InputType, Field, ID } from 'type-graphql';
import { Length, IsEmail } from 'class-validator';
import { User } from '../../entities/User';
import { ObjectId } from 'mongodb';

@InputType()
export class UserInput implements Partial<User> {
  @Field()
  @Length(1, 255)
  username: String;

  @Field()
  @IsEmail()
  email: String;

  @Field(() => ID)
  cart_id: ObjectId;
}


// app/resolvers/types/order-input.ts
import { InputType, Field } from 'type-graphql';
import { Order } from '../../entities/Order';

@InputType()
export class OrderInput implements Partial<Order> {
  @Field()
  user_id: String;

  @Field()
  payde: Boolean;

  @Field()
  date: Date;
}
In the files above, we import the InputType and Field decorators from type-graphql.
The inputType decorator is used by TypeGraphQL to automatically validate our inputs and arguments based on their definitions.
We are using the class-validator library for field-level validation. Note that TypeGraphQL has built-in support for argument and input validation based on this library.
Next, let’s examine the resolvers for these inputs and entities. The content for the category resolver in the categories.ts file is shown below:
// app/resolvers/Categories.ts
import { Resolver, Mutation, Arg, Query } from 'type-graphql';
import { Categories, CategoriesModel } from '../entities/Categories';
import { CategoriesInput } from './types/category-input';

@Resolver()
export class CategoriesResolver {
  @Query((_returns) => Categories, { nullable: false })
  async returnSingleCategory(@Arg('id') id: string) {
    return await CategoriesModel.findById({ _id: id });
  }

  @Query(() => [Categories])
  async returnAllCategories() {
    return await CategoriesModel.find();
  }

  @Mutation(() => Categories)
  async createCategory(
    @Arg('data') { name, description }: CategoriesInput
  ): Promise<Categories> {
    const category = (
      await CategoriesModel.create({
        name,
        description,
      })
    ).save();
    return category;
  }

  @Mutation(() => Boolean)
  async deleteCategory(@Arg('id') id: string) {
    await CategoriesModel.deleteOne({ id });
    return true;
  }
}
This resolver performs basic CRUD operations using the Resolver, Mutation, Arg, and Query decorators from type-graphql. We’re also importing the input types to be used for the mutation field.
For the ProductResolver file, we have the following:
// app/resolvers/Product.ts
import {
  Resolver,
  Mutation,
  Arg,
  Query,
  FieldResolver,
  Root,
} from 'type-graphql';
import { Product, ProductModel } from '../entities/Product';
import { ProductInput } from './types/product-input';

import { Categories, CategoriesModel } from '../entities/Categories';

@Resolver((_of) => Product)
export class ProductResolver {
  @Query((_returns) => Product, { nullable: false })
  async returnSingleProduct(@Arg('id') id: string) {
    return await ProductModel.findById({ _id: id });
  }

  @Query(() => [Product])
  async returnAllProduct() {
    return await ProductModel.find();
  }

  @Mutation(() => Product)
  async createProduct(
    @Arg('data')
    { name, description, color, stock, price, category_id }: ProductInput
  ): Promise<Product> {
    const product = (
      await ProductModel.create({
        name,
        description,
        color,
        stock,
        price,
        category_id,
      })
    ).save();
    return product;
  }

  @Mutation(() => Boolean)
  async deleteProduct(@Arg('id') id: string) {
    await ProductModel.deleteOne({ id });
    return true;
  }

  @FieldResolver((_type) => Categories)
  async category(@Root() product: Product): Promise<Categories> {
    console.log(product, 'product!');
    return (await CategoriesModel.findById(product._doc.category_id))!;
  }
}
The ProductResolver above contains a field resolver decorator for relational entity data. In our case, the product schema has a category-id field for fetching details about a particular category, which we have to resolve by fetching that data from another node in our data graph.
To start our application, we’ll run npm run build-ts, which compiles our code, then npm start, which starts our server.
N.B., TypeScript catches any compile-time errors when we build our code with the
tsccompiler:

Now, we can navigate to the GraphQL Playground at http://localhost:3333/graphql to test our API.
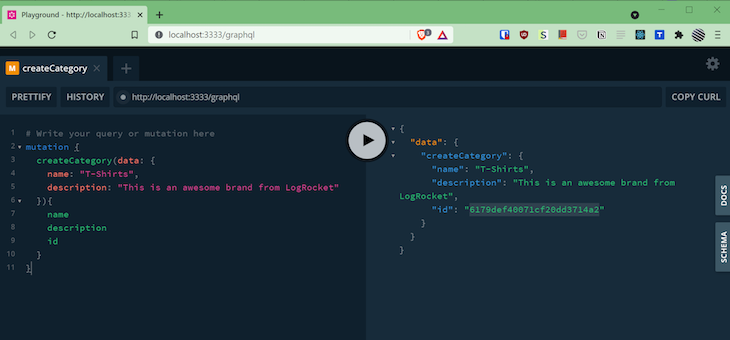
Next, let’s create a new category by running the following mutation:
mutation {
  createCategory(data: {
    name: "T-Shirts",
    description: "This is an awesome brand from LogRocket"
  }){
    name
    description
    id
  }
}
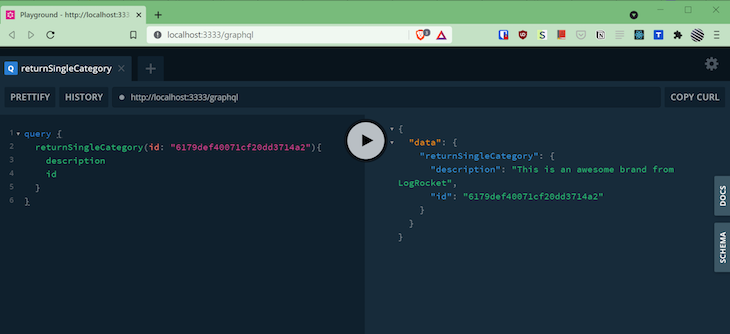
To get a category by its ID, run the following query:
You’ll see more details about the API’s capabilities when you click on the Schema tab in the Playground:
type Cart {
  id: ID!
  products: String!
  product: Product!
}

input CartInput {
  products: ID!
}

type Categories {
  id: ID!
  name: String!
  description: String!
}

input CategoriesInput {
  name: String!
  description: String!
}

scalar DateTime

type Mutation {
  createUser(data: UserInput!): User!
  deleteUser(id: String!): Boolean!
  createProduct(data: ProductInput!): Product!
  deleteProduct(id: String!): Boolean!
  createCategory(data: CategoriesInput!): Categories!
  deleteCategory(id: String!): Boolean!
  createCart(data: CartInput!): Cart!
  deleteCart(id: String!): Boolean!
  createOrder(data: OrderInput!): Order!
  deleteOrder(id: String!): Boolean!
}

type Order {
  id: ID!
  user_id: String!
  payde: Boolean!
  date: DateTime!
  products: Product!
}

input OrderInput {
  user_id: String!
  payde: Boolean!
  date: DateTime!
}

type Product {
  id: ID!
  name: String!
  description: String!
  color: String!
  stock: Int!
  price: Int!
  category_id: String!
  category: Categories!
}

input ProductInput {
  name: String!
  description: String!
  color: String!
  stock: Float!
  price: Float!
  category_id: String!
}

type Query {
  returnSingleUser(id: String!): User!
  returnAllUsers: [User!]!
  returnSingleProduct(id: String!): Order!
  returnAllProduct: [Product!]!
  returnSingleCategory(id: String!): Categories!
  returnAllCategories: [Categories!]!
  returnSingleCart(id: String!): Cart!
  returnAllCart: [Cart!]!
  returnAllOrder: [Order!]!
}

type User {
  id: ID!
  username: String!
  email: String!
  cart_id: String!
  cart: Cart!
}

input UserInput {
  username: String!
  email: String!
  cart_id: ID!
}
To learn more, we can test the queries and the mutations in the Schema tab shown above.
In this article, we have created a simple GraphQL API using TypeScript, but there’s so much more GraphQL has to offer. Let’s take a look.
GraphQL aliases allow us to rename keys of the data returned in our API query result. For example, aliases are useful when we want to reference our data result by a name different from its defined resolver.
In our ProductResolver class app/resolvers/Product.ts, we defined a resolver returnAllProduct which, when queried, returns { "data": { "returnAllProduct": […] } }:
// query
query {
  returnAllProduct {
    id
    name
    color
  }
}

// result
{
    "data": {
        "returnAllProduct": [
            {
                "id": "6375596bf51e426c86f1c3fa",
                "name": "Gucci Shoes",
                "color": "red"
            }
        ]
    }
}
To rename our result key from returnAllProduct to products, we simply alias our query using:
// query
query {
  products: returnAllProduct {
    id
    name
    color
  }
}

// result
{
    "data": {
        "products": [
            {
                "id": "6375596bf51e426c86f1c3fa",
                "name": "Gucci Shoes",
                "color": "red"
            }
        ]
    }
}
GraphQL, by default, only has a few scalar types used to define properties in schemas. These are ID, Int, Float, String and Boolean.
TypeGraphQL automatically maps the corresponding JavaScript types to these scalars. For example, type boolean defaults to scalar Boolean, type number defaults to scalar Float.
💡 JavaScript type
numbercan be mapped to scalar Int by using the@Field(type => Int)decorator.
TypeGraphQL, however, provides two built-in scalars for date: "timestamp" or "isoDate". By default, it uses "isoDate" but it can be changed in buildSchema options using the option "dateScalarMode".
const schema = await buildSchema({
  resolvers: [//Resolvers],
  dateScalarMode: "timestamp",
});
The main purpose of TypeGraphQL is to create GraphQL types based on TypeScript classes. TypeScript makes writing class-based OOP code intuitive. It provides us with classes, interfaces, and more out of the box, which then afford us the opportunity to properly structure our code in a reusable manner, making it easy to maintain and scale.
TypeGraphQL has led to the creation of tools and libraries that make it easier and faster to write applications that meet these expectations. TypeScript greatly improves our productivity and experience as engineers.
By combining both TypeScript features and the benefits of GraphQL with the TypeGraphQL library, we can build resilient and strongly typed APIs that fulfill our needs in terms of maintenance, technical debt down the line, and so on.
As a final note, it would be great to explore other advanced guides and features in the documentation to learn more about other aspects not covered in this tutorial. Thanks for reading, and don’t forget to grab the entire source code used in this tutorial on GitHub.

LogRocket lets you replay user sessions, eliminating guesswork by showing exactly what users experienced. It captures console logs, errors, network requests, and pixel-perfect DOM recordings — compatible with all frameworks, and with plugins to log additional context from Redux, Vuex, and @ngrx/store.
With Galileo AI, you can instantly identify and explain user struggles with automated monitoring of your entire product experience.
Modernize how you understand your web and mobile apps — start monitoring for free.
While GraphQL has some features for debugging requests and responses, making sure GraphQL reliably serves resources to your production app is where things get tougher. If you’re interested in ensuring network requests to the backend or third party services are successful, try LogRocket.

LogRocket lets you replay user sessions, eliminating guesswork around why bugs happen by showing exactly what users experienced. It captures console logs, errors, network requests, and pixel-perfect DOM recordings — compatible with all frameworks.
LogRocket's Galileo AI watches sessions for you, instantly aggregating and reporting on problematic GraphQL requests to quickly understand the root cause. In addition, you can track Apollo client state and inspect GraphQL queries' key-value pairs.

When should you move API logic out of Next.js? Learn when Route Handlers stop scaling and how ElysiaJS helps.

Explore how Dokploy streamlines app deployment with Docker, automated builds, and simpler infrastructure compared to traditional CI/CD workflows.

A side-by-side look at Astro and Next.js for content-heavy sites, breaking down performance, JavaScript payload, and when each framework actually makes sense.

AI-generated tests can speed up React testing, but they also create hidden risks. Here’s what broke in a real app.re
Would you be interested in joining LogRocket's developer community?
Join LogRocket’s Content Advisory Board. You’ll help inform the type of content we create and get access to exclusive meetups, social accreditation, and swag.
Sign up now

