
Editor’s note: This article was reviewed for accuracy by Elijah Asaolu on 20 April 2024 and updated to include information about working with cookies in Next.js v14, as well as in the App Router vs. the Pages Router. Sections were also added regarding defining cookie behaviors and properties, setting multiple cookies, and working with cookies and Next.js route handlers, Server Components, middleware, Server Actions, and client-side vs. server-side cookies. The article was previously updated on 3 July 2023 to include information about common issues and fixes associated with the sameSite cookie attribute. For additional information about browser cookies, see this guide.

Cookies are data blobs that our browsers unknowingly contain. While some invade user privacy, others attempt to improve the browsing experience by keeping track of your browsing habits, preferences, and more. Cookies are useful in many situations, including authentication, improving UX, and quicker response times.
In this article, we’ll explore how to manage cookies in Next.js server and client components as well as in middleware. We’ll also go over two packages that will allow us to set cookies in the Next.js Pages Router and implement them into an actual use case.
To follow along, head over to this GitHub repository. Let’s get started!
The Replay is a weekly newsletter for dev and engineering leaders.
Delivered once a week, it's your curated guide to the most important conversations around frontend dev, emerging AI tools, and the state of modern software.
Cookies are small pieces of data that web applications place on users’ computers to store stateful information, such as user preferences or session management, as well as for tracking purposes.
In recent years, the idea of cookies has generated various heated discussions, considering that they have both benefits and drawbacks.
For one, cookies can help you easily store user personalization data, allowing you to better curate the UX to each user. On the other hand, cookies’ ability to track users’ online behavior raises privacy concerns.
As a result, there are now standards and regulations that require web applications to disclose their cookie usage and give users the choice to opt out.
Given the versatility of Next.js, there are multiple approaches to cookie management. Before now, we only needed to manage cookies in pages, API routes, and middleware. However, the addition of Server Components in Next 13 introduces even more new techniques.
One question a lot of people ask is if there are any differences between client and server-side cookies.
Cookies can be created from both client and server operations. Server-side cookies refer to cookies typically created and accessed via HTTP headers. Regardless of how you create them, cookies are still stored on the user’s browser and can be accessed directly on the client side.
However, there’s an exception for httpOnly cookies. If you create a cookie with the httpOnly attribute enabled, such cookies cannot be directly accessed via client-side operations, reducing the risk of XSS attacks.
Let’s start things off by exploring how to access and modify cookies in server components using the Next.js App Router. To proceed, create a new Next app by running the following command:
npx create-next-app@latest next-cookie
During the installation process, choose your preferred configuration. However, don’t forget to select "Yes" for the "use App router?" option. With the basic setup complete, let’s get into it!
To read incoming request cookie values in server components, we use the cookies().get(cookieName) method, as shown below:
// app/page.js

import { cookies } from "next/headers";

const Home = () => {
  const cookieStore = cookies();
  const userId = cookieStore.get("user_id");

  return <>{userId && <p>User ID: {userId}</p>}</>;
};

export default Home;
In this example, if no cookie is stored with the user_id tag, we’ll get a blank screen. However, if multiple cookies match this tag, userId is set as the first match and will be displayed on the browser.
To get all cookies matching a certain name, we can use the cookies().getAll() method, as shown below:
// app/page.js

import { cookies } from "next/headers";

const Home = () => {
  const cookieStore = cookies();
  const userId = cookieStore.getAll("user_id");

  return (
    <>
      {userId.length > 0 &&
        userId.map((cookie) => (
          <div key={cookie.name}>
            <p>Name: {cookie.name}</p>
            <p>Value: {cookie.value}</p>
          </div>
        ))}
    </>
  );
};

export default Home;
In this updated example, if there’s more than one cookie with the user_id tag, we iterated over them and displayed the name and value for each.
We can set new cookies via the cookies().set() method. However, because HTTP does not allow setting cookies after streaming starts, we can only modify cookie values (set and delete) in Server Actions or API routes. Here’s an example below:
// app/page.js

import { cookies } from "next/headers";

const Home = () => {
  async function createThemeCookie(formData) {
    "use server";

    const selectedTheme = formData.get("theme");
    cookies().set("theme", selectedTheme);
  }

  return (
    <>
      <form action={createThemeCookie}>
        <select name="theme">
          <option value="dark">Dark Theme</option>
          <option value="light">Light Theme</option>
        </select>
        <button type="submit">Create Theme Cookie</button>
      </form>
    </>
  );
};

export default Home;
In this example, we marked the function for setting our cookie with the "use server" statement, specifying it as a server action. We then rendered a form that allows the user to select a preferred theme. After the user submits the form, we get their selected theme value and set it to the theme cookie.
Furthermore, we can use the syntax below to pass in additional options when setting a new cookie:
cookies().set({
  name: "theme",
  value: "light || dark",
  httpOnly: true,
  path: "/",
  maxAge: 60 * 60 * 24 * 365 * 1000,
  expires: new Date(Date.now() + 60 * 60 * 24 * 365 * 1000),
});
This way, we can create an httpOnly cookie and set the cookie’s path, maxAge, and expiration date.
If you’re using a version of Next.js that’s older than v14, you’ll probably get the following error when using Server Actions:
Error:
  × To use Server Actions, please enable the feature flag in your Next.js config.
To fix this, simply update your next.config.js file to enable the experimental serverActions, as shown below:
const nextConfig = {
  experimental: {
    serverActions: true,
  },
  // . . .
};

module.exports = nextConfig;
However, if you’re using Next.js v14 or newer, you should not encounter such an error.
We can delete cookies with the cookies().delete(name) method. However, just like with setting cookies, we can only use this method in Server Actions or API routes, as shown below:
// app/page.js

import { cookies } from "next/headers";

const Home = () => {
  async function deleteThemeCookie(formData) {
    "use server";

    cookies().delete("theme");
  }

  return (
    <>
      <form action={deleteThemeCookie}>
        <button type="submit">Delete Theme Cookie</button>
      </form>
    </>
  );
};

export default Home;
With this example above, when the user clicks the button to submit the form, the theme cookie will be deleted from the browser.
We can freely use all the cookie methods we just covered in Next.js Route Handlers — the API routes equivalent for the /app directory — without having to create Server Actions. You can see an example of this shown below:
// app/api/route.js

import { cookies } from "next/headers";
export async function GET(request) {
  const cookieStore = cookies();

  // Get Cookie
  const myCookie = cookieStore.get("cookieName");

  // Get All Cookies
  const myCookies = cookieStore.getAll("cookieName");

  // Set Cookie
  cookies().set("cookieName", "value");

  // Delete Cookie
  cookies().delete("cookieName");

  return new Response("Hello, World!", {
    status: 200,
  });
}
Alternatively, you can use the traditional Web APIs to read cookies from the request in both Route Handlers and API routes, as shown below:
// app/api/route.js OR pages/api/index.js

export async function GET(request) {
  let theme = request.cookies.get("theme");
  return new Response(JSON.stringify(theme));
}
In this example, we’re getting the theme cookie directly from the request object and returning it as the API response.
Now, let’s look at how to manage cookies in the classic Next.js Pages Router. To get started, create a new Next.js application and make sure to select the page router during the configuration process.
The first package we will explore is react-cookie. This package aims to help you load and save cookies within your React application. To try things out, we’ll create a simple application that keeps track of registered users.
Install react-cookie with the following code:
npm install react-cookie
To start using the Hooks, add the CookiesProvider component in the _app.tsx file, like so:
import type { AppProps } from 'next/app';
import { CookiesProvider } from 'react-cookie';

function MyApp({ Component, pageProps }: AppProps) {
  return (
    <CookiesProvider>
      <Component {...pageProps} />
    </CookiesProvider>
  );
}

export default MyApp;
The Hooks are now available from any part of your application. Start using it by importing the useCookies Hook, as shown below:
import { useCookies } from 'react-cookie';
We can now fetch, add, and remove cookies from the application. Let’s start off by adding a useEffect Hook to fetch all cookies on load:
import { useCookies } from 'react-cookie';

const Home: NextPage = () => {
  const [cookies, setCookie, removeCookie] = useCookies(['user']);

  useEffect(() => {
    console.log('Cookies: ', cookies);
  }, [cookies]);

  return (
  <div>...</div>
)}
For now, you shouldn’t be able to see any cookies. So, let’s create a function to set cookies using the setCookie() function:
import { useRouter } from 'next/router';

//...inside the default function
const router = useRouter();

const setCookieHandler = () => {
  setCookie('new-user', true, {
    path: '/',
  });

  router.replace("/");
};
The setCookie() function takes in three arguments: the key, the key-value, and some configuration choices. These choices include MaxAge, Path, Domain, expires, and others. The path option was used in this case to allow the program to access the cookie from any location.
As you can see, we also used the useRouter() Hook to reload our page using the replace() method to avoid adding a URL entry into the history stack. It will just look like the page re-rendered!
As we move forward, remember that this tutorial is focused only on demonstrating the capabilities of the specific packages. Therefore, we will assume that you understand concepts like authentication flow.
To learn more about authentication in Next.js, refer to this guide on SuperTokens. You can also review authentication flows in this article.
buttonNext up, let’s bind this function to a button. Input the following code:
{!cookies['user'] && (
  <button onClick={setCookieHandler} className={styles.button}>
    Complete new user registration!
  </button>
)}
In this case, the button will only render if the cookie exists. Run the development server to see this in action. You can see this cookie visually using the dev tools by triggering Control+Shift+J and then selecting the Application section, as shown below:
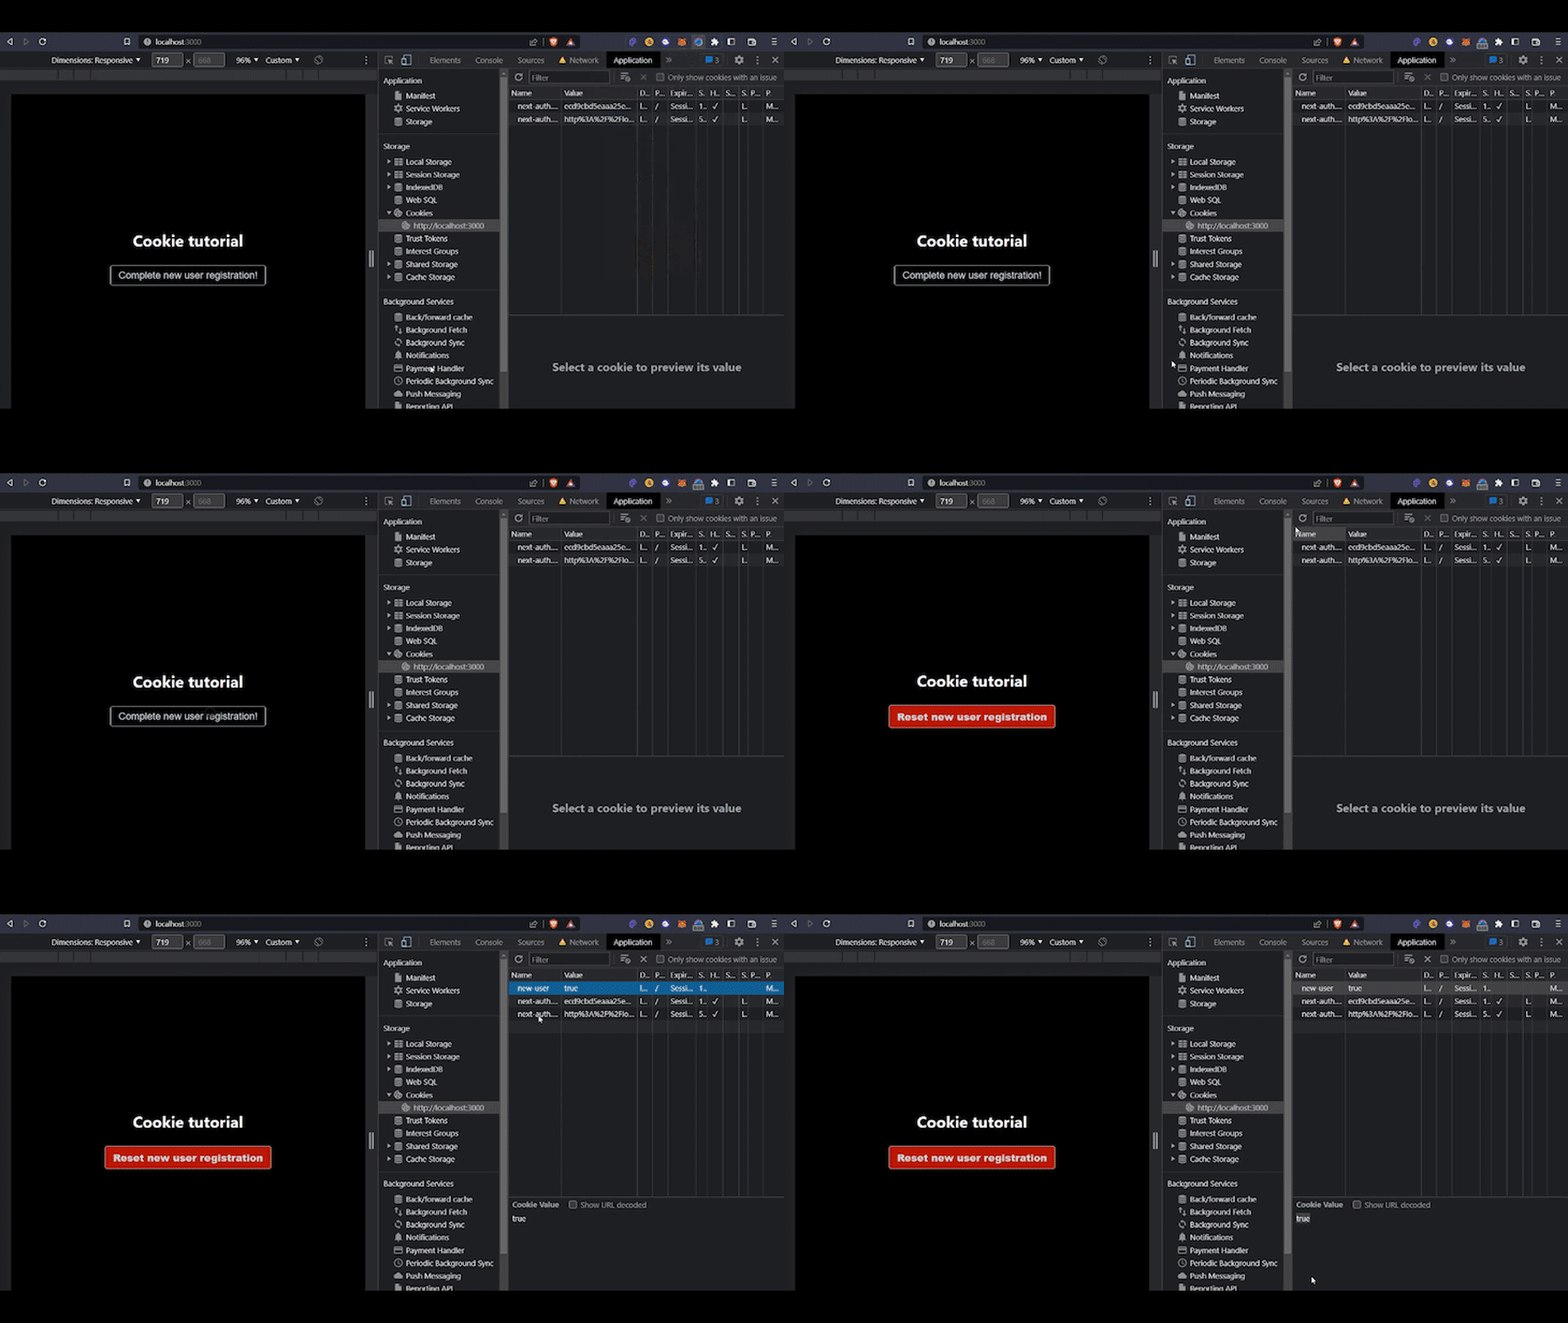
Now, let’s remove the cookie to allow the user to sign out. First, write another function:
const removeCookieHandler = () => {
  removeCookie('new-user');

  router.replace("/");
};
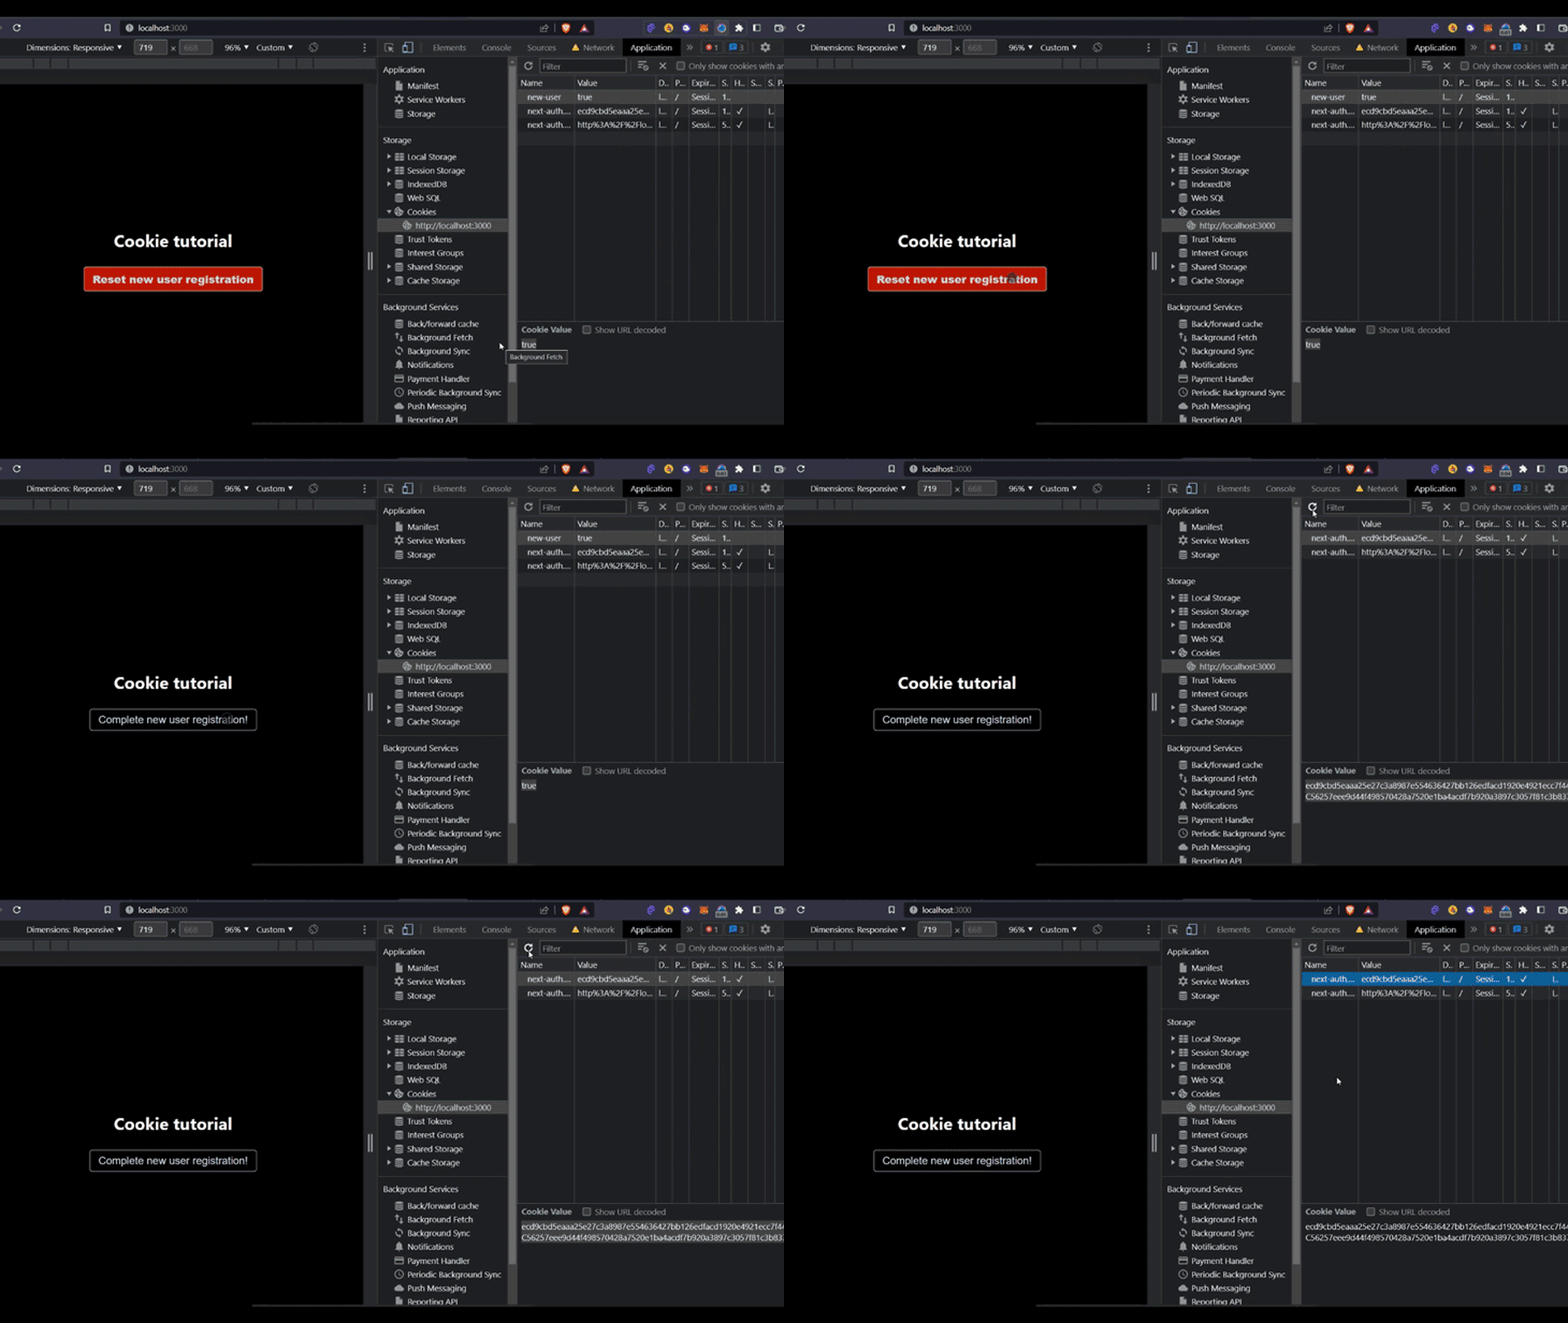
Next, bind it to another button that will only render if the cookie is available. What does that mean? The cookie will be available if the user is registered. Here’s what that will look like in the code:
{cookies['new-user'] && (
  <button onClick={removeCookieHandler} className={styles.resetbutton}>
    Reset new user registration
  </button>
)}
And here’s how it will look in the application:
With that done, let’s explore the second package, cookies-next.
Moving forward, we will look at how to use the cookies-next package. This package fits more smoothly within the Next.js ecosystem because it can be used anywhere — with both the Pages Router and the App Router, on the client side, on the server side through getServerSideProps, and even with Next.js API routes.
Here are the two packages head-to-head:
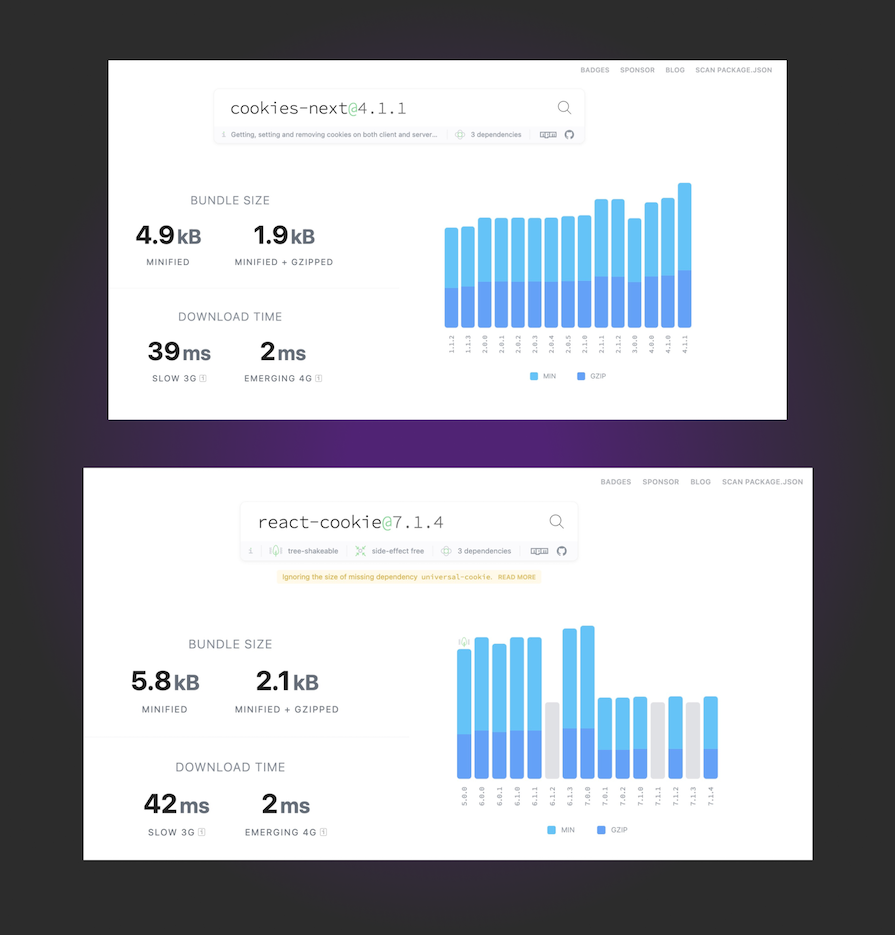
Another surprising fact about cookies-next — this one’s for all the bundle-phobic developers — is that it has a smaller bundle size compared to react-cookie. Essentially, this makes it more desirable to use in your next project! 🎉
As tradition goes, let’s start off by installing cookies-next with the following command:
npm install cookies-next
The cookies-next package comes inbuilt with similar functions to the react-cookie package. These functions can be used for setting and removing cookies. Let’s create handler functions for setting and removing cookies with the following code:
// adding cookies
const addCookie = () => {
  setCookie('user', true, {
    path: '/',
  });
  router.replace('/');
};

// removing cookies
const removeCookie = () => {
  deleteCookie('user', {
    path: '/',
  });
  router.replace('/');
};
With that done, you can test it by binding it to different buttons that render if the cookie exists. In addition to getServerSideProps and API routes, you can also use the cookies-next package on the server side of the application.
Let’s look at an example where the user receives some information, has it verified, and then sets a cookie to indicate the information’s legitimacy, all on an API route.
Go ahead and make a new API route inside ./pages/api/verify-otp.ts. Inside the file, create a basic handler function with the following code:
export default function handler (
  req: NextApiRequest,
  res: NextApiResponse
) {
  return;
}
The cookie will be set to indicate the trustworthiness of the user and expire after a specific period. More specifically, it will expire if there is some type of verification, such as a database to check the credentials or some OTP logic. The handler function is as follows:
if (
    req.method === 'POST' // only allow POST requests
  ) {
  // caputure the credentials required for verification from the request body
  const { name } = req.body;

  //   otp verification logic

  //   set cookie
  setCookie('authorize', true, {
    req,
    res,
    maxAge: 60 * 60 * 24 * 7, // 1 week
    path: '/',
  });

  //   respond with status and message
  return res.status(200).json({
    message: `${name} is authorized to access`,
    authorize: true,
    code: '20-0101-2092',
  });
}
Here, the cookie expires after a week and will require the user to re-verify again. On successful verification, the API responds with a status 200 message with relevant data that can be displayed in the frontend.
Now, let’s try to access this route from the frontend. The function can be triggered only if the user is registered the first time. Create a function with the following code:
const verifyOTP = async (name: string) => {
  const response = await fetch('/api/verify-otp', {
    method: 'POST',
    body: JSON.stringify({ name }),
  });

  const data = await response.json();

  if (data.authorize) {
    setAuthorization(true);
    setLaunchCode(data.code);
  } else {
    setAuthorization(false);
    alert('Invalid OTP');
  }
};
We can use the useState Hook to store the data coming from the API route and render the button conditionally and based on the isAuthorized variable. Use the following code:
const [isAuthorized, setAuthorization] = useState(false);
const [launchCode, setLaunchCode] = useState('');
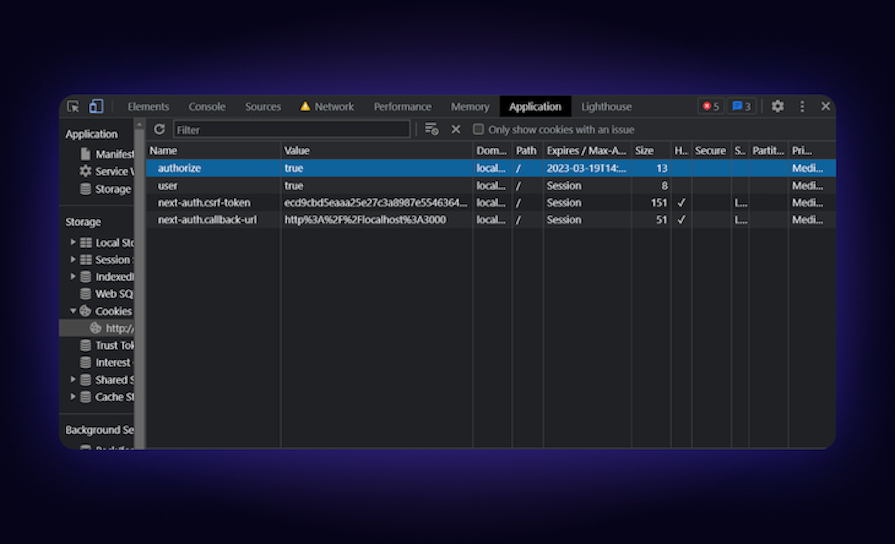
With this done, try out the code written so far. You can check if the cookie exists by opening up the dev tools and heading selecting the Application section, as shown below:
I attempted to make the example more entertaining by generating a random code at every login. It will also set a cookie on the API route. You can experiment with your own original ideas and try out something cooler! Here’s what my example looks like:
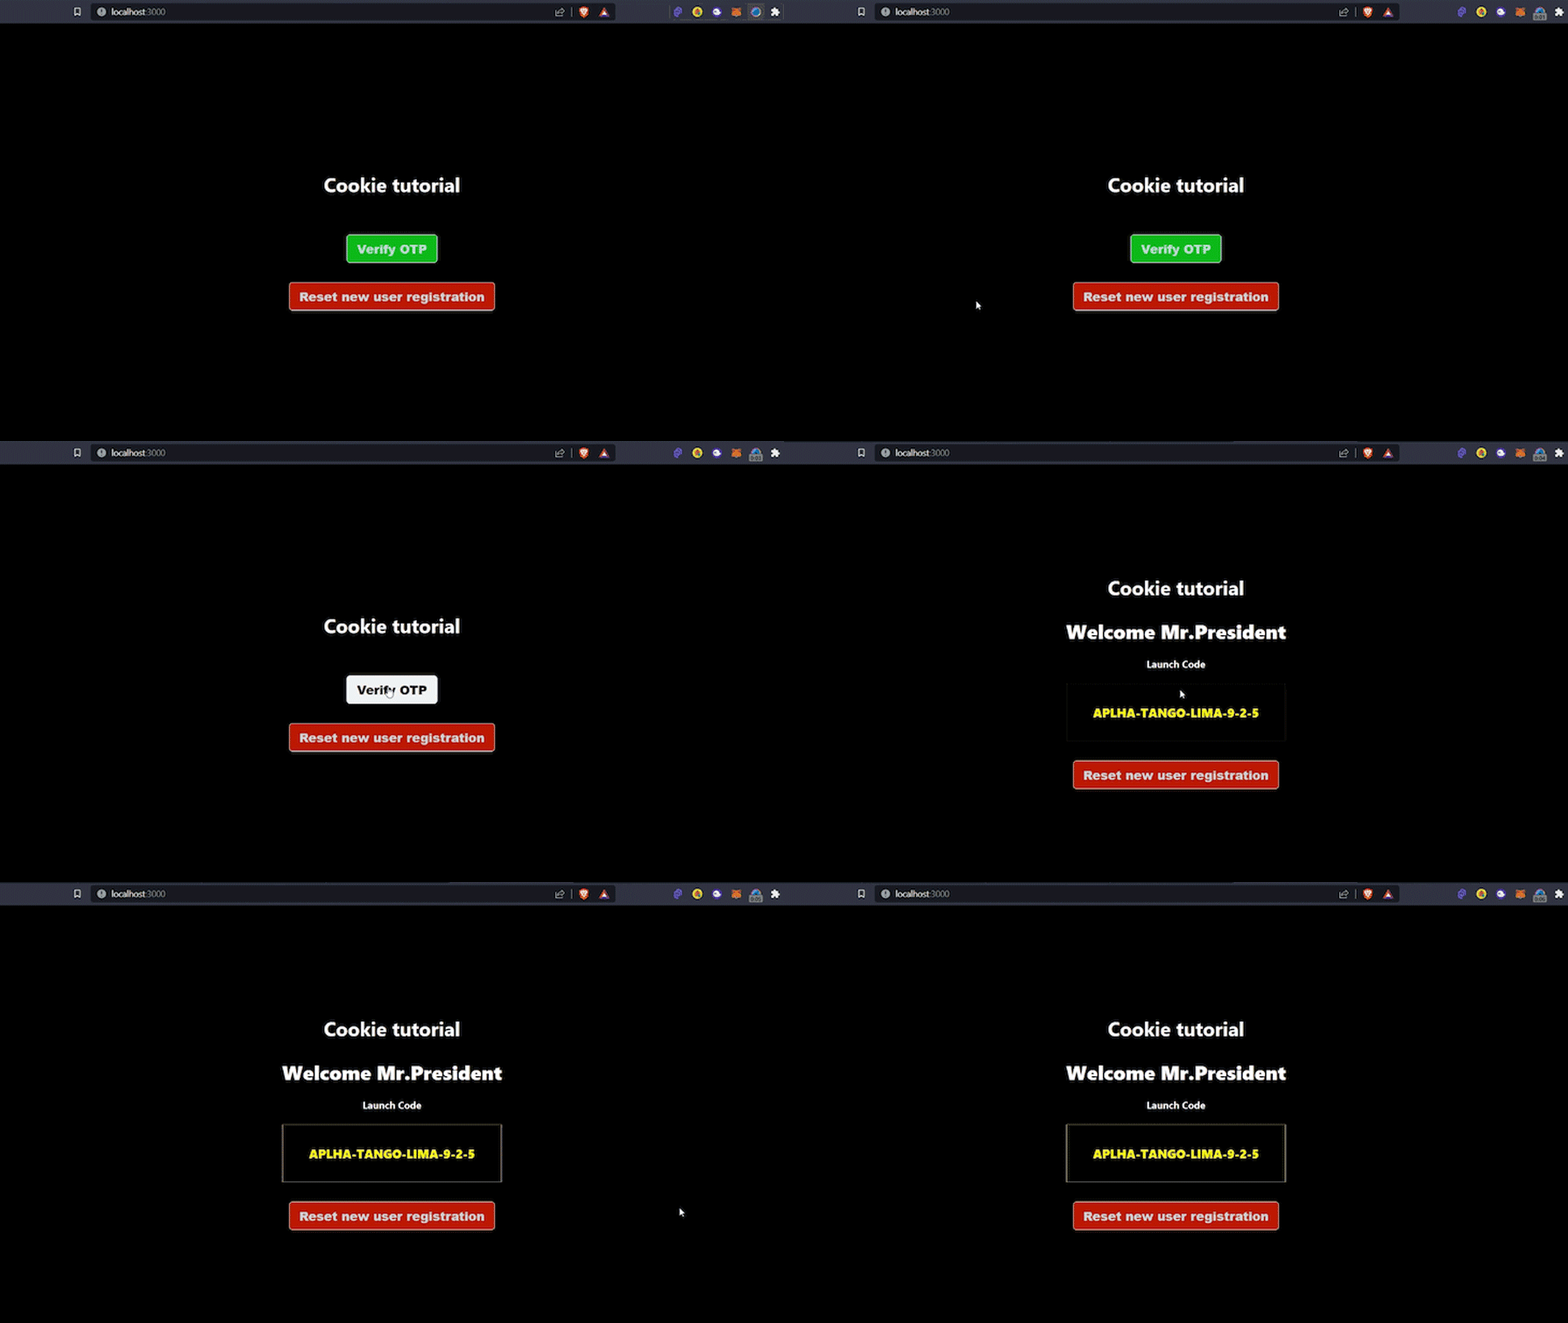
The Next.js middleware design is consistent in both the Pages Router and App Router. As a result, cookie handling in middleware is the same for both. For example, we can get and delete cookies via the middleware request, as shown below:
// middleware.js

export function middleware(request) {
  // Get Cookie
  let cookie = request.cookies.get("cookieName");
  console.log(cookie);
  // Get All Cookies
  const allCookies = request.cookies.getAll();
  console.log(allCookies);
  // Delete Cookie
  request.cookies.delete("cookieName");
}
To set new cookies in a middleware, we can also leverage the NextResponse API, as shown below.
// middleware.js

import { NextResponse } from "next/server";

export function middleware(request) {
  const response = NextResponse.next();
  // Set cookies
  response.cookies.set("foo", "bar");
  // OR
  response.cookies.set({
    name: "foo",
    value: "bar",
    path: "/",
    // . . .
  });
  return response;
}
This way, the cookie is set globally in the user’s browser and can be accessed in Next.js pages, as we’ve demonstrated in previous sections.
The sameSite feature is an important attribute of cookies, but it can also create issues in production-level applications:
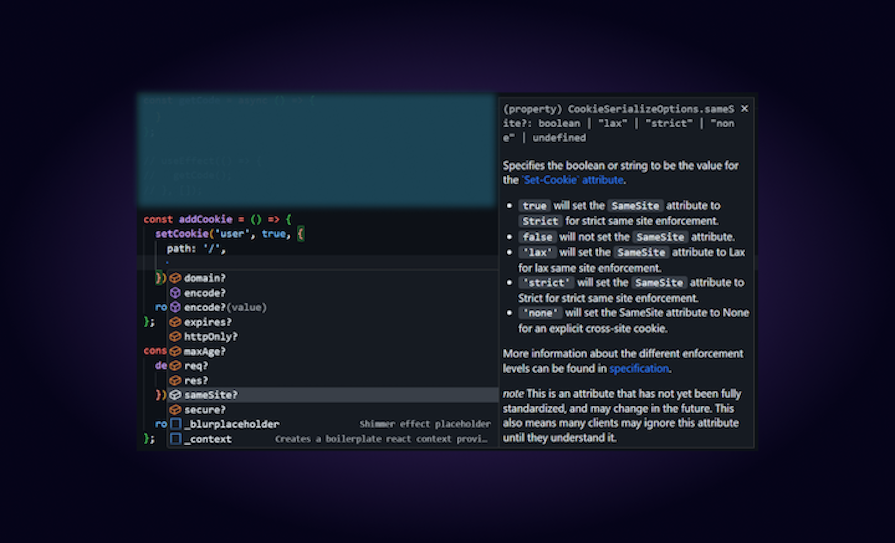
The sameSite feature merely indicates whether a cookie can be retrieved through a different website with a different origin. Ideally, this should be accurate as it offers just one layer of defense against cross-site attacks.
In order to determine whether the scheme and the last portion of the domain name match, the sameSite browser mechanism analyzes the destination URI and the request coming from the client:
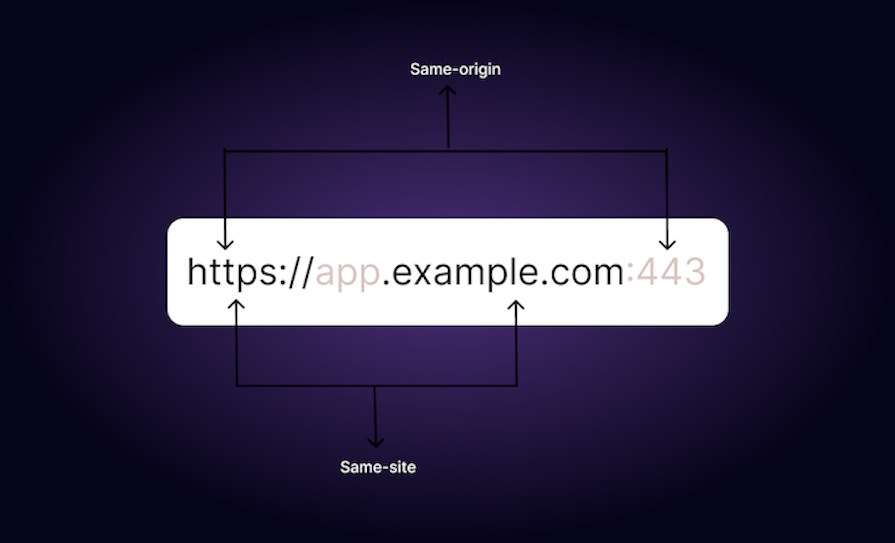
Since the sameSite parameter is set to true by default, the cookies won’t be registered if you’re a developer who frequently uses another smartphone and connects via the private IP address that the development server is hosted on your localhost.
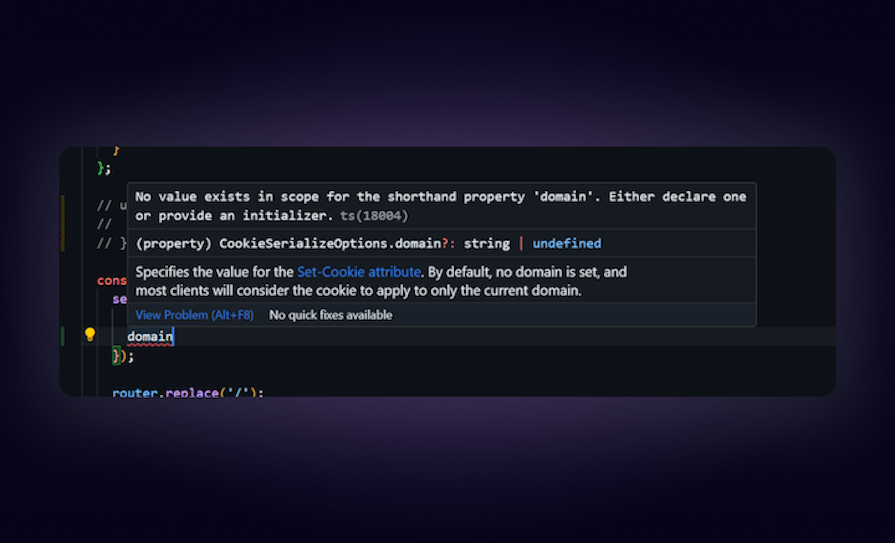
The domain attribute is a crucial, yet occasionally confusing, element of cookies. This attribute determines which domains can access the cookie. If no domains are specified, the cookie’s default domain assignment will be the one that originally produced it.
This is why it’s advisable to set the domain attribute in cases where many sub-domains are attempting to access the same cookies:
Cookies are crucial to web development. The react-cookie and cookies-next packages are ideal for a variety of use cases because of their distinctive features and advantages.
react-cookie is far more popular, providing simple-to-use APIs and great compatibility with React framework. In contrast, cookies-next, a relatively new package explicitly created for Next.js, offers server-side rendering capabilities and improved security measures.
Debugging Next applications can be difficult, especially when users experience issues that are difficult to reproduce. If you’re interested in monitoring and tracking state, automatically surfacing JavaScript errors, and tracking slow network requests and component load time, try LogRocket.
LogRocket captures console logs, errors, network requests, and pixel-perfect DOM recordings from user sessions and lets you replay them as users saw it, eliminating guesswork around why bugs happen — compatible with all frameworks.
LogRocket's Galileo AI watches sessions for you, instantly identifying and explaining user struggles with automated monitoring of your entire product experience.
The LogRocket Redux middleware package adds an extra layer of visibility into your user sessions. LogRocket logs all actions and state from your Redux stores.


Modernize how you debug your Next.js apps — start monitoring for free.

React Server Components and the Next.js App Router enable streaming and smaller client bundles, but only when used correctly. This article explores six common mistakes that block streaming, bloat hydration, and create stale UI in production.

Gil Fink (SparXis CEO) joins PodRocket to break down today’s most common web rendering patterns: SSR, CSR, static rednering, and islands/resumability.

@container scroll-state: Replace JS scroll listeners nowCSS @container scroll-state lets you build sticky headers, snapping carousels, and scroll indicators without JavaScript. Here’s how to replace scroll listeners with clean, declarative state queries.

Explore 10 Web APIs that replace common JavaScript libraries and reduce npm dependencies, bundle size, and performance overhead.
Would you be interested in joining LogRocket's developer community?
Join LogRocket’s Content Advisory Board. You’ll help inform the type of content we create and get access to exclusive meetups, social accreditation, and swag.
Sign up now
2 Replies to "A guide to cookies in Next.js"
Great article. At the Home page however, you used a hook outside the main component.
sound