Editor’s note: This article was last updated on 2 January 2024 to add information on catch-all routes and optional catch-all in Next.js, as well as to compare route handling in Next with other frameworks like React Router.

Next.js is a popular React framework that simplifies server-side rendering and the building of static web applications. One of the core features of Next.js is its flexible routing system, which allows developers to create custom routes and define how they handle incoming requests.
With the release of v13.2, Next.js introduced several new features and changes to routes that make it even more powerful and easy to use. Whether you’re a seasoned Next.js developer or just getting started, understanding Route Handlers is essential to building fast, scalable, and maintainable web applications.
In this article, we’ll take a closer look at Route Handlers in Next.js, the perks they offer, their similarity to Remix’s routing system, and how you can implement them in a Next.js application.
The Replay is a weekly newsletter for dev and engineering leaders.
Delivered once a week, it's your curated guide to the most important conversations around frontend dev, emerging AI tools, and the state of modern software.
Route Handlers are functions that are executed when users access site routes. They’re responsible for handling incoming HTTP requests for the defined URLs or routes to produce the required data.
In essence, when a user visits a particular page or URL in a Next.js application, the corresponding Route Handler handles the request created by the user and returns the appropriate response, thereby rendering desired content.
Route Handlers in Next.js can come in a couple of forms:
With Route Handlers, we can create dynamic routes, which consist of a URL that contains variable parameters that we can use to generate dynamic content. Here, the variables can be appended to the URL based on the user’s site actions and can help to carry information to different routes in the application.
Overall, Route Handlers are an essential part of Next.js, allowing us to define custom routing logic and handle incoming requests flexibly and efficiently.
Routing is essential for web applications because it handles what content is made available on different web URLs/routes. In earlier versions of Next.js, when you created a new application, you would get a pages/api directory within the application file structure. API routes were defined in this pages/api directory. This was because there was no system in place to handle routes within the app directory in earlier versions of Next.
The Next.js v13.2 release added a Route Handler feature to Next applications and also added support for dynamic route imports. This addition means that pages can be loaded on demand, ultimately improving performance and reducing initial load times.
Creating a new Next.js application with the latest version now places the api directory within the app folder. These Route Handlers provide inbuilt functions for handling various kinds of requests and responses, allowing developers to specify custom behavior for specific routes. This allows for greater flexibility and control over how routes are handled, including redirecting to other pages and providing data responses.
With this new feature, we can create API request handlers inside the app directory by exporting functions that match HTTP request methods such as GET, POST, PUT, etc. This is typically done with the following steps:
route.ts (or route.js if you’re not using TypeScript) is created within the app directoryGET, HEAD, POST, PUT, DELETE, etc.N.B., Route Handlers in Next.js v13.2 are meant to replace API Routes; as such, they are no longer available in the
pagesdirectory. Instead, we can now use the file created in the steps above.
In this section, we’ll demonstrate how to use Next’s route handling features. To get started, we’ll first need to create a new Next.js application. Do this with the following commands in your CLI:
npx create-next-app@latest router-handling
For this tutorial, we’ll be using the following configurations during the setup process:

When the installation process is complete, we will have a Next.js project folder called "router-handler" using Next.js v13.2. In this folder, we have the following in the app directory:
┣ 📂app
 ┃ ┣ 📂api
 ┃ ┃ ┗ 📂hello
 ┃ ┃ ┃ ┗ 📜route.js
 ┃ ┣ 📜favicon.ico
 ┃ ┣ 📜globals.css
 ┃ ┣ 📜layout.js
 ┃ ┣ 📜page.js
 ┃ ┗ 📜page.module.css
Here, we have the api directory in the app folder, and an example API route hello is generated by default.
To create a new API route, create a folder in the app/api directory with the name of our route. Within it, create a route.js function that exports our HTTP request; in this case, we’ll create a route called "test". To do this, create a new test folder in the app/api directory, create a route.js file, and add the following code to it:
// In this file, we can define any type of request as follows:
// export async function GET(Request) {}
// export async function HEAD(Request) {}
// export async function POST(Request) {}
// export async function PUT(Request) {}
// export async function DELETE(Request) {}
//  A simple GET Example

export async function GET(Request) {
  return new Response("This is a new API route");
}
Here, we have a GET request that returns a simple text response. To access this API route, start the application server with the npm run dev command in the CLI. Then, open up the localhost server in the browser and append the API URL: /api/test.
For example, if the localhost runs on port 3000, we will have localhost:3000/api/test. This will produce a result similar to the image below:

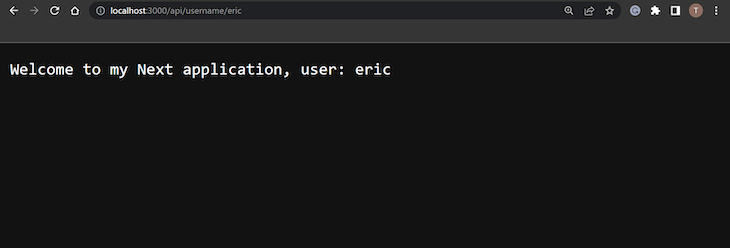
Next.js v13.2 also supports dynamic API routes. To create a dynamic API route, in the app/api folder, create a username folder for the route and define a dynamic route. For the purpose of this example, we will create a dynamic route [user] in the app/api/username directory. Then, inside the [user] route, create a route.js file with the following:
export async function GET(request, { params }) {
  // we will use params to access the data passed to the dynamic route
  const user = params.user;
  return new Response(`Welcome to my Next application, user: ${user}`);
}
To access the API, open up http://localhost:3000/api/username/[your username] in place of the username. Keep in mind that you can enter any string — for example, http://localhost:3000/api/username/eric. This will produce the following result:
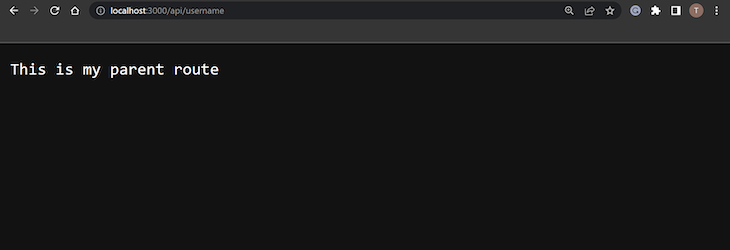
Creating nested APIs in Next.js is quite simple. To create a nested route, first define the parent API route in app/api. Any subfolders added to the created parent route are treated as nested routes rather than separate routes.
In the example above, we created a username route and nested a dynamic route [user] within it. In app/api/username, we can define the parent route in a route.js, as shown below:
export async function GET(request) {
  // username parent route
  return new Response("This is my parent route");
}
We can access the parent route via the URL localhost:3000/api/username like so:
Accessing the defined nested route http://localhost:3000/api/username/[your username] will produce the earlier result.
Route protection ensures that only authenticated users with the appropriate permissions can access specific parts of your application. This is crucial for maintaining the security of sensitive information or functionality. Without route protection, unauthorized users could potentially access confidential data or perform actions reserved for authenticated users.
To create secured routes in Next.js, middleware functions are required to authenticate and authorize the requests made to the route before allowing access to it. Defining a secured route usually follows a pretty standard pattern.
First, create a middleware function that examines the incoming request headers, cookies, query parameters, etc., and determines whether the user is authorized to access the requested resources. If the user is not authorized, the app will return a 401 or 403 status.
We can define the route we’d like to secure using the middleware function. Below, we illustrate an example of secured routes made with NextAuth.js. To install the package, enter the following in the CLI:
npm install next-auth
With that installed, we can create a secured API route in the api directory. First, we will define the authentication option with its provider. Create a folder auth, and in this folder, add a new file […nextauth].js. This file will contain the options for whatever authentication measure you choose.
For example, using Google authentication providers, the option will be defined as follows:
import NextAuth from 'next-auth';
import GoogleProvider from "next-auth/providers/google";
const authOptions = {
    providers: [
      GoogleProvider({
        clientId: process.env.CLIENT_ID,
        clientSecret: process.env.CLIENT_SECRET,
        authorization: {
          params: {
            prompt: "consent",
            access_type: "offline",
            response_type: "code"
          }
        }
      })
    ],
  // Add your session configuration here
  session: {
    jwt: true,
  }
};
export default NextAuth(authOptions);
For the secured route, create a new folder session in the api directory and add the route to be secured as a route.js file. In session/route.js, add the following:
import { getServerSession } from "next-auth/next";
import authOptions from "../auth/[...nextauth]";
export async function GET(Request) {
  const session = await getServerSession(authOptions);
  if (session) {
    // Signed in
    console.log("Session", JSON.stringify(session, null, 2));
    return new Response("Welcome authenticated user", {
      status: 200,
    });
  } else {
    // Not Signed in
    return new Response("Unauthorized access detected", {
      status: 401,
    });
  }
}
Now, attempting to access the /api/sesssion route will display the following result:
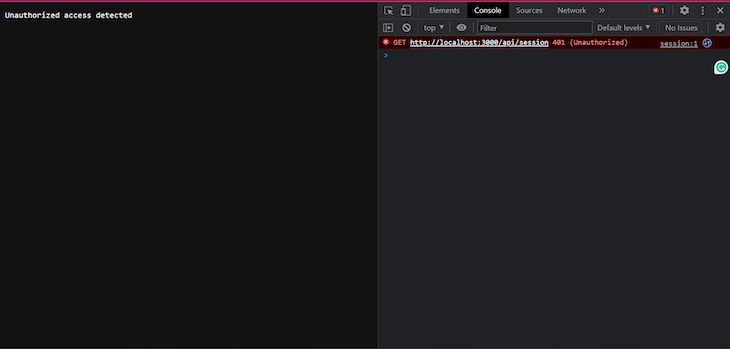
Here, the app returns the response Unauthorized access detected with status code 401.
Below are some common authentication patterns used to secure routes in Next.js:
jsonwebtoken to decode and verify tokensChoose the authentication pattern that best suits your application’s requirements and security needs.
Next.js provides great options for handling different types of routes. Such options include catch-all routes and optional catch-all routes.
Catch-all routes provide a flexible way to match any number of path segments. You will need to provide the slug parameter, which is an array that captures all the segments in the URL beyond the specified portion. It allows for the dynamic handling of various paths, making it suitable for use cases where the number of segments in the URL is unknown.
On the other hand, the optional catch-all route introduces the concept of optional parameters, allowing for more control. The slug parameter is still used as an array to capture path segments, but it is now optional. This is useful where no parameters are provided, making routing more flexible.
Catch-all routes allow you to match any number of path segments, while optional catch-all routes provide flexibility in defining optional parameters. Here’s an example of how you can implement these features:
// pages/[...slug].js for catch-all route
export default function CatchAllRoute({ slug }) {
  // Use the slug parameter as needed
  return <div>Catch-All Route: {slug.join('/')}</div>;
}

// pages/[...slug]/optional.js for optional catch-all route
export default function OptionalCatchAllRoute({ slug }) {
  // Use the slug parameter as needed
  return <div>Optional Catch-All Route: {slug ? slug.join('/') : 'No optional parameters'}</div>;
}
Looking at the code above, both components receive the slug parameter as a prop, reflecting the captured path segments. The components can then use this parameter as needed. The optional catch-all route further enhances user experience by handling cases where no parameters are present, providing an informative message. In a real-world situation, you may want to redirect to another page.
In addition to routing functions, Next 13.2 also provided features to use server-side dynamic functions such as cookies, headers, and redirects. Dynamic functions are executed on the server side when defined routes are accessed.
This is best suited for handling tasks such as data upload or requesting and accessing a database. By defining router handler functions as dynamic, developers can ensure better performance because the function is only executed when the specified route is accessed, thereby preventing unnecessary server-side processing.
On the other hand, static Route Handlers allow the developer to generate static content for specified routes, which is created at build time. This is particularly useful for frequently accessed routes containing content that won’t change often and, as such, can be pre-rendered ahead of time.
With static functions, developers can reduce the load on server-side processing for dynamic functions required to generate content for a defined route. Proper use of dynamic and server-side functions together makes for a more performant application. With dynamic and static functions explained, let’s take a look at examples under both categories: the static Route Handler and dynamic Route Handler.
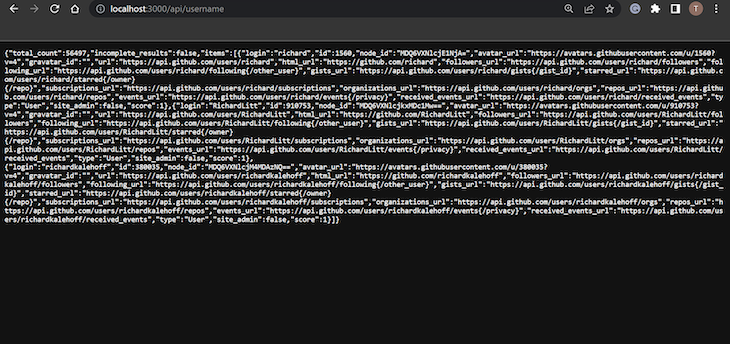
For this example, we will use the GitHub search user API. Make the following changes to route.js in the app/api/username directory:
import { NextResponse } from 'next/server';
export async function GET() {
  const res = await fetch(
    "https://api.github.com/search/users?q=richard&per_page=3"
  );
  const data = await res.json();
  return NextResponse.json(data);
}
In the code block above, we are performing a GET request to the GitHub search API and returning a response containing three users with the name "richard".
Navigating to the username route will produce results similar to the image below:
For dynamic server-side functions, we can use cookies, redirects, and headers. To use redirects, we need to add an import for the redirect dependency and specify the redirect URL. For example, we can create a redirect URL in the username route, as shown below:
import { redirect } from "next/navigation";
const name = "John Doe";
export async function GET(Request) {
  redirect(`http://localhost:3000/api/username/${name}`);
}
Here, we are redirecting users to the dynamic [user] route and passing along a name variable. Redirects can also be used with external URLs to other web pages.
With server-side functions, we can also specify route headers. This is particularly useful in cases where you need to specify different headers for different routes, especially if the routes require a different authorization bearer or authentication token, as shown below:
// Import for the headers dependency
import { headers } from 'next/headers';
export async function GET(Request) {
  const useHeader = headers(Request);
  const header = useHeader.get('content-type');
  return new Response('We are using the content-type header!', {
    status: 200,
    headers: { 'content-type': header }
  });
}
In the code block above, we are using the headers function from next/headers to get the headers from the incoming request object passed to the Route Handler. Then, we use the GET method from the Route Handler to extract the value of the content-type parameter.
Finally, we create a new response with a status of 200 and set the headers to the value of the Request header. One major improvement to the route headers in Next 13.2 was that they could be executed dynamically based on the responses of incoming requests or the data being fetched.
Next.js offers a flexible routing system that stands out compared to other frameworks like React Router. The advantages of Next.js route handling include:
The Remix routing system is built on top of React Router, so it bears some similarities to Next.js route handling patterns. Below is a list of similarities between how these two frameworks handle routing in applications:
Congratulations on making it to the end of this guide on Next.js Route Handlers. In this post, we discussed how the Route Handlers in v13.2 compare to route handling in older versions, how this new paradigm compares to the Remix routing system, and demonstrated how you can get started creating API routes in Next.js. Happy coding!
Debugging Next applications can be difficult, especially when users experience issues that are difficult to reproduce. If you’re interested in monitoring and tracking state, automatically surfacing JavaScript errors, and tracking slow network requests and component load time, try LogRocket.
LogRocket captures console logs, errors, network requests, and pixel-perfect DOM recordings from user sessions and lets you replay them as users saw it, eliminating guesswork around why bugs happen — compatible with all frameworks.
LogRocket's Galileo AI watches sessions for you, instantly identifying and explaining user struggles with automated monitoring of your entire product experience.
The LogRocket Redux middleware package adds an extra layer of visibility into your user sessions. LogRocket logs all actions and state from your Redux stores.


Modernize how you debug your Next.js apps — start monitoring for free.

AI-generated tests can speed up React testing, but they also create hidden risks. Here’s what broke in a real app.re

Why the future of DX might come from the web platform itself, not more tools or frameworks.

A hands-on test of Claude Code Review across real PRs, breaking down what it flagged, what slipped through, and how the pipeline actually performs in practice.

CSS art once made frontend feel playful and accessible. Here’s why it faded as the web became more practical and prestige-driven.
Hey there, want to help make our blog better?
Join LogRocket’s Content Advisory Board. You’ll help inform the type of content we create and get access to exclusive meetups, social accreditation, and swag.
Sign up now
