One of the biggest factor that defines whether an app is performant is how it fetches and stores data locally. Persistent data in local storage has been around since the early days of mobile app development.

The SQLite database we’ll use in this Flutter tutorial is a persistent data store that preserves the data even after the application is closed. That means everything we store in the database will stick around even if the user restarts the application or the device itself.
In this guide, we’ll show you how to create a simple Flutter app that accepts few details of a user using a form and stores it in the database. So fire up your favorite text editor and let’s get cracking!
First, open up your terminal and create a new Flutter project:
flutter create sqlite_demo
cd sqlite_demo
Next, add the required dependencies. For this article, you’ll need the sqflite package for using the SQLite database.
dependencies:
  flutter:
    sdk: flutter
  sqflite: any
Open a simulator device or connect a real device to your system and start the app using the following command:
flutter run
For this app, you’ll need a stateful widget for managing the state of the form locally.
import 'package:flutter/material.dart';

void main() {
  runApp(SqliteDemoApp());
}

class SqliteDemoApp extends StatelessWidget {
  @override
  Widget build(BuildContext context) {
    return MaterialApp(
      title: 'SQLite demo',
      theme: ThemeData(
        primarySwatch: Colors.purple,
      ),
      home: MainApp(title: 'SQLite demo'),
    );
  }
}

class MainApp extends StatefulWidget {
  MainApp({Key? key, this.title}) : super(key: key);
  final String? title;

  @override
  _MainAppState createState() => _MainAppState();
}
DatabaseHelper classFor accessing and working with the database, create a singleton DatabaseHelper class. A singleton class will ensure that we only have one instance of the database connection and global access to the database that can be called from anywhere in the project.
In Dart, the factory keyword is used to create a constructor that would only return one instance.
import 'dart:async';

import 'package:path/path.dart';

class DatabaseHelper {
  static final DatabaseHelper _databaseHelper = DatabaseHelper._();

  DatabaseHelper._();

  late Database db;

  factory DatabaseHelper() {
    return _databaseHelper;
  }
}

In this project, we’ll create a users table in the database that will contain an ID, name, email, and age column. The SQL query for creating the table is as follows:
CREATE TABLE users (
  id INTEGER PRIMARY KEY AUTOINCREMENT,
  name TEXT NOT NULL,
  age INTEGER NOT NULL,
  email TEXT NOT NULL
)
In the DatabaseHelper class, add an initDB() async function that will connect to the SQLite database. The getDatabasesPath() method will give the default location of the database file to which you need to append the name of the database — users_demo.db, in this case.
The openDatabase() function is used to open the database,. It accepts the path of the database file, a version number, and an optional onCreate callback that is executed when a database is created for the first time.
In the onCreate callback, you need to create the users table so that it can be used to store user information and do CRUD operations.
class DatabaseHelper {
  // ...
  Future<void> initDB() async {
    String path = await getDatabasesPath();
    db = await openDatabase(
      join(path, 'users_demo.db'),
      onCreate: (database, version) async {
        await database.execute(
          """
            CREATE TABLE users (
              id INTEGER PRIMARY KEY AUTOINCREMENT,
              name TEXT NOT NULL,
              age INTEGER NOT NULL,
              email TEXT NOT NULL
            )
          """,
        );
      },
      version: 1,
    );
  }
// ...
}
Next, let’s create a model class to represent a user’s data in the database. A simple data model class will provide the required methods for working with an SQLite-friendly format by converting it into a Dart object that can be used later within the application.
class User {
  int? id;
  String name;
  int age;
  String email;

  User({this.id, required this.name, required this.age, required this.email});

  User.fromMap(Map<String, dynamic> res)
      : id = res["id"],
        name = res["name"],
        age = res["age"],
        email = res["email"];

  Map<String, Object?> toMap() {
    return {'id': id, 'name': name, 'age': age, 'email': email};
  }
}
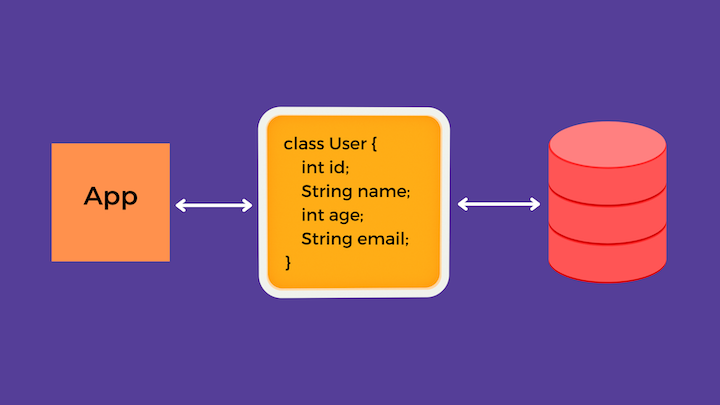
The user model class is created to define properties that can be expected by the users table in the database. The user model class consists of name, age, and email properties and has a constructor for creating a new user instance.
For conversion between instances of User class and Map objects used by the SQLite DB, the methods toMap() and fromMap() have been defined.
Now let’s get back to the DatabaseHelper class and write the DB methods to do the CRUD operations.
An instance of the database class is assigned to the db property of the DatabaseHelper class in the initDB() method. The database instance has access to methods such as insert(), update(), query(), and delete() for performing the CRUD operations on the database.
class DatabaseHelper {
  // ...
  Future<int> insertUser(User user) async {
    int result = await db.insert('users', user.toMap());
    return result;
  }

  Future<int> updateUser(User user) async {
    int result = await db.update(
      'users',
      user.toMap(),
      where: "id = ?",
      whereArgs: [user.id],
    );
    return result;
  }

  Future<List<User>> retrieveUsers() async {
    final List<Map<String, Object?>> queryResult = await db.query('users');
    return queryResult.map((e) => User.fromMap(e)).toList();
  }

  Future<void> deleteUser(int id) async {
    await db.delete(
      'users',
      where: "id = ?",
      whereArgs: [id],
    );
  }
// ...
}
It’s time to start building the user interface of the app.
In this section, we’ll create a form as shown below, which will include a name, age, and an email field. When the Submit button is clicked, the data from these fields will be stored in the respective columns of the users table.
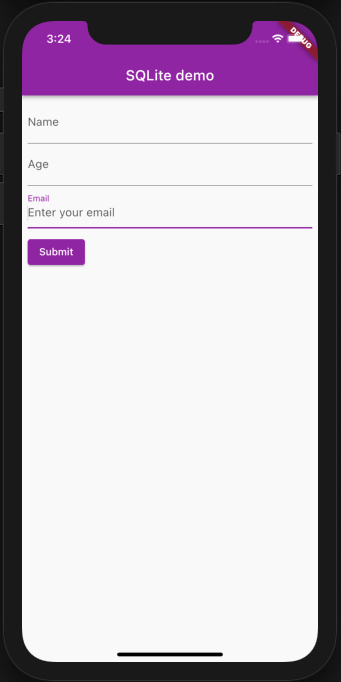
In the main state class of the widget, initialize the properties for accessing the DatabaseHelper class, User class, name, age, and email. Override the initState() lifecycle method and initialize the database so that it’s available when the widget is created.
The rest of the widget build() method consists of basic Flutter widgets, such as Form, TextFormField, and ElevatedButton, for creating the UI of the form.
import 'package:flutter/services.dart';
import 'package:sqlite_demo/model/user.dart';
import 'package:sqlite_demo/utils/database_helper.dart';

// ...
class _MainAppState extends State<MainApp> {
  late DatabaseHelper dbHelper;
  final nameController = TextEditingController();
  final ageController = TextEditingController();
  final emailController = TextEditingController();
  bool isEditing = false;
  late User _user;

  @override
  void initState() {
    super.initState();
    this.dbHelper = DatabaseHelper();
    this.dbHelper.initDB().whenComplete(() async {
      setState(() {});
    });
  }

  @override
  Widget build(BuildContext context) {
    return Scaffold(
        resizeToAvoidBottomInset: false,
        appBar: AppBar(
          title: Text(widget.title!),
        ),
        body: Column(
          children: <Widget>[
            Expanded(
                child: new Column(
              children: [
                Padding(
                    padding: EdgeInsets.all(8.0),
                    child: Form(
                        child: Column(
                            crossAxisAlignment: CrossAxisAlignment.start,
                            children: [
                          TextFormField(
                            controller: nameController,
                            decoration: const InputDecoration(
                                hintText: 'Enter your name', labelText: 'Name'),
                          ),
                          TextFormField(
                            controller: ageController,
                            keyboardType: TextInputType.number,
                            inputFormatters: [
                              FilteringTextInputFormatter.allow(
                                  RegExp(r'[0-9]')),
                            ],
                            decoration: const InputDecoration(
                                hintText: 'Enter your age', labelText: 'Age'),
                          ),
                          TextFormField(
                            controller: emailController,
                            decoration: const InputDecoration(
                                hintText: 'Enter your email',
                                labelText: 'Email'),
                          ),
                          Row(
                              mainAxisAlignment: MainAxisAlignment.start,
                              children: [
                                new Container(
                                    margin:
                                        new EdgeInsets.symmetric(vertical: 10),
                                    child: new ElevatedButton(
                                      child: const Text('Submit'),
                                      onPressed: addOrEditUser,
                                    )),
                              ])
                        ]))),
                Expanded(
                  flex: 1,
                  child: SafeArea(child: userWidget()),
                )
              ],
            )),
          ],
        ));
  }

  // ...
}
Let’s add the CRUD logic in the _MainAppState class.
In the addOrEditUser() method, get the values from the email, age, and name fields. Depending on whether the data is currently being edited or not, add or update the user record in the table using the dbHelper instance.
class _MainAppState extends State<MainApp> {
  // ...
  Future<void> addOrEditUser() async {
    String email = emailController.text;
    String name = nameController.text;
    String age = ageController.text;

    if (!isEditing) {
      User user = new User(name: name, age: int.parse(age), email: email);
      await addUser(user);
    } else {
      _user.email = email;
      _user.age = int.parse(age);
      _user.name = name;
      await updateUser(_user);
    }
    resetData();
    setState(() {});
  }

  Future<int> addUser(User user) async {
    return await this.dbHelper.insertUser(user);
  }

  Future<int> updateUser(User user) async {
    return await this.dbHelper.updateUser(user);
  }

  void resetData() {
    nameController.clear();
    ageController.clear();
    emailController.clear();
    isEditing = false;
  }

  // ...
}
Using the FutureBuilder widget, display the list of users by querying the users table.
Querying from the database is an async action and thus needs to be handled by a future. The FutureBuilder widget helps determine the current state of the future and allows you to show a different view while the async action is in progress.
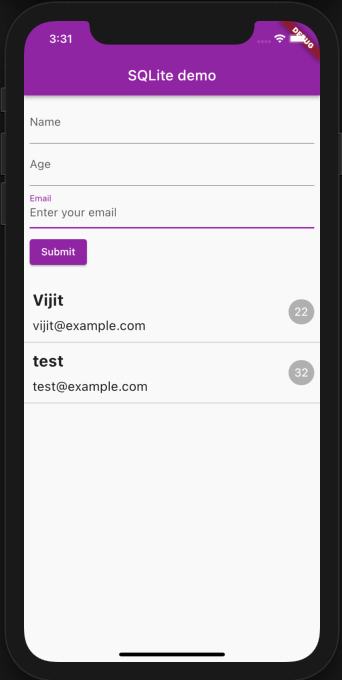
Pass the retrieveUsers() method as a future to the FutureBuilder widget and display a CircularProgress widget until the data loads.
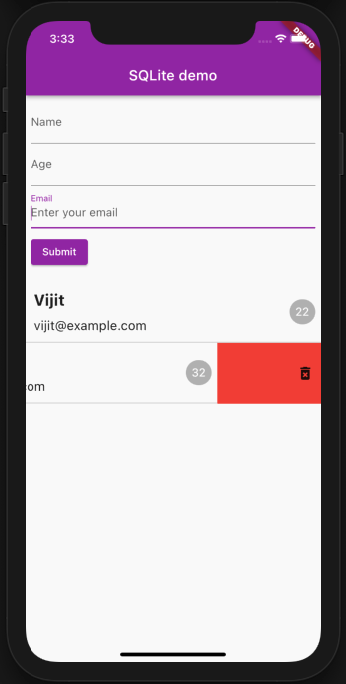
Using the ListView widget, iterate over the users data and display it on the screen. Wrap individual user data with the Dismissible widget so that when the users swipe on the data, a delete action is performed.
To delete a user record, call the deleteUser() method in the onDismissed option of the Dismissible widget.
Widget userWidget() {
    return FutureBuilder(
      future: this.dbHelper.retrieveUsers(),
      builder: (BuildContext context, AsyncSnapshot<List<User>> snapshot) {
        if (snapshot.hasData) {
          return ListView.builder(
              itemCount: snapshot.data?.length,
              itemBuilder: (context, position) {
                return Dismissible(
                    direction: DismissDirection.endToStart,
                    background: Container(
                      color: Colors.red,
                      alignment: Alignment.centerRight,
                      padding: EdgeInsets.symmetric(horizontal: 10.0),
                      child: Icon(Icons.delete_forever),
                    ),
                    key: UniqueKey(),
                    onDismissed: (DismissDirection direction) async {
                      await this
                          .dbHelper
                          .deleteUser(snapshot.data![position].id!);
                    },
                    child: new GestureDetector(
                      behavior: HitTestBehavior.opaque,
                      onTap: () => populateFields(snapshot.data![position]),
                      child: Column(
                        children: <Widget>[
                          Row(
                            mainAxisAlignment: MainAxisAlignment.spaceBetween,
                            children: <Widget>[
                              Column(
                                crossAxisAlignment: CrossAxisAlignment.start,
                                children: <Widget>[
                                  Padding(
                                    padding: const EdgeInsets.fromLTRB(
                                        12.0, 12.0, 12.0, 6.0),
                                    child: Text(
                                      snapshot.data![position].name,
                                      style: TextStyle(
                                          fontSize: 22.0,
                                          fontWeight: FontWeight.bold),
                                    ),
                                  ),
                                  Padding(
                                    padding: const EdgeInsets.fromLTRB(
                                        12.0, 6.0, 12.0, 12.0),
                                    child: Text(
                                      snapshot.data![position].email.toString(),
                                      style: TextStyle(fontSize: 18.0),
                                    ),
                                  ),
                                ],
                              ),
                              Padding(
                                padding: const EdgeInsets.all(8.0),
                                child: Column(
                                  mainAxisAlignment:
                                      MainAxisAlignment.spaceEvenly,
                                  children: <Widget>[
                                    Container(
                                      decoration: BoxDecoration(
                                          color: Colors.black26,
                                          borderRadius:
                                              BorderRadius.circular(100)),
                                      child: Padding(
                                        padding: const EdgeInsets.all(8.0),
                                        child: Text(
                                          snapshot.data![position].age
                                              .toString(),
                                          style: TextStyle(
                                            fontSize: 16,
                                            color: Colors.white,
                                          ),
                                        ),
                                      ),
                                    )
                                  ],
                                ),
                              ),
                            ],
                          ),
                          Divider(
                            height: 2.0,
                            color: Colors.grey,
                          )
                        ],
                      ),
                    ));
              });
        } else {
          return Center(child: CircularProgressIndicator());
        }
      },
    );
  }
Whenever an individual user data is tapped, we will populate the form with the data and set the isEditing flag to true.
void populateFields(User user) {
    _user = user;
    nameController.text = _user.name;
    ageController.text = _user.age.toString();
    emailController.text = _user.email;
    isEditing = true;
}
In this guide, we walked through how to access and run database queries in SQLite by using the sqflite Flutter package.
Data persistence at the client app level is crucial. Without it, end users have to depend on internet availability to store and access data. You can later sync up the data from the local database to your server when the user has a strong network connection.
Cheers and keep hustling.

Discover how React Fiber works under the hood. Learn how React builds the DOM, handles concurrent rendering, and works alongside React 19 features and the new React Compiler.

Learn how to use Skybridge, an open-source React framework, to build and deploy cross-platform AI apps and interactive UI widgets for ChatGPT, Claude, and MCP clients from a single codebase.

Learn how to set up Meilisearch, index documents, and build keyword, semantic, and hybrid search with AI-powered retrieval.

Compare pnpm and npm across security defaults, disk usage, dependency strictness, and workspace policy to decide which package manager fits your project.
Hey there, want to help make our blog better?
Join LogRocket’s Content Advisory Board. You’ll help inform the type of content we create and get access to exclusive meetups, social accreditation, and swag.
Sign up now

