State management is one of the key features a UI framework must implement — and implement well. It’s for this reason that many developers have wound up building dedicated state management libraries; the built-in solution wasn’t enough for them, or they wanted to tweak it to their taste.

UI frameworks have since stepped up their game to level the playing field. Their built-in state management solutions can now match the performance of existing outside solutions. React, for example, introduced Hooks and Context to compete with React-Redux.
The same has happened in Flutter: it offers a number of built-in methods to manage app state. In this article, we will look at some basic yet powerful ways we can manage state in our Flutter applications.
setState in FlutterIf you come from React, you will find that this method for managing state in Flutter is similar to using the useState Hook.
setState only manages the state in the widget in which it was declared — just like in React, wherein the useState hook manages local state only in the component in which it was created. This type of state management is called ephemeral state. Here, this state is controlled using StatefulWidget and the setState() method.
Let’s check out some examples of how setState works by creating a simple counter application. The app will have a counter number we can increment and decrement by clicking buttons.
First, scaffold a Flutter project by running the following command:
flutter create myapp
This creates a Flutter project folder with the name myapp. Now let’s run the project on a server:
flutter run myapp
In our project folder, we should see a main.dart file. This is the main Flutter app file. Clear the file contents and add the code below:
import 'package:flutter/material.dart';
void main() {
  runApp(MyApp());
}
class MyApp extends StatelessWidget {
  @override
  Widget build(BuildContext context) {
    return MaterialApp(
        title: 'Flutter Demo',
        theme: ThemeData(
          primarySwatch: Colors.blue,
          visualDensity: VisualDensity.adaptivePlatformDensity,
        ),
        home: Scaffold(
            appBar: AppBar(
              title: Text("State Mgmt Demo"),
            ),
            body: CounterPage(title: 'Flutter Demo')),
        );
  }
}
Everything in Flutter is a widget. MyApp is the entry/root widget of our app. In the body prop, note that we are rendering a CounterPage widget. This is a stateful widget that extends the StatefulWidget class.
StatefulWidgets are used to manage local states in widgets. They create an associated State object, and they also hold immutable variables.
Here’s an example:
class NotificationCounter extends StatefulWidget {
    final String name;
    NotificationCounter({this.name});
    @override
    _NotificationCounterState createState() => _NotificationCounterState();
}
The name variable above is an immutable variable. StatefulWidget holds only immutable variables and the State object.
Let’s see our CounterPage code:
class CounterPage extends StatefulWidget {
  CounterPage({Key key, this.title}) : super(key: key);
  final String title;
  @override
  CounterPageState createState() => CounterPageState();
}
The createState method creates an object from CounterPageState and returns it. The createState method is called when the widget is built.
Let’s see the code for CounterPageState:
class CounterPageState extends State<CounterPage> {
  int _counter = 0;
  void _incrementCounter() {
    setState(() {
      _counter++;
    });
  }
  @override
  Widget build(BuildContext context) {
    return Scaffold(
      appBar: AppBar(
        title: Text(widget.title),
      ),
      body: Center(
        child: Column(
          mainAxisAlignment: MainAxisAlignment.center,
          children: <Widget>[
            Row(
              mainAxisAlignment: MainAxisAlignment.center,
              children: [
                Text(
                  'Counter:',
                  style: Theme.of(context).textTheme.headline4,
                ),
                Text(
                  '$_counter',
                  style: Theme.of(context).textTheme.headline4,
                ),
              ],
            ),
            FlatButton(
              color: Colors.orange,
              child: Text('Increment Counter', style: TextStyle(color: Colors.white)),
              onPressed: _incrementCounter,
            )
          ],
        ),
      )
    );
  }
}
CounterPageState has a mutable variable _counter, which stores the number of the counter and can be changed over the lifetime of the widget.
The build method is called when the widget must be built. It returns the UI of the widget, and the appBar -> title sets what will be displayed in the app bar of the page. The body sets the UI of the widget’s body.
Generally, this widget will display the text Counter:, the _counter variable in a row, and a button in the next row. The button has an onPressed event set to it, similar to onclick event in HTML.
The _incrementCounter function calls setState when the button is pressed. This method call tells Flutter that a state inside a widget has changed, and the widget has to be redrawn. The function argument to setState increments the _counter variable.
void _incrementCounter() {
    setState(() {
      _counter++;
    });
  }
So, whenever we click the Increment Counter button, the _counter is incremented and setState is called, which tells Flutter to rebuild the widget tree. The build method of the CounterPageState is called, and the widget tree in the widget is then rebuilt and re-rendered on the UI (N.B., only parts that have changed are re-rendered).
If we launch our app in an emulator, it should look like this:
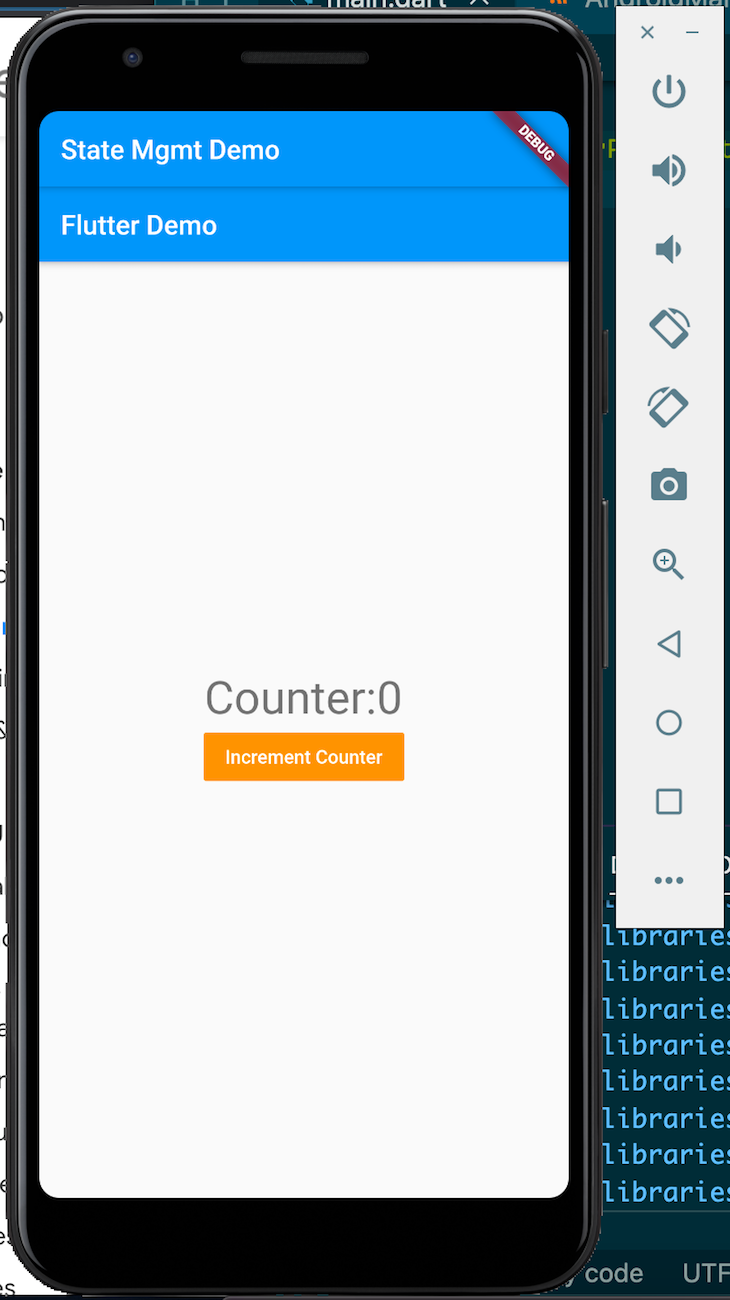
The number increases as the button is pressed:
Now let’s add a decrement button. This button will decrease the counter and reflect the update to the screen. How do we do this?
Simple: we will add a new FlatButton with the text Decrement Counter and set an onPressed event on it. We will create a method _decrementCounter and set it as a handler to the onPressed event.
This _decrementCounter method will decrease the _counter by 1 when called and call the setState to update the UI:
class CounterPageState extends State<CounterPage> {
  int _counter = 0;
  void _incrementCounter() {
    setState(() {
      _counter++;
    });
  }
  void _decrementCounter() {
    setState(() {
      _counter--;
    });
  }
  @override
  Widget build(BuildContext context) {
    return Scaffold(
        appBar: AppBar(
          title: Text(widget.title),
        ),
        body: Center(
          child: Column(
            mainAxisAlignment: MainAxisAlignment.center,
            children: <Widget>[
              Row(
                mainAxisAlignment: MainAxisAlignment.center,
                children: [
                  Text(
                    'Counter:',
                    style: Theme.of(context).textTheme.headline4,
                  ),
                  Text(
                    '$_counter',
                    style: Theme.of(context).textTheme.headline4,
                  ),
                ],
              ),
              FlatButton(
                color: Colors.orange,
                child: Text('Increment Counter',
                    style: TextStyle(color: Colors.white)),
                onPressed: _incrementCounter,
              ),
              FlatButton(
                color: Colors.red,
                child: Text('Decrement Counter',
                    style: TextStyle(color: Colors.white)),
                onPressed: _decrementCounter,
              )
            ],
          ),
        ));
  }
}
We give the Decrement Button a red background place it below the Increment Button. The _decrementCounter method is set to its onPressed event. The _decrementCounter method decrements _counter each time it’s called, and it calls the setState to trigger UI updates.
See the demo below:
Now that we’ve seen how to use the widget itself to manage state, let’s look at two other options: using the parent widget to manage state, and using a mix-and-match method.
In this approach, the parent of the widget holds the state variables and manages the state. The parent tells the widget when to update by passing the state variables down to the child widget. The methods used to alter the state are also passed down to the child widget, which the widget can call to change the state and update itself.
We can rewrite our counter example above to use this approach. We will have a stateless widget whose job is to render the UI. Create a class Counter and fill it like below:
class Counter extends StatelessWidget {
  final counter;
  final decrementCounter;
  final incrementCounter;
  Counter(
      {Key key,
      this.counter: 0,
      @required this.decrementCounter,
      @required this.incrementCounter})
      : super(key: key);
  @override
  Widget build(BuildContext context) {
    return Scaffold(
        body: Column(
      mainAxisAlignment: MainAxisAlignment.center,
      children: <Widget>[
        Row(
          mainAxisAlignment: MainAxisAlignment.center,
          children: [
            Text(
              'Counter:',
              style: Theme.of(context).textTheme.headline4,
            ),
            Text(
              '$counter',
              style: Theme.of(context).textTheme.headline4,
            ),
          ],
        ),
        FlatButton(
          color: Colors.orange,
          child:
              Text('Increment Counter', style: TextStyle(color: Colors.white)),
          onPressed: () {
            incrementCounter();
          },
        ),
        FlatButton(
          color: Colors.red,
          child:
              Text('Decrement Counter', style: TextStyle(color: Colors.white)),
          onPressed: () {
            decrementCounter();
          },
        )
      ],
    ));
  }
}
Again, this is a stateless widget, so it holds no state; it just renders what is passed to it.
Notice that we moved the job of rendering the counter to this widget. The counter is passed to it via this.counter, and the decrement and increment functions via this.decrementCounter and this.incrementCounter, respectively. All these are passed from the parent widget, CounterPageState.
Now, the CounterPageState widget will then look like this:
class CounterPageState extends State<CounterPage> {
  // ...
  @override
  Widget build(BuildContext context) {
    return Scaffold(
        // ...
        body: Center(
            child: Counter(
                counter: _counter,
                decrementCounter: _decrementCounter,
                incrementCounter: _incrementCounter
            )
        )
    );
  }
}
The Counter is rendered now by CounterPageState, the UI it previously rendered is now being handled by the new Counter widget.
Here, the _counter state is passed to the Counter widget in counter prop. The Counter widget will access the counter via the counter in its body.
Also, the _decrementCounter and _incrementCounter methods are passed to the Counter widget. These are called from the Counter widget to update the state _counter in the CounterPageState widget, which will cause the CounterPageState to rebuild and re-render the Counter to display the newly changed state.
In this approach, the parent widget manages some states while the child widget manages another aspect of the state. To demonstrate this, we will make our Counter widget hold a state, which makes it a StatefulWidget.
We will track the number of times the Increment Button and Decrement Button are clicked and hold the number in two states.
Now, let’s make the Counter widget a stateful widget:
class Counter extends StatefulWidget {
  final counter;
  final decrementCounter;
  final incrementCounter;
  Counter(
      {Key key,
      this.counter: 0,
      @required this.decrementCounter,
      @required this.incrementCounter})
      : super(key: key);
  @override
  CounterState createState() => CounterState();
}
We can see the createState method returns a CounterState object. Let’s take a look at the CounterState class:
class CounterState extends State<Counter> {
  var incrButtonClicked = 0;
  var decreButtonClicked = 0;
  @override
  Widget build(BuildContext context) {
    return Scaffold(
        body: Column(
      mainAxisAlignment: MainAxisAlignment.center,
      children: <Widget>[
        Row(
          mainAxisAlignment: MainAxisAlignment.center,
          children: [
            Text(
              'Counter:',
              style: Theme.of(context).textTheme.headline4,
            ),
            Text(
              widget.counter.toString(),
              style: Theme.of(context).textTheme.headline4,
            ),
          ],
        ),
        Column(
          mainAxisAlignment: MainAxisAlignment.center,
          children: [
            Text("'Increment Button' clicked $incrButtonClicked times"),
            Text("'Decrement Button' clicked $decreButtonClicked times")
          ],
        ),
        FlatButton(
          color: Colors.orange,
          child:
              Text('Increment Counter', style: TextStyle(color: Colors.white)),
          onPressed: () {
            widget.incrementCounter();
            setState(() {
              incrButtonClicked++;
            });
          },
        ),
        FlatButton(
          color: Colors.red,
          child:
              Text('Decrement Counter', style: TextStyle(color: Colors.white)),
          onPressed: () {
            widget.decrementCounter();
            setState(() {
              decreButtonClicked++;
            });
          },
        )
      ],
    ));
  }
}
Note that the previous UI of the Counter widget is here. We added the incrButtonClicked and decreButtonClicked states to hold the number of times the buttons were pressed. We also added a Column widget to display Text widgets in columns centered on the main axis. These Text widgets will display the number of times each button was clicked.
Now, in the onPressed event handler of each button, we call either the incrementCounter or decrementCounter method via the widget object. We used the widget object to get access to parent variables in a stateful widget. Then, we called the setState method, which increases or decreases the state variables incrButtonClicked and decreButtonClicked.
So we can see here that we have a mix-and-match state management approach: the parent widget handles the counter state, while the child widget handles the clicked state.
See the demo below:
InheritedModel and InheritedWidgetThis technique uses a communication approach between parent and child widgets. The data is set on the parent widget and child widgets can access the data from the parent widget, doing so the widget state is passed around seamlessly.
This kind of state management is similar to using Services class in Angular and also has semblance with React’s Context API.
InheritedWidgetInheritedWidget is a base class in Flutter that is used to propagate info down the widget tree.
Here’s how it works: an InheritedWidget encloses a widget tree. Now, the widgets in the tree can refer up to InheritedWidget to access the public variables in it, thus passing the data around the tree. The data to be held by the InheritedWidget is passed to it via its constructor.
InheritedWidget is very useful when we have to pass data through a long chain of widgets just to use it in a widget. For example, we have our tree of widgets like this:
  MyApp
    |
    v
CounterPage
    |
    v
DummyContainer1
    |
    v
DummmyContainer2
    |
    v
  Counter
The CounterPage has a counter state with incrementCounter and incrementCounter methods. We want to display the counter in the UI with the Counter widget. To do that, we have to pass the counter state and the two methods down to the Counter widget.
First, from the CounterPage widget, we will render the DummyContainer widget, passing the counter and the two methods as arguments to its constructor. Next, DummyContainer1 will render DummyContainer2 and pass the counter state and the two methods to the DummyContainer2 constructor as arguments. Finally, DummyContainer2 will render Counter and pass the counter and the methods to it.
With InheritedWidget, we can do away with all this props drilling. With InheritedWidget, we will set the counter and the two methods in it. The InheritedWidget will render the DummyContainer1 and the CounterPage will render the InheritedWidget. CounterPage will set the counter and the methods as data in the InheritedWidget.
  MyApp
    |
    v
CounterPage
    |
    v
MyInheritedWidget
    |
    v
DummyContainer1
    |
    v
DummmyContainer2
    |
    v
  Counter
This is how the tree will look with the inclusion of InheritedWidget.
Let’s code it! We’ll start with CounterPage:
class CounterPage extends StatefulWidget {
  CounterPage({Key key, this.title}) : super(key: key);
  final String title;
  @override
  CounterPageState createState() => CounterPageState();
  static CounterPageState of(BuildContext context) {
    return context.dependOnInheritedWidgetOfExactType<MyInheritedWidget>().data;
  }
}
We’ve added a static method of. This method uses the context to return an InheritedWidget using the method call dependOnInheritedWidgetOfExactType<MyInheritedWidget>(). This method returns the nearest Inherited``W``idget in the widget tree of an exact type; in this case, we want a MyInheritedWidget type.
Now, in our CounterPageState, we will render MyInheritedWidget, and inside it, we will render the DummyContainer1 widget.
class CounterPageState extends State&lt;CounterPage&gt; {
// ...
@override
Widget build(BuildContext context) {
return Scaffold(
appBar: AppBar(
title: Text(widget.title),
),
body: Center(
child: MyInheritedWidget(
child: DummyContainer1(),
data: this
)
)
);
}
}
The data parameter holds this, which means the public properties of CounterPageState are accessible to MyInheritedWidget via the data prop. We did so because we want the _counter, and the two methods _incrementCounter and _decrementCounter, to be referenced by an InheritedWidget. With that, we can use the InheritedWidget to access the counter state and the methods anywhere in the widget tree.
Let’s create the MyInheritedWidget, DummyContainer1, and DummyContainer2 widgets.
class MyInheritedWidget extends InheritedWidget {
  final CounterPageState data;
  MyInheritedWidget({
    Key key,
    @required Widget child,
    @required this.data,
  }) : super(key: key, child: child);
  @override
  bool updateShouldNotify(InheritedWidget oldWidget) {
    return true;
  }
}
We have a data property and an object CounterPageState. This is the object of the class we passed in the CounterPageState. The updateShouldNotify method determines whether the InheritedWidget will rebuild the widget tree below it. If it returns true, the widget tree will be rebuilt; if it returns false, the widget tree will not be rebuilt when the state changes.
class DummyContainer1 extends StatelessWidget {
  const DummyContainer1({Key key}) : super(key: key);
  @override
  Widget build(BuildContext context) {
    return DummyContainer2();
  }
}
This DummyContainer1 widget renders the DummyContainer2 widget.
class DummyContainer2 extends StatelessWidget {
  const DummyContainer2({Key key}) : super(key: key);
  @override
  Widget build(BuildContext context) {
    return Counter();
  }
}
The DummyContainer2 widget, in turn, renders the Counter widget.
Now, let’s see our Counter widget:
class Counter extends StatefulWidget {
@override
CounterState createState() =&gt; CounterState();
}
It only implements the createState method:
class CounterState extends State&lt;Counter&gt; {
var incrButtonClicked = 0;
var decreButtonClicked = 0;
var counter;
CounterPageState data;
@override
void didChangeDependencies() {
super.didChangeDependencies();
data = CounterPage.of(context);
counter = data._counter;
}
@override
Widget build(BuildContext context) {
return Scaffold(
body: Column(
mainAxisAlignment: MainAxisAlignment.center,
children: &lt;Widget&gt;[
Row(
mainAxisAlignment: MainAxisAlignment.center,
children: [
Text(
'Counter:',
style: Theme.of(context).textTheme.headline4,
),
Text(
counter.toString(),
style: Theme.of(context).textTheme.headline4,
),
],
),
Column(
mainAxisAlignment: MainAxisAlignment.center,
children: [
Text("'Increment Button' clicked $incrButtonClicked times"),
Text("'Decrement Button' clicked $decreButtonClicked times")
],
),
FlatButton(
color: Colors.orange,
child:
Text('Increment Counter', style: TextStyle(color: Colors.white)),
onPressed: () {
data._incrementCounter();
setState(() {
incrButtonClicked++;
});
},
),
FlatButton(
color: Colors.red,
child:
Text('Decrement Counter', style: TextStyle(color: Colors.white)),
onPressed: () {
data._decrementCounter();
setState(() {
decreButtonClicked++;
});
},
)
],
));
}
}
Note that we removed the props from the constructor. We used CounterPageState data = CounterPage.of(context); to get the MyInheritedWidget in the data variable. From there, we can access the public properties and methods in MyInheritedWidget. Note how we accessed the _counter, _incrementCounter, and _decrementCounter properties from the data variable.
These are the properties that were stored in MyInheritedWidget from CounterPageState, so once we reference the MyInheritedWidget, we can get those properties from anywhere in the widget tree. This is how data is passed and accessed via an InheritedWidget anywhere in the widget tree.
Here’s the demo:
InheritedModelInheritedModel works the same way as InheritedWidget: it manages the state and propagates the state across its widget tree. But InheritedModel is slightly different in that it allows for greater control over the change detection triggers and update notification, which can be set to respond when specific data changes.
InheritedModel is easy to implement. Let’s rewrite our above Counter example to use InheritedModel. Surprisingly, the code will be almost the same.
First, change MyInheritedWidget to MyInheritedModel:
class MyInheritedModel extends InheritedModel&lt;String&gt; {
final CounterPageState data;
MyInheritedModel({
Key key,
@required Widget child,
@required this.data,
}) : super(key: key, child: child);
@override
bool updateShouldNotify(MyInheritedModel old) {
return true;
}
@override
bool updateShouldNotifyDependent(MyInheritedModel old, Set&lt;String&gt; aspects) {
return true;
}
static MyInheritedModel of(BuildContext context, String aspect) {
return InheritedModel.inheritFrom&lt;MyInheritedModel&gt;(context,
aspect: aspect);
}
}
Still the same; the key thing here is the static method of. It returns an instance of itself so we can use it to access its public properties. final CounterPageState data; is the property we want to make publicly available — it’s the state that will be propagated by this InheritedModel down its widget tree. Note that its value is set by the this.data parameter in the constructor.
Next, we update our CounterState accordingly:
class CounterState extends State&lt;Counter&gt; {
var incrButtonClicked = 0;
var decreButtonClicked = 0;
var counter;
MyInheritedModel inheritedModel;
@override
Widget build(BuildContext context) {
inheritedModel = MyInheritedModel.of(context, "");
counter = inheritedModel.data._counter;
return Scaffold(
body: Column(
mainAxisAlignment: MainAxisAlignment.center,
children: &lt;Widget&gt;[
Row(
mainAxisAlignment: MainAxisAlignment.center,
children: [
Text(
'Counter:',
style: Theme.of(context).textTheme.headline4,
),
Text(
counter.toString(),
style: Theme.of(context).textTheme.headline4,
),
],
),
Column(
mainAxisAlignment: MainAxisAlignment.center,
children: [
Text("'Increment Button' clicked $incrButtonClicked times"),
Text("'Decrement Button' clicked $decreButtonClicked times")
],
),
FlatButton(
color: Colors.orange,
child:
Text('Increment Counter', style: TextStyle(color: Colors.white)),
onPressed: () {
inheritedModel.data._incrementCounter();
setState(() {
incrButtonClicked++;
});
},
),
FlatButton(
color: Colors.red,
child:
Text('Decrement Counter', style: TextStyle(color: Colors.white)),
onPressed: () {
inheritedModel.data._decrementCounter();
setState(() {
decreButtonClicked++;
});
},
)
],
));
}
}
Here we have MyInheritedModel inheritedModel;, and we call inheritedModel = MyInheritedModel.of(context, ""); in the build() method to get the instance of MyInheritedModel.
Now, from inheritedModel, we can access the final CounterPageState data; property to get the counter, _incrementCounter, and _decrementCounter properties in the CounterPageState widget.
The counter state is received from counter = inheritedModel.data._counter; and then converted to a string before it’s displayed.
The _incrementCounter, _decrementCounter methods are called via inheritedModel.data._incrementCounter(); and inheritedModel.data._decrementCounter(); to increase and decrease the button click times, respectively.
This will be the Counter code:
class Counter extends StatefulWidget {
@override
CounterState createState() =&gt; CounterState();
}
Nothing much to note here; just implement the createState method and return an instance of the CounterState widget.
Now, here’s our CounterPageState:
class CounterPageState extends State&lt;CounterPage&gt; {
int _counter = 0;
void _incrementCounter() {
setState(() {
_counter++;
});
}
void _decrementCounter() {
setState(() {
_counter--;
});
}
@override
Widget build(BuildContext context) {
return Scaffold(
appBar: AppBar(
title: Text(widget.title),
),
body: Center(
child: MyInheritedModel(
child: DummyContainer1(),
data: this
)
)
);
}
}
CounterPageState mounts MyInheritedModel. The instance of the CounterPageState is passed to its constructor via the data param. This is how we’re able to access the public properties of CounterPageState from MyInheritedModel.
And here’s the demo:
We’ve covered the basics of state management using Flutter’s inbuilt mechanism. We started by analyzing what state management is and how it is ideal for any UI framework to have. Next, we looked at setState and how its compares to React’s useState Hook. We illustrated by example how setState works and how we can use it to build real-world apps.
We then discussed InheritedWidget and saw how we can declare a state and propagate it down the widget tree. Widgets down the tree can subscribe to the state to get the updates whenever the state changes.
Similar to InheritedWidget, we looked at InheritedModel, which propagates state down the widget tree. The difference here is that we can choose the state we wish to be notified of when it changes.
Install LogRocket via npm or script tag. LogRocket.init() must be called client-side, not
server-side
$ npm i --save logrocket

// Code:

import LogRocket from 'logrocket';
LogRocket.init('app/id');
// Add to your HTML:

<script src="https://cdn.lr-ingest.com/LogRocket.min.js"></script>
<script>window.LogRocket && window.LogRocket.init('app/id');</script>
Would you be interested in joining LogRocket's developer community?
Join LogRocket’s Content Advisory Board. You’ll help inform the type of content we create and get access to exclusive meetups, social accreditation, and swag.
Sign up now
Not sure if low-code is right for your next project? This guide breaks down when to use it, when to avoid it, and how to make the right call.

Compare Firebase Studio, Lovable, and Replit for AI-powered app building. Find the best tool for your project needs.

Discover how to use Gemini CLI, Google’s new open-source AI agent that brings Gemini directly to your terminal.

This article explores several proven patterns for writing safer, cleaner, and more readable code in React and TypeScript.


