React Native is a popular technology used to develop Android and iOS applications. Although it is built on React — Facebook’s JavaScript toolkit for creating user interfaces — React Native targets mobile platforms as opposed to browsers.

With React Native, you get the benefit of being able to use the same technologies you’d use in web development like CSS and JavaScript. React Native also provides a ton of elements for you to compose your mobile app’s UI.
When building out your UI, it can be easy for two or more React Native elements to overlap each other. In other words, the elements are stacked on one another. When this happens, you may not like the order in which they appear on the screen.
You can use CSS parameters like position and zIndex in React Native to manage the order in which overlapping components are stacked. This tutorial will explore these and other techniques and best practices for stacking elements.
We will cover:
position propertyzIndex in React Native to stack and reposition elementsFlatList
To follow this tutorial, you’ll need basic knowledge of React Native, some familiarity with CSS, and a starter app on Expo Snack.
position propertyThe CSS position property is used to position an element on a page either in relation to its normal position or in absolute terms. In other words, it positions the element relative to its nearest positioned ancestor.
After applying the position attribute to an element, you’ll then use the top, bottom, left, and right attributes to specify exactly where you want the element to be placed.
In this section, we’ll use three <View> elements, along with a bit of CSS, to create three overlapping containers in our app.
By this point, you should have your starter app at Expo Snack already set up. If so, replace the following App component with the default one found inside the App.js file in your project:
export default function App() {
  return (
    <View style={styles.container} >
      <View style={[styles.square, {backgroundColor: 'green'}]} />
      <View style={[styles.square, {backgroundColor: 'red'}]} />
      <View style={[styles.square, {backgroundColor: 'blue'}]} />
    </View>
  );
}
Here we’re placing three <View> elements with different background colors inside a container <View> element.
Next, inside the same file, replace the default styles code with the following styles:
const styles = StyleSheet.create({
  container: {
    margin: 20,
    marginTop: 30,
    flex: 1,
    flexDirection:'row',
    backgroundColor: 'linen',
  },
  square: {
    height: 70,
    width: 70,
  },
});
With the above code, your three nested <View> elements are styled into squares and aligned properly in the parent container. The output is as follows:

In the above image, the elements are aligned horizontally and are clearly separate from each other. But say, for example, you want the green container at the bottom instead of at the top. You can use the CSS position property to reposition the green container.
Let’s see that in action. In the App.js file, add the position: 'absolute' property on the green container’s <View> element and set both bottom and right properties to 0 as the code below shows:
return (
    <View style={styles.container} >
      <View style={
        [
          styles.square,
          {backgroundColor: 'green', position: 'absolute', bottom: 0, right: 0}
        ]
        }
      />
      <View style={[styles.square, {backgroundColor: 'red'}]} />
      <View style={[styles.square, {backgroundColor: 'blue'}]} />
    </View>
  );
With this code, the first container will be placed at the bottom right corner of the screen, which we set using bottom: 0, right: 0. This gives us the following output:
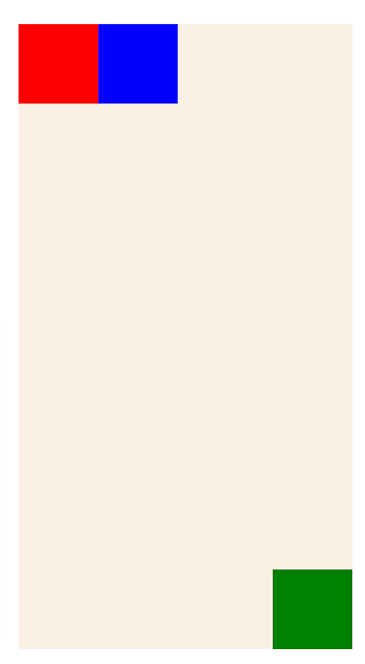
Notice how the second container now occupies the position of first, while the third container occupies the second position. This is because position: 'absolute' completely removed the element from the normal flow.
Let’s now make all three containers overlap. Update the style property on all nested <View > elements to the following:
return (
    <View style={styles.container} >
      <View style={[styles.square, {backgroundColor: 'green', position: 'absolute', top: 0, left: 0}]}/>
      <View style={[styles.square, {backgroundColor: 'red', position: 'absolute', top: 30, left: 30}]}/>
      <View style={[styles.square, {backgroundColor: 'blue', position: 'absolute', top: 60, left: 60}]} />
    </View>
  );
Here we’re offsetting the red square 30px from the top and 30px from the left, and the third box 60px from the top and 60px from the left. The result is shown in the image below:
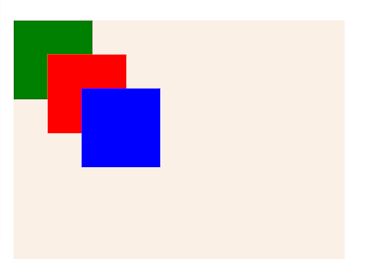
In the image above, you can see that all three boxes have overlapped and that the blue box is placed in front of the other two, as it has the highest priority. But what if you wanted to bring the red box to the front instead?
The answer is to set its zIndex value.
zIndex in React Native to stack and reposition elementsWhen two or more React Native elements overlap, their zIndex values will determine where they’ll be placed in the stack. The element with the highest zIndex will be placed in front, while the element with the lowest zIndex will be placed at the back.
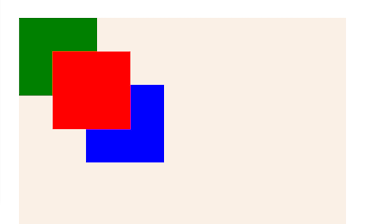
By default, the zIndex value in React Native increases from top to bottom. Going back to the image of the three overlapping squares, this default behavior makes it obvious that the blue square has the highest zIndex value while the green has the lowest.
To place the red square in front, all you have to do is set its zIndex to an integer value greater than or equal to 1.
// <View />
<View style={[styles.square, {backgroundColor: 'red', position: 'absolute', top: 30, left: 30, zIndex: 1}]}/>
// <View />
Here’s the result:
To place another square in front of the red one, set a higher zIndex value on the style property of that element.
So far we have demonstrated how to stack elements using CSS position and zIndex properties in React Native. In React Native, the FlatList element provides a modern way to stack elements.
FlatListReact Native provides a FlatList element that allows you to place elements on a screen using a grid layout. In this section, we’ll demonstrate how to stack elements using FlatList by enhancing the elements we created in the last section.
Let’s add a simple FlatList element in our App.js file. At the top of the file, import FlatList from react-native:
import { FlatList, ... } from 'react-native';
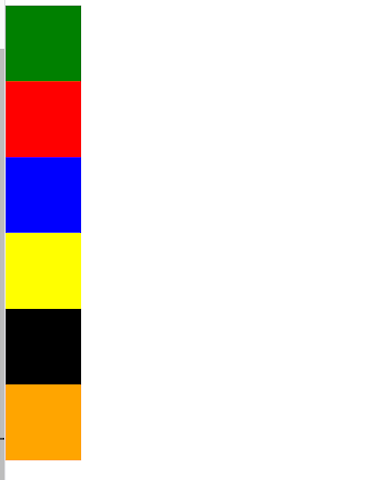
Next, just above the App component, create a bgColorArr array with several colors. Then, create a function named renderItem and return a <View> element from it:
const bgColorArr = [
  'green',
  'red',
  'blue',
  'yellow',
  'black',
  'orange'
]

function renderItem({item}) {
  return (
      <View style={[styles.square, {backgroundColor: item}]}/>
  );
}
Next, modify the App component. Replace all four <View> elements inside the return statement with a single FlatList:
return (
    <FlatList data={bgColorArr} renderItem={renderItem} />
  );
Here we passed the following:
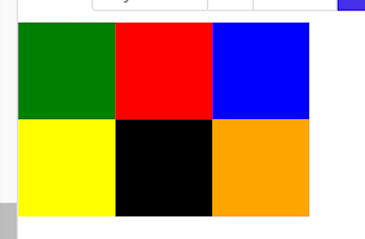
bgColorArr: the array of items (background colors) that we want to iterate overrenderItem: the component that we want to render for each item (i.e. for each color)As a result, the FlatList will render six View elements with different background colours:
Here the items are rendered into a row, but you can specify columns as well. Let’s see how.
FlatListIn this section, we’ll render the items into a grid system with three columns.
Modify the App component once again. Add two attributes — numColumn and key — and set their values to 3:
return (
    <FlatList
      data={bgColorArr}
      renderItem={renderItem}
      numColumns={3}
      key={3}
    />
  );
The output is as follows:
Dimension API to create responsive columnsTo make sure that the items are aligned well across different screen resolutions, use the Dimension API provided by React Native to get the width and height depending on the device.
In the App.js file, get the width of the screen and divide it by the number of columns to get the size of each column. Then, pass that value to the width property of your render item:
const screenWidth = Dimensions.get("windows").width;
const numColumns = 4
const tileSize = screenWidth / numColumns

function renderItem({item}) {
  return (
      <View style={[styles.square, {backgroundColor: item, width: tileSize, height: tileSize }]}/>
  );
}
This code ensures that you accurately use the available spacing at all times. Don’t forget to import Dimension from react-native at the top of the file for the code to work.
I hope this tutorial helped you understand stacking better. You should now be able to create flexible grid systems in your React Native app using the techniques we covered in this post — zIndex, position, and Flatlist.
If you have any questions regarding this topic, leave a comment and I’ll respond as soon as I get it. Have a great week!

LogRocket's Galileo AI watches sessions for you and and surfaces the technical and usability issues holding back your React Native apps.
LogRocket also helps you increase conversion rates and product usage by showing you exactly how users are interacting with your app. LogRocket's product analytics features surface the reasons why users don't complete a particular flow or don't adopt a new feature.
Start proactively monitoring your React Native apps — try LogRocket for free.

We built the same app in TanStack Start RSC and Next.js RSC. TanStack shipped 40% less JS and built 4x faster — but Next.js is still the safer production bet.

From RSC vulnerabilities and the Vercel breach to TypeScript 7.0 Beta and AI agents — the nine frontend storylines that defined H1 2026, ranked.

AI tools generate working React code fast, but miss race conditions, empty states, debouncing, and accessibility. Here’s how to catch bugs before production.

Learn how to use Gemini CLI subagents to delegate frontend, backend, testing, and docs tasks to specialized agents with guardrails and clear ownership.
Hey there, want to help make our blog better?
Join LogRocket’s Content Advisory Board. You’ll help inform the type of content we create and get access to exclusive meetups, social accreditation, and swag.
Sign up now

