Vitest is a powerful testing library built on top of Vite that is growing in popularity. You can use Vitest for a range of testing needs, such as unit, integration, end-to-end (E2E), snapshot, and performance testing of functions and components.

This versatile testing library works seamlessly with many popular JavaScript frontend frameworks, including React, Vue, Angular, Svelte, Lit, SolidJS, Alpine.js, Preact, Ember.js, and Backbone.js. Also, you can use Vitest in Node.js in the backend, and it supports full-stack frameworks such as Next.js and Nuxt.js.
Vitest is a very good option to consider when writing tests in your next or existing projects. In this article, we will discuss Vitest in full, looking at some of its limitations, features, and more, as well as comparing it to other testing libraries for JavaScript and TypeScript projects.
Vitest is a very fast testing framework with out-of-the-box hot module reload (HMR), TypeScript, ECMAScript module (ESM), and JSX support. The HMR support ensures that only tests related to the current changes are run, while the JSX support is actually powered by esbuild under the hood.
Vitest is described as Jest-compatible, meaning that tests which were previously based on Jest work seamlessly with little or no changes. Furthermore, although Vitest is built on top of Vite, it can still be used in many JavaScript and TypeScript projects that were not set up with Vite.
According to the creator of Vitest, Anthony Fu, when Vite was initially released in 2020, it came with a bunch of nice features such as HMR and ESM support. However, since it was new and relied on the browser for module evaluation (which means serving the source file to the user one file after the other), there was no way to run Vite-powered apps without the browser.
This meant that existing testing libraries could not properly run tests for Vite-powered projects, and the Vite team couldn’t find a testing library to recommend for Vite. Jest, the most popular testing library at that time, was able to partially run tests for Vite powered apps, but it didn’t yet support async transformation and ESM.
So, a member of the Vite team, Matias Capeletto, suggested that they create their own tool to help run Vite-powered apps outside the browser. They came up with the Vitest and reserved it on npm before even deciding to build a testing framework.
Although Vitest is arguably similar to Jest, you’re more likely to run into import and export issues with Jest, which is somewhat shocking since most modern JavaScript frameworks heavily depend on that feature.
Vitest has the same amazing features Jest does, but follows a more modern approach with out-of-the-box import, export, and even TypeScript support. Read more about this below in our section comparing Vitest with other testing libraries.
Vitest takes a file — e.g., summarize.test.ts — and runs it through a compiler like react-vite or a rollup plugin. Then, it processes the file into a framework-agnostic format that can be run in ESM or CommonJS. This means you can quickly reload and rerun tests.
In comparison, a testing library like Jest takes a test file and runs it through packages like babel-preset-env, babel-ts, and babel-react before finally converting it to CommonJS and running the test.
Interestingly, Vitest keeps a sort of cache in the form of import maps of every dependency involved in our test. So, when there’s a file change related to a test that we’re running, then only the associated tests are run again. Vitest accomplishes this by using the Vite bundler under the hood, which has the HMR feature attached to it.
Generally, re-running tests on Vitest is much faster because it doesn’t bundle the test files over and over. Instead, it only re-bundles the specific files that changed.
Suppose we have a JSX component that looks like this:
// Example.jsx

export const ScienceClass = () => {
   return (
          <>
            <Physics />
            <Chemistry />
            <Biology />
            <Mathematics />
            <ComputerScience />
          </>
)}
Let’s say you run a test using Vitest for the component above and it takes about 100ms to be run. Then, if you make a change or swap the <Biology /> component with a different component like <Agriculture />, Vitest will only rebundle the <Agriculture /> component or bundle the new component and might take even a shorter period like 20ms to complete the test.
However, when you use other testing libraries like Jest, then upon any file change, it will re-bundle the whole component and take probably the same amount of time it took for the test to be run initially.
The number one reason to use Vitest is the fact that it supports TypeScript and ESM out of the box. This means that you don’t have to configure it yourself or install any plugin in order to parse the run tests that are written in TypeScript or contain imports and exports of asset files like CSS.
Let’s see some other reasons to choose Vitest.
Vitest is amazing since it can be used to run a test once installed in our project without any configuration. But if you do want to configure more options for your test, you can create a vite.config.ts or vite.config.js file to do so.
Since Vitest is built on top of Vite, it uses the minimal Vite configuration and setup to add more options to the test runner. This means that developers don’t have to worry about setting up and managing complex build tool configurations — instead, you can focus on writing code.
With Vitest, we can decide to not create a test file for some functions such as add.test.ts. If we write the test directly inside the add.ts file, it will run exactly as it should.
To use this feature, let’s first wrap our inline test inside an if statement that checks the import.meta.vitest value, like so:
// add.ts

/** A function that accepts a  list of numbers and sums it up */
export default function add(...numbers: number[]) {
  return numbers.reduce((acc, curr) => acc + curr, 0);
}

// Inline test for the add function
if (import.meta.vitest) {
  const { describe, expect, it } = import.meta.vitest;

  describe("add function", () => {
    it("returns 0 with no numbers", () => {
      expect(add()).toBe(0);
    });

    it("returns correct value when numbers are passed", () => {
      expect(add(25, 40, 1)).toBe(66);
    });
  });
}
Then we can create a vite.config.ts file or update our existing one with the includeSource option. This ensures that instead of scanning for only spect.ts, test.ts, or other such files, Vitest will scan the whole src folder for a .ts or .js file:
// vite.config.ts
import { defineConfig } from "vitest/config";

export default defineConfig({
  test: {
    includeSource: ["src/**/**.{js,ts}"],
  },
});
Note that you might face this TypeScript error when you try write the inline test:

To fix this error, update the compilerOptions in your tsconfig.json file with "types": ["vitest/importMeta"] like so:
// tsconfig.json
{
  "compilerOptions": {
    "target": "ES2020",
    "useDefineForClassFields": true,
    "module": "ESNext",
    "lib": ["ES2020", "DOM", "DOM.Iterable"],
    "skipLibCheck": true,
    /* Bundler mode */
    "moduleResolution": "bundler",
    "allowImportingTsExtensions": true,
    "resolveJsonModule": true,
    "isolatedModules": true,
    "moduleDetection": "force",
    "noEmit": true,
    /* Linting */
    "strict": true,
    "noUnusedLocals": true,
    "noUnusedParameters": true,
    "noFallthroughCasesInSwitch": true,
    /* The fix to the inline test warning */
    "types": ["vitest/importMeta"]
  },
  "include": ["src"]
}
As mentioned earlier, Vitest supports most of the APIs from Jest — you can take a test exactly as it was written in Jest and run it in Vitest with little or no change at all. Also, because Vitest is written on top of Vite, you can use it with any JavaScript frontend and backend frameworks.
The HMR feature support in Vitest means that only affected tests are re-run. As a result, the time spent to run a test is greatly reduced, which also contributes to improving the DX.
Generally, Vitest supports many modern JavaScript features out of the box without any further configuration. This means that developers can use the latest best practices to write their test.
The Vitest documentation is one of the most robust documentation for a testing library out there. It features a very comprehensive explanations of the concepts that exists in the library.
Since Vitest has implemented most of the APIs that already exist in other popular testing library like Jest and Mocha, developers who are familiar with these existing tools will not have a hard picking up Vitest.
Vitest is really popular at the moment with over 12k stars on GitHub and has an active community of over 450 contributors who are actively developing and supporting the library.
The Vitest development team did a great job in providing a Vitest extension for many popular IDEs and text editors, such as VS Code, JetBrains IDE, and Wallaby.js. This means that you can just go to the appropriate marketplace to download the robust Vitest extension and start running related tests in a folder or a single test.
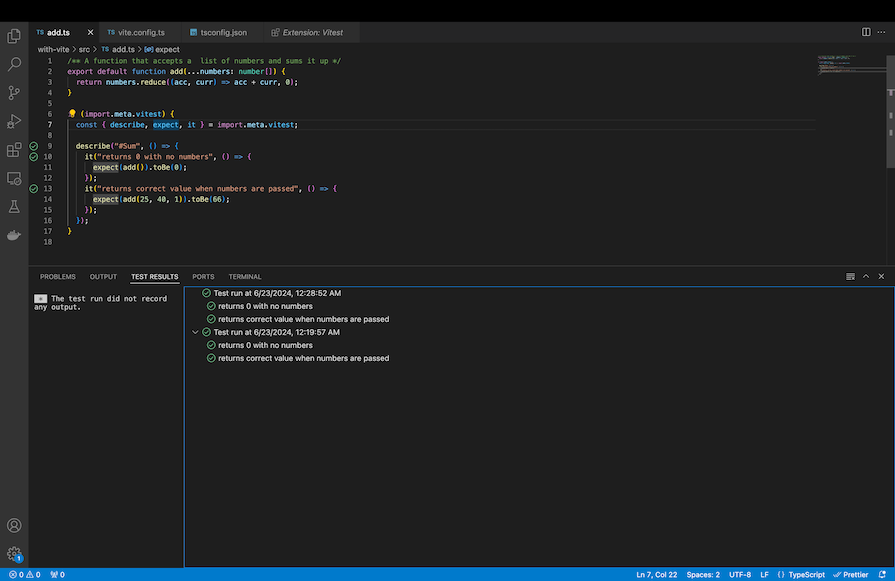
Note that for VS Code, you can simply go to the Extensions Marketplace to install the Vitest extension. Once installed, right click on any test file or any folder that may contain tests, and select the Run Tests or Run Tests with Coverage command to run the test. It runs and renders the test and its results in a very nice interface below like this:
Vitest also offers a wide range of plugins provided to achieve some sort of desired results or enhance the capabilities of the test library. Such useful plugins include:
@vitest/ui — Provides a visual interface for Vitest@vitest/coverage-v8 — Provides a way to run test coverage for a projectVitest comes with many of the great features found in other testing libraries without the limitations of those libraries, along with other exciting features. I strongly recommend using Vitest for your next or existing project.
The fact that Vitest supports TypeScript and ESM out the box and removes unnecessary dependency management is enough of a reason for large teams to consider using it. Also, Vitest uses HMR to rerun tests, making it blazingly fast — which many testing libraries do not have out the box.
Let’s start setting up and running some tests with Vitest. Getting some hands-on experience with Vitest is the most exciting part of the guide for me, and I hope it’s exciting for you as well.
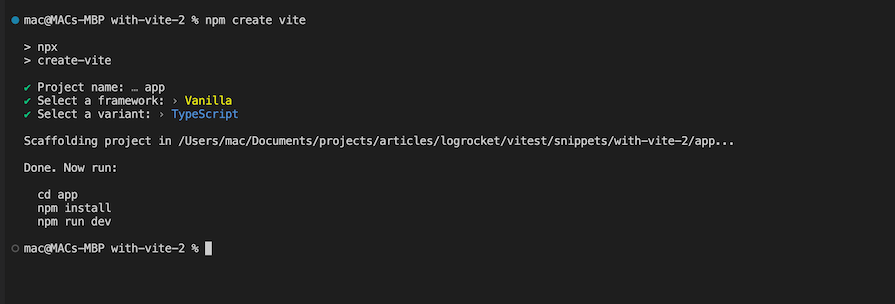
To quickly demonstrate how we can use Vitest, we’ll set up a Vite project from scratch. The fastest way to set up Vite is to use the Vite CLI. Open a new folder in the terminal and run the npm create vite command.
When you’re asked for the project name, you can enter any name — I’m just calling mine app. Then, select Vanilla as the framework and TypeScript as the variant as shown in the image below:
Next, we can run these commands:
cd app
npm install
npm run dev
The next step is to install the Vitest package by running the following in the terminal:
npm install --save-dev vitest
At this point, you can create a file such as add.ts and add.test.ts in the src folder. Your folder tree should now look similar to this:
// Folder structure
app
 ┣ public
 ┃ ┗ vite.svg
 ┣ src
 ┃ ┣ add.test.ts
 ┃ ┣ add.ts
 ┃ ┣ counter.ts
 ┃ ┣ main.ts
 ┃ ┣ style.css
 ┃ ┣ typescript.svg
 ┃ ┗ vite-env.d.ts
 ┣ .gitignore
 ┣ index.html
 ┣ package-lock.json
 ┣ package.json
 ┗ tsconfig.json
Inside the src/add.ts file, we can add this simple function that adds numbers:
// src/add.ts

/** A function that accepts a  list of numbers and sums it up */
export default function add(...numbers: number[]) {
  return numbers.reduce((acc, curr) => acc + curr, 0);
}
For the test file, we can just add the following code to the src/add.test.ts file:
// src/add.test.ts
import add from "./add";
import { describe, expect, it } from "vitest";

describe("#Add", () => {
  it("returns 0 with no numbers", () => {
    expect(add()).toBe(0);
  });
  it("returns correct value when numbers are passed", () => {
    expect(add(25, 40, 1)).toBe(66);
  });
});
With this, we can just update the scripts to include a test run command:
// package.json
{
  "name": "app",
  "private": true,
  "version": "0.0.0",
  "type": "module",
  "scripts": {
    "dev": "vite",
    "build": "tsc && vite build",
    "preview": "vite preview",
    "test": "vitest"
  },
  "devDependencies": {
    "typescript": "^5.2.2",
    "vite": "^5.3.1",
    "vitest": "^1.6.0"
  }
}
Finally, we can run npm run test to run the test. This will output a result similar to this:
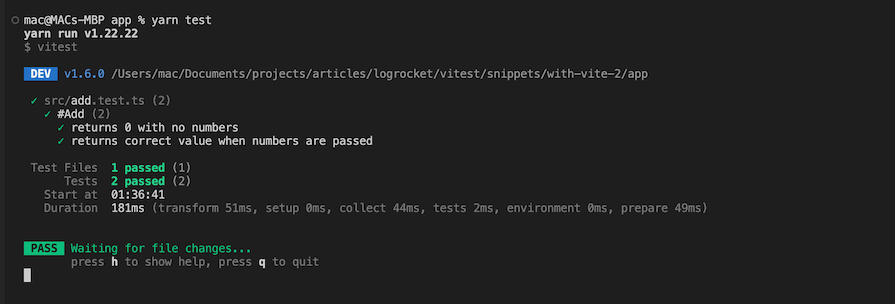
Note that Vitest enables watch mode by default. You can get the source code for the examples above on GitHub.
Vitest isn’t just used to write simple tests as we demonstrated in the code above. You can also use it to write more complex tests, as well as for unit tests, test coverages, snapshots, mocking, and even test reporting. Let’s talk about some standout Vitest features.
Vitest provides a very useful feature that gives us the ability to filter test by a particular name. Normally, we can run tests by running vitest (or npm run vitest) in the terminal. However, Vitest allows us to filter tests using a word in the path. This means that when we do vitest add, it will run any test with the add in their path.
The Vitest command line interface provides us with a ton of options that we can use to perform certain actions. What this means is that when running tests using vitest, we can also provide a followup action, which may include:
vitest --watch — Enables watch mode. It ensures that Vitest monitors file changes and only reruns tests for affected files. You should note that this option is enabled by defaultvitest --silent — Hides console output for testsvitest --dom — Ensures Vitest uses the happy-dom package to mock some browser APIsvitest --run — Disables watch mode. It’s used to run the test at once instead of waching for file changesvitest --standalone — Starts Vitest without running tests, which means that tests will be run only when files relating to a test changesvitest --clearScreen — Clears the terminal screen before running a new testSnapshots are a very important and useful tool in testing. They’re used to keep track of changes in the output of a function or a method.
Generally, when we use a snapshot testing method, Vitest will create a __snapshot__ folder which contains the filename of the tests where the snapshot test was run — e.g., add.test.ts.snap:
// add.test.ts

import add from "./add";

import { describe, expect, it } from "vitest";
describe("#Add", () => {
  it("returns 0 with no numbers", () => {
    expect(add()).toBe(0);
  });
  it("returns correct value when numbers are passed", () => {
    const output = add(25, 40, 2);
    expect(output).toMatchSnapshot();
  });
});
Then Vitest will create __snapshot__/add.test.ts.snap:
// __snapshot__/add.test.ts.snap

// Vitest Snapshot v1, https://vitest.dev/guide/snapshot.html
exports[`#Add > returns correct value when numbers are passed 1`] = `66`;
You can access the snapshot methods from the expect() command. They include toMatchSnapshot(), toMatchInlineSnapshot(), and toMatchFileSnapshot(), which allow us to provide a path to a file containing a custom snapshot.
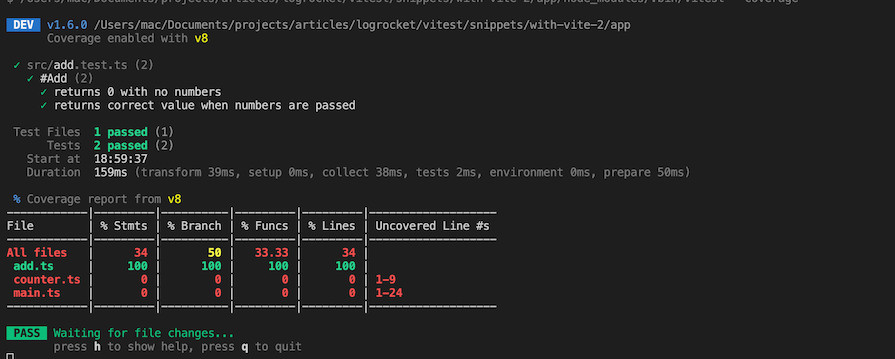
Like other testing libraries, Vitest provides a test coverage feature to report and highlight the number of files that has been tested or not. By default, simply running npm run vitest --coverage will output the report on the terminal like this:
However, with Vitest, you can also pass the type of reporter you want. So, you can output the coverage as HTML instead of in the terminal in the vitest.config.ts or vite.config.ts files:
// vitest.config.ts or vite.config.ts
import { defineConfig } from "vitest/config";

export default defineConfig({
  test: {
    coverage: {
      reporter: ["html"],
    },
  },
});
The result will be saved in a coverage folder containing a bunch of HTML. When you open the index.html file on the live server, it will look similar to this:

The Vitest testing library comes with a bunch of helper functions that makes testing easier and more efficient. Some of the functions include:
afterEach — Used to run an operation after each test has been run individuallyafterAll — Used to run an operation after all the test has been runbeforeAll — Used to run an operation before all the test has been runexpect — Used to perform assertions on operations and valuesit — Used to hold a single block of testtest — Similar to the it functionbeforeEach — Used to run an operation before each test has been run individuallyHere’s an example of how to use beforeEach:
  beforeEach(() => {
    console.log("Hello");
  });
You should be aware that by default, Vitest makes use of the @vitest/coverage-v8 package to process and output the coverage. However, you can also use a different or custom provider such as @vitest/coverage-istanbul. To configure the use of other providers, you can modify the vitest.config.ts or vite.config.ts files like so:
// vitest.config.ts or vite.config.ts
import { defineConfig } from "vitest/config";

export default defineConfig({
  test: {
    coverage: {
      reporter: ["html"],
      provider: "instabul"
    },
  },
});
You can also pass a different folder location to output your coverage report like so:
// vitest.config.ts or vite.config.ts
import { defineConfig } from "vitest/config";

export default defineConfig({
  test: {
    coverage: {
      reporter: ["html"],
      provider: "instabul",
      reportsDirectory: "./some-custom-directory/coverage"
    },
  },
});
Vitest provides a way to mock function and modules, so you can confirm when a particular function has been called after a specific event. Also, Vitest provides the ability to mock the implementation of an external package by allowing us to change its implementation and output.
To mock a function, you can either use vi.fn() or vi.spyOn(). vi.fn() enables us to create a totally fake version of a function, while vi.spyOn() is used to simply observe a function.
Suppose we want to mock the add function in the add.ts file above. We can use the vi.fn() method to completely fake its implementation like so:
// add.test.ts
import add from "./add";
import { describe, expect, it, vi } from "vitest";

const calculation = {
add: a
}

describe("#Add", () => {
  it("Should fake the add function", () => {
    const mock = vi.fn().mockImplementation(add);
    expect(mock(1, 2, 3)).toEqual(6);
    expect(mock).toHaveBeenCalledTimes(1);
  });
});
We completely mocked the add.ts function using the vi.fn().mockImplementation(add) and then used the new mock to perform the same actions that we can otherwise perform with the add function. This can be done on any other kind of function.
As for vi.spyOn, we can use it like so:
// add.test.ts

import add from "./add";
import { describe, expect, it, vi } from "vitest";

const calculation = {
  add,
};

describe("#Add", () => {
  it("Should spy on the add function", () => {
    const spy = vi.spyOn(calculation, "add");
    calculation.add(6, 10, 20);
    expect(spy).toHaveBeenCalledTimes(1);
  });
});
Note that to use the spy method, the method or function to be spied on should be in a module as shown in the example above.
Even though Vitest doesn’t run on the web, we can use Mock Service Worker (MSW) to intercept REST and GraphQL API requests. The essence of mocking API calls is to not call the real API unnecessarily during the development of a functionality.
To use this feature, we have to install the msw package and set it up. First, create a setup file such as setup.ts in your root folder and link the file to Vitest by adding the setupFiles option:
// vitest.config.ts or vite.config.ts

import { defineConfig } from "vitest/config";

export default defineConfig({
  test: {
    includeSource: ["src/**/**.{js,ts}"],
    coverage: {
      provider: "istanbul",
    },
    setupFiles: ["./setup.ts"],
  },
});
Next, mock the REST or GraphQL API handlers in the setup.ts file:
// setup.ts

import { afterAll, afterEach, beforeAll } from "vitest";
import { setupServer } from "msw/node";
import { HttpResponse, graphql, http } from "msw";

const names = ["John", "Jane", "Megan", "Stewie", "Peter"];

export const restHandlers = [
  http.get("https://list-family-guy.com", () => {
    return HttpResponse.json(names);
  }),
];

// How to mock grahql api
// const graphqlHandlers = [
//  graphql.query("ListFamilyGuys", () => {
//    return HttpResponse.json({
//      data: { names },
//    });
//  }),
// ];

const server = setupServer(...restHandlers, ...graphqlHandlers);

beforeAll(() => server.listen({ onUnhandledRequest: "error" }));
afterAll(() => server.close());
afterEach(() => server.resetHandlers());
Now you can use it in your application. For example, suppose you have a file such as api.ts. You can pass this code to have something to test — essentially, a fake API that matches the real API’s behavior:
// src/api.ts
const fetchFamilyGuy = async () => {
  const res = await fetch("https://list-family-guy.com");
  const result = await res.json();
  return result;
};

export const usernames = async () => {
  const names = await fetchFamilyGuy();
  //   console.log({ names });
  return names;
};
Then we can write a test such as in api.test.ts like so:
// src/api.ts
import { describe, expect, it } from "vitest";
import { usernames } from "./api";

describe("Api requests", () => {
  it("Checks if the request is called in usernames()", async () => {
    const list = await usernames();
    expect(list).toEqual(["John", "Jane", "Megan", "Stewie", "Peter"]);
  });
});
In this example, we have mocked the API request and are now providing the response for each each request ourselves. The essence of this test is to confirm that when an action or side effect occurs in our app and causes the API to be called, we will receive an expected outcome.
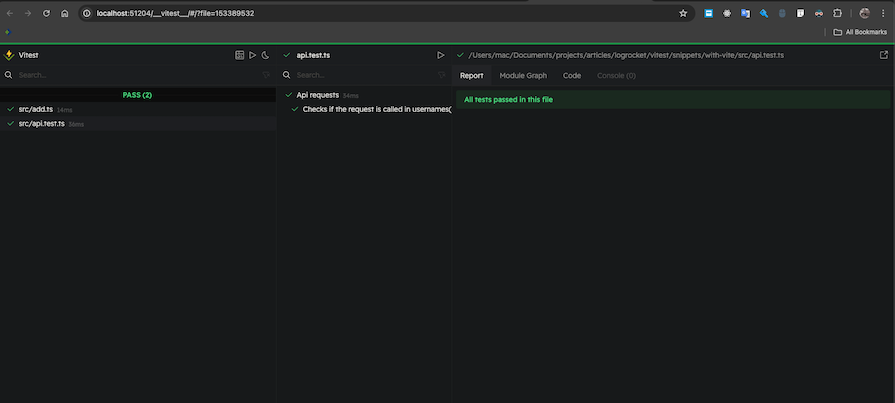
We can use the Yarn Vitest UI, which is powered by @vitest/ui, to view tests and their results in the browser in an aesthetic format. To use this feature, simply install @vitest/ui and attach the --ui option when we want to run a test, like so:
npm run vitest --ui
This will output a beautiful UI on the browser with our tests like this:
Yes, you read it right! You can test your TypeScript types with Vitest.
This feature stands out as a major reason why you start using Vitest in your projects. With type testing, you can actually check your types to confirm that they are as expected. To achieve this, we use the expectTypeOf API from the vitest package like so:
// some-types.test.ts
import { describe, expectTypeOf, it } from "vitest";

type ManTypes = {
  name: string;
  age: number;
  schools: { college: string; grade: string }[];
};

describe("some types", () => {
  it("matches the expected type", () => {
    const man: ManTypes = {
      name: "John",
      age: 98,
      schools: [{ college: "Harvard", grade: "first class" }],
    };
    expectTypeOf(man).toEqualTypeOf<ManTypes>();
  });
});
Vitest has many practical use cases, including:
In addition, Vitest offers many advantages from a business perspective, including quality assurance, continuous integration and delivery (CI/CD), and documentation.
Vitest is obviously not the only testing library out there. Popular alternatives include Jest, Cypress, and Uvu. It’s important to note that you don’t necessarily have to choose between testing library options; you can often use them together for more thorough testing coverage.
Vitest and Jest are very similar; however, a striking difference is that Vitest supports TypeScript and ESM out of the box while Jest doesn’t. Therefore, if you’re considering using TypeScript and ESM in your project, then you should consider using Vitest instead of Jest.
Although Jest is the most popular JavaScript testing library, Vitest is also growing in popularity and finding its way into many modern applications. The two testing libraries do share a very similar API, but that just means switching from Jest to Vitest is pretty straightforward.
Running tests with Vitest happens very quickly because of the hot module replacement feature, which allows Vitest to only re-run tests that have encountered a change. So, if performance is your concern, then you should consider Vitest.
Cypress is actually an end-to-end testing library. It’s browser based and is mostly used to test the accessibility, visibility, and interactiveness of applications on the web.
Cypress complements Vitest nicely — the Vitest team even recommends it as an end-to-end and component testing library to be used alongside Vitest.
uvu is a very fast test runner, but it has a lot of drawbacks. For instance, it does not feature HMR, which comes by default with Vitest. It also uses a single thread to run tests, which means that files can sometimes be accidentally leaked on the browser which is not good for a security cautious team.
uvu can be used for very small projects and will work just fine, but it’s not recommended to be used in a big application.
In this table, we’ll summarize the comparison between Vitest and other popular testing libraries so you can evaluate them at a high level at a glance:
| Features | Vitest | Jest | Cypress | uvu |
|---|---|---|---|---|
| Use case | Unit, snapshot, integration testing | Unit, snapshot, integration testing | End-to-end testing | Unit testing |
| Parallel testing | Built-in | Built-in | Built-in | Not available |
| Assertions | Built-on | Built-in | External library (Chai) | Built-in |
| TypeScript support | Out of the box | Extra configuration | Extra configuration | Extra configuration |
| Mocking | Out of the box | Out of the box | Extra configuration | Extra configuration |
| ESM support | Out of the box | Extra configuration | Extra configuration | Extra configuration |
| Performance | Fast | Not very fast | Slow | Very fast |
Vitest is relatively new, but has grown in popularity and become a favorite of many developers who use ESM and TypeScript. It’s a fast testing library that greatly improves the developer experience and is easy to learn, use, and integrate or extend as needed.
Therefore, I recommend using Vitest for your project if you want a library with a really robust api and community behind it.
Would you be interested in joining LogRocket's developer community?
Join LogRocket’s Content Advisory Board. You’ll help inform the type of content we create and get access to exclusive meetups, social accreditation, and swag.
Sign up now
Making carousels can be time-consuming, but it doesn’t have to be. Learn how to use React Snap Carousel to simplify the process.

Consider using a React form library to mitigate the challenges of building and managing forms and surveys.

In this article, you’ll learn how to set up Hoppscotch and which APIs to test it with. Then we’ll discuss alternatives: OpenAPI DevTools and Postman.

Learn to migrate from react-native-camera to VisionCamera, manage permissions, optimize performance, and implement advanced features.