Vite has become the lynchpin of frontend toolchains. This build tool also has been adopted by SvelteKit, which is the official application framework for Svelte. So, I think it is fair to say that Vite has become the first choice dev tool for Svelte.

Vitest is a relatively new, Vite-native unit testing framework. It holds the promise of being Vite’s ideal testing partner, but does it deliver?
In this article, I’ll explore the following:
Currently, Svelte does not recommend a particular unit testing framework, and it does not advocate for a particular testing strategy. The official site provides some basic advice. In theory, you can use any JavaScript unit testing library you like for testing, and your frontend toolchain will eventually spit out a vanilla JavaScript bundle, right?
Well, this is the crux of the problem; you are dealing with different permutations of syntaxes and formats related to JavaScript. These formats are transformed into another format by your toolchain. It can be tricky to integrate tools into a toolchain when they are not speaking the same syntax, and are not cooperating well.
Vite provides a fast dev environment by using native ECMAScript Modules (ESM) to provide on-demand file serving. It performs on-the-fly atomic translation of Svelte to JavaScript. Many unit testing frameworks were built using CommonJS modules, which is an alternate module standard. Using Vite to manage the translation of the files and then passing them onto a testing framework built with a different standard can create friction.
Vite’s Unit Testing story hasn’t been clear though. Existing options like Jest were created in a different context. There is a lot of duplication between Jest and Vite, forcing users to configure two different pipelines.
Jest is probably the most popular unit testing framework; it came out on top in the State of JS Survey in 2021. Jest’s integration with Vite is patchy. There’s a library called vite-jest, which aims to provide first-class Vite integration for Jest; however, it is currently a work-in-progress.
Vite-jest does not mention Svelte, and may not work with Svelte. For SvelteKit, there’s an experimental library called svelte-add-jest. The bottom line is that there is not a clear, reliable way of using Jest with Vite and Svelte.
In any case, as mentioned by the Vitest team, there is a duplication of effort between Jest and Vite. You end up with a pipeline for development and a pipeline for testing. For Jest, you may be using Babel with a plugin to translate from Svelte to JavaScript. Then, you need to stitch some accompanying pieces together to make it work. It becomes a bit of a Rube Goldberg Machine.
I wrote about this in another article, Testing a Svelte app with Jest. I created a starter template to use Vite, Svelte, Jest, and Svelte Testing Library together. It required approximately 10 dependencies, and two additional config files (.babelrc and jest.config.json) to create the testing pipeline.
Having this kind of setup is fragile, especially when you don’t fully understand the inner workings of the tools. I would be praying that a change to one of those dependencies does not break the chain! More links, more possibility for failure! Not a good feeling if you become the maintainer of a project!

In summary, a more integrated solution is preferable. A Vite-native solution is even better. A Vite-native solution with a Jest-compatible API would be better still! Doing it all in a single configuration file would be Nirvana! This is potentially what Vitest can deliver.
First, let’s skim over the API to see how our tests will look.
You can read the Vitest API documentation for more detailed information, but to review the key points I’ll provide a quick API overview.
By default, Vitest looks for filenames that end with either .spec.js or .test.js. You can configure it differently if you prefer. I name my test files <component-name>.spec.js and place them alongside my component files.
The API is compatible with Chai assertions and Jest expect. If you have used these before, this will be familiar. The key bits are:
describe blocks: used to group related tests into a test suite; a suite lets you organize your tests so reports are clear; you can nest them too if you wish to do further aggregationtest or it blocks: used to create an individual testexpect statements: when you’re writing tests, you need to check that values meet certain conditions – these are referred to as assertions; the expect function provides access to several “matcher” functions that let you validate different types of things (e.g., toBeNull, toBeTruthy)Here is a basic skeleton of how a test suite with one test for our Todo component might look:
import {describe, expect, it} from 'vitest';
import Todo from "./Todo.svelte";

describe("Todo", () => {
    let instance = null;

    beforeEach(() => {
        //create instance of the component and mount it
    })

    afterEach(() => {
        //destory/unmount instance
    })

    test("that the Todo is rendered", () => {
        expect(instance).toBeDefined();
    })
})
While you could use Vitest on its own to run tests, you’d have to create an instance of the component and then mount it to a document. We can do this in the beforeEach function. You’d also probably need to destroy or unmount this instance in afterEach. This is cumbersome; it’s the kind of boilerplate that is best avoided.
It is more common to use the Svelte Testing Library which helps push you towards good testing practices. It has a render function that takes care of the rendering of the component for us and does it in-memory using jsdom. You can also get more convenient matcher functions, such as toBeInTheDocument() by jest-dom library.
First, you’ll install the libraries using this command:
npm i -D @testing-library/svelte jest-dom jsdom
I’m not entirely sure if you need to install jsdom yourself. I may have been prompted to install it; I don’t recall exactly!
Now, we can focus on writing tests. You can see that we pass our component name and props to the render function to render our component. Then, we have access to HTML output through an implicit screen variable. We can run query methods to find the page elements that we’d like to test.
import { render, screen } from "@testing-library/svelte";
import Todo from "./Todo.svelte";

describe("Todo", () => {
  const todoDone = { id: 1, text: "buy milk", done: true };
  const todoNotDone = { id: 2, text: "do laundry", done: false };

  test("shows the todo text when rendered", () => {
    render(Todo, { props: { todo: todoDone } });

    expect(screen.getByLabelText("Done")).toBeInTheDocument(); // checkbox
    expect(screen.getByText(todoDone.text)).toBeInTheDocument();
  });
});
There’s a short migration guide on the Vitest website.
(deep breath)
Let’s go!
I will fork a Todo app that I previously made and then tested with Jest and the Svelte Testing Library. I use the <component_name>.spec.js naming convention for my tests alongside the accompanying component. It has 98.07% coverage.
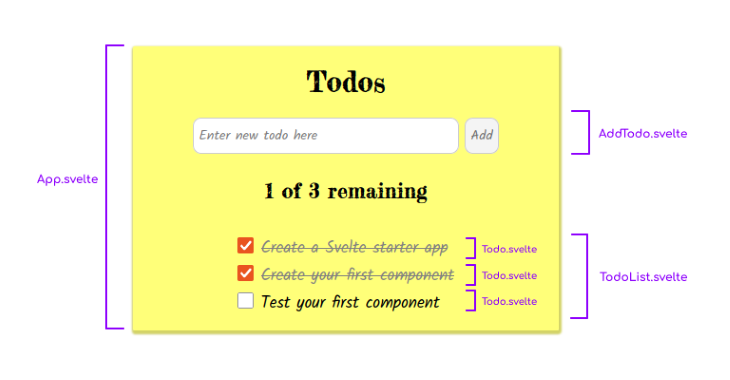
The Todo app has the following features:
Here’s an overview of the components:
First, we install Vitest. I installed it with npm, but you can use your package manager of choice:
# with npm
npm i -D vitest

# or with yarn
yarn add -D vitest

# or with pnpm
pnpm add -D vitest
Next, let’s check that we have the latest versions of everything. Vitest requires Vite v2.7.10+ and Node v14+.
For Vite, I was using v2.6.4, so I need to update that. The quickest way is to run: npm i -D vite.
I was using Node is v14.18.1, so no update was required there. If you need to update Node, you can follow this guide.
According to the Vitest migration guide:
Jest has their globals API enabled by default. Vitest does not. You can either enable globals via the
globalsconfiguration setting or update your code to use imports from thevitestmodule instead.
Let’s enable the globals option. Here’s what our vite.config.js file looks like with the globals option enabled:
import { defineConfig } from "vite";
import { svelte } from "@sveltejs/vite-plugin-svelte";

// https://vitejs.dev/config/
export default defineConfig({
  plugins: [svelte()],
  test: {
    globals: true,
  },
});
Now, let’s try to run Vitest; the command: npx vitest run will runs the tests once.
After running this command, all 16 tests fail!
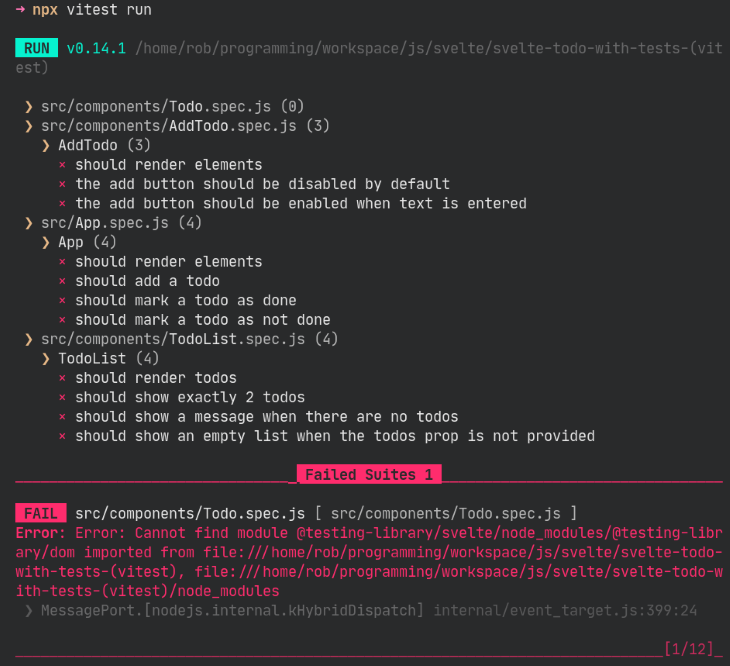
There are two types of errors:
@testing-library/svelte Node modules: This is the Svelte Testing Library that we’re using; we can come back to this oneReferenceError: document is not defined: The document object is defined in jsdom; this is used to emulate the DOM APII guess that the environment is set to Node by default, the same move Jest made recently. Let’s change the environment variable to jsdom:
export default defineConfig({
  plugins: [svelte()],
  test: {
    globals: true,
    environment: "jsdom",
  },
});
And that solves the document errors. Now, four tests pass. But, we still have seven fails.
The remaining errors are different; they are classified as an invalid Chai propertyError. For example, invalid Chai property: toBeInTheDocument.
The toBeInTheDocument and toBeEnabled functions come from the jest-dom library, which is a companion to the Svelte Testing Library. We did not need import statements in our test files previously because we configured Jest to include jest-dom. Here’s the option from our Jest config file (jest.config.json):
"setupFilesAfterEnv": ["@testing-library/jest-dom/extend-expect"]
To do the equivalent in Vitest, we can configure a setup file that is run before each test file. We can set this through the setupFiles option.
We’ll create an src/setuptest.js file that includes the following import statement:
import "@testing-library/jest-dom";
We can update our test object in the vite.config.js file so that it looks like this:
export default defineConfig({
  plugins: [svelte()],
  test: {
    globals: true,
    environment: "jsdom",
    setupFiles: ["src/setupTest.js"],
  },
});
Now, 11 tests pass, and only one fails! We’re almost there!
FAIL  src/components/Todo.spec.js [ src/components/Todo.spec.js ]
Error: Error: Cannot find module @testing-library/svelte/node_modules/@testing-library/dom imported from file:///home/rob/programming/workspace/js/svelte/svelte-todo-with-tests-(vitest), file:///home/rob/programming/workspace/js/svelte/svelte-todo-with-tests-(vitest)/node_modules
 ❯ MessagePort.[nodejs.internal.kHybridDispatch] internal/event_target.js:399:24
The final error has to do with the second import statement in to the Todo.spec.js file:
import { render, screen } from "@testing-library/svelte";
import { fireEvent } from "@testing-library/svelte/node_modules/@testing-library/dom";
I’m not sure why I had a second import statement like that! The fireEvent is part of the same library as the first statement, so we should be able to condense both statements into a single import like this:
import { render, screen, fireEvent } from "@testing-library/svelte";
Are we good?
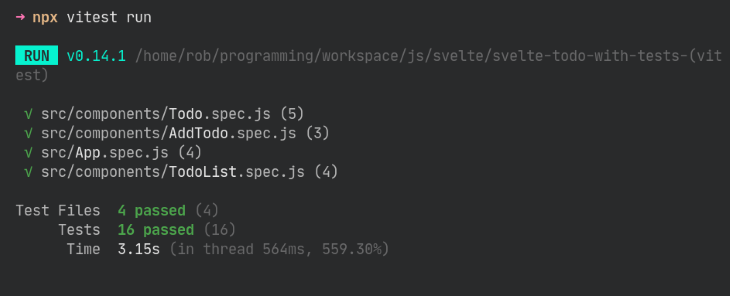
Yes! All 16 tests pass! 🙌
Now, let’s tidy up our scripts in the package.json file:
scripts: {
    "test": "npx vitest",
    "coverage": "npx vitest run --coverage"
}
Coverage reporting requires an additional package, c8. Let’s install that package and run the coverage:
npm i -D c8
npm run coverage
Here’s the output:

We’ve been upgraded to 100% coverage now (it was 98.07% in Jest). Bonus points! 🎁
And finally, we can delete the Jest-related dependencies and configurations. Here are the commands I used to clean up:
rm jest.config.json .babelrc
npm uninstall -D @babel/preset-env babel-jest jest jest-transform-stub svelte-jester
We drop two configuration files and five dependencies. I feel like I am floating! 🎈😄
Here’s the GitHub repo for this project.
I would give the Vitest migration experience a seven out of 10. The migration guide leaves you short if you’re using jsdom, Svelte Testing Library, or jest-dom. It is a couple of extra, short steps, which may have you scratching your head. If that document is improved, I would give it a nine out of 10. It was a pleasant surprise to be able to get everything to work without editing the test files.
So far, we’ve confirmed that several of Vitest’s features work:
Now, let’s use our Todo project to look at some of Vitest’s other important features. I’m trying to gauge if Vitest is production-ready. Currently, Vitest is at version 0.14.1, so I guess it’s still considered beta.
Just like how Vite works in the browser, Vitest also knows the graph of your modules. This enables Vitest to do smart detection and only rerun tests related to changes. According to the Vitest team, it “…feels almost like HMR, but for tests”.
Let’s run Vitest in watch mode with npm run test and change one of the component files.
Let’s open the AddTodo.svelte file and make a breaking change. I’ll remove the disabled attribute from the button, which should trigger a failing test.
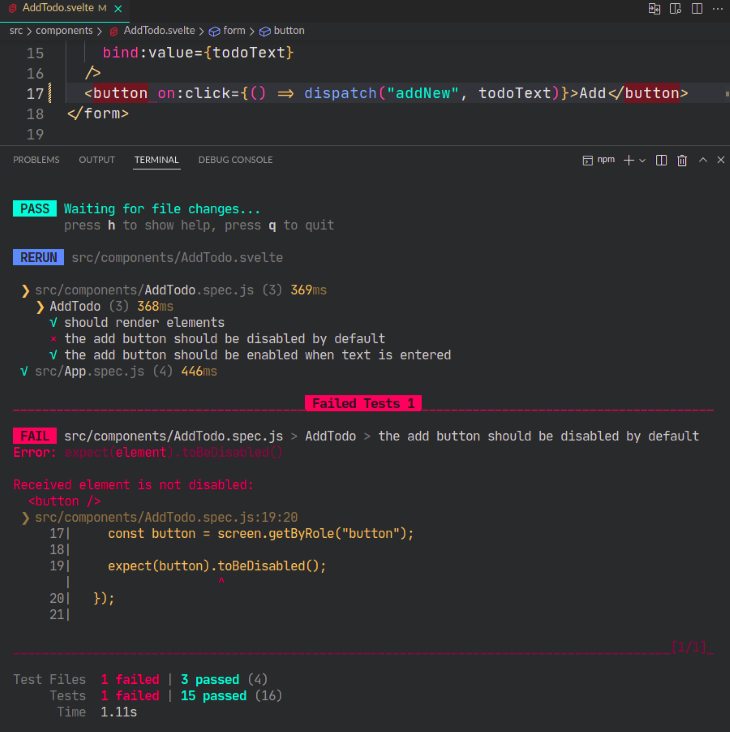
Vitest only reruns the related test suites (AddTodo and App), and we get one failing test case as expected! The running of the test suites takes 446ms, whereas to run all test suites takes at least a few seconds! This improvement is great for productivity.
We can add .concurrent to a suite or to individual tests to run them in parallel:
import { render, screen, fireEvent } from "@testing-library/svelte";
import App from "./App.svelte";

describe.concurrent("App", () => {
  /* all tests run in parallel */
})
Let’s see if this speeds up the tests! In theory, my app should be able to run all tests concurrently.
As a baseline, running my four test suites took 5.11s from a cold start. Running it with the test suites changed to be concurrent took 3.97s. It shaved off over a second! 🎉
Testing a TypeScript-Svelte app appears to be working well. Johnny Magrippis has a thorough video tutorial on this topic. He makes a small currency dashboard with SvelteKit and tests it with Vitest. The code can be found in this GitHub repo.
Test files to be targeted on the command line can be filtered by passing a name/pattern as an argument. For example, the following command will only run files that contain the word List:
npx vitest List
In the case of our example, only the TodoList.spec file is run.
You can also add .skip to the describe or test functions to avoid running certain suites or tests.
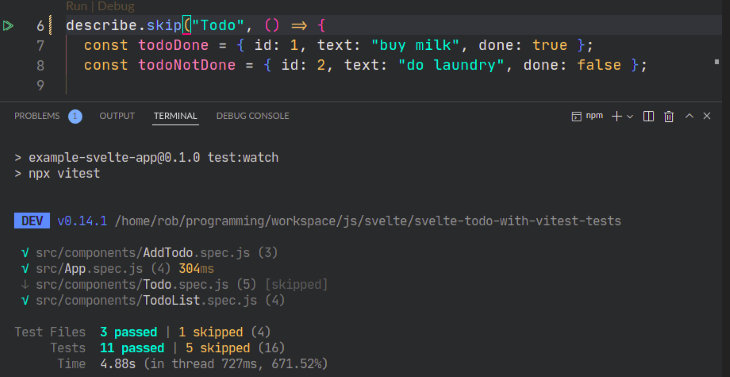
Here I skip the Todo test suite by adding .skip to the describe function. As you can see above, the output informs you which test suites and tests are skipped. And, the color encoding makes them easy to spot.
To use Vitest with SvelteKit, you’ll need to add the testing dependencies:
npm i -D vitest @testing-library/svelte jest-dom jsdom
Next, we need to add the same configuration that I shared earlier in the Jest to Vitest migration example. But, where exactly do we put the configuration?
The approach I took was to put my configuration in a file called vitest.config.js in the project root. This file contained the following code:
import { defineConfig } from "vite";
import { svelte } from "@sveltejs/vite-plugin-svelte";

// https://vitejs.dev/config/
export default defineConfig({
  plugins: [svelte({ hot: !process.env.VITEST })],
  test: {
    globals: true,
    environment: "jsdom",
    setupFiles: ["src/setupTest.js"],
  },
});
I also added the src/setupTest.js file that imports jest-dom. This saves us from having to add the import statement to each file. The src/setupTest.js file has the following contents:
import "@testing-library/jest-dom";
This works, but am I doing something suspect?
I’m not sure. But, there is another way that I have seen mentioned.
The SvelteKit configuration lives in the svelte.config.js file located in the project root. There is a Vite option that takes a Vite config object as its value. It would be nice to add the Vitest-related options here, and then we would have everything in a single config. I tried this, and it did not work!
I noticed that Johnny Magrippis added a library called vitest-svelte-kit in order to add the Vitest-related options directly into the svelte.config.js file. However, this does not work automatically. To use this technique, you need to do the following:
First, install vitest-svelte-kit:
npm i -D vitest-svelte-kit
Next, add the test-related stuff to your svelte.config.js file in the vite object:
import adapter from "@sveltejs/adapter-auto"
import preprocess from "svelte-preprocess"

/** @type {import('@sveltejs/kit').Config} */
const config = {
    // Consult https://github.com/sveltejs/svelte-preprocess
    // for more information about preprocessors
    preprocess: preprocess(),

    kit: {
        adapter: adapter(),
        vite: {
            test: {
                environment: "jsdom",
                globals: true,
                setupFiles: 'src/setupTests.ts',
            },
        },
    },
}

export default config
Then, create a vitest.config.js file and expose a function from the library:
import { extractFromSvelteConfig } from "vitest-svelte-kit"

export default extractFromSvelteConfig()
I guess vitest-svelte kit hasn’t totally worked out all the kinks yet, but it worked fine for me as far as I went with it.
Later, I hope that there will be an adder. Adders are a simple way to add integrations to a SvelteKit project. An adder would make it possible to include Vitest when you create a new app on the command line. That would provide a proven path. So, we’re not all the way there yet with a single config file.
I was surprised to see how well supported Vitest is already for testing in the browser and in your IDE. Now, let’s take a look at how Vitest integrates with a Web UI and an IDE.
You can use Vitest in a web UI. It requires an additional package, and you should run it with the --ui flag:
npm i -D @vitest/ui
Next, you can start Vitest by passing the --ui flag:
npx vitest --ui
Then, you can visit the Vitest UI at http://localhost:51204/__vitest__/.
However, I did not see the results in any browser on Ubuntu! 🙈 I only saw a thin green line!
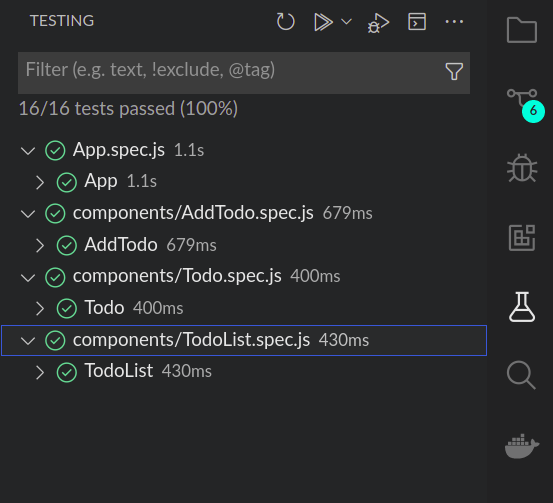
You can also use Vitest in an IDE. There’s an extension for VS Code and a plugin for JetBrains products.
I took the VS Code extension for a spin, and it worked well. It provides a sidebar view where you can run tests. It can kick off a debugging session by bringing you to the code of your failed tests.
I’m impressed with Vitest. It’s fast, the smart watch mode is great, it’s easier to configure than the competition, and it has melded the best practices from other frameworks to provide a familiar testing experience.
Being able to migrate an existing project from Jest to Vitest, without having to change the test files, is a huge win. I think using Vitest with Svelte and SvelteKit is almost a no-brainer.
While I did take Vitest through it paces for a small app, I cannot say if there are any issues when working on a larger project, or speak to how it manages more complex test cases. I guess you’d be in a pioneering space if you used it on a production app; so there’s some element of risk there.
If you’re using Jest in your project already, you can pilot Vitest alongside Jest without needing to meddle with your test files. If you’re in this camp, this strategy would enable you to mitigate the risk.
Overall, I would recommend using Vitest with Svelte. It has financial backing, full-time team members, and a robust community I expect a bright future for Vitest!
Install LogRocket via npm or script tag. LogRocket.init() must be called client-side, not
server-side
$ npm i --save logrocket

// Code:

import LogRocket from 'logrocket';
LogRocket.init('app/id');
// Add to your HTML:

<script src="https://cdn.lr-ingest.com/LogRocket.min.js"></script>
<script>window.LogRocket && window.LogRocket.init('app/id');</script>
Hey there, want to help make our blog better?
Join LogRocket’s Content Advisory Board. You’ll help inform the type of content we create and get access to exclusive meetups, social accreditation, and swag.
Sign up now
Learn how OpenAPI can automate API client generation to save time, reduce bugs, and streamline how your frontend app talks to backend APIs.

Discover how the Interface Segregation Principle (ISP) keeps your code lean, modular, and maintainable using real-world analogies and practical examples.

<selectedcontent> element improves dropdowns

Learn how to implement an advanced caching layer in a Node.js app using Valkey, a high-performance, Redis-compatible in-memory datastore.