
After React v18 introduced Server Components, Next.js implemented a similar feature that resulted in pages being rendered on the server by default. While you can still use client-side rendering with the Pages Router, doing so will prevent you from using the new features of the App Router in Next.js 13.
With this architectural shift in Next.js 13, there’s been a corresponding shift in data handling that’s important to understand. It’s quite unlike what you were used to when working with client-side pages in the pages directory.
For example, with the Server Component pages in Next.js 13, you can no longer use React Hooks or even React Context to manage any sort of state updates. This has prompted developers to change their strategies for handling states, either with or without a library.
In this article, you will learn how you can handle state in your Next.js app using a popular third-party library called TanStack Query, formerly known as React Query.
Jump ahead:
To demonstrate how to use TanStack Query for data handling in Next.js, we’ll put together two simple apps.
One uses TanStack Query with Next.js 12 or earlier and fetches data from the RESTful Pokémon API. You can check out the first project’s GitHub repo here.
The other uses TanStack Query with Next.js 13 and the ReactQueryStreamedHydration API. You can see this second project’s GitHub repo here.
Ready to dive in? Let’s get started.
The Replay is a weekly newsletter for dev and engineering leaders.
Delivered once a week, it's your curated guide to the most important conversations around frontend dev, emerging AI tools, and the state of modern software.
Before diving in, it’s necessary to understand the tool we’re discussing and the problem it’s trying to solve. In short, TanStack Query — previously known as React Query — is a powerful state management solution. It provides easy-to-use surface-level APIs for your app.
Handling state updates in a large-scale application can be quite cumbersome, especially when you want to scale your app over time. TanStack Query not only helps with your getter and setter state updates, but also:
These features make data handling much easier with TanStack Query, enhancing performance as well as both user and developer experience.
We’ll discuss how to use TanStack Query in Next.js 13, which uses Server Components by default. But as a refresher, it’s important to understand how TanStack Query helps with data handling in pages rendered on the client side, as is the case with Next.js 12 or earlier.
To understand this, we’ll set up a demo project that illustrates how data handling works with TanStack Query in Next.js. Let’s begin by quickly spinning up a new Next.js project:
npx create-next-app@latest
The Next.js CLI will ask you to choose between a pages-based or an app-based directory. For this section, opt for a pages-based directory, which will allow your pages to use client-side rendering by default.
Once your app finishes installing, you will have a pages-based Next.js boilerplate app. Now you can install TanStack Query like so:
npm i @tanstack/react-query
After installing TanStack Query, go to the entry point of your app — in this case, the _app.tsx file. In that root file, we’ll add the basic setup required to initialize TanStack Query.
Here, QueryClientProvider will wrap up your entire app. This QueryClientProvider takes in a client prop provided by TanStack Query:
import "@/styles/globals.css"
import type { AppProps } from "next/app"
import { QueryClient, QueryClientProvider } from "@tanstack/react-query"
import { ReactQueryDevtools } from "@tanstack/react-query-devtools"

const queryClient = new QueryClient()

export default function App({ Component, pageProps }: AppProps) {
  return (
    <QueryClientProvider client={queryClient}>
      <Component {...pageProps} />
    </QueryClientProvider>
  )
}
You may notice that we also imported ReactQueryDevtools, which is an optional set of developer tools provided by the TanStack team. Simply import this at the top of your root file and add it between providers to gain more in-depth insights about your data across the app.
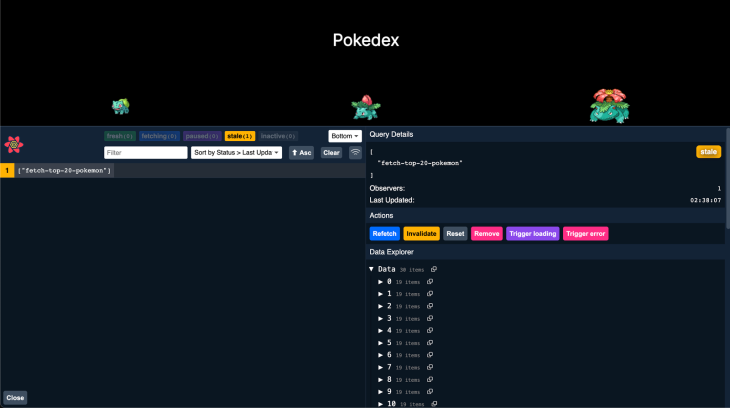
These developer tools help visualize how you are fetching data and how TanStack Query is handling that data in terms of fetching, caching, etc across your application. This tool set also provides a Data Explorer tab where you can check the API response that is being rendered.
In the Pokémon app, you can refresh the page and pull up your ReactQueryDevtools to see how a network call is being made:
Now, navigate to the index.tsx file and write a simple fetch function that will list Pokémon names from the Pokémon API:
const fetchPokemon = async (pokemonNumber: any) => {
    const res = await fetch(`https://pokeapi.co/api/v2/pokemon/${pokemonNumber}`).then((res) =>
      res.json()
    )
    return res // Return the Pokémon data
  }
This function returns a JSON-formatted data object containing Pokémon names. You can subscribe to this function to benefit from various states, caching, data manipulation, and more provided by the useQuery Hook, which demonstrates how TanStack Query provides a better way to handle data.
useQuery HookAs mentioned above, the useQuery Hook accepts a unique key name and an anonymous arrow function to the actual query that we wrote earlier. It also destructures the top-level isLoading, error, and data APIs, which indicate various states while fetching a given query:
const { isLoading, error, data: pokemon } = useQuery([`fetch-all-pokemon`], () => fetchPokemon())
You now have a function that fetches Pokémon names from the Pokémon API. This function has been passed on to the useQuery Hook provided by TanStack Query. You can now see how various states are being used in the JSX while the Pokémon list is being rendered:
import Head from "next/head"
import { Inter } from "next/font/google"
import { useQuery } from "@tanstack/react-query"
import { Fragment } from "react"

const inter = Inter({
  weight: "400",
  subsets: ["latin"],
})

export default function Home() {
  const fetchPokemon = async (pokemonNumber: any) => {
    const res = await fetch(`https://pokeapi.co/api/v2/pokemon/${pokemonNumber}`).then((res) =>
      res.json()
    )
    return res // Return the Pokémon data
  }

  const fetchPokemonArray = async () => {
    const pokemonArray = []
    for (let i = 1; i <= 30; i++) {
      try {
        const pokemonData = await fetchPokemon(i)
        pokemonArray.push(pokemonData)
      } catch (error) {
        console.error(error)
      }
    }
    return pokemonArray
  }

  const {
    isLoading,
    error,
    data: pokemon,
  } = useQuery([`fetch-top-20-pokemon`], () => fetchPokemonArray())

  console.log({ pokemon })

  return (
    <>
      <Head>
        <title>Create Next App</title>
        <meta name="description" content="Generated by create next app" />
        <meta name="viewport" content="width=device-width, initial-scale=1" />
        <link rel="icon" href="/favicon.ico" />
      </Head>
      <main className={inter.className}>
        <h1 style={{ textAlign: "center", margin: "4rem" }}>Pokedex</h1>
        {isLoading && <h2>Loading...</h2>}
        {error && <h2>Oops! An error has occured!</h2>}
        <div
          style={{
            display: "grid",
            gridTemplateColumns: "1fr 1fr 1fr",
            alignItems: "center",
            justifyContent: "center",
            justifySelf: "center",
          }}
        >
          {pokemon?.map((itm, index) => (
            <div
              style={{ display: "flex", alignItems: "center", flexDirection: "column" }}
              key={index}
            >
              <img alt={itm?.name} src={itm?.sprites?.front_default} />
              <div>{itm?.name}</div>
            </div>
          ))}
        </div>
      </main>
    </>
  )
}
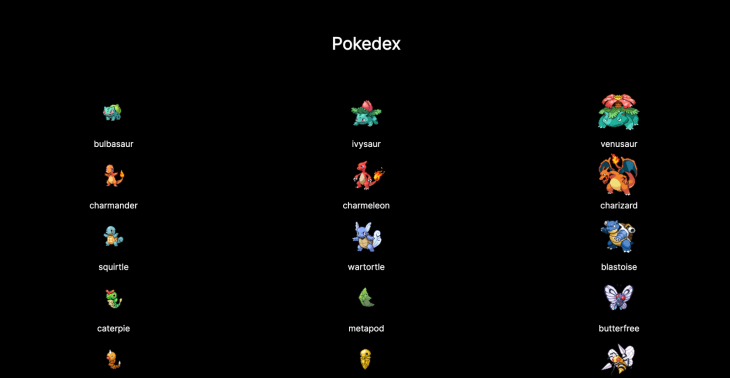
We now have a simple list of Pokémon that we fetched using the useQuery Hook. It utilizes the various fetching states and re-renders the UI accordingly for loading or error states:
You can find the complete code in this GitHub repo.
When React was introduced, it was purely unopinionated. React Server Components changed that. It now offers patterns and ideas regarding how you should fetch data, emphasizing server-rendered components more.
Now, some may think that fetching data on the server side has made client-side libraries such as TanStack Query pretty much redundant. After all, these libraries fetch data on the client side that is now being taken care of by React itself by moving data fetching to the server side only.
Even the core maintainer of TanStack Query tweeted the following after the release of React v18 and wrote a pretty good article worth reading called You Might Not Need React Query:
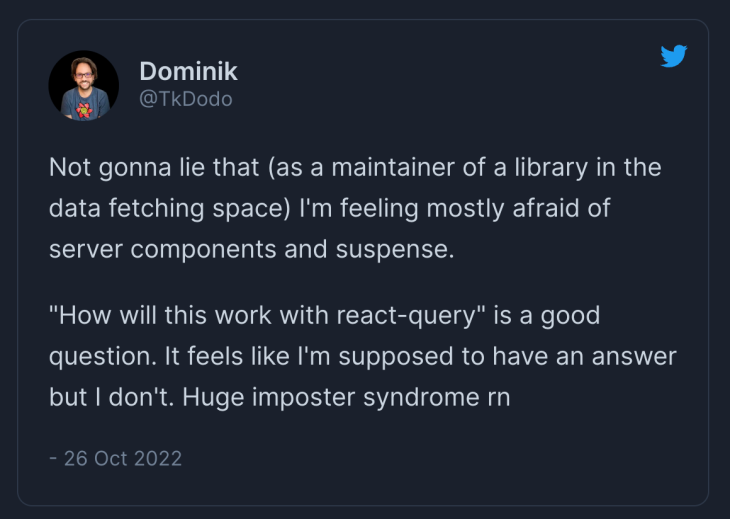
In a nutshell, TanStack Query is not “just” a data-fetching library. It also adeptly handles caching, mutating requests, automatic background data refresh, explicit handling of query states, and much more.
For TanStack Query to work with the new Server Components architecture, the TanStack team has introduced an experimental API called ReactQueryStreamedHydration. This neat little package has solved a lot of issues experienced previously while trying to make TanStack Query work with Next.js 13.
ReactQueryStreamedHydration allows you to fetch data on the server itself during the initial request. In other words, the API call from the useQuery Hook will be made on the server.
Once the data is available, it gets passed to the QueryClient. Then, as the QueryClient receives the data, it hydrates your UI.
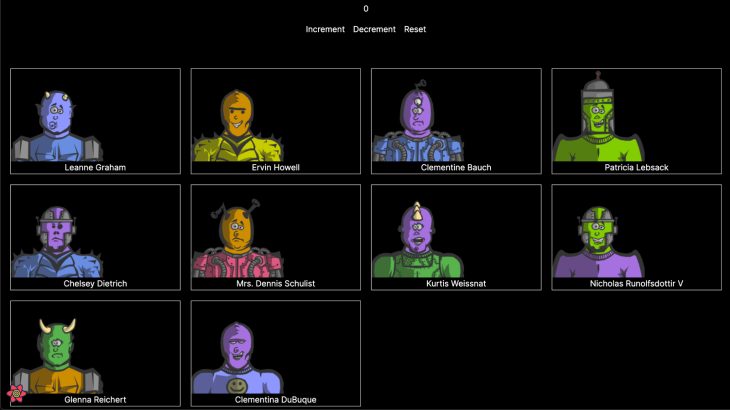
To demonstrate how easy it is to integrate TanStack Query with this new experimental package, let’s build a simple app that displays a list of robots using the RoboHash API.
To get started, create a new Next.js 13 project and install the following packages:
npm i @tanstack/react-query
npm i @tanstack/react-query-next-experimental
npm i @tanstack/react-query-devtools
The next few steps may seem familiar, as they’re similar to how we started our earlier Pokémon project.
Provider componentAfter installing, wrap your children prop with the ReactQueryStreamedHydration API. Create a separate folder called utils and create a file called Provider.tsx inside.
In this Provider.tsx file, you can wrap the children prop with ReactQueryStreamedHydration. Make sure to add ReactQueryDevtools as we did earlier:
"use client"
import React, { useState } from "react"
import { ReactQueryStreamedHydration } from "@tanstack/react-query-next-experimental"
import { QueryClientProvider, QueryClient } from "@tanstack/react-query"
import { ReactQueryDevtools } from "@tanstack/react-query-devtools"

function Provider({ children }: any) {
  const [client] = useState(new QueryClient())

  return (
    <>
      <QueryClientProvider client={client}>
        <ReactQueryStreamedHydration>
            {children}
        </ReactQueryStreamedHydration>
        <ReactQueryDevtools initialIsOpen={false} />
      </QueryClientProvider>
    </>
  )
}

export { Provider }
Like last time, the QueryClientProvider takes in a QueryClient. However, this time it will hydrate your pages with the data already fetched in the server.
Once the Provider component is done, you can now use it in the Next.js 13 layout.tsx entry file, wrapping the app content as children:
export default function RootLayout({ children }: { children: React.ReactNode }) {
  return (
    <html lang="en">
      <body className={inter.className}>
        <Provider>{children}</Provider>
      </body>
    </html>
  )
}
The Provider component is now ready to be used in the root file in this app:
 <QueryClientProvider client={client}>
    <ReactQueryStreamedHydration>{children}</ReactQueryStreamedHydration>
    <ReactQueryDevtools initialIsOpen={false} />
</QueryClientProvider>
You can now use the new App Router and TanStack Query by building out a page that will display the list of robots. In this example, the app structure is as follows:
- app
    - streaminghydration
        - counter.tsx // for client side interactions
        - page.tsx // the main page that will route to /streaminghydration
        - Robots.tsx // component for fetching robots and listing them
Let’s begin by writing actual logic for fetching using the useQuery Hook in the Robots.tsx file.
useQuery takes in a function as a parameter. This function is the getUsers function that is defined above the JSX. Along with the function, useQuery accepts a unique key, a staleTime option, and suspense property as well.
This staleTime option specifies the time after which the fetched data will go “stale” and TanStack Query needs to fetch it again. This is customizable and usually 0 seconds by default, meaning it will go stale immediately after the first fetch call. In our case, we’ll set it to 5 * 1000.
Let’s see the code:
"use client"
import { useQuery } from "@tanstack/react-query"
import React, { Fragment, useEffect } from "react"
async function getUsers() {
  return (await fetch("https://jsonplaceholder.typicode.com/users").then((res) =>
    res.json()
  )) as any[]
}
export default function Robots() {
  const [count, setCount] = React.useState(0)
  const { data } = useQuery<any[]>({
    queryKey: ["stream-hydrate-users"],
    queryFn: () => getUsers(),
    suspense: true,
    staleTime: 5 * 1000,
  })
  useEffect(() => {
    const intervalId = setInterval(() => {
      setCount((prev) => prev + 1)
    }, 100)
    return () => {
      clearInterval(intervalId)
    }
  }, [])
  return (
    <Fragment>
      {
        <div
          style={{
            display: "grid",
            gridTemplateColumns: "1fr 1fr 1fr 1fr",
            gap: 20,
          }}
        >
          {data?.map((user) => (
            <div key={user.id} style={{ border: "1px solid #ccc", textAlign: "center" }}>
              <img
                src={`https://robohash.org/${user.id}?set=set2&size=180x180`}
                alt={user.name}
                style={{ width: 180, height: 180 }}
              />
              <h3>{user.name}</h3>
            </div>
          ))}
        </div>
      }
    </Fragment>
  )
}
If you look closely, we’re using a useEffect Hook to demonstrate that you can have client-side updates while passing data from the server, or QueryClient. Using this instance of the useEffect Hook, we’re just automatically incrementing the count state at a fixed interval.
Counter component to the final projectOptionally, you can build purely client components using the useState Hook. TanStack Query will make sure to run everything smoothly. In our demo project, the Counter component is a basic counter state that you can increment, decrement, or reset from the client side:
export default function Counter() {
  const [count, setCount] = useState(0)

  return (
    <div style={{ marginBottom: "5rem", textAlign: "center" }}>
      <h4 style={{ marginBottom: 20 }}>{count}</h4>
      <button onClick={() => setCount((prev) => prev + 1)}>increment</button>
      <button onClick={() => setCount((prev) => prev - 1)} style={{ marginInline: 16 }}>
        decrement
      </button>
      <button onClick={() => setCount(0)}>reset</button>
    </div>
  )
}
Combining everything we’ve done so far, you now have a page.tsx that will route to /streaminghydration as its URL. Here, you can make use of <Suspense> boundaries and add your necessary loaders or skeletons:
import Counter from "./counter"
import Robots from "./Robots"
import { Suspense } from "react"

export default async function Page() {
  return (
    <main style={{ padding: 20 }}>
      <Counter />
      <Suspense fallback={<p style={{ textAlign: "center" }}>Loading...</p>}>
        <Robots />
      </Suspense>
    </main>
  )
}
For a deeper dive into Suspense, check out our tutorial on using Suspense with React Query.
This concludes our demonstration of using Tanstack Query’s ReactQueryStreamedHydration API with Next.js 13. Easy, right? Your final app should look like this:
You can find the complete code on GitHub.
In this post, we saw how TanStack Query pairs up quite well with the Next.js stack. With minimal setup to the repo, you get a powerful state management solution that takes care of caching, routing, data validation after a certain period of time, and much more.
Despite the recent shakeups in Next.js 13, the TanStack team quickly came up with a solution to fetch data on the server and later hydrate the client side. ReactQueryStreamedHydration proved to be an easy-to-integrate package that solved the issues of handling data while still using the latest Server Components.
If you are starting a project now with Next.js 13, Server Components provides a highly optimized way of fetching data. You might not need TanStack Query for smaller use cases.
However, as you have seen, TanStack Query is much more than a fetching library. It has a ton of features baked into it, including the set of ReactQueryDevtools that makes managing data across large-scale apps a breeze to deal with.
Debugging Next applications can be difficult, especially when users experience issues that are difficult to reproduce. If you’re interested in monitoring and tracking state, automatically surfacing JavaScript errors, and tracking slow network requests and component load time, try LogRocket.
LogRocket captures console logs, errors, network requests, and pixel-perfect DOM recordings from user sessions and lets you replay them as users saw it, eliminating guesswork around why bugs happen — compatible with all frameworks.
LogRocket's Galileo AI watches sessions for you, instantly identifying and explaining user struggles with automated monitoring of your entire product experience.
The LogRocket Redux middleware package adds an extra layer of visibility into your user sessions. LogRocket logs all actions and state from your Redux stores.


Modernize how you debug your Next.js apps — start monitoring for free.

React Server Components and the Next.js App Router enable streaming and smaller client bundles, but only when used correctly. This article explores six common mistakes that block streaming, bloat hydration, and create stale UI in production.

Gil Fink (SparXis CEO) joins PodRocket to break down today’s most common web rendering patterns: SSR, CSR, static rednering, and islands/resumability.

@container scroll-state: Replace JS scroll listeners nowCSS @container scroll-state lets you build sticky headers, snapping carousels, and scroll indicators without JavaScript. Here’s how to replace scroll listeners with clean, declarative state queries.

Explore 10 Web APIs that replace common JavaScript libraries and reduce npm dependencies, bundle size, and performance overhead.
Would you be interested in joining LogRocket's developer community?
Join LogRocket’s Content Advisory Board. You’ll help inform the type of content we create and get access to exclusive meetups, social accreditation, and swag.
Sign up now