Editor’s note: This article was last updated 14 July 2022 to reflect updates to Create React App.

In an effort to make writing React components easier with less code, the React team introduced Hooks to manage states in functional apps. Despite these improvements to React, one major functionality was still missing, caching.
Suspense simplifies managing loading states in React components, supporting fallbacks in case the component hasn’t finished loading yet. These features make it easier to fetch data from the frontend and are useful when you need a better way of showing the user a loading screen.
In this article, we’ll explore using React Query alongside Suspense to build a simple recipe app that will fetch recipe data from an API and render it to the DOM. Let’s get started!
useQuery?React Query’s useQuery(query, fn) is a Hook that fetches data based on the query passed to it and then stores the data in its parent variable. A query, in this case, consists of a unique key and an asynchronous function that is acted upon.
The unique key passed into the query is used for internal operations like fetching data, caching, and refetching data linked to the query.
You can install the React Query Hook library as follows via npm or Yarn:
yarn add react-query

// or

npm i -s react-query
Let’s imagine you want to test React Query’s Hook by fetching some data from a particular source. The Hook is stored in a variable called query using the default style:
const query = useQuery("demo", fetchQueries)

// fetchQueries()

async function fetchQueries() {
  return (await fetch(`http://some-url.com/endpoint`))
}
When used, the query variable is stored with information returned from the asynchronous function fetchQueries.
useQuery() featuresIf you need to fetch data from a source, for example, an API, you usually need to create a request in the useEffect() Hook, in componentDidMount, or in another function, which will be run every time your app reloads. This process can become quite stressful, which is where React Query comes in handy.
The basic feature behind useQuery() is data fetching. Let’s use a simple demo to see how the data fetching aspect works. First, you define the component and store the result from useQuery into three destructed variables:
function Recipes() {
   const { data, isLoading, error } = useQuery('recipes', fetchRecipes)

  return (
      <div>

      </div>
  )
}
The three variables to be destructed will contain the returned information with the following names:
data variable: Holds the data returned from the fetchRecipes functionisLoading: A boolean variable that holds the running status of the Hookerror variable: Holds whatever error is sent back from the HookNext, the received information is displayed by adding the following block of code into the <div> body:
function Recipes() {

  ...
  <div>
    { isLoading ? (
      <b> Loading .. </b>
    ) : error ? (
      <b>There's an error: {error.message}</b>
    ) : data ? (
      <ul>
        {data.map(recipe => (
          <li key={recipe.id}>{recipe.title}</li>
        ))}
      </ul>
    ) : null }
  </div>
  ...
}
The code above conditionally renders data from useQuery() using the ternary operator. If you’re a seasoned React developer, this shouldn’t be new to you. But, if you’re a beginner, then you should read up on conditional rendering in JavaScript as well as React. Keep in mind that the ternary operator is a shorthand method to the native if-else.
The code above checks the loading status of the query from the boolean variable isLoading. If the variable reads true, it displays a loading message. Otherwise, it will display an error if there’s an error message in the error object.
If there is no error message, and the data isn’t empty and has been created by the query, it displays the data. Otherwise, it returns a default null object, leaving the page blank if none of the above conditions are met. The idea of leaving the page blank isn’t ideal, so we’ll see how we can return relevant messages when there isn’t any data loaded.
Prefetching is one of the most interesting features in React Query. It works the same way as data fetching in that it is loaded from inception from either your useEffect() or your componentDidMount() method.
In this case, data is loaded and stored in the cache, so your app doesn’t have to send a new request to retrieve data each time a user needs it.
Caching simply means storing data for a period of time. Caching is a superb feature from React Query that allows your app to retrieve data from memory once it’s cached without having to re-query.
We’ll build a simple recipe app that fetches and renders data from an API using React Query’s useQuery() Hook. The full code for this article can be found at this GitHub repo as well. Let’s get started!
The first step in building our app is to set up a working directory by installing our required dependencies and creating the required files. To set up the working directory from your terminal, run the following commands in your preferred root directory:
npx create-react-app react-query-app
mkdir api
cd react-query-app
Next, we install React Query in our React app:
npm install react-query
Next, we’ll style our app in the index.css file:
body {
  background-color: #f0ebeb;
  font-family: 'Sedgwick Ave', cursive;
  font-size: 16px;
}
h1 {
  font-size: 40px;
  font-weight: lighter;
}
h2 {
  font-size: 20px;
}
button {
  background-color: #c8d2ddf3;
  border-radius: 12px;
  border: 5px 10px;
  font-family: 'Arvo', serif;
}
p {
  font-size: 18px;
  font-family: 'Copse', serif;
}
Let’s start our app by building the backend API where we’ll fetch data. We’ll start by installing the required dependencies:
npm init -y // initialize the repo first
npm i express cors body-parser
Now, we’ll write the backend code in the app.js file we created earlier:
app.jsWe’ll write our app’s backend code in app.js. In this file, a simple route and static JSON data is filed into an array where it returns data from the static JSON upon using the GET method. Add the code below to app.js:
// import necessary dependencies

const express = require("express");
const bodyParser = require("body-parser");
const cors = require('cors')

// initialize express.js
const app = express();

app.use(bodyParser.json());
app.use(cors())

// hardcoded recipes

const recipes = [
  {
    id: 1,
    title: "Jollof Rice Recipe",
    content: "How to make jollof rice ..."
  },
  {
    id: 2,
    title: "Bacon and Sauced Eggs",
    content: "How to make bacon and sauced eggs"
  },
  {
    id: 3,
    title: "Pancake recipes",
    content: "how to make pancakes..."
  },
  {
    id: 4,
    title: "Fish peppersoup recipe",
    content: "how to make it..."
  },
  {
    id: 5,
    title: "Efo Riro",
    content: "how to make it..."
  },
  {
    id: 6,
    title: "Garden Egg soup",
    content: "how to make it..."
  }
];

// return all recipes
app.get("/", (req, res) => {
  res.send(recipes);
});

// return a single recipe by ID
app.get("/:id", (req, res) => {
  const recipe = recipes.filter(
    recipe => recipe.id === parseInt(req.params.id)
  );
  if (recipe.length === 0) return res.status(404).send();
  if (recipe.length > 1) return res.status(500).send();
  res.send(recipe[0]);
});

app.listen(8081, () => {
  console.log("App's running on port 8081");
});
The backend code, as stated earlier, contains a hardcoded recipes array and simple routes. The backend simply receives requests, parses them to JSON with the aid of body-parser, and returns the data in JSON format. The backend API receives only two requests:
"/": When a request is directed to "/", the backend returns all data in the recipes array"/:id": When a request is directed to "/:id" with :id replaced with an integer, it returns a recipe with a corresponding IDSince we’re building a simple recipe app, that is all the backend code required. Let’s move on to building the frontend part of our app, where we’ll get to see how React Query works with Suspense.
We’ve successfully built the backend part of our application from which data will be retrieved. Now, we have to build the frontend part of our app, where data will be displayed or rendered.
index.jsxIn the index.jsx file, we mount our React app and render our data:
import React, { lazy } from "react";
import ReactDOM from "react-dom";

const rootElement = document.getElementById("root");
ReactDOM.render(<App />, rootElement)
index.jsx is a basic render file. Next, we import React Query and the recipe components since we’ll be writing the main app component, <App />, in the index.jsx file:
import { ReactQueryConfigProvider } from "react-query";

const Recipes = lazy(() => import("./components/Recipes"));
const Recipe = lazy(() => import("./components/Recipe"));

const queryConfig = {
  suspense: true
};
We imported React Query’s configuration context provider and also created a queryConfig object, which indicates that we will use Suspense in our app alongside React Query. Next, we’ll write our App component as follows:
function App() {
  const [activeRecipe, setActiveRecipe] = React.useState(null);

  return (
  <React.Fragment>
    <h2>Fast Recipes</h2>
    <hr />
    <ReactQueryConfigProvider config={queryConfig}>
        <React.Suspense fallback={<h1> Loading ...</h1>}>
          {  activeRecipe ? (
              <Recipe
                activeRecipe={activeRecipe}
                setActiveRecipe={setActiveRecipe}
              />
            ) : (
              <Recipes setActiveRecipe={setActiveRecipe} />
            )}
        </React.Suspense>
    </ReactQueryConfigProvider>
  </React.Fragment>
  );
}
In our app component, we initialized a state named activeRecipe and the state handler setActiveRecipe. We then created a title for our app and grouped the children tags under React.Fragment.
Next, we loaded React Query’s configuration provider component and passed the config object queryConfig that tells React Query we’ll be using Suspense.
Next, we wrapped the conditional rendering under React.Suspense. If activeRecipe is set to true, it displays the recipe. Otherwise, it displays the list of recipes.
We also added a fallback prop to React.Suspense. This is a required prop that renders the passed data whenever there isn’t any data to be rendered or there’s a delay in fetching data.
Without the addition of Suspense, React Query would render a blank page when it is in the process of querying and rendering data. This isn’t ideal because these situations don’t give users any indication of what the app is doing at that moment.
Next, we’ll write the queries that React Query will deal with in queries.jsx.
queries.jsxexport async function fetchRecipes() {
return (await fetch(`http://localhost:8081`)).json();
}
export async function fetchRecipe({ id }) {
return (await fetch(
`http://localhost:8081/${id}`
)).json();
}
The fetchRecipes() function returns the list of all recipes when queried, and fetchRecipe returns only a single recipe.
Next, we’ll write the component that renders a single recipe.
Recipe.jsximport React from "react";
import { useQuery } from "react-query";
import Button from "./Button";
import { fetchRecipe } from "../queries";
First, we import React and useQuery from its library to give us access to its features. We also import secondary components that handle little things, as we’ll see later on.
Next, we write the component after the import statements:
export default function Recipe({ activeRecipe, setActiveRecipe }) {
const { data, isFetching } = useQuery(
["recipe", { id: activeRecipe }],
fetchRecipe
);
return (
<React.Fragment>
<Button onClick={() => setActiveRecipe(null)}>Back</Button>
<h1>
ID: {activeRecipe} {isFetching ? "Loading Recipe" : null}
</h1>
{data ? (
<div>
<p>Title: {data.title}</p>
<p>Content: {data.content}</p>
</div>
) : null}
<br />
<br />
</React.Fragment>
);
}
The Recipe component takes two props, activeRecipe and setActiveRecipe, which will be used by the useQuery Hook to query and render data.
The useQuery Hook took two arguments, (["recipe", { id: activeRecipe }],fetchRecipe).
The first argument is an array that consists of a query name and a unique identifier, which, in this case, is the { id: activeRecipe }. The app uses the unique identifier when querying data through the second argument, fetchRecipe. The Hook is saved into a destructurable object:
data: Contains the information returned by the second argument, fetchRecipeisFetching: A Boolean that tells us the loading state of the appOnce there’s data returned from the useQuery Hook, the component renders the recipe data, as shown on lines 13–18. Otherwise, it renders nothing. The data is in turn cached, and if the user goes back and clicks on the same recipe, a new request won’t be sent. Instead, the recipe is displayed immediately, about twice as fast as when a request is sent.
There is also a Button component that allows the user to easily navigate within the app. Next, we’ll build the Recipes component.
Recipes.jsxThe Recipes component is responsible for rendering the list of recipes queried from fetchRecipes using useQuery(). We’ll use the code below:
import React from "react";
import { useQuery, prefetchQuery } from "react-query";

import Button from "./Button";

import { fetchRecipes, fetchRecipe } from "../queries";

export default function Recipes({ setActiveRecipe }) {
  const { data, isFetching } = useQuery("Recipes", fetchRecipes);

  return (
    <div>
      <h1>Recipes List
      { isFetching
        ? "Loading"
        : null
      }
        </h1>
      {data.map(Recipe => (
        <p key={Recipe.title}>
          <Button
            onClick={() => {
              // Prefetch the Recipe query
              prefetchQuery(["Recipe", { id: Recipe.id }], fetchRecipe);
              setActiveRecipe(Recipe.id);
            }}
          >
            Load
          </Button>{" "}
          {Recipe.title}
        </p>
      ))}
    </div>
  );
}
In the component, we started off by importing React and React Query, enabling us to use the useQuery Hook.
A loading message is displayed when the data is being fetched. The useQuery()Hook is used to retrieve the list of recipes from the backend. Traditionally, this would have been done in the useEffect() Hook as follows:
const [data, setData] = useState([])

useEffect(() => {
  fetch('https://api-url/recipes')
      .then(response => response.json())
      .then(data => {
        setData(data); // save recipes in state
      });
}, [])
This is the process carried out by React Query behind the scenes. Next, the data retrieved from React Query is cached, mapped out from its array, and then rendered on the DOM.
Button.jsxThe code for the helper component Button is as folllows:
import React from "react";

export default function Button({ children, timeoutMs = 3000, onClick }) {

  const handleClick = e => {
      onClick(e);
  };

  return (
    <>
      <button onClick={handleClick}>
        {children}
      </button>
    </>
  );
}
Next, we want to preview the app we’ve built. We’ll start by running the app first without the backend to verify that a blank page will be displayed when no data is returned. Start the React app from your terminal:
npm run start
Next, open your web browser and navigate to http://localhost:3000, and you should see a page like the following:
We get a blank page after the timeout, approximately 1,000ms, since the app has nothing to render to the DOM. Next, we start our backend app by running the command below from the api folder:
npm run start

// or

node app.js
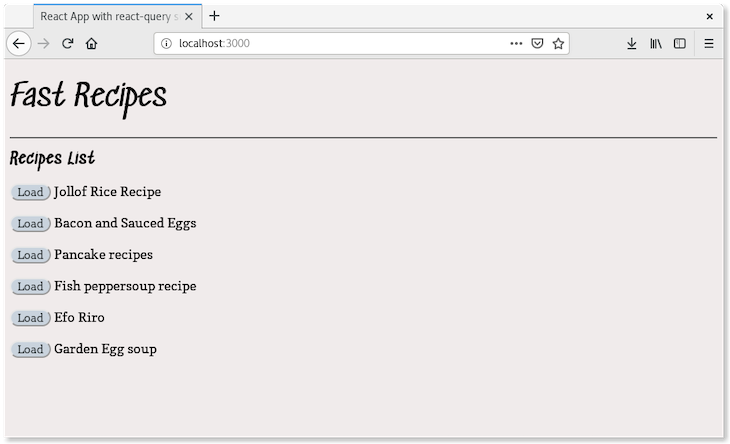
Once our backend app starts running, we get a notification from the terminal. Then, we refresh the browser at localhost:3000 to render our recipes:

Suspense will inform the user of the app’s status when fetching or loading data from a source. In this case, React Query fetches data, and Suspense keeps us updated with the app status, as instructed in the App component.
However, since the app is loading fast, we haven’t seen the real effect of Suspense. Setting the browser’s connection to 3G and refreshing the browser renders Loading… for a long time. The app is still awaiting data from the backend, i.e., the fetch status is pending, and therefore, Suspense displays the fallback message to avoid rendering a blank page. Once the data is fetched, the page renders the recipes:
With that, we have successfully implemented Suspense in our React Query app.
When a recipe is being loaded, the Suspense fallback message is displayed when there’s a delay in data fetching. The fetched recipe data is stored in cache and is immediately displayed again if the same recipe is loaded again:
In this article, we explored what Suspense and React Query are all about by building a simple recipe app. We learned how we can improve the user experience with Suspense by keeping the user informed during load times, and how we can improve data fetching using React Query’s useQuery() Hook. You can find the full code for the app built in this article at this GitHub repo. Happy coding!
Install LogRocket via npm or script tag. LogRocket.init() must be called client-side, not
server-side
$ npm i --save logrocket

// Code:

import LogRocket from 'logrocket';
LogRocket.init('app/id');
// Add to your HTML:

<script src="https://cdn.lr-ingest.com/LogRocket.min.js"></script>
<script>window.LogRocket && window.LogRocket.init('app/id');</script>
Hey there, want to help make our blog better?
Join LogRocket’s Content Advisory Board. You’ll help inform the type of content we create and get access to exclusive meetups, social accreditation, and swag.
Sign up now
Not sure if low-code is right for your next project? This guide breaks down when to use it, when to avoid it, and how to make the right call.

Compare Firebase Studio, Lovable, and Replit for AI-powered app building. Find the best tool for your project needs.

Discover how to use Gemini CLI, Google’s new open-source AI agent that brings Gemini directly to your terminal.

This article explores several proven patterns for writing safer, cleaner, and more readable code in React and TypeScript.


4 Replies to "Using Suspense and React Query: Tutorial with examples"
There’s such a think as `await return`? Could it be a typo?
Thanks Mykeels!, It was a typo. Thanks for reading 🙂
your app file is leaving me bugs.
react-dom.development.js:28439 Uncaught Error: Element type is invalid: expected a string (for built-in components) or a class/function (for composite components) but got: undefined. You likely forgot to export your component from the file it’s defined in, or you might have mixed up default and named imports.
Check the render method of `App`.
at createFiberFromTypeAndProps
super annoying after making it halfway through this and coding along for an hour…
You need to update this article… otherwise the App/index.js file breaks. took me a solid hour to fix this. this is the same in v3 and v4
const queryClient = new QueryClient({
defaultOptions: {
queries: {
suspense: true,
},
},
});