Editor’s note: This article builds a simple app to demonstrate communication between two sibling components using Redux. It was last updated on 18 January 2024 to update code and content according to Next.js v14.

Redux is one of the React ecosystem’s most popular state management solutions. Nowadays, there are plenty of alternatives, but Redux remains the most trusted and widely used tool.
For this reason, many projects that use Next.js also want to take advantage of Redux. However, Redux in a Next application has a few catches, and the setup is not always straightforward. The article aims to guide readers through the complexities and specific considerations necessary for integrating Redux with Next.js, addressing common challenges and optimizing the setup process for effective state management in Next.js applications.
There are many reasons why you might want to use Redux in a Next application. Let’s take a look at some of them.
Usually, a central state is used to manage the shared data between the components in a tree. In React, data only flows downwards, meaning you can pass data from the parent down to the child components.
This limitation sometimes makes things difficult because the components might not be close to the component tree, or there might not even be a parent-child path. In this case, using a common store that wraps all the components makes sense, and you might consider Redux.
Redux is very powerful as a state management solution. It’s been around for a while and has excellent community support.
If you are building something severe and are unsure which use cases might appear in the future, more likely than not, Redux will have a solution for you. While nothing is entirely future-proof, Redux is a safe bet for long-term projects.
In many projects, speed is often a priority. Many React developers are already familiar with Redux, and companies often want to use the same tool across all projects, if possible.
This means even if you are working in a company building a new project in Next, you might be forced to use Redux anyway, so it’s a good idea to learn how to use it based on popularity alone.
One of the major reasons why Redux is so popular is its flexibility. Redux provides many features, including middleware, caching, and performance. It has a very active and vibrant developer community. Also, Redux can separate the concerns inside your application, resulting in better code management in the future.
If you start using Redux in your application, its features won’t limit you. It will open up many new possibilities. You can choose to incorporate these features in your application or not.
Even if you choose not to use Redux, you can’t go wrong by learning a new concept! So, let’s dive in and see how we can integrate Redux into a Next.js application.
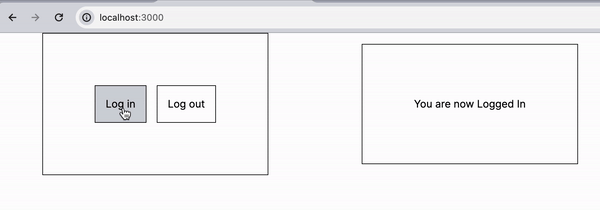
Today, we will build a simple application that tracks if a user is logged in or not, then, based on the state, changes the text above the button:


We will have two sibling components that will communicate between themselves using Redux.
Additionally, we will also use Redux Persist to persist the state. This is especially useful for handling authentication scenarios. You can play with the application here:

Going forward, we have two options. We can use plain Redux or Redux Toolkit. Redux is used in many legacy projects, but Redux Toolkit is recommended because it reduces boilerplate code and improves performance. However, the setups are almost the same for both tools.
Let’s create the starter project by running the following command:
yarn create next-app nextjs-redux-persist-boilerplate
We are using the Next.js App Router along with the src folder. You can see the project in action by running yarn dev and visiting http://localhost:3000/ on your browser.
Let’s install the required dependencies for Redux Toolkit:
yarn add @reduxjs/toolkit react-redux
Now, let’s create a new folder called store and a file named authSlice.ts inside it. The official documentation defines a slice as “a collection of Redux reducer logic and actions for a single feature in your app.”
We will put the logic for our authState inside this authSlice.ts file:
import { createSlice } from "@reduxjs/toolkit";
import type { PayloadAction } from "@reduxjs/toolkit";
export interface IAuthState {
  authState: boolean;
}

const initialState: IAuthState = {
  authState: false,
};

export const authSlice = createSlice({
  name: "auth",
  initialState,
  reducers: {
    setAuthState: (state, action: PayloadAction<boolean>) => {
      state.authState = action.payload;
    },
  },
});

export const { setAuthState } = authSlice.actions;
export const authReducer = authSlice.reducer;
This represents a basic Redux slice, applicable to standard React applications using Redux. It adheres to conventional practices without yet introducing any specific modifications or requirements for Next.js integration.
The two important parts here are:
authState variable is the data we want to share between components. This can be configuration, shared data, etc.setAuthState function will help us update the data in the store from any componentNext, create a file named store.ts to create the store, and add our authSlice there:
import { configureStore } from "@reduxjs/toolkit";
import { useDispatch, TypedUseSelectorHook, useSelector } from "react-redux";
import { authReducer } from "@/store/authSlice";

export const store = configureStore({
  reducer: { auth: authReducer },
  middleware: (getDefaultMiddleware) =>
    getDefaultMiddleware({ serializableCheck: false }),
});

export type RootState = ReturnType<typeof store.getState>;
export type AppDispatch = typeof store.dispatch;

export const useAppDispatch = () => useDispatch<AppDispatch>();
export const useAppSelector: TypedUseSelectorHook<RootState> = useSelector;
In the code above, we are importing authReducer, and passing it into the auth key in line six. This means all of the auth-related states will live under the auth key now. This is mainly for separation of concern.
We are also exporting two hooks. useAppDispatch helps us dispatch actions to update the state value, and useAppSelector helps us read the state values.
Our first component is named auth-viewer.tsx. This component accesses the current auth state:
import React from "react";
import { useAppSelector } from "@/store";

const AuthViewer = () => {
  const authState = useAppSelector((state) => state.auth.authState);
  return (
    <div className="flex gap border border-1 border-black p-20">
      You are now {authState ? "Logged  In" : "Logged Out"}
    </div>
  );
};
export default AuthViewer;
Notice on line five that we are using the useAppSelector Hook that we exported before. This is a simple demonstration of how you can access the state data.
Our next component is named auth-updater.tsx. This is a simple component with two buttons:
import React from "react";
import { setAuthState } from "@/store/authSlice";
import { useAppDispatch } from "@/store";
const AuthUpdater = () => {
  const dispatch = useAppDispatch();
  return (
    <div>
      <button onClick={() => dispatch(setAuthState(true))}>Log in</button>
      <button onClick={() => dispatch(setAuthState(false))}>Log out</button>
    </div>
  );
};
export default AuthUpdater;
Here, we are using useAppDispatch on line five to get a hold of the dispatch function of Redux.
But these components wont work yet because we have to wrap the topmost parent with a Provider to share the state across multiple children.
ProviderCreate a new file named store/redux-provider.tsx and add the following code:
import { Provider } from "react-redux";
import { store } from "./index";
import { persistStore } from "redux-persist";

export default function ReduxProvider({
  children,
}: {
  children: React.ReactNode;
}) {
  return <Provider store={store}>{children}</Provider>;
}
Now, let’s wrap our application with this Provider.
Before Next.js 13, we would typically add the Provider in the _app.tsx file. But in the latest version of Next, all pages are server-side rendered by default. But to make Redux work, we need client-side components.
Next.js provides a "use client" directive to mark a page or component as a client-side component.
Let’s open the app/page.tsx file to add the two components that we just created. Don’t forget to add the "use client" directive at the top of the page:
"use client";
import ReduxProvider from "@/store/redux-provider";
import AuthUpdater from "./auth-updater";
import AuthViewer from "./auth-viewer";
export default function Home() {
  return (
    <ReduxProvider>
      <main className="w-full h-screen grid grid-cols-2 place-items-center">
        <AuthUpdater />
        <AuthViewer />
      </main>
    </ReduxProvider>
  );
}
Notice that in line seven, we are wrapping the child components into ReduxProvider. Whenever you need to share the state, you have to do this.
If you have completed the Redux setup properly, you will see that the two sibling components are now communicating via Redux, and the button clicks actually update the state:
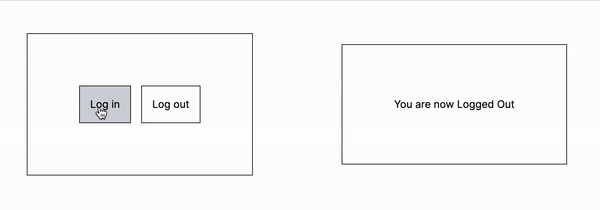
At this point, we have successfully set up our Redux store. But if you refresh your page, you will see that the state doesn’t persist. This is not an ideal scenario for authentication because you can’t ask your users to log in on every refresh.
But why does this happen? In Next.js, each page is rendered on demand, which means when you navigate from one page to another, the previous state will be gone. To resolve this issue and persist in the authentication state properly, we can use the Redux Persist library. Let’s see how to integrate this.
First, install the dependency like so:
yarn add redux-persist
Then, open the store/index.ts file and update the code as follows:
// Other imports stays as before...
import { persistReducer } from "redux-persist";
import storage from "redux-persist/lib/storage";

// configure which keuy we want to persist
const authPersistConfig = {
  key: "auth",
  storage: storage,
  whitelist: ["authState"],
};

const rootReducer = combineReducers({
  auth: persistReducer(authPersistConfig, authReducer),
});

export const store = configureStore({
  reducer: rootReducer,
  middleware: (getDefaultMiddleware) =>
    getDefaultMiddleware({ serializableCheck: false }),
});

// the rest is same as before....
Notice that authPersistConfig specifies which segments of the store to persist. For example, it allows for the exclusion of sensitive data from storage.
The rest of the code stays mostly the same. We are using combineReducers as a “nice to have” because, most likely, you will have more than one slice in a real-world application.
Finally, update auth-provider like the following:
import { Provider } from "react-redux";
import { store } from "./index";

// Just add the following 2 lines
import { persistStore } from "redux-persist";
persistStore(store);

export default function ReduxProvider(){
  // everything stays same here
}
We are calling the persistStore method to persist the store before we pass it to the Provider.
Now, if everything goes well, we can refresh our application, and the authentication state will persist:
Hooray! We successfully added Redux Persist to our application, allowing us to manage authentication.
There are some situations where Redux might not be the best option. Like everything else, Redux has some drawbacks, and this is especially true when integrating with Next.js. Let’s discuss some scenarios when you shouldn’t use Redux.
Redux might be overkill if you are only building a small-scale project. In Next.js, the default state management solutions will be able to handle almost all use cases.
So unless you build something serious or a proof of concept, you should consider the default state management solutions.
Integrating Redux in Next.js is a complex procedure. Redux may not be your best option if you need to ship a feature quickly.
Context is React’s solution for sharing state between components. According to the documentation: “Context provides a way to pass data through the component tree without having to pass props down manually at every level.“
This is the same thing that Redux is doing. So, if you don’t need the fancy features of Redux, then don’t bother using it. For most use cases, React’s Context API is enough.
Integrating Redux with Next.js enhances state management, offering solutions for shared state across components, future-proofing projects, and leveraging Redux’s flexibility and community support. This guide covered setting up Redux in Next.js, including Redux Persist for state persistence, addressing the challenges of server-side rendering, and considerations for when to use Redux.
Despite its complexity, Redux remains a great option for large-scale or complex Next.js projects. You can find the GitHub repository for this project here and the demonstration here.
You can also check out my other works in my portfolio.
Have a great day!
Debugging Next applications can be difficult, especially when users experience issues that are difficult to reproduce. If you’re interested in monitoring and tracking state, automatically surfacing JavaScript errors, and tracking slow network requests and component load time, try LogRocket.
LogRocket captures console logs, errors, network requests, and pixel-perfect DOM recordings from user sessions and lets you replay them as users saw it, eliminating guesswork around why bugs happen — compatible with all frameworks.
LogRocket's Galileo AI watches sessions for you, instantly identifying and explaining user struggles with automated monitoring of your entire product experience.
The LogRocket Redux middleware package adds an extra layer of visibility into your user sessions. LogRocket logs all actions and state from your Redux stores.


Modernize how you debug your Next.js apps — start monitoring for free.
Would you be interested in joining LogRocket's developer community?
Join LogRocket’s Content Advisory Board. You’ll help inform the type of content we create and get access to exclusive meetups, social accreditation, and swag.
Sign up now
A breakdown of the wrapper and container CSS classes, how they’re used in real-world code, and when it makes sense to use one over the other.

This guide walks you through creating a web UI for an AI agent that browses, clicks, and extracts info from websites powered by Stagehand and Gemini.

This guide explores how to use Anthropic’s Claude 4 models, including Opus 4 and Sonnet 4, to build AI-powered applications.

Which AI frontend dev tool reigns supreme in July 2025? Check out our power rankings and use our interactive comparison tool to find out.


14 Replies to "How to use Redux in Next.js"
I really like this tutorial and I am very grateful for it. But I have one question. I have a lot of pages, how can I maintain a state on every page? In your example you are using SSR, but do I need to invoke it on every page? It would be perfect to use it on layout component or something. Do you have any idea how to do it?
we use redux or useContext for it if it’s an easy thing like logging out you can use two of em.
What am I missing? I followed your article carefully and the state does not persist in the browser. I’ using the latest version of Chrome. I even downloaded your repo, added the node_modules, but even your own repo does not retain the state. I checked my code against your repo code also. What am I missing?
It took me a while to figure out, but it looks like extraReducers should be moved outside of the reducers object in the authSlice.ts file
Rightly said Darin.
Thank you for this great tutorial. That helped already. But one question please. Do we need the extraReducer with the Hydrate type in every single Slice?
Thank you, nice tutorial! Perfect for next/redux beginner.
Hi thanks, could you please update it to useWrappedStore?
I would also appreciate this update.
thank you .
I’ve downloaded and ran the sample in production mode (npm run build; npm run start;), but when I examine initial Html served by the server – it only has “Loading”, unless I remove Persist Gate wrapper. Store state is passed from backend, but it’s not Hydrated in HTML. This kills SEO, which is one of the major reasons to use Next.JS. Am I missing something?
Please note, that this article describes using redux with Page Router of Next 13. Next 13 also introduced App Router that integrate React Server Components, but works very differently and using Redux with it is not this straightforward.
Great article! you really save my day with the useAppDispatch. Thank you
Thanks for the post. I Could install all without problems.