Editor’s note: This article was last updated by Timonwa Akintokun on 14 June 2024 to explore using middleware for async actions, including Redux Thunk and Redux Saga. It also now includes testing Redux authentications to ensure that the state management for user authentication functions correctly.

User authentication can be handled in a myriad of ways. Because of this feature’s importance, we’ve seen more companies provide authentication solutions to ease the process — Firebase, Auth0, and NextAuth.js, to name a few.
Regardless of how such services handle authentication and authorization on their end, the implementation process typically involves calling some API endpoints and receiving a private token — usually a JSON Web Token (JWT) — to be used in your frontend infrastructure.
In this article, you’ll learn how to use Redux Toolkit (RTK) and RTK Query to create a frontend authentication workflow in React. We’ll use essential Toolkit APIs like createSlice, createAsyncThunk, createApi, and fetchBaseQuery to make asynchronous requests to an Express backend.
The backend for this project is built using Express with a MongoDB database. However, the frontend workflow should still apply for any authentication service you use that provides a token.
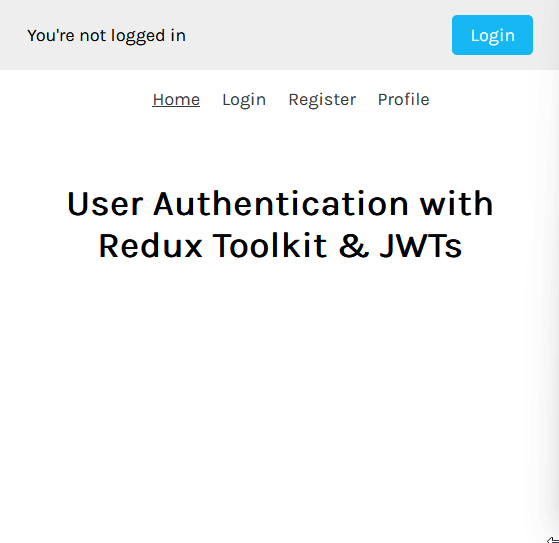
You can download the source code from the project’s repository with instructions on how to set up a database and run the application locally. View the live demo here and take a peek at what the final project will look like below:
To follow along, you’ll need to be familiar with the following:
createSlice and createAsyncThunk APIsNow, let’s start authenticating!
The repository includes a starter-files branch that contains the necessary files to bootstrap this application. The frontend folder also includes the various user interfaces seen in the demo, such as Home, Login, Register, and Profile screens with respective routes /, /login, /register, and /user-profile.
Here’s what the routing structure currently looks like:
// App.js
import { BrowserRouter as Router, Routes, Route } from 'react-router-dom'
import Header from './components/Header'
import LoginScreen from './screens/LoginScreen'
import RegisterScreen from './screens/RegisterScreen'
import ProfileScreen from './screens/ProfileScreen'
import HomeScreen from './screens/HomeScreen'
import './App.css'

function App() {
  return (
    <Router>
      <Header />
      <main className='container content'>
        <Routes>
          <Route path='/' element={<HomeScreen />} />
          <Route path='/login' element={<LoginScreen />} />
          <Route path='/register' element={<RegisterScreen />} />
          <Route path='/user-profile' element={<ProfileScreen />} />
        </Routes>
      </main>
    </Router>
  )
}
export default App
The input fields on the registration pages are connected to React Hook Form, which cleanly grabs the input values and returns them in a handleSubmit function:
// LoginScreen.js
import { useForm } from 'react-hook-form'

const LoginScreen = () => {
  const { register, handleSubmit } = useForm()

  const submitForm = (data) => {
    console.log(data.email)
  }

  return (
    <form onSubmit={handleSubmit(submitForm)}>
      <div className='form-group'>
        <label htmlFor='email'>Email</label>
        <input
          type='email'
          className='form-input'
          {...register('email')}
          required
        />
      </div>
      <div className='form-group'>
        <label htmlFor='password'>Password</label>
        <input
          type='password'
          className='form-input'
          {...register('password')}
          required
        />
      </div>
      <button type='submit' className='button'>
        Login
      </button>
    </form>
  )
}
export default LoginScreen
In your terminal, clone the starter-files branch with the following command:
git clone --branch starter-files --single-branch https://github.com/Chinwike1/redux-user-auth.git
Next, install all project dependencies:
npm install
cd frontend
npm install
The above process installs the following packages on the frontend:
You can get familiar with these Redux terms first if you need to.
Finally, run the application with the following command:
cd ..
npm run dev
Redux Toolkit introduces a new way of creating a store. It separates parts of the store into different files, known as slices.
A slice represents a single unit of Redux state. It’s a collection of reducer logic and actions for a single feature in your app, typically defined together in a single file. For us, this file is features/auth.
By using RTK’s createSlice API, we can create a Redux slice like so:
// features/auth/authSlice.js
import { createSlice } from '@reduxjs/toolkit'
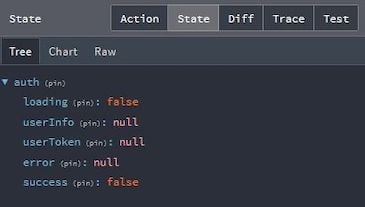
const initialState = {
loading: false,
userInfo: {}, // for user object
userToken: null, // for storing the JWT
error: null,
success: false, // for monitoring the registration process.
}
const authSlice = createSlice({
name: 'auth',
initialState,
reducers: {},
extraReducers: {},
})
export default authSlice.reducer
Next, import the reducer property from authSlice into the store so it reflects in the root Redux state object:
// app/store.js
import { configureStore } from '@reduxjs/toolkit'
import authReducer from '../features/auth/authSlice'

const store = configureStore({
  reducer: {
    auth: authReducer
  }
})
export default store
To make these store values accessible to every component, wrap the entire application with the React Redux Provider component:
// index.js
import React from 'react'
import ReactDOM from 'react-dom/client'
import App from './App'
import { Provider } from 'react-redux'
import store from './app/store'

const root = ReactDOM.createRoot(document.getElementById('root'))
root.render(
  <React.StrictMode>
    <Provider store={store}>
      <App />
    </Provider>
  </React.StrictMode>
)
The Redux Toolkit docs suggest consolidating actions and reducers into one slice file. Conversely, I’ve found my code more readable when I split these two parts into separate files — e.g., features/auth/authActions.js. Here, we’ll create actions that make asynchronous requests to the backend.
But before that, I’ll give a quick overview of the backend routes currently available.
Our Express server, hosted on localhost:5000, currently has three routes.
First, api/user/login is the login route. It accepts POST requests and requires the user’s email and password as arguments. It then returns a JWT after successful authentication or an error message. This token has a 12-hour lifespan.
Second, api/user/register is the registration route. It accepts POST requests and requires the user’s first name, email, and password.
Third, api/user/profile is an authorization route. It accepts GET requests and requires a token to fetch user details from the database. It returns the user’s object after successful authorization or an error message.
We will use createAsyncThunk to create the login and register actions. Then, we will create an RTK Query getUserDetails query for the profile route.
In features/auth/authActions.js, you will import and use the createAsyncThunk API. createAsyncThunk accepts three parameters: a string action type, a callback function, and an optional options object.
The callback function is an important parameter with two key arguments to take into consideration when writing Redux actions.
The first argument — arg — is the single value passed into the dispatch method when the action is called. If you need to pass multiple values, you can pass in an object.
The second argument — thunkAPI — is an object containing parameters usually passed to a Redux thunk function. Parameters include getState, dispatch, rejectWithValue, and more.
See the code below:
// authActions.js
import axios from 'axios'
import { createAsyncThunk } from '@reduxjs/toolkit'

const backendURL = 'http://127.0.0.1:5000'

export const registerUser = createAsyncThunk(
  'auth/register',
  async ({ firstName, email, password }, { rejectWithValue }) => {
    try {
      const config = {
        headers: {
          'Content-Type': 'application/json',
        },
      }
      await axios.post(
        `${backendURL}/api/user/register`,
        { firstName, email, password },
        config
      )
    } catch (error) {
    // return custom error message from backend if present
      if (error.response && error.response.data.message) {
        return rejectWithValue(error.response.data.message)
      } else {
        return rejectWithValue(error.message)
      }
    }
  }
)
In the code block above, we begin by storing our Express server’s URL in a backendURL variable. The values from the registration form are then used to make a POST request to the register route using Axios.
If an error should occur, thunkAPI.rejectWithValue will return the custom error message from the backend as a payload to the reducer.
extraReducersActions created with createAsyncThunk generate three possible lifecycle action types: pending, fulfilled, and rejected.
You can utilize these action types in the extraReducers property of authSlice to make the appropriate changes to your state:
// authSlice.js
import { createSlice } from '@reduxjs/toolkit'
import { registerUser } from './authActions'

const initialState = {
  loading: false,
  userInfo: null,
  userToken: null,
  error: null,
  success: false,
}

const authSlice = createSlice({
  name: 'auth',
  initialState,
  reducers: {},
  extraReducers: {
    // register user
    [registerUser.pending]: (state) => {
      state.loading = true
      state.error = null
    },
    [registerUser.fulfilled]: (state, { payload }) => {
      state.loading = false
      state.success = true // registration successful
    },
    [registerUser.rejected]: (state, { payload }) => {
      state.loading = false
      state.error = payload
    },
  },
})
export default authSlice.reducer
In this case, we set the success value to true when the action is fulfilled to signify a successful registration. Next, you’ll make appropriate UI changes with the updated state.
useDispatch and useSelector HooksBy using useSelector and useDispatch from the react-redux package, you can read the state from a Redux store and dispatch an action from any component, respectively:
// RegisterScreen.js
import { useForm } from 'react-hook-form'
import { useDispatch, useSelector } from 'react-redux'
import Error from '../components/Error'
import Spinner from '../components/Spinner'
import { registerUser } from '../features/auth/authActions'

const RegisterScreen = () => {
  const { loading, userInfo, error, success } = useSelector(
    (state) => state.auth
  )
  const dispatch = useDispatch()
  const { register, handleSubmit } = useForm()

  const submitForm = (data) => {
    // check if passwords match
    if (data.password !== data.confirmPassword) {
      alert('Password mismatch')
    }
    // transform email string to lowercase to avoid case sensitivity issues in login
    data.email = data.email.toLowerCase()
    dispatch(registerUser(data))
  }
  return (
    <form onSubmit={handleSubmit(submitForm)}>
      {error && <Error>{error}</Error>}
      <div className='form-group'>
        <label htmlFor='firstName'>First Name</label>
        <input
          type='text'
          className='form-input'
          {...register('firstName')}
          required
        />
      </div>
      <div className='form-group'>
        <label htmlFor='email'>Email</label>
        <input
          type='email'
          className='form-input'
          {...register('email')}
          required
        />
      </div>
      <div className='form-group'>
        <label htmlFor='password'>Password</label>
        <input
          type='password'
          className='form-input'
          {...register('password')}
          required
        />
      </div>
      <div className='form-group'>
        <label htmlFor='email'>Confirm Password</label>
        <input
          type='password'
          className='form-input'
          {...register('confirmPassword')}
          required
        />
      </div>
      <button type='submit' className='button' disabled={loading}>
        {loading ? <Spinner /> : 'Register'}
      </button>
    </form>
  )
}
export default RegisterScreen
When the form is submitted, you start by checking if both password fields match. If they do, the registerUser action is dispatched with the form data as its argument.
The useSelector Hook is used to pull out the loading and error state values from the auth object in the Redux store. These values are then used to make certain UI changes, like disabling the submit button while the request is in progress, showing a spinner, and displaying an error message.
Currently, when a user completes registration, there’s no indication that what they’ve done is successful. With the success value from userSlice alongside React Router’s useNavigate Hook and the useEffect Hook, you can redirect the user to the Login page after registration. Here’s how that would look:
// RegisterScreen.js
import { useEffect } from 'react'
import { useForm } from 'react-hook-form'
import { useDispatch, useSelector } from 'react-redux'
import { useNavigate } from 'react-router-dom'
import Error from '../components/Error'
import { registerUser } from '../features/auth/authActions'

const RegisterScreen = () => {
  const { loading, userInfo, error, success } = useSelector(
    (state) => state.user
  )
  const dispatch = useDispatch()
  const { register, handleSubmit } = useForm()

  const navigate = useNavigate()

  useEffect(() => {
    // redirect user to login page if registration was successful
    if (success) navigate('/login')
    // redirect authenticated user to profile screen
    if (userInfo) navigate('/user-profile')
  }, [navigate, userInfo, success])

  const submitForm = (data) => {
    // check if passwords match
    if (data.password !== data.confirmPassword) {
      alert('Password mismatch')
      return
    }
    // transform email string to lowercase to avoid case sensitivity issues in login
    data.email = data.email.toLowerCase()
    dispatch(registerUser(data))
  }

  return (
    <form onSubmit={handleSubmit(submitForm)}>
      {/* form markup... */}
    </form>
  )
}
export default RegisterScreen
There’s a familiar pattern you’ll notice while writing RTK logic. It usually goes like this:
It doesn’t have to be in that order, but they’re usually reoccurring steps. Let’s repeat this with the login action.
The login action will be similar to the register action. The difference is that with the login action, you’d store the JWT returned from the backend in local storage before passing the result to the reducer:
// authActions.js
const backendURL = 'http://127.0.0.1:5000'
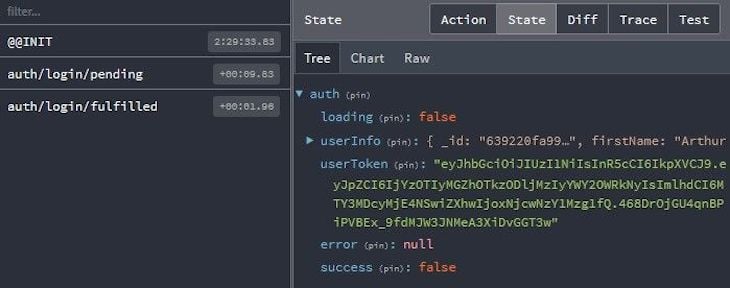
export const userLogin = createAsyncThunk(
'auth/login',
async ({ email, password }, { rejectWithValue }) => {
try {
// configure header's Content-Type as JSON
const config = {
headers: {
'Content-Type': 'application/json',
},
}
const { data } = await axios.post(
`${backendURL}/api/user/login`,
{ email, password },
config
)
// store user's token in local storage
localStorage.setItem('userToken', data.userToken)
return data
} catch (error) {
// return custom error message from API if any
if (error.response && error.response.data.message) {
return rejectWithValue(error.response.data.message)
} else {
return rejectWithValue(error.message)
}
}
}
)
Now you can handle the lifecycle action types in authSlice.js:
// authSlice.js
import { createSlice } from '@reduxjs/toolkit'
import { registerUser, userLogin } from './authActions'

// initialize userToken from local storage
const userToken = localStorage.getItem('userToken')
  ? localStorage.getItem('userToken')
  : null

const initialState = {
  loading: false,
  userInfo: null,
  userToken,
  error: null,
  success: false,
}

const authSlice = createSlice({
  name: 'auth',
  initialState,
  reducers: {},
  extraReducers: {
    // login user
    [userLogin.pending]: (state) => {
      state.loading = true
      state.error = null
    },
    [userLogin.fulfilled]: (state, { payload }) => {
      state.loading = false
      state.userInfo = payload
      state.userToken = payload.userToken
    },
    [userLogin.rejected]: (state, { payload }) => {
      state.loading = false
      state.error = payload
    },
    // register user reducer...
  },
})
export default userSlice.reducer
Because the value of userToken depends on the value of the token from localStorage, it’s better to initialize it at the beginning, as done above.
Now you can dispatch this action when the form is submitted and make your preferred UI updates:
// LoginScreen.js
import { useForm } from 'react-hook-form'
import { useDispatch, useSelector } from 'react-redux'
import { userLogin } from '../features/auth/authActions'
import Error from '../components/Error'

const LoginScreen = () => {
  const { loading, error } = useSelector((state) => state.user)
  const dispatch = useDispatch()
  const { register, handleSubmit } = useForm()

  const submitForm = (data) => {
    dispatch(userLogin(data))
  }

  return (
    <form onSubmit={handleSubmit(submitForm)}>
      {error && <Error>{error}</Error>}
      <div className='form-group'>
        <label htmlFor='email'>Email</label>
        <input
          type='email'
          className='form-input'
          {...register('email')}
          required
        />
      </div>
      <div className='form-group'>
        <label htmlFor='password'>Password</label>
        <input
          type='password'
          className='form-input'
          {...register('password')}
          required
        />
      </div>
      <button type='submit' className='button' disabled={loading}>
        {loading ? <Spinner /> : 'Login'}
      </button>
    </form>
  )
}
export default LoginScreen
You also want to make sure that previously authenticated users can’t access this page. The value of userInfo can be used to redirect an authenticated user to the Login page with useNavigate and useEffect:
// LoginScreen.js
import { useEffect } from 'react'
import { useForm } from 'react-hook-form'
import { useNavigate } from 'react-router-dom'
import { useDispatch, useSelector } from 'react-redux'
import { userLogin } from '../features/user/userActions'
import Error from '../components/Error'

const LoginScreen = () => {
  const { loading, userInfo, error } = useSelector((state) => state.user)
  const dispatch = useDispatch()
  const { register, handleSubmit } = useForm()
  const navigate = useNavigate()

  // redirect authenticated user to profile screen
  useEffect(() => {
    if (userInfo) {
      navigate('/user-profile')
    }
  }, [navigate, userInfo])

  const submitForm = (data) => {
    dispatch(userLogin(data))
  }

  return (
    <form onSubmit={handleSubmit(submitForm)}>
      {/* form markup... */}
    </form>
  )
}
export default LoginScreen
And that completes the registration process!
getUserDetails queryNext, you’ll learn how to create a query using RTK Query. This query will automatically authenticate a user whose valid token is stored in the browser.
The RTK Query docs define it as a powerful data fetching and caching tool. It simplifies data fetching and caching in React apps and builds on top of RTK’s createSlice and createAsyncThunk APIs. RTK Query is similar to other data-fetching libraries like React Query and SWR.
Despite Redux being a UI-agnostic tool, RTK Query offers a React-specific entry point for generating React hooks that cover the entire data fetching process, providing data and isLoading values that can be used in components. Let’s see how to create a query.
To use RTK Query in your app, you will first create an RTKQ service definition using RTKQ’s createApi and fetchBaseQuery functions. Create an authService.js file in the following directory app/services/auth/ and fill it with the code below:
// app/services/auth/authService.js
// React-specific entry point to allow generating React hooks
import { createApi, fetchBaseQuery } from '@reduxjs/toolkit/query/react'

export const authApi = createApi({
  reducerPath: 'authApi',
  baseQuery: fetchBaseQuery({
    baseUrl: 'http://127.0.0.1:5000/',
    prepareHeaders: (headers, { getState }) => {},
    endpoints: () => ({}),
  }),
})
createApi is the core of RTK Query’s functionality. It lets you define a set of “endpoints” that describe how to retrieve data from backend APIs.
reducerPath is a unique key that your service will be mounted to in your store. It defaults to 'api'.
baseQuery is used by each defined endpoint if the queryFn option is not specified. RTK Query provides a utility called fetchBaseQuery, which is a lightweight wrapper around fetch.
The final service definition that reaches out to the /api/user/profile backend route should look like this:
// app/services/auth/authService.js
// React-specific entry point to allow generating React hooks
import { createApi, fetchBaseQuery } from '@reduxjs/toolkit/query/react'

export const authApi = createApi({
  reducerPath: 'authApi',
  baseQuery: fetchBaseQuery({
    // base url of backend API
    baseUrl: 'http://127.0.0.1:5000/',
    // prepareHeaders is used to configure the header of every request and gives access to getState which we use to include the token from the store
    prepareHeaders: (headers, { getState }) => {
      const token = getState().auth.userToken
      if (token) {
       // include token in req header
        headers.set('authorization', `Bearer ${token}`)
        return headers
      }
    },
  }),
  endpoints: (builder) => ({
    getUserDetails: builder.query({
      query: () => ({
        url: 'api/user/profile',
        method: 'GET',
      }),
    }),
  }),
})

// export hooks for usage in functional components, which are
// auto-generated based on the defined endpoints
export const { useGetUserDetailsQuery } = authApi
endpoints are a set of operations that you want to perform against your server. They’re defined as objects using the builder syntax.
There are two basic endpoint types: query and mutation. Above, we’ve created a query endpoint that makes a GET request to the profile route. Then, we exported the React hook generated by this endpoint.
Next, you have to add this auth service to the store. An RTKQ service generates a “slice reducer” and a custom middleware that handles the data fetching. Both need to be added to the Redux store:
// app/store.js
import { configureStore } from '@reduxjs/toolkit'
import authReducer from '../features/auth/authSlice'
import { authApi } from './services/auth/authService'

const store = configureStore({
  reducer: {
    auth: authReducer,
    [authApi.reducerPath]: authApi.reducer,
  },
  middleware: (getDefaultMiddleware) =>
    getDefaultMiddleware().concat(authApi.middleware),
})
export default store
Now you’re ready to execute useGetUserDetailsQuery in a component. We’ll use it in the Header component because it stays visible on every page of the application.
Our expected behavior for this query is that it will fetch the user’s details from the server when the header component mounts. We also want to validate the token at regular intervals — say, every 15 minutes — to ensure it hasn’t expired.
You can achieve this with the useGetUserDetailsQuery query, like so:
// components/Header.js
import { useDispatch, useSelector } from 'react-redux'
import { NavLink } from 'react-router-dom'
import { useGetUserDetailsQuery } from '../app/services/auth/authService'
import '../styles/header.css'

const Header = () => {
  const { userInfo } = useSelector((state) => state.auth)
  const dispatch = useDispatch()

  // automatically authenticate user if token is found
  const { data, isFetching } = useGetUserDetailsQuery('userDetails', {
  // perform a refetch every 15mins
    pollingInterval: 900000,
  })

  console.log(data) // user object

  return (
    <header>
      {/* header markup */}
    </header>
  )
}
export default Header
pollingInterval represents the time in milliseconds before the query performs a refetch.
Now the query works as expected and data should contain the user’s info if a valid token is present. But currently, the info isn’t persisted to the store. To achieve this, you’ll create a setCredentials reducer in authSlice.js that updates the store value like so:
// features/auth/authSlice.js
import { createSlice } from '@reduxjs/toolkit'
import { registerUser, userLogin } from './authActions'

// initialize userToken from local storage
const userToken = localStorage.getItem('userToken')
  ? localStorage.getItem('userToken')
  : null

const initialState = {
  // ...initial state
}

const authSlice = createSlice({
  name: 'auth',
  initialState,
  reducers: {
    logout: (state) => {
      // ...logout reducer
    },
    setCredentials: (state, { payload }) => {
      state.userInfo = payload
    },
  },
  extraReducers: {
    // ...userLogin reducer
    // ...registerUser reducer
  },
})

export const { logout, setCredentials } = authSlice.actions
export default authSlice.reducer
Now, dispatch this reducer in a useEffect function so that the store is updated wherever data changes:
// components/Header.js
import { useEffect } from 'react'
import { useDispatch, useSelector } from 'react-redux'
import { NavLink } from 'react-router-dom'
import { useGetUserDetailsQuery } from '../app/services/auth/authService'
import { logout, setCredentials } from '../features/auth/authSlice'
import '../styles/header.css'

const Header = () => {
  const { userInfo } = useSelector((state) => state.auth)
  const dispatch = useDispatch()

  // automatically authenticate user if token is found
  const { data, isFetching } = useGetUserDetailsQuery('userDetails', {
    pollingInterval: 900000, // 15mins
  })

  useEffect(() => {
    if (data) dispatch(setCredentials(data))
  }, [data, dispatch])

  return (
    <header>
      <div className='header-status'>
        <span>
          {isFetching
            ? `Fetching your profile...`
            : userInfo !== null
            ? `Logged in as ${userInfo.email}`
            : "You're not logged in"}
        </span>
        <div className='cta'>
          {userInfo ? (
            <button className='button' onClick={() => dispatch(logout())}>
              Logout
            </button>
          ) : (
            <NavLink className='button' to='/login'>
              Login
            </NavLink>
          )}
        </div>
      </div>
      <nav className='container navigation'>
        <NavLink to='/'>Home</NavLink>
        <NavLink to='/login'>Login</NavLink>
        <NavLink to='/register'>Register</NavLink>
        <NavLink to='/user-profile'>Profile</NavLink>
      </nav>
    </header>
  )
}
export default Header
Notice the use of isFetching and userInfo to display different messages and elements on the navigation bar that correlate with the user’s authentication status.
And that completes the getUserDetails query! Now you can move on to render the user’s details on the Profile screen.
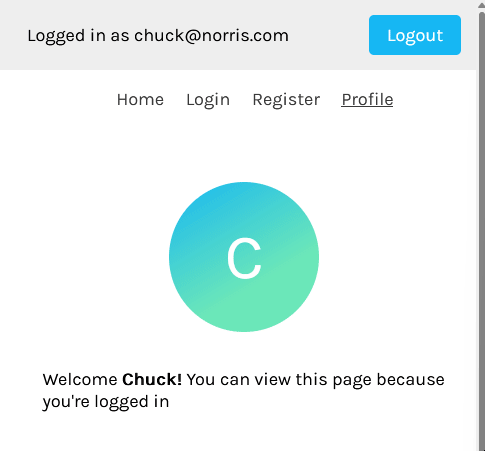
Profile screenImport useSeletor into ProfileScreen.js to display values from the store:
// ProfileScreen.js
import { useSelector } from 'react-redux'
import '../styles/profile.css'

const ProfileScreen = () => {
  const { userInfo } = useSelector((state) => state.user)

  return (
    <div>
      <figure>{userInfo?.firstName.charAt(0).toUpperCase()}</figure>
      <span>
        Welcome <strong>{userInfo?.firstName}!</strong> You can view this page
        because you're logged in
      </span>
    </div>
  )
}
export default ProfileScreen
Currently, the Profile page is accessible to everyone regardless of authentication status. We want to protect this route by verifying if a user exists before granting them access to the page. This logic can be extracted into a single ProtectedRoute component, and you are going to create that next.
Create a folder called routing in src and a file named ProtectedRoute.js. ProtectedRoute is intended to be used as a parent route element, whose child elements are protected by the logic residing in this component.
Here, you can use userInfo’s value to detect if a user is logged in. If userInfo is absent, an unauthorized template is returned. Otherwise, we use React Router’s Outlet component to render the child routes:
// ProtectedRoute.js
import { useSelector } from 'react-redux'
import { NavLink, Outlet } from 'react-router-dom'

const ProtectedRoute = () => {
  const { userInfo } = useSelector((state) => state.user)

  // show unauthorized screen if no user is found in redux store
  if (!userInfo) {
    return (
      <div className='unauthorized'>
        <h1>Unauthorized :(</h1>
        <span>
          <NavLink to='/login'>Login</NavLink> to gain access
        </span>
      </div>
    )
  }

  // returns child route elements
  return <Outlet />
}
export default ProtectedRoute
According to the documentation, <Outlet> should be used in parent route elements to render their child route elements. This means that <Outlet> doesn’t render any markup on the screen, but is replaced by the child route elements.
Now you can wrap ProfileScreen with the protected route like so:
// App.js
import { BrowserRouter as Router, Routes, Route } from 'react-router-dom'
import Header from './components/Header'
import LoginScreen from './screens/LoginScreen'
import RegisterScreen from './screens/RegisterScreen'
import ProfileScreen from './screens/ProfileScreen'
import HomeScreen from './screens/HomeScreen'
import ProtectedRoute from './routing/ProtectedRoute'
import './App.css'

function App() {
  return (
    <Router>
      <Header />
      <main className='container content'>
        <Routes>
          <Route path='/' element={<HomeScreen />} />
          <Route path='/login' element={<LoginScreen />} />
          <Route path='/register' element={<RegisterScreen />} />
          <Route element={<ProtectedRoute />}>
            <Route path='/user-profile' element={<ProfileScreen />} />
          </Route>
        </Routes>
      </main>
    </Router>
  )
}
export default App
And that’s most of the application complete! Let’s now see how to log a user out.
To log a user out, you’ll create an action that resets the Redux store to its initial value and clears the token from local storage. Because this isn’t an asynchronous task, you can create it directly in userSlice with the reducer property:
// userSlice.js
import { createSlice } from '@reduxjs/toolkit'
import { getUserDetails, registerUser, userLogin } from './userActions'

// initialize userToken from local storage
const userToken = localStorage.getItem('userToken')
  ? localStorage.getItem('userToken')
  : null

const initialState = {
  loading: false,
  userInfo: null,
  userToken,
  error: null,
  success: false,
}

const userSlice = createSlice({
  name: 'user',
  initialState,
  reducers: {
    logout: (state) => {
      localStorage.removeItem('userToken') // deletes token from storage
      state.loading = false
      state.userInfo = null
      state.userToken = null
      state.error = null
    },
  },
  extraReducers: {
    // userLogin reducer ...
    // registerUser reducer ...
    // getUserDetails reducer ...
  },
})
// export actions
export const { logout } = userSlice.actions
export default userSlice.reducer
You can then dispatch the logout action in the Header component:
// Header.js
import { useEffect } from 'react'
import { useDispatch, useSelector } from 'react-redux'
import { NavLink } from 'react-router-dom'
import { getUserDetails } from '../features/user/userActions'
import { logout } from '../features/user/userSlice'
import '../styles/header.css'

const Header = () => {
  const { userInfo, userToken } = useSelector((state) => state.user)
  const dispatch = useDispatch()

  // automatically authenticate user if token is found
  useEffect(() => {
    if (userToken) {
      dispatch(getUserDetails())
    }
  }, [userToken, dispatch])

  return (
    <header>
      <div className='header-status'>
        <span>
          {userInfo ? `Logged in as ${userInfo.email}` : "You're not logged in"}
        </span>
        <div className='cta'>
          {userInfo ? (
            <button className='button' onClick={() => dispatch(logout())}>
              Logout
            </button>
          ) : (
            <NavLink className='button' to='/login'>
              Login
            </NavLink>
          )}
        </div>
      </div>
      <nav className='container navigation'>
        <NavLink to='/'>Home</NavLink>
        <NavLink to='/login'>Login</NavLink>
        <NavLink to='/register'>Register</NavLink>
        <NavLink to='/user-profile'>Profile</NavLink>
      </nav>
    </header>
  )
}
export default Header
And that completes our application! You now have a MERN stack application with a frontend authentication workflow managed with Redux Toolkit.
Role-based authentication is a method of identifying and authenticating users based on the roles they hold within an application. This means when a user attempts to log into a system, their assigned role within the organization — not their individual permissions — determines their access to certain parts of the system.
To implement role-based authentication in React, you would first need to determine the different roles that users can hold within your application — for example, admin, regular user, or guest. This role is usually stored in the user’s object on the server and retrieved by the client through a fetch request.
Once an authenticated user’s role is known, you can use it to control what they are allowed to do within your application. This can be done by adding conditional statements to your code that check a user’s role before allowing them to perform certain actions.
For example, suppose you had an AdminScreen component that would only render to users with an admin role. Your solution could look something like this:
import { useSelector } from 'react-redux'

const AdminScreen = () => {
  const { userInfo } = useSelector((state) => state.auth)

  if (userInfo.role === "regular") return <Navigate to="/dashboard/regular" />
  if (userInfo.role === "admin") return <AdminLayout />
}

export default AdminScreen
Overall, implementing role-based authentication in React involves setting up a login system, storing user roles securely, and using conditional statements to control access to different features based on a user’s role.
In Redux applications, action creators are returned as plain objects, which work well for synchronous actions but less so for asynchronous actions. For example, a synchronous action like updating a user profile simply returns an object with the new profile data.
However, for asynchronous actions like fetching data from an API, plain objects are insufficient because they can’t handle the delay and multiple stages involved, such as initiating the fetch, handling success, and catching errors.
Middleware like Redux Thunk and Redux Saga address these complexities by allowing you to intercept and manipulate the responses and requests you receive.
Redux Thunk is included by default in the Redux Toolkit, which allows you to write action creators that return functions instead of plain objects. Within the functions, you can write certain conditions determining how to manipulate the action.
Redux Saga is another popular middleware for Redux that allows you to create more complex and efficient asynchronous workflows. Although it is not included by default in the Redux Toolkit, it can be added via the configureStore function.
Some of the benefits of using middleware in Redux are that they:
Testing Redux authentication ensures that the state management for your user authentication functions correctly. The important components to test are:
There are many testing libraries to choose from, but the most popular ones are
The following are some strategies for testing Redux authentication.
Authentication reducers manage the authentication state based on dispatched actions:
import { authReducer } from './authReducer';
import { LOGIN_SUCCESS, LOGOUT } from './actionTypes';
test('should handle LOGIN_SUCCESS', () => {
  const initialState = { isAuthenticated: false, user: null };
  const action = { type: LOGIN_SUCCESS, payload: { user: { name: 'John Doe' } } };
  const expectedState = { isAuthenticated: true, user: { name: 'John Doe' } };
  expect(authReducer(initialState, action)).toEqual(expectedState);
});
test('should handle LOGOUT', () => {
  const initialState = { isAuthenticated: true, user: { name: 'John Doe' } };
  const action = { type: LOGOUT };
  const expectedState = { isAuthenticated: false, user: null };
  expect(authReducer(initialState, action)).toEqual(expectedState);
});
Action creators for authentication generate actions for login and logout processes:
import { loginSuccess, logout } from './actions';
import { LOGIN_SUCCESS, LOGOUT } from './actionTypes';
test('should create an action for login success', () => {
  const user = { name: 'John Doe' };
  const expectedAction = { type: LOGIN_SUCCESS, payload: { user } };
  expect(loginSuccess(user)).toEqual(expectedAction);
});
test('should create an action for logout', () => {
  const expectedAction = { type: LOGOUT };
  expect(logout()).toEqual(expectedAction);
});
Selectors extract specific parts of the authentication state:
import { selectIsAuthenticated, selectUser } from './selectors';
test('should select authentication status', () => {
  const state = { auth: { isAuthenticated: true } };
  expect(selectIsAuthenticated(state)).toEqual(true);
});
test('should select the user', () => {
  const state = { auth: { user: { name: 'John Doe' } } };
  expect(selectUser(state)).toEqual({ name: 'John Doe' });
});
Use redux-mock-store to mock the store and test async actions:
import configureMockStore from 'redux-mock-store';
import thunk from 'redux-thunk';
import * as actions from './actions';
import { LOGIN_SUCCESS } from './actionTypes';
import fetchMock from 'fetch-mock';
const middlewares = [thunk];
const mockStore = configureMockStore(middlewares);
afterEach(() => {
  fetchMock.restore();
});
test('creates LOGIN_SUCCESS when logging in has been done', () => {
  fetchMock.postOnce('/login', {
    body: { user: { name: 'John Doe' } },
    headers: { 'content-type': 'application/json' }
  });
  const expectedActions = [
    { type: LOGIN_SUCCESS, payload: { user: { name: 'John Doe' } } }
  ];
  const store = mockStore({ auth: {} });
  return store.dispatch(actions.login('username', 'password')).then(() => {
    expect(store.getActions()).toEqual(expectedActions);
  });
});
React Router recently announced the upcoming release of React Router v7, which merges Remix into React Router. With this new version, developers will be able to seamlessly upgrade existing React Router projects to leverage Remix’s advanced features such as automatic code splitting, simplified data loading, and server-side rendering.
By eliminating the need for a separate framework, React Router v7 will simplify development and enhance performance for millions of projects currently relying on it. This release proposes a new and efficient way to handle state and authentication in React and Redux.
It’s not surprising to say that creating an authentication workflow in React isn’t a cakewalk. You will have to make numerous decisions as to how you will track authentication status, make async requests to your backend API, store tokens securely in the browser, and more.
Redux Toolkit and RTK Query do well to ease the state management and data fetching processes. You can even use them to set up role-based authentication and authorization for your app.
Writing tests for your Redux authentications also ensures your authentication workflows work correctly. Using libraries like Jest, React Testing Library, and Redux Mock Store, lets you write comprehensive tests for your reducers, action creators, selectors, and async actions, ensuring a reliable authentication system.
Feel free to share your takes on frontend authentication and authorization in the comments below!
Install LogRocket via npm or script tag. LogRocket.init() must be called client-side, not
server-side
$ npm i --save logrocket

// Code:

import LogRocket from 'logrocket';
LogRocket.init('app/id');
// Add to your HTML:

<script src="https://cdn.lr-ingest.com/LogRocket.min.js"></script>
<script>window.LogRocket && window.LogRocket.init('app/id');</script>
Hey there, want to help make our blog better?
Join LogRocket’s Content Advisory Board. You’ll help inform the type of content we create and get access to exclusive meetups, social accreditation, and swag.
Sign up now
This guide walks you through creating a web UI for an AI agent that browses, clicks, and extracts info from websites powered by Stagehand and Gemini.

This guide explores how to use Anthropic’s Claude 4 models, including Opus 4 and Sonnet 4, to build AI-powered applications.

Which AI frontend dev tool reigns supreme in July 2025? Check out our power rankings and use our interactive comparison tool to find out.

Learn how OpenAPI can automate API client generation to save time, reduce bugs, and streamline how your frontend app talks to backend APIs.


10 Replies to "Handling user authentication with Redux Toolkit"
Very coolly written!
I take as an example.
Thank you
Thank you friend, that means a lot!
You did miss the Provider Part.
you destructure a lot, just saying, i, as a complete beginner, might have a hard time reading and understanding it.
I must be doing something wrong because I have to wait a minute or refresh my page for the user name to show up …
Why not simply using RTK Query? It wasn’t available when the tutorial got written?
Hello, why you are using an RTK Query getUserDetails query for the profile route. ? why not CreateAsyncThunk ?
extraReducers is deprecated . need to update the blog soon
But when we try to get api/user/profil , which user you are calling ? I am kinda confused , Because as a far I know, we can get only user by Id, username, mail or phone number etc
There is one question I would ask you. How you are using the same authSlice.js for login,register and logout?