Frontend developers are constantly looking for ways to streamline their workflows and build compelling user experiences. Enter Supabase, a backend-as-a-service (BaaS) platform designed with frontend developers in mind.

Supabase offers a comprehensive set of backend features out of the box, including a powerful PostgreSQL database, user authentication, real-time data synchronization, and serverless functions. These features make it very easy for frontend developers to build and manage complex backend infrastructure, allowing them to focus on crafting exceptional user interfaces.
In this adoption guide, we’ll get to know the features, benefits, and use cases that make Supabase an excellent choice for your next project. We’ll also discuss some of the considerations you should keep in mind and your options for testing and deploying your Supabase project.
By the end of this guide, you’ll be well-equipped to decide whether adopting Supabase is the right choice for your team and needs. Let’s get started.
Supabase is an open source BaaS that provides developers with a suite of tools to create, manage, and scale their applications. It’s built on top of PostgreSQL and aims to be an open source alternative to Firebase, providing real-time capabilities, authentication, and storage functionalities that integrate seamlessly with frontend frameworks.
Supabase was launched in 2020 by Paul Copplestone to address challenges facing frontend developers who wanted to create amazing UIs and functionalities without getting bogged down managing complex backend infrastructure, like setting up and maintaining servers, databases, and authentication systems.
As a frontend developer myself, I’m constantly on the lookout for tools that empower me to build beautiful, functional web applications faster. Supabase isn’t just another option; it’s a game-changer. Here are some reasons why I think you should consider using Supabase for your next project, but also some caveats to keep in mind.
Supabase prides itself on being a lean backend solution. This translates to a smaller bundle size for your frontend code, as evidenced by its 98.2 kB minified size and 25.2 kB size when compressed using GZIP. This results in faster application loading times.
Supabase excels in performance due to its real-time capabilities, leveraging PostgreSQL, a relational database engine known for speed, security, and reliability. This translates to fast performance for your application’s backend operations.
PostgreSQL’s scalable infrastructure can also handle heavy traffic while maintaining high performance. Additionally, Edge Functions reduce latency by running computations close to the user.
These features make Supabase a robust choice for building responsive and high-performance web applications.
Supabase offers an excellent developer experience with its simple setup and seamless integration with popular frontend frameworks. It provides built-in features like authentication, storage, and real-time capabilities, simplifying development.
Supabase has an extensive documentation that enables developers to quickly solve and handle errors and provide easy reference for troubleshooting
Supabase offers loads of advantages that make it a great choice for your next projects. However, it’s not perfect. Below are some drawbacks with using Supabase:
Despite these drawbacks, the learning curve is generally considered gentler than traditional backend development, and Supabase is still highly customizable and offers an extensive feature set. Keep these minor drawbacks in mind, but don’t let them stop you from adopting Supabase as a solution.
Let’s see how to install and get started with Supabase in your next project. Supabase comes with loads of documentation to get started with Supabase and is compatible with a myriad of various
programming languages and frameworks; however, we’ll briefly cover how to get started with Supabase in your Next.js application.
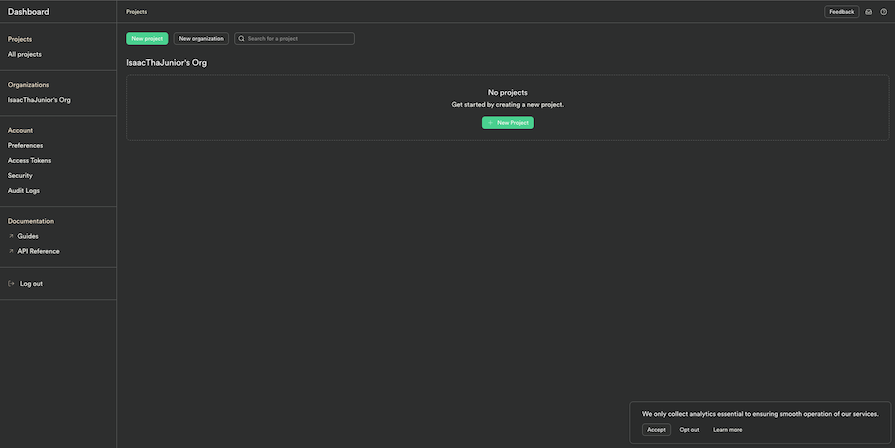
The first step we take before building is to set up our Supabase database and get our Supabase API key, which enables us to connect and handle database operations from our application. To do that, navigate to your Supabase dashboard and click on New Project:
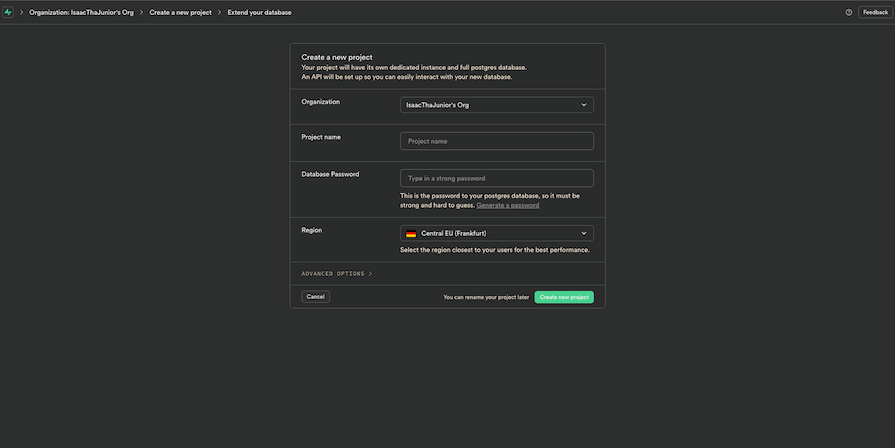
Enter your project details, give your database a strong password, and click on Create new project:
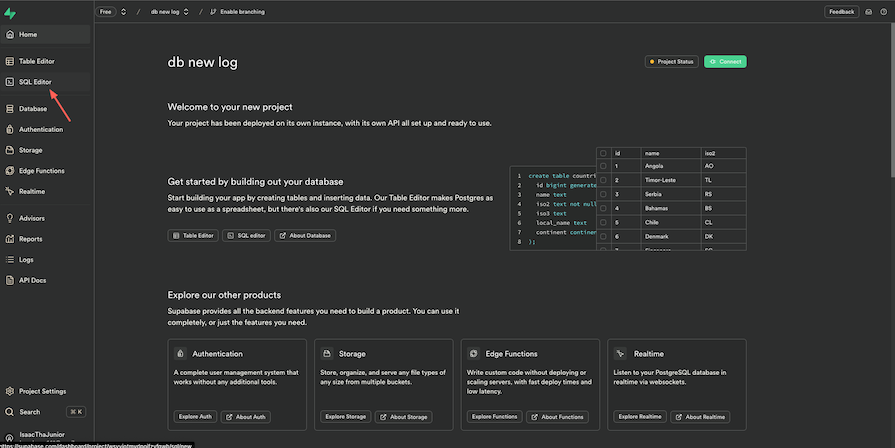
With our project created, the next step is to create and build out the database for our application. Click on SQL Editor on the left menu panel:
Click on New Query, paste in the SQL below, and then click on RUN:
CREATE TABLE Books (
  id bigint generated by default as identity primary key,
  book_name text,
  author_name text,
  summary text
);
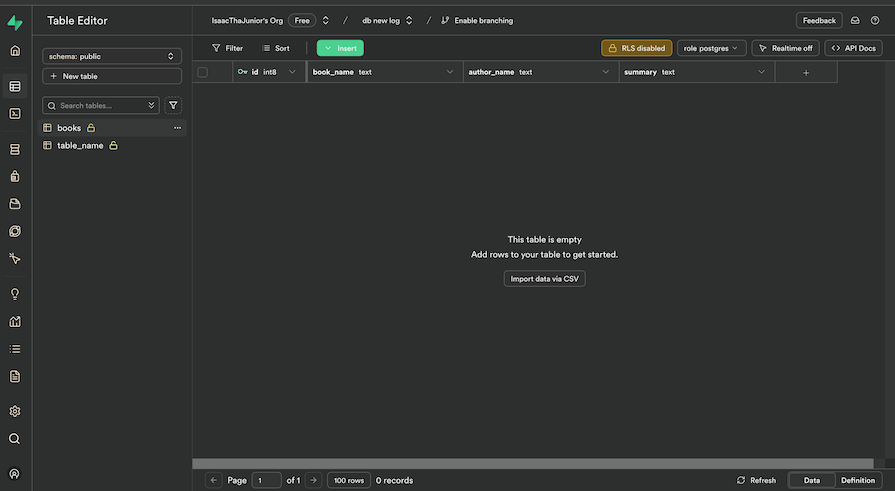
This will create a table of books with columns for the book name, the author of said book, and a summary of the book. Now when we navigate to the Table Editor via the left-hand menu, we can see the created books table as shown below:
Let’s manually populate the table so that when we query the data, we can connect to our Next.js application. To do that, click on Insert in the table editor menu and Insert row:
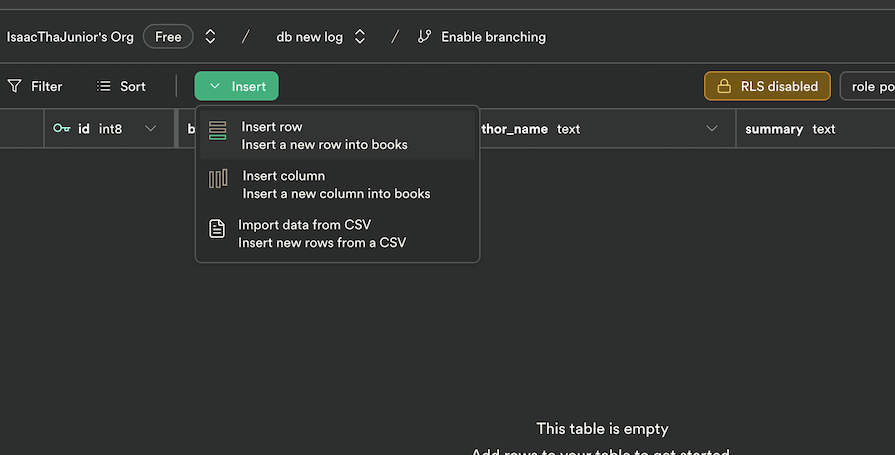
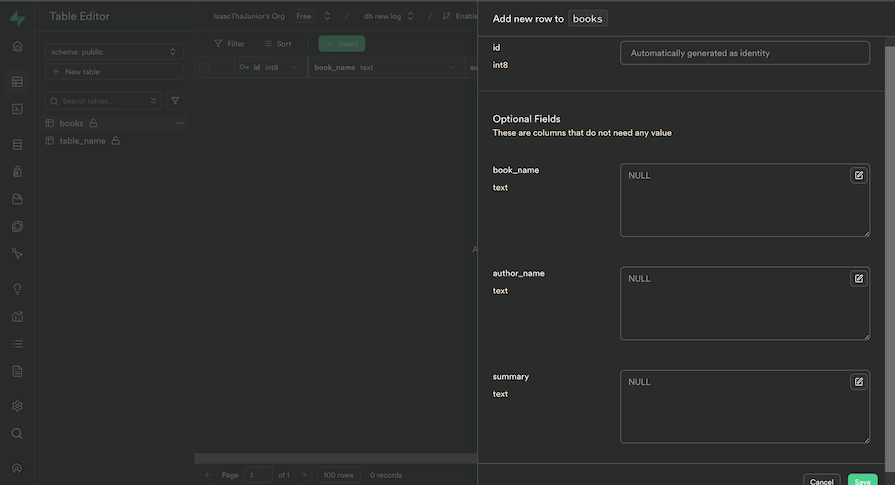
You will be navigated to a page where you can input the information that you wish to have shown below:
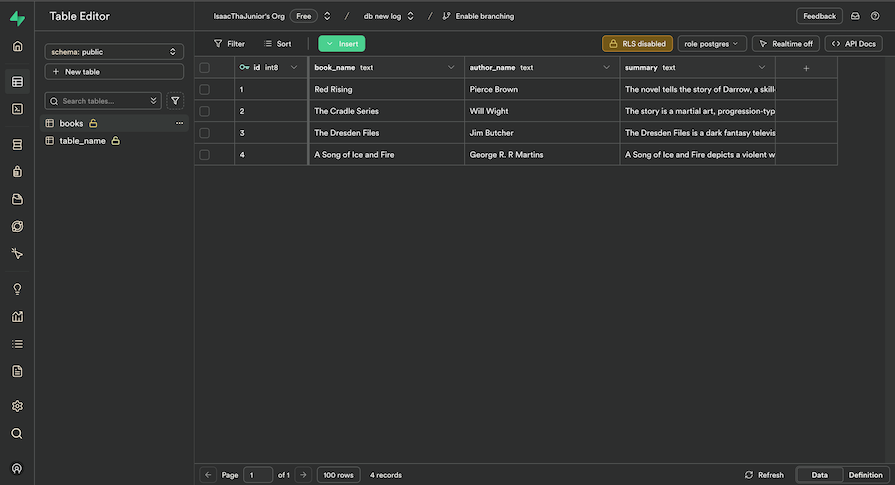
Below is an example of how everything should look when you have successfully populated your table:
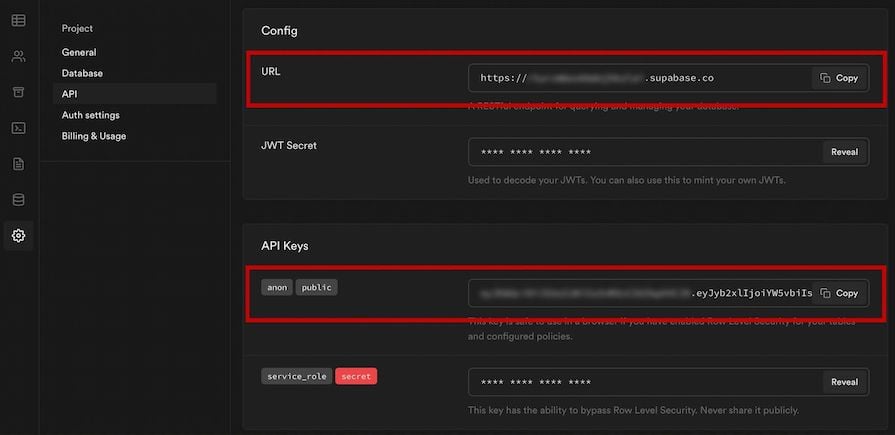
After that, we need to get our API keys so we can connect to our database from our application. To do so, we need to access the Project Settings from the left-hand menu:
With that done, we can create a new Next.js project by running the command below:
npx create-next-app <NAME OF YOUR PROJECT>
The next step is to install the Supabase client package for Next.js as shown below:
npm install @supabase/supabase-js
If you want to add server-side rendering, static site generation, API routes, and middleware edge function into your application, then you should also install the @supabase/ssr package for server-side auth. You can do that with the command below:
npm install @supabase/ssr
Create a .env.local file in the root of your project and add your API key to the file as shown below:
NEXT_PUBLIC_SUPABASE_URL=<SUPABASE_URL>
2
NEXT_PUBLIC_SUPABASE_ANON_KEY=<SUPABASE_ANON_KEY>
Next, create another file at the root of your project named api.js and paste in the code below:
import { createClient } from '@supabase/supabase-js'
export const supabase = createClient(
  process.env.NEXT_PUBLIC_SUPABASE_URL,
  process.env.NEXT_PUBLIC_SUPABASE_ANON_KEY
)
Copy and paste the code below into the app/page.js file:
import { supabase } from "@/api";
export default async function Home() {
  const { data, error } = await supabase.from("books").select("");
  return (
    <main className="flex flex-col items-center justify-between min-h-screen p-24">
      <h1>Fantasy books that I read and loved</h1>
      <table className="w-full text-sm text-left text-gray-500 rtl:text-right dark:text-gray-400">
        <thead className="text-xs text-gray-700 uppercase bg-gray-50 dark:bg-gray-700 dark:text-gray-400">
          <tr>
            <th scope="col" className="px-12 py-3">
              Book Name
            </th>
            <th scope="col" className="py-3 px-36">
              Author name
            </th>
            <th scope="col" className="px-24 py-3">
              Summary
            </th>
          </tr>
        </thead>
        <tbody>
          {data.map((book) => (
            <tr
              className="border-b dark:bg-gray-800 dark:border-gray-700"
              key={book.id}
            >
              <td className="px-6 py-4">{book.book_name}</td>
              <td className="py-4 px-36">{book.author_name}</td>
              <td className="px-6 py-4">{book.summary}</td>
            </tr>
          ))}
        </tbody>
      </table>
    </main>
  );
}
In the code above, we first query data from our created book table from Supabase. Then we present the data in a tabular format. With that and some additional styling to the table, we get a result which looks like the image below:

Here’s a glimpse into some of Supabase’s standout functionalities.
Supabase utilizes PostgreSQL for its data engine. This, in turn, provides Supabase with robust database querying capabilities, including:
joins, subqueries and moreORDER BY clause with ascending or descending orderSupabase allows you to filter and modify your database queries to retrieve specific data and also to format the results in a way that best suits your needs.
Filters act like sieves, allowing you to select only the rows that meet certain criteria from your database tables. You can use filters on select(), update(), upsert(), and delete() queries:
const { data, error } = await supabase
.from('users')
.select('*')
.eq('age', 25)
Modifiers manipulate and refine the results that are returned by a query. Unlike filters, modifiers don’t affect which rows are returned in your database. Some common modifiers are SELECT, LIMIT, ORDER BY, and many more. You can also combine modifiers and filters to create complex queries that can precisely control the data you want returned:
const { data, error } = await supabase
.from('users')
.select('id, name')
.eq('status', 'active')
.gt('age', 18)
.order('created_at', { ascending: false })
.limit(10)
Supabase also has integrated object storage that lets developers store various file types (images, videos, documents) alongside their application data.
Supabase also provides built-in user authentication features, including email-and-password logins, social logins (for example, via Google or GitHub), passwordless authentication options, and SSO.
Using WebSockets and subscriptions, Supabase provides real-time updates that notify your app of changes that happen to your database as soon as they occur. When data in the subscribed table changes in the form of inserts, updates, or deletes, the client is notified in real time:
const subscription = supabase
  .from("users")
  .on("INSERT", (payload) => {
    console.log("New user added!", payload.new);
  })
  .on("UPDATE", (payload) => {
    console.log("User updated!", payload.new);
  })
  .on("DELETE", (payload) => {
    console.log("User deleted!", payload.old);
  })

  subscription.subscribe(); //This opens the connection
Edge Functions are server-side TypeScript functions designed to run at the edge, closer to your users, for reduced latency and faster response times. They are built on Deno, which provides benefits like portability, open-source and low latency.
Supabase also provides a toolkit for creating AI applications with Postgres and pgvectors, allowing you to index, store, and query your vector embeddings easily and at scale.
The toolkit contains a Python client to manage unstructured embeddings, an embedding generation process that uses open source models that utilize Edge Functions. It also includes database migrations to manage structured embeddings and integrations with popular AI providers.
Supabase UI is an open source library of UI components that was inspired by Tailwind and Ant Design and seeks to help developers quickly build applications with Supabase. This library provides a set of pre-built components that are styled and ready to use, ensuring consistency and reducing the amount of time needed to develop the UI.
The Supabase UI library integrates seamlessly with Supabase’s backend services, making it easier to create feature-rich applications. Keep in mind that this library is deprecated for reasons including that it’s still a work in progress and not production ready.
Supabase is a versatile backend-as-a-service platform that can be used for a variety of practical and business use cases:
Supabase offers various tools to test and deploy your next project. Let’s look at some of these testing and deployment options and also some best practices to take note of.
For testing, your options include:
pgTAP to verify your database schema and logic, and also handle database migrations in your projectMeanwhile, deployment options include:
Finally, here are some best practices to note and follow when testing and deploying your Supabase project:
As we’ve mentioned, Supabase aims to be an open source alternative to Firebase. So, then, how do they stack up against each other? Let’s see:
| Feature | Supabase | Firebase |
|---|---|---|
| Database | PostgreSQL (relational) | Firestore (NoSQL) and Realtime Database (NoSQL) |
| Authentication | Email, password, OAuth | Email, password, phone, OAuth |
| Real-time updates | Real-time updates for PostgreSQL | Real-time with Firestore and Realtime Database |
| Storage | Object storage | Cloud Storage |
| Functions | Edge Functions using Deno | Cloud Functions |
| Open source | Yes | No |
| Scalability | Scales well, optimization needed for large sets | Excellent, especially with Firestore |
| Community support | Growing and active on GitHub and Discord | Large, established, Google-supported |
| Documentation | Comprehensive with examples | Extensive with in-depth guides |
| Learning resources | Blogs, tutorials, YouTube | Tutorials, official YouTube, Google resources |
This table should help you determine whether Supabase is a viable alternative for your needs or if you should opt for Firebase instead.
Further reading:
In this article, we have examined Supabase, looking at the various reasons for choosing Supabase, its key features, and how to get started with it in your next project.
We discussed various use cases for Supabase and how to test and deploy your Supabase project. We also covered some best practices to take note of when testing and deploying your Supabase project. Lastly, we compared Supabase and Firebase to help inform your decision between the two.
I hope this article allows you to make an informed choice on adopting Supabase in your next project. Happy coding!
Hey there, want to help make our blog better?
Join LogRocket’s Content Advisory Board. You’ll help inform the type of content we create and get access to exclusive meetups, social accreditation, and swag.
Sign up now
Learn how OpenAPI can automate API client generation to save time, reduce bugs, and streamline how your frontend app talks to backend APIs.

Discover how the Interface Segregation Principle (ISP) keeps your code lean, modular, and maintainable using real-world analogies and practical examples.

<selectedcontent> element improves dropdowns

Learn how to implement an advanced caching layer in a Node.js app using Valkey, a high-performance, Redis-compatible in-memory datastore.