Remix and Supabase are potent tools that can be used together to build performant web apps. With Remix, you can create the frontend of an application, using a familiar React-based syntax and taking advantage of its robust routing and state management capabilities. Meanwhile, Supabase takes care of the backend, providing a powerful PostgreSQL database and real-time functionality, allowing users to see updates as they occur.

This guide will explore how to use Remix and Supabase to build a real-time chat application from scratch. We’ll cover everything from setting up a new project and configuring Supabase to creating the frontend and integrating real-time functionality.
Let’s get started!
Jump ahead:
As the first step of building the chat application, you’ll need to set up a new Remix project:
npx create-remix@latest
This command will prompt you to enter the project name; I’m using “remix-supabase-chat” for this tutorial. You’ll also be prompted to specify the deployment environment (choose Netlify), whether to include TypeScript or JavaScript in the project (choose TypeScript), and whether TypeScript should be installed (select Yes):

Once you’ve answered the prompts, you can navigate to the project directory and run your Remix application.
We’ll include several libraries, such as Tailwind CSS and Daisy UI, to help build the frontend and backend functionality. Tailwind CSS is a popular utility-first CSS framework that provides pre-defined CSS classes to help quickly style web applications. We’ll also use Daisy UI, a user interface library built on top of Tailwind CSS that provides additional UI components and styles. Finally, we’ll include supabase-js, a JavaScript library that allows us to interact with the Supabase database and authentication functionality from within our application.
Follow the steps outlined here to set up Tailwind CSS in the Remix app. Next, install the daisy-ui and @supabase/supabase-js libraries using the following command:
npm i daisy-ui @supabase/supabase-js
In the tailwind.config.js file, located in the project’s root directory, add the following code:
module.exports = {
  // ...
  plugins: [require("daisyui")],
  daisyui: {
    themes: ["light"],
  },
};
Here we tell Tailwind to use Daisy UI as a plugin and to enable the "light" theme for the UI components.
To integrate Supabase into your Remix project, You’ll first need to set up a new Supabase project and obtain the necessary credentials.
Visit the Supabase website and sign up for an account if you don’t already have one. Once logged in, click the Create a new project button to create a new Supabase project. Provide a name for your project and select the region.
After successfully creating the project, you‘ll be moved to the project dashboard. You’ll find essential details and credentials for connecting to your Supabase project here.
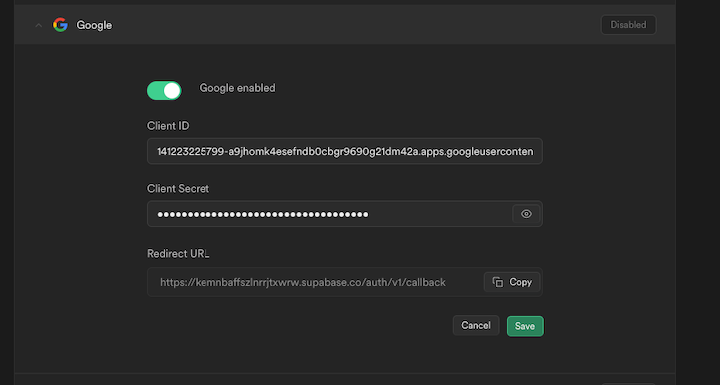
In the Supabase project dashboard, navigate to the “Authentication” tab. Then, under the “Social Login” section, click Add Provider and select Google from the list of available options.
Next, you’ll need to provide the necessary Google OAuth credentials. You’ll need to first create a project in the Google Cloud Console to obtain the credentials. Then return to the Supabase dashboard and add the OAuth credentials in the respective fields under the Google provider settings. Click Save and the Google login will be enabled for your Supabase project:
To store messages sent by users in the chat application follow these steps:
messages, within your Supabase projectThe messages table should have two columns: content and user_id. The content column will hold the message content and the user_id column will associate each message with the corresponding user:
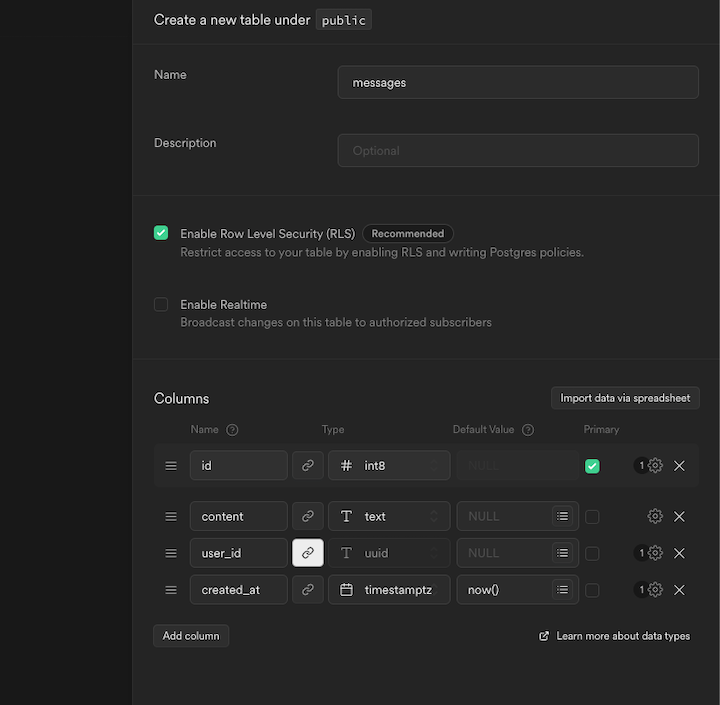
Save the table configuration to create the messages table in your Supabase database. This table will serve as the central repository for storing chat messages.
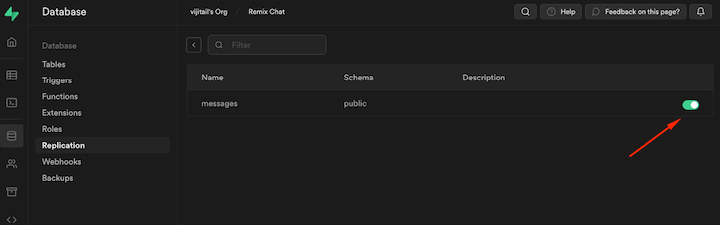
To enable real-time updates for the messages table, go to the Replication settings within the database dashboard. Enable replication for the messages table to ensure real-time notifications are sent to connected clients when messages are added or modified:

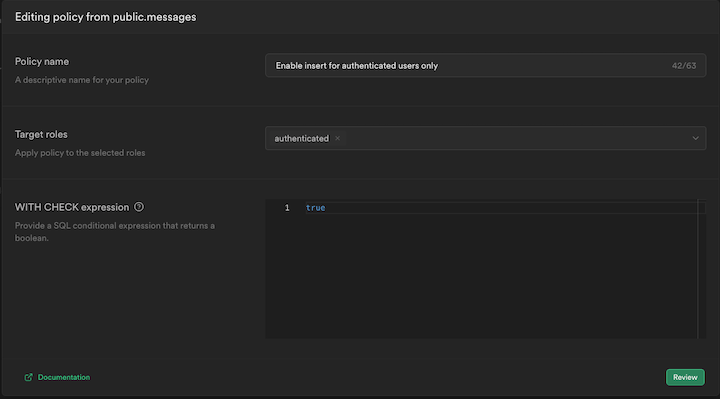
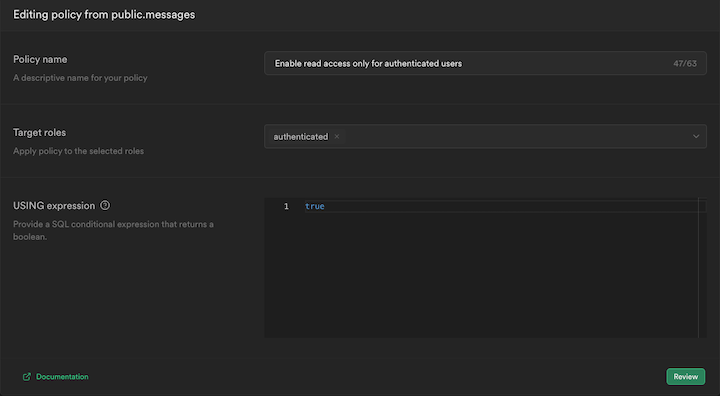
You’ll also need to enable row-level security (RLS) on the messages table so the data will not be accessible to unauthenticated users on the client side. This provides an added layer of security to protect the privacy and integrity of chat data, as it ensures that only authenticated users will be able to read and send messages in the chat application..
Check out this guide to learn more about RLS:
Now, let’s add the Supabase library to the Remix application to access tables and user data from the Supabase project. With the Supabase Remix Auth Helper package, the process becomes even more accessible.
The Supabase Remix Auth Helper is a package that simplifies implementing server-side authentication with Supabase in Remix applications. It is part of a collection of framework-specific tools created to make authenticated server-side operations as seamless as the client side. Instead of relying on local storage, this package utilizes cookies to store session data securely.
Install the Supabase Remix Auth Helper package using the following command:
npm i @supabase/auth-helpers-remix.
Once installed, you can leverage its functionalities to handle authentication-related tasks within your Remix application, such as user login, registration, session management, and more.
To establish a connection with the Supabase instance, let’s start by creating a .env file in the project’s root folder. Within this file, declare two environment variables: SUPABASE_URL and SUPABASE_PUBLIC_KEY. Then, populate these variables with the corresponding values obtained from your Supabase dashboard:
SUPABASE_URL=<YOUR_SUPABASE_URL>
SUPABASE_PUBLIC_KEY=<YOUR_SUPABASE_PUBLIC_KEY>
Next, use the createServerClient() function to create an authenticated Supabase client. This function requires the following parameters: SUPABASE_URL, SUPABASE_PUBLIC_KEY, and a Request and Response object.
Create a new file, supabase.server.ts, inside the utils directory of the app folder. Then, import the createServerClient function from the @supabase/auth-helpers-remix package:
// app/utils/supabase.server.ts
import { createServerClient } from "@supabase/auth-helpers-remix";

export const createSupabaseServerClient = ({
  request,
  response,
}: {
  request: Request;
  response: Response;
}) =>
  createServerClient(
    process.env.SUPABASE_URL!,
    process.env.SUPABASE_PUBLIC_KEY!,
    { request, response }
  );
createServerClient() will return a Supabase client that enables you to interact with your Supabase project in the server-side code.
Next, import and use the createSupabaseServerClient() function in the root.tsx file. In a Remix application, the root.tsx file serves as the entry point and the main component that wraps all other components. It is crucial for handling various aspects of the application’s lifecycle and provides a central place for managing shared functionality:
// app/root.tsx
import { createSupabaseServerClient } from "./utils/supabase.server";

...
export const loader = async ({ request }: LoaderArgs) => {
  const env = {
    SUPABASE_URL: process.env.SUPABASE_URL!,
    SUPABASE_PUBLIC_KEY: process.env.SUPABASE_PUBLIC_KEY!,
  };

  const response = new Response();

  const supabase = createSupabaseServerClient({ request, response });

  const {
    data: { session },
  } = await supabase.auth.getSession();

  return json({ env, session }, { headers: response.headers });
};
...
In the above code, we leverage the newly created supabase client, call the getSession() method on the auth object. This allows us to fetch the session data of the currently authenticated user. Then we return the retrieved session data and environment variables as a JSON response using the json() function.
You’ll also need to include the response headers so that the browser can set the cookies. The client-side doesn’t have access to environment variables, so you’ll need to pass them from the loader function.
Client-side integration with Supabase involves using the Supabase client for functionalities such as authentication and real-time subscriptions.
In the <App /> component, use the useLoaderData() hook to grab the env and session objects that were sent from the loader() function:
const { env, session } = useLoaderData();
Then use the createBrowserClient() to create a singleton instance of the Supabase client on the browser that the components can share using the Outlet context:
...
const [supabase] = useState(() =>
  createBrowserClient(env.SUPABASE_URL, env.SUPABASE_PUBLIC_KEY)
);
...
<Outlet context={{ supabase, session }} />
Authentication occurs on the client side, so it’s essential to instruct Remix to re-trigger all active loaders when the user signs in or out. Remix offers a useful hook, useRevalidator(), that allows us to revalidate all loaders on the current route. To determine when to revalidate, you must compare the user’s access token in both the server and client states.
When the authentication state changes, check if the session’s access token received from Supabase’s client-side instance (session.access_token) differs from the server’s access token (serverAccessToken). If they are not the same, this implies that the user’s authentication state has changed. In that case, you’ll need to invoke the revalidate() function to re-trigger all active loaders on the current route. This ensures that the data fetched from the server is updated and reflects the user’s latest authentication status:
// app/root.tsx

...
export default function App() {
  const { env, session } = useLoaderData<typeof loader>();
  const { revalidate } = useRevalidator();

  const [supabase] = useState(() =>
    createBrowserClient(env.SUPABASE_URL, env.SUPABASE_PUBLIC_KEY)
  );

  const serverAccessToken = session?.access_token;

  useEffect(() => {
    const {
      data: { subscription },
    } = supabase.auth.onAuthStateChange((event, session) => {
      if (session?.access_token !== serverAccessToken) {
        revalidate();
      }
    });
    return () => {
      subscription.unsubscribe();
    };
  }, [supabase.auth, serverAccessToken, revalidate]);

  return (
    <html lang="en">
      <head>
        <meta charSet="utf-8" />
        <meta name="viewport" content="width=device-width,initial-scale=1" />
        <Meta />
        <Links />
      </head>
      <body>
        <Outlet context={{ supabase, session }} />
        <ScrollRestoration />
        <Scripts />
        <LiveReload />
      </body>
    </html>
  );
}
Next, let’s define the type for the OutletContext object, like so:
// app/types.ts
import type { Session, SupabaseClient } from "@supabase/supabase-js";

export type OutletContext = {
  supabase: SupabaseClient;
  session: Session;
};
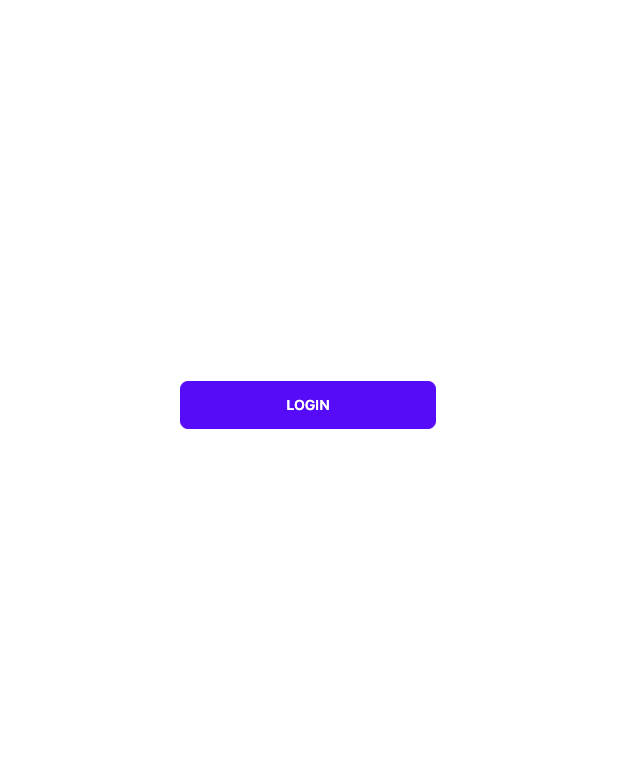
Now let’s create a simple <Login /> component that renders a login button. When the button is clicked, it triggers the login process using the Google OAuth provider through the Supabase client. It utilizes the useOutletContext() hook to access the Supabase client instance provided by the Outlet Context:
// app/components/Login.tsx

import { useOutletContext } from "@remix-run/react";
import type { OutletContext } from "~/types";

export const Login = () => {
  const { supabase } = useOutletContext<OutletContext>();

  const handleLogin = () => {
    supabase.auth.signInWithOAuth({
      provider: "google",
    });
  };

  return (
    <div className="flex h-full w-full items-center justify-center">
      <button className="btn btn-primary btn-wide" onClick={handleLogin}>
        Login
      </button>
    </div>
  );
};
In the index route, we conditionally render the <Login /> component based on the authentication status of the user obtained from the session object:
// app/routes/_index.tsx

export default function Index() {
  const { session } = useOutletContext<OutletContext>();

  return (
    <div className="container mx-auto md:w-[800px] h-screen">
      {!session?.user && <Login />}
    </div>
  );
}
Let’s now focus on building the core functionality of the chat app. We’ll implement all necessary components and logic to enable users to send and receive real-time messages within the application.
Start by creating a Message interface for representing the message data from Supabase.:
// app/types.ts

...
export interface Message {
  id: number;
  content: string;
  user_id: string;
  created_at: string;
}
The Chat component utilizes React Hooks, such as useState(), useRef(), and useEffect(), to manage the state and interactions within the chat interface. It leverages the useOutletContext() Hook to access the Supabase instance and handle user logout action. The component dynamically renders chat bubbles for each message in the messages array and allows users to send new messages through the input field:
// app/components/Chat.tsx

import { Form, useOutletContext } from "@remix-run/react";
import { useEffect, useRef, useState } from "react";
import type { Message, OutletContext } from "~/types";
import { ChatBubble } from "./ChatBubble";

interface ChatProps {
  messages: Message[];
}

export const Chat = ({ messages: serverMessages }: ChatProps) => {
  const [messages, setMessages] = useState(serverMessages);

  const { supabase } = useOutletContext<OutletContext>();
  const formRef = useRef<HTMLFormElement>(null);
  const inputRef = useRef<HTMLInputElement>(null);

  const handleLogout = () => {
    supabase.auth.signOut();
  };

  return (
    <div className="flex h-full flex-col">
      <div className="my-2">
        <button className="btn btn-xs btn-error" onClick={handleLogout}>
          Logout
        </button>
      </div>
      <div className="flex flex-col flex-grow h-0 p-4 overflow-auto bg-blue-50 rounded-md">
        {messages.map((message, idx) => (
          <ChatBubble
            message={message}
            key={message.id}
          />
        ))}
      </div>
      <div className="mt-auto mb-5 py-2">
        <Form
          method="post"
          ref={formRef}
          onSubmit={(e) => {
            e.preventDefault();
            formRef.current?.submit();
            formRef.current?.reset();
          }}
        >
          <input
            type="text"
            placeholder="Type here"
            className="input input-bordered w-full"
            name="message"
            ref={inputRef}
          />
        </Form>
      </div>
    </div>
  );
};
The <ChatBubble /> component renders a single message in the chat, receives a message object as a prop, and displays the message content along with the timestamp. It also applies different styles based on whether the message is from the current user or a different user. To ensure clear communication, messages sent by the current user should be right-aligned, while messages sent by different users should be left-aligned:
// app/components/ChatBubble.tsx

import { useOutletContext } from "@remix-run/react";
import type { Message, OutletContext } from "~/types";

interface ChatBubbleProps {
  message: Message;
}

export const ChatBubble = ({ message }: ChatBubbleProps) => {
  const { session } = useOutletContext<OutletContext>();

  const isCurrentUser = session.user.id === message.user_id;

  return (
    <div className={`chat ${!isCurrentUser ? "chat-start" : "chat-end"}`}>
      <div className="chat-header mb-1">
        <time className="text-xs opacity-50 ml-1">
          {new Date(message.created_at).toTimeString().slice(0, 5)}
        </time>
      </div>
      <div
        className={`chat-bubble ${
          isCurrentUser ? "chat-bubble-primary" : "bg-slate-500"
        }`}
      >
        {message.content}
      </div>
    </div>
  );
};
Now, add the action() and loader() functions in the index route to handle server-side actions and data loading. When a new chat message is submitted, it will be handled by the action() function. The message is retrieved from the request payload and then added to the messages table using the Supabase client. The loader() function loads the existing messages from the messages table using the Supabase client.
The index component displays the <Login /> or <Chat /> components depending on whether a user session exists. It also sends the messages data to the <Chat /> component as a prop:
// app/routes/_index.tsx
import type { Message, OutletContext } from "~/types";
import { createSupabaseServerClient } from "~/utils/supabase.server";

export const action = async ({ request }: ActionArgs) => {
  const response = new Response();
  const supabase = createSupabaseServerClient({ request, response });

  const { message } = Object.fromEntries(await request.formData());

  await supabase.from("messages").insert({ content: String(message) });

  return json(null, { headers: response.headers });
};

export const loader = async ({ request }: LoaderArgs) => {
  const response = new Response();
  const supabase = createSupabaseServerClient({ request, response });

  const { data } = await supabase.from("messages").select("*");

  return json({ messages: data ?? [] }, { headers: response.headers });
};

export default function Index() {
  const { messages } = useLoaderData<typeof loader>();
  const { session } = useOutletContext<OutletContext>();

  return (
    <div className="container mx-auto md:w-[800px] h-screen">
      {!session?.user ? <Login /> : <Chat messages={messages as Message[]} />}
    </div>
  );
}
To set up a real-time subscription in the Chat component, you’ll need to leverage Supabase’s channel functionality. It listens for changes in the messages table by subscribing to the "postgres_changes" event with the specified schema and table filters:
// app/components/Chat.tsx
...
export const Chat = ({ messages: serverMessages }: ChatProps) => {

  useEffect(() => {
    const channel = supabase
      .channel("*")
      .on(
        "postgres_changes",
        { event: "INSERT", schema: "public", table: "messages" },
        (payload) => {
          const newMessage = payload.new as Message;
          if (!messages.find((message) => message.id === newMessage.id)) {
            setMessages([...messages, newMessage]);
          }
        }
      )
      .subscribe();

    return () => {
      supabase.removeChannel(channel);
    };
  }, [messages, supabase]);

...
}
Upon receiving a new message through the subscription, we’ll check if it has already been displayed. If it’s a new message, we use the setMessages function to update the existing messages state. The cleanup function returned by useEffect Hook removes the channel subscription when the component unmounts, ensuring that the subscription is correctly disposed of to prevent memory leaks.
Check out the chat UI below:

The chat UI is tidy, but it lacks essential elements, such as the sender’s name and profile image. it’s not possible to directly query the "users" table to get this because the auth schema is protected.
To display the profile image and username, we need to create a "user_meta_data" JSON column in the messages table. Then, we can use a trigger to automatically update this column whenever a new message is added to the table:
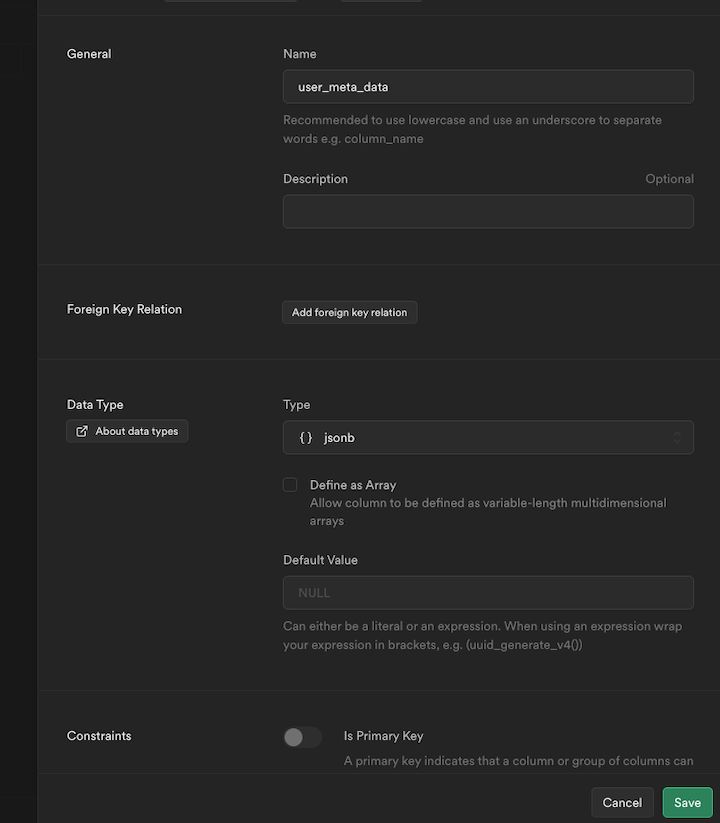
The below code is a PostgreSQL trigger function that automatically updates the user_meta_data column in the messages table with user metadata from the auth.users table whenever a new message is added. It retrieves the user metadata by using the new message’s user_id and creates a JSONB object that includes the user’s name and profile image.
The trigger is set to execute the function after every insert operation on the messages table, guaranteeing that the user metadata is linked to the correct message effortlessly:
create function public.handle_new_message()
returns trigger
language plpgsql
security definer set search_path = public
as $$
  declare user_data jsonb;
begin
  select raw_user_meta_data into user_data from auth.users where id = new.user_id for update;
  update public.messages set user_meta_data = jsonb_build_object('name', user_data ->> 'name', 'profile_image', user_data ->> 'avatar_url') where id = new.id;
  return new;
end;
$$;


create trigger on_message_created
  after insert on public.messages
  for each row execute procedure public.handle_new_message();
Now, switch the channel listen event in the <Chat /> component from INSERT to UPDATE to receive the metadata object in the update event. Also, it’s good practice to group messages sent by the same user:
// app/components/Chat.tsx
...
{ event: "UPDATE", schema: "public", table: "messages" }

...
  <ChatBubble
    message={message}
    key={message.id}
    isGrouped={
      message.user_id === messages[idx - 1]?.user_id &&
      new Date(message.created_at).getTime() -
        new Date(messages[idx - 1]?.created_at).getTime() <
        60000
    }
  />
...
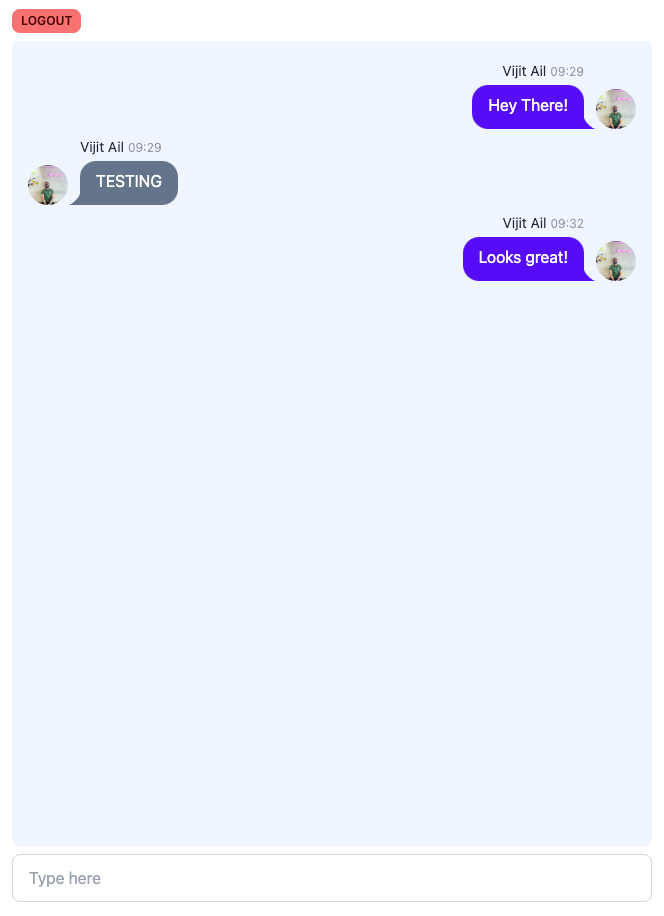
Here’s the updated <ChatBubble /> component with the profile image and user name:
// app/components/ChatBubble.tsx

import { useOutletContext } from "@remix-run/react";
import type { Message, OutletContext } from "~/types";

interface ChatBubbleProps {
  message: Message;
  isGrouped?: boolean;
}

export const ChatBubble = ({ message, isGrouped = false }: ChatBubbleProps) => {
  const { session } = useOutletContext<OutletContext>();

  const isCurrentUser = session.user.id === message.user_id;

  return (
    <div className={`chat ${!isCurrentUser ? "chat-start" : "chat-end"}`}>
      {!isGrouped ? (
        <>
          <div className="chat-image avatar">
            <div className="w-10 rounded-full">
              <img
                alt={message.user_meta_data.name}
                src={message.user_meta_data.profile_image}
                referrerPolicy="no-referrer"
              />
            </div>
          </div>
          <div className="chat-header mb-1">
            {message.user_meta_data.name}
            <time className="text-xs opacity-50 ml-1">
              {new Date(message.created_at).toTimeString().slice(0, 5)}
            </time>
          </div>
        </>
      ) : (
        <div className="chat-image avatar">
          <div className="w-10"></div>
        </div>
      )}
      <div
        className={`chat-bubble ${
          isCurrentUser ? "chat-bubble-primary" : "bg-slate-500"
        }`}
      >
        {message.content}
      </div>
    </div>
  );
};
Here’s the final chat UI:
Start the local server by running the following command:
> npm run dev
N.B., to test the real-time functionality, you may need to sign in with a separate Gmail account and use a different browser or an incognito window
This article explored how to build a real-time chat application using Remix and Supabase. We started by setting up a Supabase project, creating tables to store messages, and enabling real-time functionality. Then, we integrated Supabase into the Remix project, both on the server-side and client-side, allowing us to access the tables and user data. By leveraging Supabase’s authentication and real-time features, we created a seamless chat experience for users.
By following the steps outlined in this guide, you’ll be able to quickly build real-time applications with Remix and Supabase. You’ll find the complete code in this GitHub repo.
Install LogRocket via npm or script tag. LogRocket.init() must be called client-side, not
server-side
$ npm i --save logrocket

// Code:

import LogRocket from 'logrocket';
LogRocket.init('app/id');
// Add to your HTML:

<script src="https://cdn.lr-ingest.com/LogRocket.min.js"></script>
<script>window.LogRocket && window.LogRocket.init('app/id');</script>

Explore 15 essential MCP servers for web developers to enhance AI workflows with tools, data, and automation.

Learn how contrast-color() automatically picks accessible text colors using native CSS, without JavaScript.

Learn how to build a harness-style AI workflow using Claude Code with specialized Dev, QE, and Ops subagents, gated handoffs, MCP telemetry, and LEARNING.md.

Learn how to build smooth staggered animations in CSS using modern features like sibling-index(), complete with practical examples, fallbacks, and accessibility tips.
Would you be interested in joining LogRocket's developer community?
Join LogRocket’s Content Advisory Board. You’ll help inform the type of content we create and get access to exclusive meetups, social accreditation, and swag.
Sign up now

