In a previous article, I covered how to build a custom blockchain implementation using the Substrate framework in Rust. However, in this article, we looked only at the backend part of the application. We used the default Substrate frontend template to interact with the blockchain, calling functions and inspecting the blockchain state manually.
In this article, we’ll implement a custom frontend for the Blogchain blockchain built in the previous article using React. There are many ways to go about building a frontend for a Substrate-based blockchain, both native and using the web. In this example, we’ll continue with the web. You can find the full code for this example on GitHub. Let’s get started!
By default, blockchains built using Substrate provide an API for clients to connect for RPC calls, for example, using WebSockets. The official recommended way to interact with any Substrate-based chain is to use Polkadot-JS.
However, there are also libraries for other languages, as well as the option to use Substrate Connect, which uses Polkadot-JS internally and is focused on providing a basis for light clients for a Substrate blockchain.You can check out the Polkadot-JS docs to learn more about how it works. Essentially, you have full RPC access to a Substrate blockchain.
To save ourselves some time, we’ll base our custom React frontend on the Substrate Frontend Template, forking it and customizing it by extending the template with some Blogchain specific UI elements to interact with our custom blockchain.
While our setup and boilerplate will be handled by the template, we’ll use the same libraries and functionalities that we would use with any other application. The frontend template is based on React and also includes Polkadot-JS.
Inside the template, a lot of the useful blockchain-related functionality is already bundled up and made usable at a higher level. Also, by extending an existing project, we can look at the code that is being used within the template to learn how to build working components in an idiomatic way.
Let’s jump into setting up the project and get coding!
First, we’ll fork the Substrate Frontend Template repository. Then, we can clone our fork:
git clone url-of-your-fork
Once that’s done and we have our fork locally available, we can navigate inside of the directory and execute the command below:
yarn install
The command above will install all the necessary dependencies and start the template on http://localhost:8000. Of course, this will only work well if you have the Blogchain project locally running. To do so, simply follow the steps outlined in the README of this repository after cloning it locally. Note that you’ll need Rust and Cargo to run a Substrate blockchain locally.
Now, we can check out the folder structure within the Substrate frontend template, which is essentially just a modern React application. The entry point is in src/index.js, which includes the src/App.js file.
Looking through src/App.js, we see that the template uses Semantic UI React, a React version of the Semantic UI framework. Therefore, we can use the existing,pre-styled components of Semantic UI.
Within the render function, we can also see all the components that are actually visible in the browser, like <NodeInfo />, <Balances />, etc. All of these components are actually implemented within the project, so, for example, we can just look at Transfer.js to see how we could build a component for sending funds from one account to another.
Another important aspect is the substrate-lib/ folder, which bundles and abstracts over much of the blockchain-related RPC logic we’ll need to interact with our chain, as well as some pre-built components for this purpose.
If you want to dive deeper into building web clients for Substrate blockchains, exploring and understanding the frontend template project is a fantastic way to start. With the setup out of the way, let’s get coding!
We’ll build several custom components. On the highest level, we want to show the existing blog posts and have a form to create blog posts. Then, we want to check out a post’s details, including the comments on the post. Finally, we want to tip the blog post author and add new comments.
We’ll create the following components:
Blogchain: The top-level component, which will contain the rest of our components. We’ll integrate Blogchain into our Frontend Templateblogchain/ListBlogPost: Component for listing blog posts and their detailsblogchain/CreateBlogPost: Form for adding a new blog postblogchain/CreateComment: Form for adding a new commentblogchain/Tip: Form for tipping a blog post authorSince this is just an example and not a production app, we won’t deal with error handling and input validation. But, if you’re familiar with React, whatever you’ve used in other projects should work just as well here.
Let’s start with the high-level Blogchain component:
import { Grid, Container } from 'semantic-ui-react'

function Blogchain() {
  return (
    <Grid.Column width={16}>
      <Container>
        <Grid stackable columns="equal">
          <ListBlogPosts />
          <CreateBlogPost />
        </Grid>
      </Container>
    </Grid.Column>
  )
}
export default Blogchain
As mentioned above, we use Semantic UI components to build the UI. Essentially, we just create a grid column since our component will be integrated in an existing grid of the template application. The column has the size 16, meaning it will span the whole width of the page.
Within the Blogchain component, we create a new container with a grid inside where we can lay out our own components right next to each other, each taking up 50 percent of the space.
Next, let’s look at the CreateBlogPost component, which will be somewhat more interesting:
import { Grid, Form, Input } from 'semantic-ui-react'
import { useState } from 'react'
import { TxButton } from '../substrate-lib/components'

function CreateBlogPost() {
  const [status, setStatus] = useState(null)
  const [formState, setFormState] = useState({ content: '' })

  const onChange = (_, data) =>
    setFormState(prev => ({ ...prev, [data.state]: data.value }))

  const { content } = formState

  return (
      <Grid.Column width={8}>
        <h1>Create Blog Post</h1>
        <Form>
          <Form.Field>
            <Input label="Content" type="text" placeholder="type here..." state="content" onChange={onChange} value={content} />
          </Form.Field>
          <Form.Field style={{ textAlign: 'center' }}>
            <TxButton
              label="Submit"
              type="SIGNED-TX"
              setStatus={setStatus}
              attrs={{
                palletRpc: 'blogchain',
                callable: 'createBlogPost',
                inputParams: [content],
                paramFields: [true],
              }}
            />
          </Form.Field>
        <div style={{ overflowWrap: 'break-word' }}>{status}</div>
        </Form>
      </Grid.Column>
  )
}
export default CreateBlogPost
Let’s go through our code line-by-line. We’ll also reuse this model of a form-based component for the CreateComment and Tip components later on, so it’s important to get a good understanding of what’s happening here.
First, we define a local state called status with useState, initializing it to null. In this case, the status means the lifecycle of the transaction. In a typical web-based request-response system, there’s not much relevant state. We send the request and expect the response, handling errors.
To persist state in a blockchain system, instead of putting it into some database, we add it to a block, which has to be agreed on by the network. But, due this nature, a transaction can have several states.
First, when we send it, it might not be accepted by the blockchain, for example, because we sent invalid data. If it’s a valid request, we still have to wait until it is mined into a block. So, this status state essentially reflects this state to the user in a simplistic way.
Then, we define the formState, which is an object containing our form fields. The onChange function can be used to update this formState if an input field is changed.
All of this form-handling logic is basically copied from the existing Transfer.js component, to be as idiomatic as possible. Let’s look at the components we use for building the actual form.
Semantic UI has built-in Form components that we can use and wire up automatically with our formState and onChange functions by setting the state prop.
Then, we add a TxButton component, which is a pre-existing component from the substrate-lib bundle, for interacting with the blockchain. This button also takes care of executing a transaction. In this case, we want to make a signed transaction, which is why we use the SIGNED-TX type.
Here, we also see our status state set the setStatus property to our function, meaning that the TxButton functionality, which keeps track of the lifecycle of the triggered transaction, updates this status.
Next, we can set attrs. These attributes define what we actually want to achieve with this transaction. In our case, we say that we want to call the blogchain::createBlogPost extrinsic with the content from our form in the inputParams. Below the form, we display our status state, which will be updated during the execution of the transaction.
The TxButton component is actually implemented inside the substrate-lib/components folder, so if you’re interested in everything that’s going on behind the scenes, it might be worth it to check it out.
Now, let’s move on to listing our blog posts.
To list our blog posts, we need to fetch both the blog posts and their comments, then render them:
import { useSubstrateState } from '../substrate-lib'
import { Grid, Button, Modal } from 'semantic-ui-react'
import { useEffect, useState } from 'react'

function ListBlogPosts() {
  const { api } = useSubstrateState()
  const [ blogPosts, setBlogPosts ] = useState([])
  const [ blogPostComments, setBlogPostComments ] = useState({})

  useEffect(() => {
    api.query.blogchain.blogPosts.entries().then((posts) => {
      const p = posts.map(post => {
        return {
          id: post[0].toHuman(),
          content: post[1].toHuman().content,
          author: post[1].toHuman().author,
        }
      })
      setBlogPosts(p)
    })

  }, [api])

  useEffect(() => {
    api.query.blogchain.blogPostComments.entries().then((commentsMap) => {
      const c = commentsMap.reduce((acc, commentsEntry) => {
        return {
          ...acc,
          [commentsEntry[0].toHuman()]: commentsEntry[1].toHuman(),
        }
      }, {})
      setBlogPostComments(c)
    })

  }, [api])

  return (
      <Grid.Column width={8}>
        <h1>Blogposts</h1>
        {blogPosts.map((post) => {
          return <BlogPost key={post.id} post={post} comments={blogPostComments[post.id]}/>
        })}
      </Grid.Column>
  )
}
export default ListBlogPosts
We start off by using the useSubstrateState method to get the API. useSubstrateState is a built-in library function from substrate-lib. The API is basically an abstraction for making RPC calls to the blockchain.
We use useState to create component state for blogPosts and blogPostComments. Then, we actually define two effects using useEffect, the React lifecycle function. In this case, we’re basically just making requests when the components are loaded. However, Polkadot-JS is quite powerful when it comes to real-time data, and we could also create WebSocket-based subscriptions.
For example, if we had a storage item, which changes every time a blog post is added, we could subscribe to that value and refetch the data every time it changes, updating our UI accordingly. So ,moving from a request-response model to a full real-time model is fully supported by the tech we’re already using here.
We use the API abstraction to first query blogchain.blogPosts.entries(), which returns the actual StorageMap, a map from blog post ID hash to the actual blog posts.
We get this in the form of an array, where each element is essentially a tuple of the ID and the blog post. We use the .toHuman() function to get a human-readable representation of the blog post ID and the blog post data, setting it in our blogPosts state.
We do basically the same for the blog post comments. However, we don’t just map over it to create a list of blog posts, but we reduce down the map of blog post IDs to blog post comments for each ID. We also set this data in our blogPostComments state.
Then, we simply render another grid column and map the blogPosts to BlogPost components, passing down the post and comments to the detail component. The BlogPost component, which we used for displaying the blog posts in the list, is very simple:
function BlogPost(props) {
  const { post, comments } = props

  return (
    <div>
      id: {post.id} <br />
      content: {post.content.substring(0, 15) + '...'} <br />
      author: {post.author}<br />
      <BlogPostModal post={post} comments={comments} />
      <hr/>
    </div>
  )
}
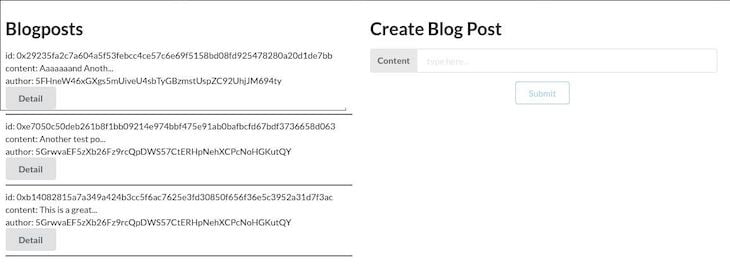
We just display the ID, the first 15 characters of the content, and the author of the post, passed down using props. More interestingly, below the data, we show the BlogPostModal, which will be the Detail component that pops up when people click on the Detail button of a blog post:
function BlogPostModal(props) {
const [open, setOpen] = useState(false)
const { post, comments } = props
return (
<Modal
onClose={() => setOpen(false)}
onOpen={() => setOpen(true)}
open={open}
trigger={
<Button>Detail</Button>
}
>
<Modal.Header>Post ID: {post.id}</Modal.Header>
<Modal.Content>
<b>Author:</b> {post.author} <br />
<b>Content:</b> {post.content}
</Modal.Content>
<Modal.Content>
<h3>Comments:</h3>
<ul>
{comments && comments.map((comment) => {
return <li key={comment.content}>{comment.author} wrote: <br />{comment.content}</li>
})}
</ul>
<CreateComment postId={post.id} />
<Tip postId={post.id} />
</Modal.Content>
</Modal>
)
}
Semantic UI has a built-in Modal component. We can define state-functions for opening and closing the modal, and more interestingly, a trigger property. In our case, this trigger is simply a button that will trigger onOpen when clicked.
When the Modal component is clicked while open, it triggers onClose. In a more complex application, we could use these Hooks could implement more interesting functionality concerning opening and closing the Modal.
Inside the Modal component, we can implement our logic and user interface for the detail view. In our case, we start off with the post ID as a header, followed by the full content and author of the post. Below that, we display the comments that we passed down into the BlogPost and Modal component, as well as our CreateComment and Tip components, which we’ll look at next.
Otherwise, not too much is happening here; we use the powerful Modal from Semantic UI to do the heavy lifting for us. As mentioned above, the CreateComment and Tip components are similar to CreateBlogPost with minor changes:
import { Grid, Form, Input } from 'semantic-ui-react'
import { useState } from 'react'
import { TxButton } from '../substrate-lib/components'

function CreateComment(props) {
  const [status, setStatus] = useState(null)
  const [formState, setFormState] = useState({ content: '' })
  const { postId } = props;

  const onChange = (_, data) =>
    setFormState(prev => ({ ...prev, [data.state]: data.value }))

  const { content } = formState

  return (
      <Grid.Column width={8}>
        <h3>Create Comment</h3>
        <Form>
          <Form.Field>
            <Input label="Content" type="text" placeholder="type here..." state="content" onChange={onChange} value={content} />
          </Form.Field>
          <Form.Field style={{ textAlign: 'center' }}>
            <TxButton
              label="Submit"
              type="SIGNED-TX"
              setStatus={setStatus}
              attrs={{
                palletRpc: 'blogchain',
                callable: 'createBlogPostComment',
                inputParams: [content, postId.toString()],
                paramFields: [true, true],
              }}
            />
          </Form.Field>
        <div style={{ overflowWrap: 'break-word' }}>{status}</div>
        </Form>
      </Grid.Column>
  )
}
export default CreateComment
We create a form again and use the postId, passed in using the props from the outside. Unlike the blog post creation form, we set [content, postId.toString()] within the TxButton when defining the inputParams.
The createBlogPostComment extrinsic takes two parameters, the content String and a Hash of the blog post we want to comment on. This hash is just our postId. We can simply set it to postId.toString(). The content field is passed in the same way as when we created a blog post.
The rest of the form logic is indeed very much the same as in the previous form. The same goes for our last component, the Tip form:
import { Grid, Form, Input } from 'semantic-ui-react'
import { useState } from 'react'
import { TxButton } from '../substrate-lib/components'

function Tip(props) {
  const [status, setStatus] = useState(null)
  const [formState, setFormState] = useState({ amount: 0 })
  const { postId } = props;

  const onChange = (_, data) =>
    setFormState(prev => ({ ...prev, [data.state]: data.value }))

  const { amount } = formState

  return (
      <Grid.Column width={8}>
        <h3>Tip</h3>
        <Form>
          <Form.Field>
            <Input label="Amount" type="text"  state="amount" onChange={onChange} amount={amount} placeholder="10000" />
          </Form.Field>
          <Form.Field style={{ textAlign: 'center' }}>
            <TxButton
              label="Submit"
              type="SIGNED-TX"
              setStatus={setStatus}
              attrs={{
                palletRpc: 'blogchain',
                callable: 'tipBlogPost',
                inputParams: [postId.toString(), amount],
                paramFields: [true, true],
              }}
            />
          </Form.Field>
        <div style={{ overflowWrap: 'break-word' }}>{status}</div>
        </Form>
      </Grid.Column>
  )
}
export default Tip
Again, since the tipBlogPost extrinsic expects two arguments, a Hash of the post and an amount of funds, we can do the same as in the previous component by pre-setting the Hash in the inputParams of the TxButton component to the postId.
Within these components, in a production application, you could imagine us checking whether we’re the author of a post or a comment and displaying those differently. Or, we might disable the Tip component if it’s our own blog post. At the end of the day, this is very similar to any other API-based web application where we make requests for data using Polkadot-JS and update the state in our frontend.
With that, all of our components are done. The only thing left is to wire them up with the frontend template by extending App.js:
import Blogchain from './Blogchain'

...
          <Grid.Row stretched>
            <NodeInfo />
            <Metadata />
            <BlockNumber />
            <BlockNumber finalized />
          </Grid.Row>

          <Grid.Row>
            <Blogchain />
          </Grid.Row>

          <Grid.Row stretched>
            <Balances />
          </Grid.Row>
...
Now, let’s see if what we built actually works. Check the Setup section above for instructions on checking if the Blogchain blockchain is running. We then execute yarn start, and our application will open in a browser pointing to http://localhost:8000.
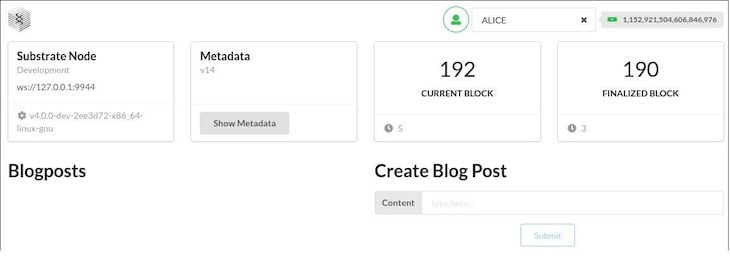
There, we’ll see the basic frontend template user interface. Right below the basic blockchain info, where we added our <Blogchain /> component, we can see our blog post list and blog post creation components:
Now, let’s try to create a blog post:
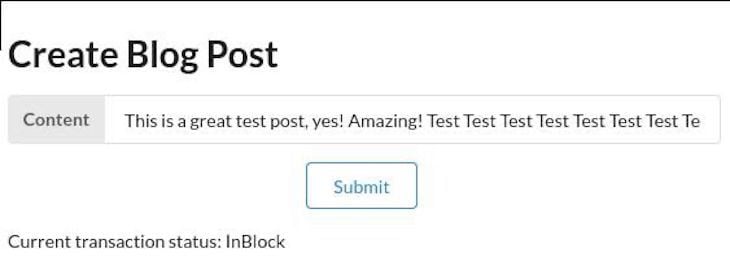
Once we click on Submit, we can see the status below change. Once the status is InBlock, everything is persisted. Now, by refreshing the page and adding some more blog posts, we can see our list of blog posts:
Great, now let’s click on the Detail button of a post to see our Modal for interacting with the post:
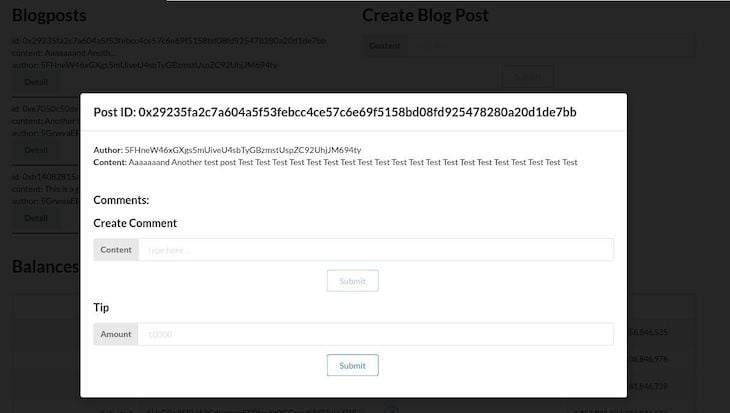
Here, we can see the details of the post and our form for adding comments and tipping the blog post author. Let’s do both:
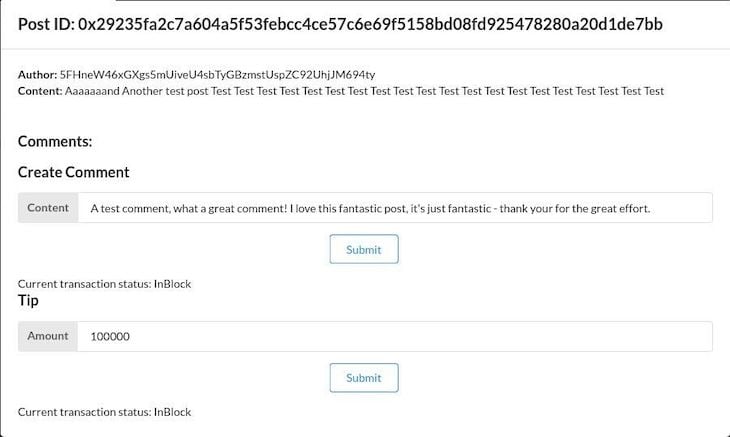
Upon adding a comment and tipping, we can check the balance and see that the money has actually changed hands. Also, refreshing and opening the Detail again, we can see our new comment the detail page:
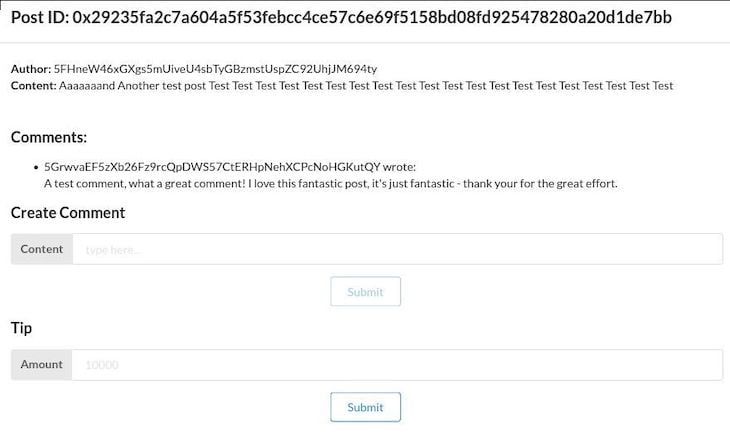
It works, fantastic!
Like in the previous backend-oriented example with Substrate, using a pre-existing template project with thorough documentation made getting started with Polkadot-JS and interacting with the blockchain a seamless experience.
Especially with the novelty and high complexity of blockchain technology and Web3 in general, Substrate’s approach is powerful to help developers get started. In this example, we covered adding some customizations to the existing Substrate Frontend Template. It’s not too much of a stretch from this example to using the whole Substrate ecosystem to build a working Web3 application.
I hope you enjoyed this article! Be sure to leave a comment if you have any questions.
Install LogRocket via npm or script tag. LogRocket.init() must be called client-side, not
server-side
$ npm i --save logrocket

// Code:

import LogRocket from 'logrocket';
LogRocket.init('app/id');
// Add to your HTML:

<script src="https://cdn.lr-ingest.com/LogRocket.min.js"></script>
<script>window.LogRocket && window.LogRocket.init('app/id');</script>
Hey there, want to help make our blog better?
Join LogRocket’s Content Advisory Board. You’ll help inform the type of content we create and get access to exclusive meetups, social accreditation, and swag.
Sign up now
Discover how the Interface Segregation Principle (ISP) keeps your code lean, modular, and maintainable using real-world analogies and practical examples.

<selectedcontent> element improves dropdowns

Learn how to implement an advanced caching layer in a Node.js app using Valkey, a high-performance, Redis-compatible in-memory datastore.

Learn how to properly handle rejected promises in TypeScript using Angular, with tips for retry logic, typed results, and avoiding unhandled exceptions.
2 Replies to "Substrate blockchain application with a custom React frontend"
Hi, that’s a fantastic work you are doing! Please, keep on going! It’s very helpful to get hands on the blockchain development. All the articles are created in a very friendly manner and inspires to keep on working! Thank you, Mario!
Ethereum is planning to switch from its current proof-of-work (POW) consensus algorithm to a proof-of-stake (POS) algorithm. This change will likely happen sometime in 2023. Once Ethereum switches to POS, it will no longer be possible to mine Ethereum!