Delivering solutions to real-world problems is one of the reasons why the product management field is so exciting. It is, however, also one of the more challenging aspects of the role, as many different unforeseen issues might arise during the design and development of the solution. This threatens to potentially derail your team’s focus and, ultimately, end up with a solution that neither the customer nor the team is happy about.
This is where rapid prototyping can help. Depending on where you are in the product development lifecycle, having a reasonably assembled prototype — which can be used to receive feedback from customers — is extremely useful. It cultivates that focus and ensures that the team continues to stay on track to deliver a feature or function that solves a real-world customer pain point or issue.
A prototype is a simple visualization of the product to test its concept. Its purpose is to gather customer feedback about its usability. Using a prototype allows you to explore the user interface that your team is planning for the intended application and get feedback from customers on any potential problems in the user flow.
As a product manager, it is important to use your prototype well so that you can do things to iterate, validate, and improve the product’s intended application.
By watching a user interact with your prototype, you can gain insight into user behavior, interests, and patterns. This can help you make iterative and insightful decisions that will help in solving your customer’s pain point or issue.
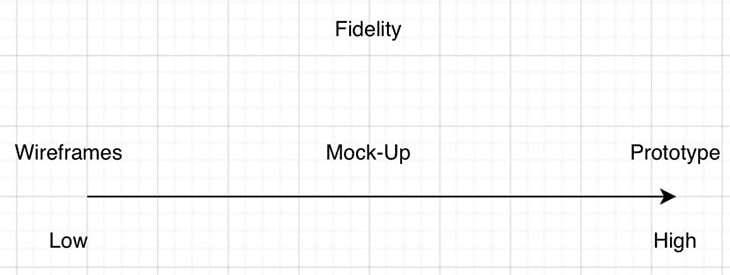
Before we dive into the rapid prototyping process, it is important to understand the key differences between the different types of design artifacts. As can be seen above, there are three different fidelity stages when it comes to representing a future initiative: wireframes, mockups, and prototypes.
In summary, a wireframe is used to represent low-fidelity (aka low-effort) concepts of your product idea. They’re used to ideate on what the structure, layout, and organization of your idea look like before putting in the effort of creating any additional visual detail.
After your wireframe is validated, it’s time to move to mockups. This is usually a static yet simple display of what your final product should look like. User interactions and flows in the mockup should be based on the concepts, structure, and patterns decided upon during the wireframing phase. Mockups build on top of those ideas by including interface elements, colors, typography, and style.
Finally, a prototype is a high-fidelity, almost-functioning representation of the intended application. It allows customers to fully immerse themselves in the flows, interactions, and responses that help provide valuable feedback to the team.
Now that we understand the differences between prototypes and other forms of pre-product artifacts, we’re ready to launch into a discussion of the rapid prototyping process.
Rapid prototyping makes use of prototypes — the highest fidelity and almost functioning representations of your intended product — to launch into a feedback loop. This feedback can be used to affirm, validate, and test whether or not your customers’ pain points or issues are solved with the prototype.
Rapid prototyping get’s the name “rapid” due to the value of getting quick feedback on your prototype. The fast turnaround allows your team to be responsive in not only disseminating the feedback, but also utilizing it to iterate before pushing out an improved version of the prototype for further validation and testing.
Also, it’s important to note that validation and testing your prototype isn’t simply just showing it to your customers and merely asking them for their opinions. Simulated situations that mimic real user workflows play a key role in receiving targeted feedback from customers. These simulated situations are vital to whether or not your solution solves a real-world problem faced by customers using your product or not.
The following are the advantages of the rapid prototyping process:
Because your prototype is a close representation of the final product or feature, rapid prototyping enables you and your team to get relevant, high-quality feedback from your customers.
Rapid prototyping helps them relay back their experience, feelings, and understanding about using the prototype, which can ultimately help your team build the best product for your customer.
The ability to make incremental changes every time your prototype receives feedback helps your team keep their focus on ensuring that your prototype — and eventually your final product — will reflect your customer’s needs.
Because of the quick, incremental changes, rapid prototyping helps your team avoid building something that, in the end, is not what the customer wanted at all. In that situation, your team would have to go back to the drawing board and start anew.
As such, the rapid prototyping process helps your team avoid wasting time building something without customer input. By having a simple, automated, and fast feedback loop in between iterations, your team can ensure that the company’s resources (as well as your own team’s valuable time and effort) are optimally spent.
Because you get customer feedback from every incremental improvement made to the prototype, rapid prototyping gives a nice balance of efficiency, speed, and urgency. Usually, most rapid prototyping sessions last between 2–4 weeks at a time, with several customer conversations happening each week.
The regularity and swiftness of customer feedback helps your team not only implement the feedback into the product but also to show the improved version of the product at the next customer conversation. This is typically maybe a day or two after being provided feedback to confirm if the iterations made are enough or if further work is required.
If more work is required, the feedback and iteration loop starts again until the customer is satisfied that your team has covered all of their concerns.

There are many different methods to conduct a rapid prototyping process. When boiled down into the components that might make up the process, most rapid prototyping processes have the following steps:
Customer pain points and issues are at the very center of the rapid prototyping process. A prototype exists as a possible high-fidelity solution to fill a potential customer need. As such, before your team can begin the process of creating a prototype, there needs to be an investment of time into finding out what are the customer’s problems in the first place.
There are many different ways to curate these customer problems, such as looking at previous support tickets or via a customer feedback platform such as UserVoice.
Once you’ve gathered enough evidence that there is a particular problem, you want to start forming assumptions based on this evidence. You want to gather about 5–7 assumptions to test with your prototype.
Assumption gathering should take no longer than 1–2 weeks, on average. An example of how an assumption can be made includes the following:
Support ticket: “Can you please help me? I am unable to log into your application using two-factor authentication. I feel very vulnerable that I am unable to authenticate my identity when logging in. Who knows who might try to hack me?”
Assumption: Customers want to be able to use two-factor authentication when logging in, as they feel more secure about their accounts if this option was enabled for them by default.
Once you’ve gathered enough assumptions, it is time to assemble your prototype. The product manager and designer will usually start discussions with a simple wireframe. From this, they’ll understand the basic user flow and information architecture that the prototype — and final feature — might look like in the future.
After the wireframe, the product designer might create a mockup to see if, visually, all the intended functions and features are working as planned.
Finally, once the mockup is approved, the designer will move on to creating the prototype. These days, it is quite easy to create a prototype without any engineering work through programs like Figma. It will typically take the product designer a week to fully develop the prototype from what was agreed to during the wireframe and mockup stage.
If you want more functionality, the engineering team can typically also create a minimally-functioning prototype. However, to avoid wasting engineering time and resources on an idea that is still being validated, it might be best to create a moving, functioning prototype in Figma to start with.
If, in the middle of the feedback and iteration loop, your team is confident enough with the direction the prototype is headed in, they can then consider whether a prototype created by engineering should replace the Figma prototype.
Once the prototype has been created or is near the end of its creation, the team should start thinking about recruiting users to test the prototype. Depending on the popularity and accessibility of your product, this is usually the easiest part of the process. It typically involves recruiting either from your existing customer base or reaching out to customers who might not know your product, but are knowledgeable about the industry in which your product operates.
The goal is to gather fair and constructive feedback about the usability of your prototype and whether it helps solve the problem that customers face.
Once you’ve scheduled a few user interviews, it’s finally time to show your prototype! This can be a nerve-wracking experience, but there are a few patterns and structures you can put in place.
Instead of asking the user typical questions, you might be tempted to ask in the course of the normal discovery process. The best way to get feedback for your prototype is to put the user in hypothetical situations that mirror the user flow of your prototype. This helps obtain feedback that is not led by your questions but is, instead, led by the experience the user has.
For example, taking the two authentication issue mentioned in step one, let’s say your team created a prototype to test out two-factor authentication when a user logs into your product:
Hypothetical: “Hello! Welcome to our prototype. This is the login screen when you first enter the application. Your task is to log into your account using our new login system. Please walk through your usual login process using this new design.”
Desired result: the user can select two-factor authentication from the login screen at first instance, without further guidance from the interviewer
During the interview process, it is likely that your team will receive not just positive feedback, but also constructive (and even negative) feedback at times. This is where the rapid prototyping process really shows its strength — the feedback provided should be ingested by the team and decided on if it’s valid to improve the product or if it should be consigned to the side.
Once it is agreed that the feedback should be integrated into the product, the team should make iterations to the prototype that reflect the feedback that was provided. The newly iterated product, once completed, should then be shown again at the next user interview with 1–2 new questions that cover the new iteration. This will fully validate whether it is enough to fully satisfy the customer’s pain point or issue.
This will usually take 4–5 rounds before your prototype is perfected and there are no other customer feedback, questions, or issues with your prototype.
Finally, once the prototype is complete, it is time for you and your product designer to conclude the rapid prototyping process. You’ll make any final iterations on the product before discussing with the engineering team to divide and organize work that’ll deliver the prototype into the product as a final feature.
Use the above tips and you’ll be undertaking the rapid prototype process in no time. Until next time!
Featured image source: IconScout

LogRocket identifies friction points in the user experience so you can make informed decisions about product and design changes that must happen to hit your goals.
With LogRocket, you can understand the scope of the issues affecting your product and prioritize the changes that need to be made. LogRocket simplifies workflows by allowing Engineering, Product, UX, and Design teams to work from the same data as you, eliminating any confusion about what needs to be done.
Get your teams on the same page — try LogRocket today.

How AI reshaped product management in 2025 and what PMs must rethink in 2026 to stay effective in a rapidly changing product landscape.

Deepika Manglani, VP of Product at the LA Times, talks about how she’s bringing the 140-year-old institution into the future.
Burnout often starts with good intentions. How product managers can stop being the bottleneck and lead with focus.
Should PMs iterate or reinvent? Learn when small updates work, when bold change is needed, and how Slack and Adobe chose the right path.