As modern web applications grow, it becomes increasingly difficult to maintain their performance. That’s why it’s essential to optimize application performance from the very start.

With the advent of frameworks like Next.js, a popular React framework, you can create a fully functional web application in just minutes. Next.js offers many inbuilt features, including server-side rendering, static site generation, and file-based routing. It also provides many inbuilt optimizations to improve app performance.
In this article, we will look at several approaches for optimizing the build performance of your Next.js application.
Jump ahead:
The Replay is a weekly newsletter for dev and engineering leaders.
Delivered once a week, it's your curated guide to the most important conversations around frontend dev, emerging AI tools, and the state of modern software.
Build performance is the time it takes to build your application: that is, to compile and generate the static files. A fast build performance enables you to iterate faster and deliver your application to your users more quickly.
Many factors can affect the build performance of your application, including its size and the number of dependencies, pages, and components. If the build performance of your application is slow, the overall performance of your application will be affected, thereby impacting user experience.
By default, Next.js provides many optimizations to improve app build performance. Additionally, there are many other approaches you can take to further improve the build performance of your application. Let’s take a look.
The easiest way to improve the build performance of your Next.js application is to use the latest stable version of Next.js. The team behind Next.js is constantly working to further improve the framework and add new features and optimizations. So, it’s important to use the latest stable release.
As of this writing, the latest stable version of Next.js is v13.4. You can check the latest stable version of Next.js here, and can upgrade your app to the latest stable version of Next.js by running the following command:
npm install next@latest
Next.js provides several inbuilt optimizations that you can use to improve the build performance of your application, such as automatic static optimization, code splitting, image optimization, font optimization, and prefetching, as well as optimizing third-party scripts.
If there are no dynamic routes in your application, Next.js will automatically render your application as static HTML by default. If neither getServerSideProps nor getInitialProps are defined, Next.js will not need to re-render the page on every request, as pages will be built once and served to all users.
This optimization improves app performance by reducing the time it takes to generate the static HTML for the application. Static optimization is perfect for web applications without dynamic routes and pages that only change occasionally.
For pages that do have dynamic routes or that fetch data from an external API, using the Next.js getServerSideProps or getInitialProps functions allows you to prerender the page on the server and fetch the necessary data before sending the HTML to the client. This helps improve the initial load time and overall performance of the page.
Code splitting is the process of dividing your code into smaller chunks. Each chunk contains the code required for a particular page.
By default, Next.js will automatically break your code into smaller chunks to reduce the time it takes to load the code for your application. This means that Next.js will only load the code needed for that particular page on the initial page load.
To further utilize the benefits of code splitting, you can use dynamic imports to load the code for a particular page only when needed. Code splitting is helpful for pages that are visited infrequently.
You can use the next/image component, which is the Next.js inbuilt <img> element, to automatically optimize your images with lazy loading and by automatically resizing or compressing images based on device size.
Lazy loading is the process of loading images only when they are needed: that is, when they are visible on the screen. Automatic image optimization reduces the time it takes to load the images in your application, thereby improving performance.
You can also specify that some images should be loaded initially by setting the priority prop on the next/image component to true. Next.js will prioritize loading the essential images you want to load first.
Next.js uses the next/font component to optimize font. This component includes inbuilt automatic self hosting for Google Fonts. You can use Google Fonts in your application without having to worry about layout shift or flash of invisible text (FOIT).
Next.js will automatically download the fonts and serve them from your application. The fonts will be available to your users, even offline. This reduces the time it takes to load the fonts in your application, thereby improving app performance.
Prefetching refers to loading the code for a particular page before the user navigates to the page. By default, When you use the Link component from next/link, Next.js will automatically prefetch the code for the page the user is likely to visit next.
When the initial page is loaded, the visible links on the screen are prefetched. This is handy for pages that are visited often.
For pages that are visited less frequently, you can use the prefetch prop on the Link component and set it to false to disable prefetching for that page. With this approach, the code for the page will only prefetch when the user hovers over the link.
Depending on the use case, you can improve the performance of your application with prefetch, reducing the time it takes to load the code for the next page.
Next.js provides a next/script component to load third-party scripts. By default, this component allows you to load scripts early, but after some critical content has loaded to prevent blocking the page load.
Next.js also ensures that a script is only loaded once, which is beneficial for scripts used across multiple pages in your application. Even when the user navigates to a page that does not use the script, the script will not be loaded again when the user navigates to a page that uses it.
Critical rendering path (CRP) refers to the steps a browser takes to convert HTML, CSS, and JavaScript into a rendered webpage. Optimizing CRP is essential for improving a web application’s initial load time and perceived performance.
CRP optimization involves optimizing the delivery and rendering of the most critical content to the user as quickly as possible. By minimizing the time it takes for the browser to render the page, you can improve the perceived performance and provide a better user experience. Let’s take a closer look at some techniques for optimizing critical path rendering.
Large contentful paint (LCP) is a Core Web Vitals metric that measures the time it takes for the largest content element in the viewport to become visible. LCP is crucial because it measures the perceived load speed of your application.
Tools like Lighthouse and PageSpeed Insights can help identify opportunities to improve the LCP of your application. Some of the ways to enhance an app’s LCP include:
async and the next/script component to load scripts: Allowing the browser to download the script asynchronously without blocking the rendering of the page can also help improve your application’s LCPThe Intersection Observer API is a browser API that allows us to observe changes in the intersection of a target element with its ancestor element or a top-level document’s viewport. This API is helpful for lazy loading images and other content that’s not visible on the screen. You can use the Intersection Observer API to improve the LCP of your application by loading content only when it is visible on the screen.
CSS and JavaScript optimization and minification remove unnecessary characters from your CSS and JavaScript files without changing their functionality. Avoid using CSS preprocessors that add unnecessary characters to your CSS files.
You can also use tools like PurgeCSS to remove unused CSS from your application. This will reduce the size of your CSS files, improving the LCP of your application. Similarly, avoid using unnecessary characters in your JavaScript files. Tools like Terser will also help you to minify your JavaScript files, reducing their size and improving your application’s LCP.
Improving network performance is another way to reduce the build performance of your Next.js application. Network performance is the time it takes for the browser to download the resources required for your application. Let’s take a look at a couple of strategies for improving your app’s network performance.
Caching stores the resources for your application in the browser. Implementing caching strategies like Cache-Control headers and service workers can help improve the network performance of your application.
Cache-Control headers allow you to specify browser caching policies, like how long to cache a resource and when to revalidate the resource. Next.js enables you to set the Cache-Control headers for your application by using the headers property in the next.config.js file.
Service workers allows you to cache resources in the browser and serve them from the cache when the user is offline. This reduces the time it takes to load the resources in your application, thereby improving the network performance of your application.
A Content Delivery Network (CDN) is a network of servers distributed globally. You store your static assets on these servers, which get delivered to users based on location.
You can cache static assets and serve them from edge locations using a CDN for faster global delivery. Next.js also provides inbuilt support for Vercel Edge Network. If you use Vercel for deployment, you’ll the Vercel Edge Network as a CDN automatically.
Bundle analysis is an approach for analyzing your application to identify opportunities for reducing its size. With a bundle analysis tool, you can see what modules in your application bundle take up much space, identify unnecessary files, and find ways to reduce the size of such files or delete unused ones.
Some tools for analyzing the size of your Next.js application include next/bundle-analyzer, webpack-bundle-analyzer, and next-bundle-analyzer.
Managing the dependencies in your application is another way to improve its build performance. By removing unused dependencies and optimizing those that are being used, you can enhance its build performance.
Dependency management tools, like depcheck, can help identify unused dependencies. You can then uninstall the unused dependencies, reducing your application’s size and improving its build performance.
Tree shaking is the process of removing unused or dead code from the final bundle of your application. use ES6 modules instead of CommonJS to take advantage of the Next.js inbuilt support for tree shaking. For example, use import and export statements instead of require and module.exports statements.
When importing a module, you should only import the parts you need. It is handy to keep this approach in mind for modules that have a lot of exports.
For example, instead of importing the entire module like this:
import { Button, Card, Input } from "react-bootstrap";
You can import only the parts of the module that you need, like this:
import Button from "react-bootstrap/Button";
import Card from "react-bootstrap/Card";
import Input from "react-bootstrap/Input";
Another way to optimize the build performance of your Next.js application is to exclude unnecessary folders or files from the build process. You can reduce the build time and improve overall performance by excluding specific directories or files that are not required for rendering your application.
You can use the exclude option in the next.config.js file to configure the build process to exclude specific directories or files. This enables you to specify patterns or paths that should be ignored during the build.
For example, you can exclude folders containing large media files, documentation, or development-specific assets that are not necessary for the production build:
module.exports = {
  exclude: ["**/media/**", "**/docs/**", "**/dev/**"],
};
By excluding unnecessary resources from the build, you’ll reduce the amount of data that needs to be processed and bundled, resulting in faster build times and more efficient resource utilization. This optimization technique is advantageous when dealing with large projects or when you have specific folders or files that don’t contribute to the rendering.
To demonstrate the significant impact that some of the above approaches can have on build performance, I created a simple Next.js web app. You can find the example app on GitHub. The app has four pages: home, form, accordion, and carousel.
I fully optimized the main branch of the web app. Then, I built other branches, such as unused-dependencies and unnecessary-imports, in order to compare them to the main branch.
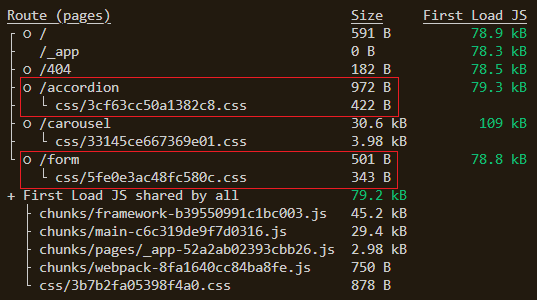
We’ll run yarn build in the terminal on the main branch to build the app. Below, you can see the build size for each page:

main branch build.Next, I installed a few unnecessary dependencies in the unused-dependencies branch:
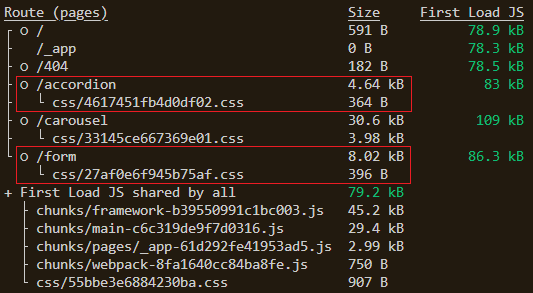
react-icons: The project only needs one icon, and using an SVG is betterreact-accessible-accordion: Building a customized accordion is easy and smaller in sizereact-hook-form: For a simple form, this package is overkillNow, let’s run yarn build in the terminal for this branch. Below, you can see the build size of the pages:

unused-dependencies branch build.If you compare both builds, you’ll notice a big difference in page size. The form page increased from 844B to 8.416kB and the accordion page increased from 1.39kB to 5.004kB. Understanding when to use a package or dependency can be vital in building performance.
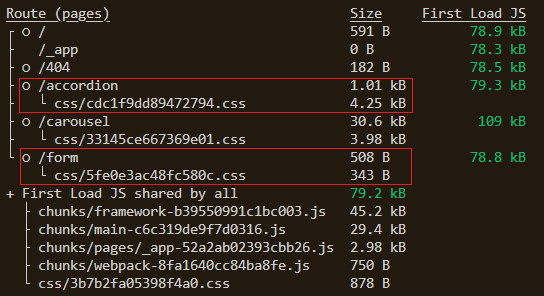
Now, let’s compare the unnecessary-imports branch to the main branch. In this new branch, I imported some CSS files into the accordion and then ran yarn build. The accordion page size increased from 1.39kB to 5.26kB.

The build performance would be even more significant if these optimization approaches were applied to a more complex codebase.
Optimizing the build performance of your Next.js application is crucial for a fast and responsive user experience. Take advantage of the inbuilt Next.js optimizations and other techniques like optimizing critical rendering paths, improving network performance, and leveraging dependency management to improve the build performance of your application. Continuous monitoring and testing of your application will help identify areas for improvement and ensure ongoing performance enhancements.
Debugging Next applications can be difficult, especially when users experience issues that are difficult to reproduce. If you’re interested in monitoring and tracking state, automatically surfacing JavaScript errors, and tracking slow network requests and component load time, try LogRocket.
LogRocket captures console logs, errors, network requests, and pixel-perfect DOM recordings from user sessions and lets you replay them as users saw it, eliminating guesswork around why bugs happen — compatible with all frameworks.
LogRocket's Galileo AI watches sessions for you, instantly identifying and explaining user struggles with automated monitoring of your entire product experience.
The LogRocket Redux middleware package adds an extra layer of visibility into your user sessions. LogRocket logs all actions and state from your Redux stores.


Modernize how you debug your Next.js apps — start monitoring for free.

Gil Fink (SparXis CEO) joins PodRocket to break down today’s most common web rendering patterns: SSR, CSR, static rednering, and islands/resumability.

@container scroll-state: Replace JS scroll listeners nowCSS @container scroll-state lets you build sticky headers, snapping carousels, and scroll indicators without JavaScript. Here’s how to replace scroll listeners with clean, declarative state queries.

Explore 10 Web APIs that replace common JavaScript libraries and reduce npm dependencies, bundle size, and performance overhead.

Russ Miles, a software development expert and educator, joins the show to unpack why “developer productivity” platforms so often disappoint.
Would you be interested in joining LogRocket's developer community?
Join LogRocket’s Content Advisory Board. You’ll help inform the type of content we create and get access to exclusive meetups, social accreditation, and swag.
Sign up now