Lazy loading is a technique that allows us to delay loading nonessential content in our application until after the initial page load. By loading only the most essential content at first and loading the remaining content when it is needed by the user, we can reduce the bundle size of our application, saving valuable seconds when a user first deploys our application.
There are many different ways to add lazy loading in modern applications, but one of the most frequently used is infinite scroll. The content of the page is already rendered, and more content is loaded as the user scrolls down the page.
We can also utilize lazy loading through a technique called code splitting. Often used in React applications, it helps us to reduce our bundle size by splitting the code of our application into lazily loaded parts.
In this tutorial, we’ll apply the lazy loading technique in our vanilla JavaScript applications using the Intersection Observer API.
The Replay is a weekly newsletter for dev and engineering leaders.
Delivered once a week, it's your curated guide to the most important conversations around frontend dev, emerging AI tools, and the state of modern software.
As the web has evolved throughout the years, browsers have gained more support, newer features, and newer APIs. Something that used to be a pain point for web developers was creating any kind of functionality dependent on a specific DOM element’s position visibility.
Previously, browsers didn’t have any API for checking the visibility of an element, and we had to rely on solutions like JavaScript and jQuery. It was very difficult to implement a solution to this problem. Modern browsers are making our lives easier by implementing new APIs that update on a daily basis. The Intersection Observer API is one of them.
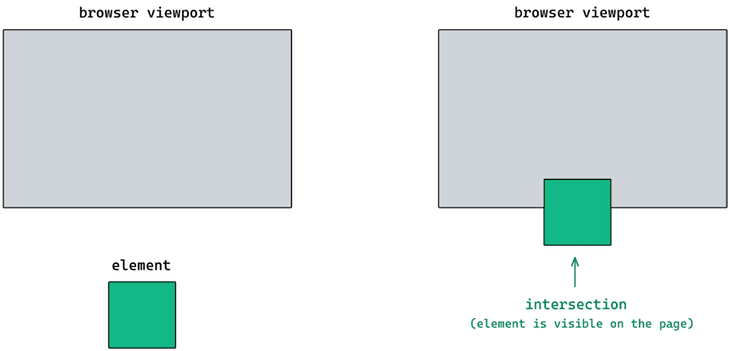
The Intersection Observer API provides a way to observe changes in the intersection of a specific element. We can use this API to check the visibility of specific elements in our applications without having to create messy codes and work-around functionalities.
The Intersection Observer API can be used in a variety ways:
Now, we’ll use the IntersectionObserver interface to create a new observer and keep track of changes in the intersection of a target element:
let observer = new IntersectionObserver(callback, options);
The first argument of the IntersectionObserver is a callback function that is called when our target element intersects our device viewport or a specific element. The second argument is an object that we call options. This object is responsible for controlling the circumstances of how your callback is invoked and has the following fields:
root : the element that was set as the viewport for checking the visibility of the target. This element should be an ancestor of the target elementrootMargin : the defined margin around the root element. This element can receive CSS values such as pixels or percentagesthresold : a number or an array of numbers that indicates what percentage of the target’s visibility the observer’s callback function should invoke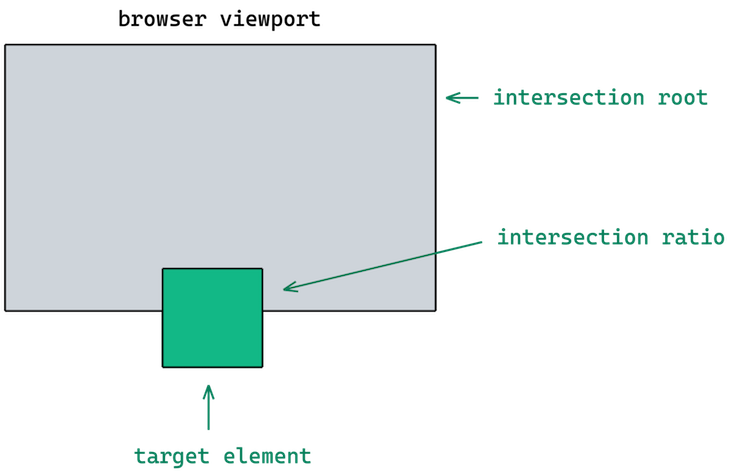
Let’s create our first observer using the Intersection Observer API.
We’ll have an object called options where we’ll pass the options for our observer. Then we’ll create our first observer by creating a new IntersectionObserver and passing a callback function:
const options = {
  root: document.querySelector(".container"),
  rootMargin: "10px",
  threshold: 0.5
};
const myFirstObserver = new IntersectionObserver((elements) => {
  elements.forEach((element) => console.log("element", element));
}, options);
Now, we need to get our target element, which we will observe:
const target = document.querySelector(".header");
After that, we use the observe method to observe changes in the intersection of a target element:
observer.observe(target);
This is what our final code looks like:
const options = {
  root: document.querySelector(".container"),
  rootMargin: "10px",
  threshold: 0.5
};
const observer = new IntersectionObserver((elements) => {
  elements.forEach((element) => console.log("element", element));
}, options);
const target = document.querySelector(".header");
observer.observe(target);
There are a couple of things that we need to remember when using the Intersection Observer API:
IntersectionObserverEntry objectsIntersectionObserver interface, if you don’t set the root element, it will default to the browser viewport or nullIntersectionObserver interfaces do not allow you to observe more than one element at a time. To observe multiple, you will have to iterate and observe them one by oneHow you use the Intersection Observer API can vary depending on which technology you are using in your application. If you’re using vanilla JavaScript, you can easily go with the browser API itself. If you’re using some JavaScript framework, there are a few libraries that can help you use the Intersection Observer API.
We’re going to create an example using the Intersection Observer API with React because it’s a popular and frequently used JavaScript UI library. However, you can easily use the Intersection Observer API with any framework or library you want.
Let’s create a new Create React App project using the following command:
npx create-react-app intersection-observer-in-practice
We’re going to write all the code inside our App component. First, we need to style our app a little bit using CSS, starting with our section and our target element. Inside the target element, when the element is visible, we’ll add the .isVisible class.
Inside the default styles.css file, paste the following code:
.root {
  display: flex;
  flex-direction: column;
  align-items: center;
  justify-content: center;
  background-color: #fff;
}

.section {
  height: 100vh;
  width: 100%;
}

.target {
  display: flex;
  justify-content: center;
  align-items: center;
  background: #151419;
  color: #fff;
  font-weight: 900;
  font-size: 20px;
  width: 300px;
  height: 200px;
  border-radius: 5px;
}

.isVisible {
  display: flex;
  justify-content: center;
  align-items: center;
  position: fixed;
  top: 0;
  width: 100%;
  background: #151419;
  color: #fff;
  font-size: 20px;
  font-weight: 900;
  padding: 40px;
}
We’ll create a simple example using the Intersection Observer API that changes the content inside our header component when our target element becomes visible to us.
Inside our App component, we’re going to create a few HTML elements:
<div className="root">
  <div className="isVisible">
    {isVisible ? "✅ Visible" : "❌ Not visible"}
  </div>
  <div className="section"></div>
  <div className="target" ref={targetRef}>
    target element
  </div>
</div>
Now, we’ll create a ref called rootRef, which we passed to our target element. After that, we’re going to create a state called isVisible to check whether the target element is visible on our page:
const rootRef = useRef(null);
const [isVisible, setIsVisible] = useState(false);
Next, we’ll use the useEffect Hook to create our observer. Inside the hook, we’ll create our options object:
const options = {
  root: null,
  rootMargin: "0px",
  threshold: 1.0
};
Remember that when our callback function is invoked, it receives a list of IntersectionObserverEntry objects. These objects have many properties, and one of them is called isIntersecting. The isIntersecting property is a Boolean value that is true if the target element is intersecting with the observer’s root element.
Now let’s create our observer. For our callback function, we’re going to get the value of the isIntersecting property and set the isVisible state:
const observer = new IntersectionObserver((entries: any) => {
  const [entry] = entries;
  setIsVisible(entry.isIntersecting);
}, options);
Now, we’re going to use the observe function and the unobserve method to do the cleanup:
if (targetRef.current) observer.observe(targetRef.current);
return () => {
  if (targetRef.current) observer.unobserve(targetRef.current);
};
All we need to do is pass our targetRef as a dependency to our useEffect hook, and we have a full example of the Intersection Observer API working smoothly. You can notice that the content changes when the target element is visible on the page.
In case you don’t want to use the browser API and want to work with a library to speed up the development, there’s a very good library called react-intersection-observer.
To use this library, you need to import the useInView hook and pass an options object as an argument:
const options = {
  root: null,
  rootMargin: "0px",
  threshold: 1.0
};
const { ref, inView, entry } = useInView(options);
Finally, all you have to do is assign the ref to the DOM element you want to observe, and the hook will report the status:
import React from 'react';
import { useInView } from 'react-intersection-observer';
const Component = () => {
  const options = {
    root: null,
    rootMargin: "0px",
    threshold: 1.0
  };
  const { ref, inView, entry } = useInView(options);
  return (
    <div ref={ref}>
      <h2>{`Header inside viewport ${inView}.`}</h2>
    </div>
  );
};
There are infinite possibilities using the Intersection Observer API. With a few extra lines of code, you can vastly improve the user experience on your application by reducing load time. You can lazy load images, implement link pre-fetching when they’re visible on the page, and more.
Support for the Intersection Observer API is strong. At the time of writing, the majority of modern browsers are supporting it. This API is worth taking into consideration to help observe changes on our web pages.
Debugging code is always a tedious task. But the more you understand your errors, the easier it is to fix them.
LogRocket allows you to understand these errors in new and unique ways. Our frontend monitoring solution tracks user engagement with your JavaScript frontends to give you the ability to see exactly what the user did that led to an error.

LogRocket records console logs, page load times, stack traces, slow network requests/responses with headers + bodies, browser metadata, and custom logs. Understanding the impact of your JavaScript code will never be easier!

Learn how next-browser gives AI agents runtime context for debugging Next.js apps, including React props, hydration, PPR, forms, and performance.

Build dynamic LLM routing in Next.js with OpenRouter, TanStack AI, task classification, model fallbacks, and cost-aware routing.

TSRX adds first-class control flow, conditional hooks, and scoped styles to React via a TypeScript compiler extension — no new framework required.

Learn how to build a full React Native auth system using Better Auth and Expo — with email/password login, Google OAuth, session persistence, and protected routes.
Would you be interested in joining LogRocket's developer community?
Join LogRocket’s Content Advisory Board. You’ll help inform the type of content we create and get access to exclusive meetups, social accreditation, and swag.
Sign up now

