Editor’s note: This article was last updated by Muhammed Ali in March 2026 to include modern best practices such as TypeScript adoption, API contract design, structured logging, containerization, and other production-ready architecture patterns.
The Replay is a weekly newsletter for dev and engineering leaders.
Delivered once a week, it's your curated guide to the most important conversations around frontend dev, emerging AI tools, and the state of modern software.
Having a strong foundation for your project architecture is critical if you want your application to scale and evolve without breaking down. When the architecture isn’t thought through, problems show up quickly:
At its core, a well-structured Node.js project should help you:
Instead of thinking about architecture as a rigid structure, it helps to treat it as a set of practical decisions that shape how your application grows over time. What follows is a checklist you can use as a reference when designing or refining your Node.js project:
.env filesconsole.log for observabilityEverything has to have its place in our application, and the folder structure is the perfect place to start organizing things.
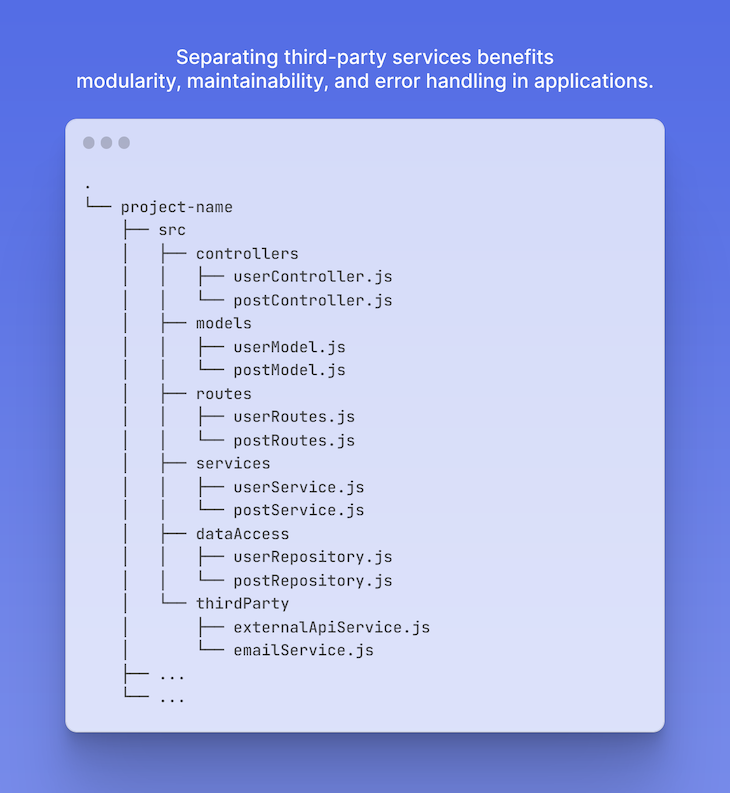
The folder structure of a software project plays a significant role in enforcing the separation of concerns, which refers to the practice of organizing code and components in a way such that each module or component has a clear and distinct responsibility:
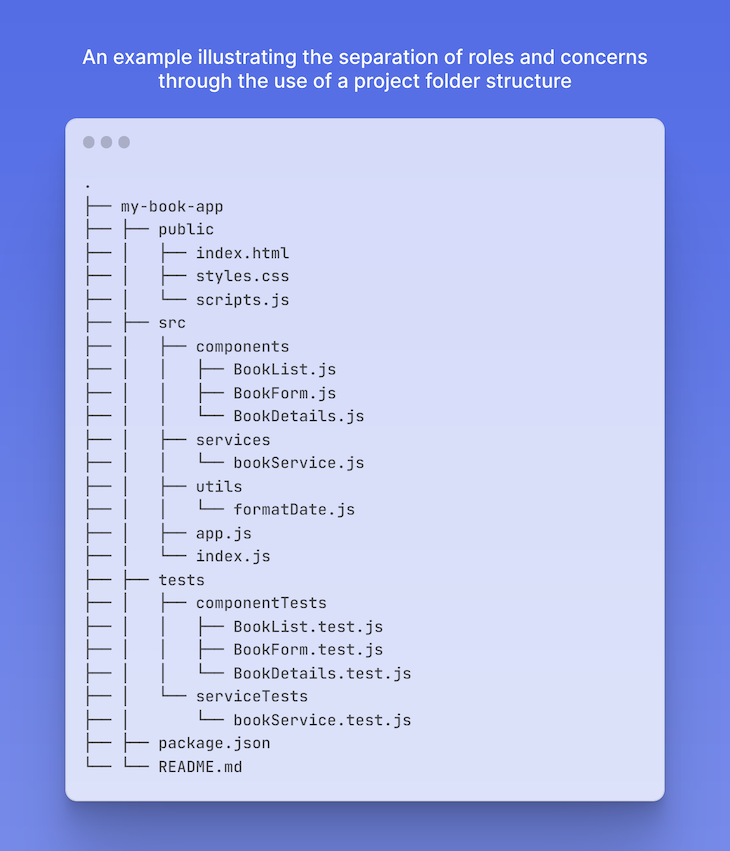
By establishing an organized folder structure, you can group related files and components together, making it easier to locate and manage specific functionalities. Additionally, this organization promotes a clear separation of concerns by keeping different parts of the app separate and independent.
The next best practice to organize your Node.js project architecture is to break your application into smaller modules, each handling a specific functionality.
Following the Single Responsibility Principle (SRP) of SOLID software development to design each module will ensure a single responsibility or purpose, making it easier to understand, test, and maintain.
“A module should be responsible for one, and only one, actor.”
Source: Wikipedia
It’s also recommended to minimize the use of global variables as they can lead to tightly-coupled code and make it challenging to identify dependencies. Instead, encapsulate variables within modules and expose only the necessary interfaces.
If the code of a class, function, or file becomes excessively lengthy, consider splitting it into smaller modules wherever possible and bundling them within related folders. This approach helps in grouping related files together and is essential for enhancing code modularity and organization.
When writing complex code that is hard to comprehend, it is vital to ensure clarity through improved naming conventions or comments. While comments can be helpful, they are often not updated and can potentially provide outdated information. Therefore, it is advised to opt for descriptive names for the variables, functions, and classes in your code:

Readable code, which is easier to understand, reduces the need for extensive time and effort spent deciphering the code’s intent. This benefit extends not only to your fellow developers but also to your future self.
TypeScript has become the de facto standard for modern Node.js applications. By adding static type annotations, you can catch bugs at compile time rather than runtime, dramatically reducing the number of type-related errors that reach production.
Key benefits of using TypeScript in Node.js projects include:
To get started, install TypeScript and the Node.js type definitions:
npm install --save-dev typescript @types/node ts-nodeUse tsconfig.json to configure your TypeScript compiler options, and consider using ts-node for development and the TypeScript compiler (tsc) for production builds. The @types/* packages on npm provide type definitions for the most popular libraries.
Frameworks like Express.js offer incredible features for managing requests, views, and routes. With such support, it can be tempting to place our business logic directly in our API routes. Unfortunately, this approach quickly leads to the creation of large, monolithic blocks that become unmanageable, difficult to read, and prone to decomposition in the long run.
It’s important to consider how this approach impacts the testability of our application, leading to longer development times as a consequence. At this point, you might be wondering how to tackle this challenge effectively and where to position your business logic in a clear and intelligent manner. Let’s address that in the next point.
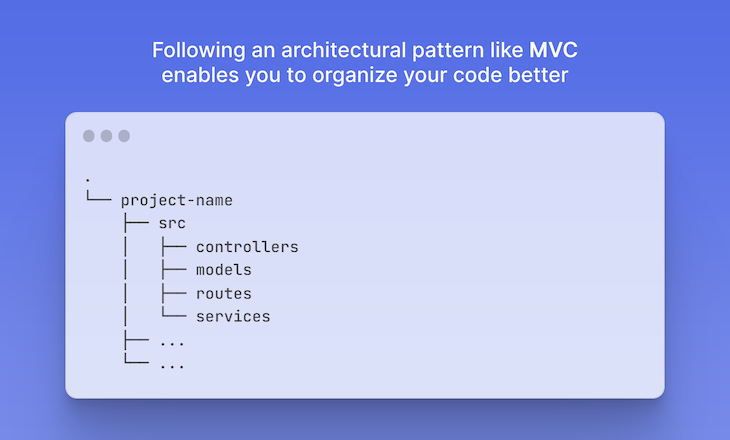
When it comes to code organization, implementing the widely adopted model-view-controller (MVC) pattern in Node.js can help you neatly separate your application’s concerns into three main components: models, views, and controllers.
The Model component represents the data, database interactions, and business logic of the application. It is responsible for implementing the core business rules and application logic, and also focuses on CRUD operations, data validation, and maintaining data integrity.
The View’s primary responsibility is to present the data to the user and handle UI components. It receives data from the Model via Controllers and renders it for the user to interact with.
Meanwhile, the Controller serves as an intermediary component that receives user input, updates the Model data as needed, and coordinates the interaction between the Model and the View. The Controller updates the Model based on user input and ensures that the View displays the updated data.
A modern evolution of the MVC approach is to treat your API contract as a first-class artifact. Instead of letting routes and controllers implicitly define your API’s shape, make it explicit and self-documenting through a specification.
OpenAPI (formerly Swagger) is the industry standard for describing REST APIs. By maintaining an openapi.yaml or openapi.json file, you enable:
express-openapi-validator)For more flexible, client-driven data requirements, GraphQL is an excellent alternative. A well-defined GraphQL schema serves as both documentation and a type-safe contract between your server and any consuming client.
Whichever approach you choose, documenting your API contract early reduces integration friction and accelerates frontend and third-party development in parallel.
We can add some additional components or layers in an MVC workflow to specifically manage the business logic and data access.
The service layer is an additional layer introduced to encapsulate the applications’ business logic. It is a collection of classes, methods, and functions that represent the core operations and workflows of our application. The Controller delegates complex business logic tasks to the service layer, and the service layer, in turn, interacts with the Model to perform data-related operations. The data access layer fits into the MVC architecture as an added service layer by acting as a separate component responsible for database interactions:
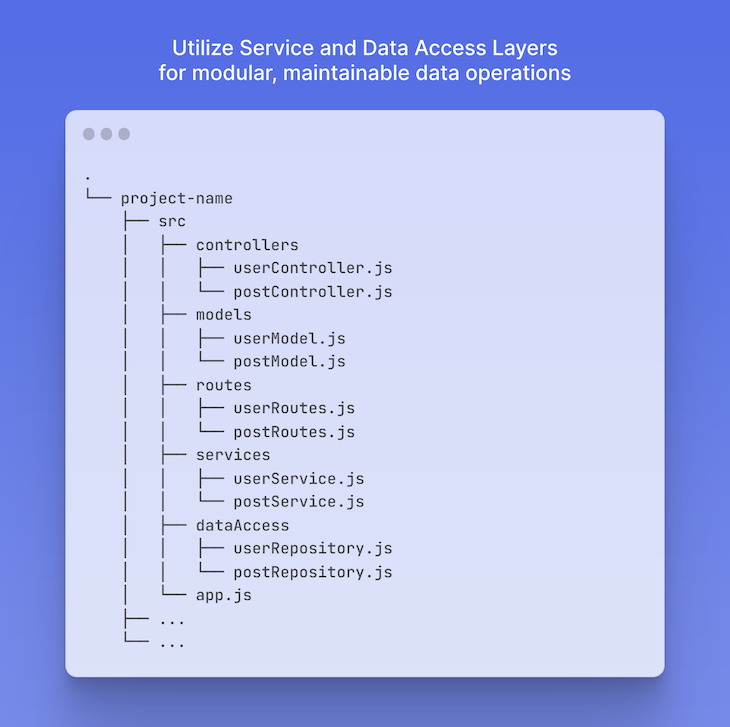
Both these layers allow for better separation of concerns, eventually improving code organization, maintainability, and scalability in complex applications.
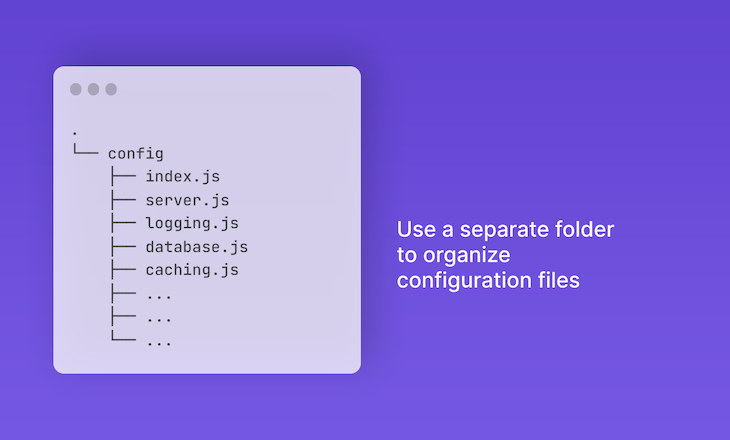
Organizing configuration files in a dedicated directory provides several benefits. It helps centralize and group various configurational settings and credentials, such as database, server, logging, caching, environments, localization, etc. This approach ensures stability and configurational consistency across the application.
Having separately managed configurations also simplifies the identification and isolation of files that contain sensitive information. When utilizing version control systems like Git, you can establish appropriate ignore rules to prevent the config folder or specific configuration files from being committed to the repository.
This reduces the risk of accidentally exposing or granting unauthorized access to confidential data. As a result, it promotes collaboration and improved version control, and helps safeguard sensitive information:
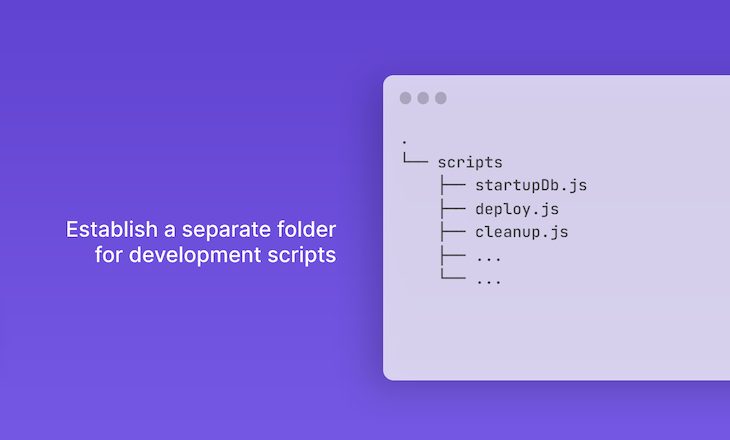
Creating a dedicated folder for development scripts in your Node.js project is always a beneficial practice, enabling organization and breaking down complex commands into smaller, more manageable scripts. This approach ensures a clear separation between the development scripts and the main application code, which contributes to better organization and maintainability.
A separate scripts folder not only enhances readability, maintainability, and reusability but also facilitates seamless integration with the build automation tools and task runners, which results in a streamlined development process:
Node.js is packed with an array of incredible features and tools that make our lives easier. However, working with dependencies can often be troublesome due to testability and code management challenges.
Fortunately, there is a solution for that called dependency injection. By incorporating dependency injection in your Node.js applications, you can achieve several benefits, as outlined below:
Let’s understand this with an example. Below is a simple example of querying a database for user info based on a provided username:
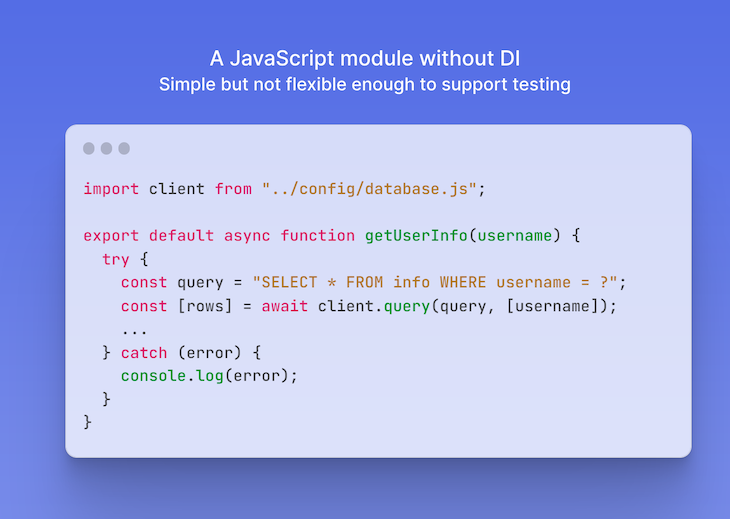
While this approach may seem straightforward, it is not inherently flexible for our code. Consider the scenario where we need to alter this test to use an example database. In such cases, we would have to make changes to the existing code to accommodate this new requirement.
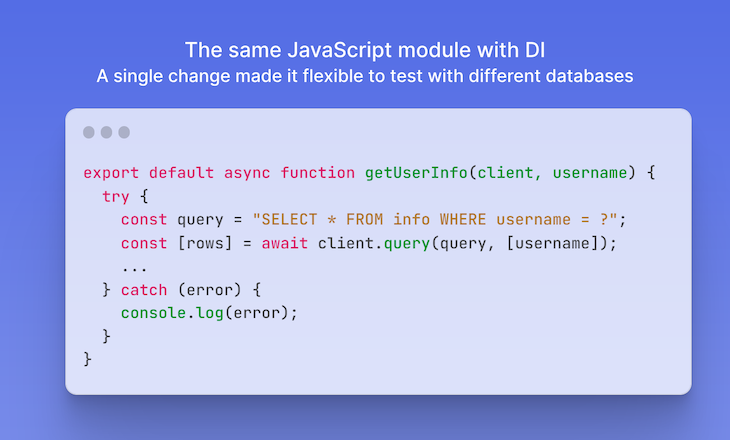
A more flexible alternative is to pass the database as a dependency, instead of casually hardcoding it inside the module. This approach allows for easier adaptation and ensures that the test can seamlessly utilize the desired database:
Remember to consider your project’s specific needs when deciding to use dependency injection. While it introduces some complexity, the benefits it offers can outweigh the initial investment. For smaller projects, the benefits of DI, such as testability, code reusability, and scalability, may not outweigh the added complexity it introduces. In such cases, a simpler approach where dependencies are manually instantiated or passed directly to the modules may be sufficient.
Deciding whether to adopt dependency injection can be a complex topic in itself. However, leveraging DI frameworks or containers to automate dependency resolution can greatly save you time and reduce errors.
Now that we have implemented dependency injection, we can also incorporate unit testing into our project. Testing plays a vital role in application development, as it affects the entire project flow, not just the final result. It helps identify and address issues early, preventing them from slowing down development and causing other problems.
Unit testing is a common approach where code sections are isolated and verified for correctness. In procedural programming, a unit can refer to an individual function or procedure. Typically, unit testing is performed along with development, which is commonly known as Test-driven Development, or TDD.
The benefits of unit testing include:
Unit testing enhances the code quality by uncovering the problems that might have been overlooked before advancing to subsequent stages of development. It enables the identification of edge cases and encourages the creation of overall better code.
By conducting tests early in the development process, issues are identified earlier. Because the tests are performed at the time of development, bugs can be caught sooner, reducing the time-consuming process of debugging.
Having fewer flaws in the application leads to less time spent on debugging, resulting in cost savings for the project. Time becomes a critical factor as resources can now be allocated toward developing new features for the product.
For more information on unit testing Node.js projects, check out “Unit and integration testing for Node.js apps.” And check out this article for a comparison of the best Node.js unit testing frameworks.
console.logRaw console.log statements are fine for quick debugging, but in production applications, they produce unstructured, hard-to-search output. Replacing them with a structured logging library is one of the highest-leverage improvements you can make for observability.
Structured logs (JSON format) are easily consumed by log aggregation platforms like Logrocket, Grafana Loki, AWS CloudWatch, to enable:
Often, in our application, there arises a need to interact with third-party services for data retrieval or performing operations. However, if we fail to separate these calls into a dedicated layer, we may encounter unwieldy code that becomes too difficult to manage due to its size.
A common solution to address this challenge is to employ the pub/sub pattern. This pattern revolves around a messaging mechanism where entities called publishers send messages, while entities called subscribers receive them:
Publishers do not directly program messages to be sent to specific receivers. Instead, they categorize published messages into specific classes, unaware of which subscribers may handle them. Similarly, subscribers express interest in processing one or more classes and exclusively receive messages relevant to their interests, without knowledge of the publishers involved.
The publish-subscribe model facilitates event-driven architectures and asynchronous parallel processing, resulting in enhanced performance, reliability, and scalability. It offers an effective approach for managing interactions with third-party services while improving overall system capabilities.
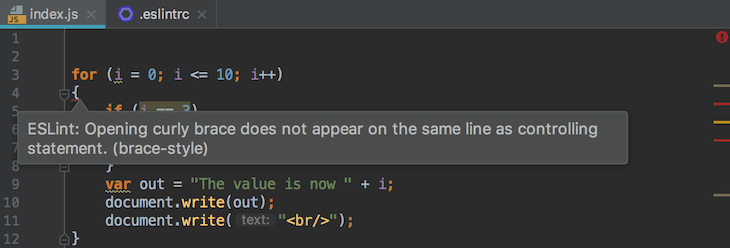
A code linter is a simple tool that aids in performing a faster and improved development process, helping you catch small errors on the go and ensuring uniformity throughout your application’s code.
The image below illustrates how ESLint analyzes source code for potential errors, stylistic issues, and best practices, simplifying the task of maintaining code uniformity across your codebases:
Are you still considering which formatting style to adopt and how to maintain consistent code formatting in your projects? You might want to consider leveraging one of the excellent style guides offered by Google or Airbnb.
By adhering to a specific guide, reading code becomes significantly easier, and the frustration of correctly placing that curly brace is eliminated:

Modern Node.js applications are expected to run consistently across development, staging, and production environments. Containerization with Docker, combined with orchestration platforms like Kubernetes, is now the industry standard for achieving this consistency.
Use multi-stage builds in your Dockerfile to produce lean, production-ready images that don’t include development dependencies, source TypeScript files, or build tooling:
# Stage 1: Build
FROM node:22-alpine AS builder
WORKDIR /app
COPY package*.json ./
RUN npm ci
COPY . .
RUN npm run build

# Stage 2: Production
FROM node:22-alpine
WORKDIR /app
COPY package*.json ./
RUN npm ci --omit=dev
COPY --from=builder /app/dist ./dist
CMD ["node", "dist/index.js"].dockerignore file to exclude node_modules, .env files, test directories, and build artifacts from the image context. This both speeds up builds and prevents accidental leakage of secrets--memory, --cpus) to prevent a single misbehaving service from starving others on the same hostnode:22.4.0-alpine) for reproducible buildsImplementing caching in Node.js apps can significantly improve the performance of your app in terms of responsiveness and speed. In-memory caching libraries like Redis or Memcached are ideal for storing frequently accessed data in memory. Define a cache strategy, such as time-based expiration or Least Recently Used (LRU), to efficiently manage cached data.
Also, consider caching database queries to avoid repeated slow retrievals in complex apps. Consider using Content Delivery Networks (CDNs) for caching static assets, reducing latency, and improving download speeds. Middleware caching can be used for computationally expensive tasks or frequently accessed API routes.
It is advised to implement the cache-aside pattern by checking the cache before fetching data from the original source. Employ cache-busting for clients to access the latest asset version after updates. For complex objects, use object-oriented caching with serialization and deserialization. When the cache is unavailable or errors occur, ensure graceful degradation and regularly monitor and manage the cache, setting appropriate eviction policies to prevent stale data and excessive memory usage.
Keep in mind that caching is not a one-size-fits-all solution. Carefully choose what to cache and set proper expiration policies. Benchmark and test your caching strategy to verify its performance improvements.
Two fundamental concepts that come up frequently while talking about Node.js architecture are event-driven design and non-blocking I/O operations. These principles are critical for understanding how Node.js achieves great performance and scalability, especially in I/O-bound applications.
Non-blocking I/O is a fundamental principle in Node.js that allows it to efficiently manage several I/O operations without getting stuck waiting for any one of them to complete. When an I/O operation (such as reading a file or querying a database) runs on a typical server, the server waits for it to finish before proceeding to the next activity. This can lead to performance issues, particularly when dealing with a large number of simultaneous queries.
In contrast, Node.js makes use of non-blocking I/O. When an I/O operation starts, Node.js does not wait for it to finish. Instead, it continues to execute the next lines of code. Once the I/O operation is completed, a callback function is invoked to handle the result. This method enables Node.js to handle numerous I/O operations continuously, making it extremely scalable.
For example, when a Node.js server reads a file from a disk, it starts the process and then instantly switches to another task. When the file is ready, a callback is invoked to process the information. This keeps the server from sitting idle while waiting for the disk I/O to complete.
Node.js uses an event-driven design to efficiently manage the non-blocking I/O model. This design is built around an event loop and event emitters. The event loop is the foundation of Node.js’s event-driven design. It continuously watches for events, such as incoming requests or the result of an I/O operation, and routes them to the appropriate handlers. Because the event loop is single-threaded, it only handles one event at a time, but it does so swiftly.
Many Node.js modules are based on event emitters, which are objects that emit named events and attach listeners (callback functions) to them. When an event is called, the emitter notifies all attached listeners. This enables asynchronous code to be executed in response to events, ensuring the application remains responsive.
The true power of Node.js stems from how it integrates non-blocking I/O with its event-driven architecture. Node.js can process numerous requests concurrently without creating new threads for each one. It manages the completion of I/O operations and triggers the appropriate callbacks as needed. This concurrency architecture makes Node.js ideal for I/O-heavy applications, such as web servers, that must handle a large number of connections at once.
Even though it can handle multiple tasks at the same time, Node.js is only single-threaded. This simplifies the programming model because developers do not have to deal with synchronization concerns that come in multi-threaded systems. The event-driven model ensures that while I/O activities are asynchronous, the rest of the code executes synchronously and in a predictable order.
Security is an important factor to consider with respect to Node.js architecture. The structure of its ecosystem, which includes thousands of open source dependencies and the possibility of misconfiguration, presents several security problems. Here’s how security comes into play with the architectural considerations of a Node.js application:
Node.js applications usually rely on several third-party packages. While these packages facilitate development, they may also cause issues. To reduce risks, regular audits should be carried out on your dependencies using tools like npm audit or yarn audit. These tools look for known vulnerabilities in the packages that your application relies on.
Dependencies should be kept up to date; major version updates may create breaking changes or new vulnerabilities. Automated tools, such as Dependabot, can help handle updates. Check out this in-depth guide on securing Node.js dependencies.
ESLint, a popular linter for JavaScript and Node.js, can be enhanced with security-focused plugins such as eslint-plugin-security and eslint-plugin-node.
These plugins help in the detection of potential security vulnerabilities, such as unsafe usage of eval() or unhandled errors, during development. Regular code reviews focused on security can identify issues that automated tools may overlook.
Aside from tooling, secure coding techniques are important. Helmet is a middleware that secures your Node.js application by specifying HTTP headers. It’s a simple technique to keep your app safe from some common web vulnerabilities.
The proper management of user authentication and authorization is an important part of Node.js development. Whether you use tokens, sessions, or JWTs, implementing these techniques securely will safeguard your application from unauthorized access.
Serverless architecture, powered by services like AWS Lambda, Azure Functions, and Google Cloud Functions, is a suitable choice for certain types of applications. It is particularly well-suited for event-driven, microservices-powered, async-tasks-rich, scalable, and cost-efficient apps.
Despite its effectiveness, serverless tech might not be the best fit for all scenarios due to potential issues with cold start latency, time limits on function execution for long-running processes, increased complexity in apps with intricate workflows and dependencies, and the possibility of vendor lock-in.
It is crucial to carefully consider these factors to decide whether or not serverless is the appropriate choice for your Node.js application.
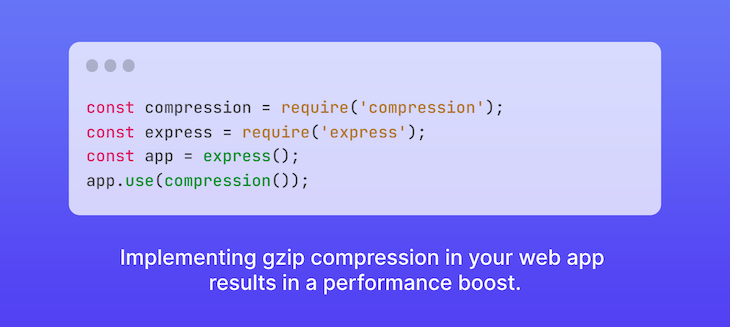
The server can employ gzip compression, a widely used method for compressing files, to effectively reduce their size before transmitting them to a web browser. By compressing files using gzip, the server can significantly decrease their size, resulting in faster transmission over the network.
This improvement in transmission speed leads to enhanced performance, reduced bandwidth usage, and better responsiveness of your web app:
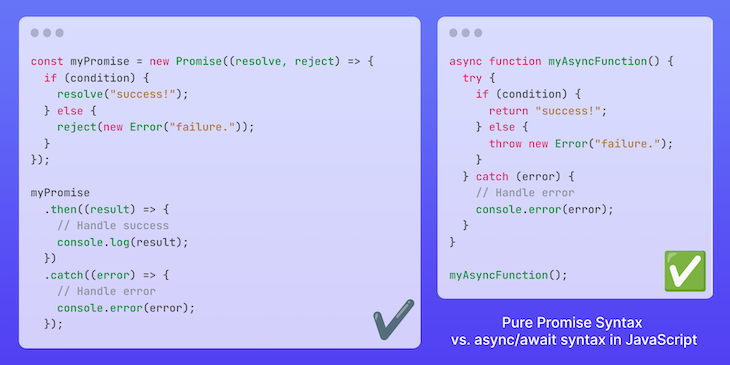
async/awaitUsing callbacks is the simplest approach for handling asynchronous code in JavaScript. However, raw callbacks often compromise the application control flow, error handling, and the familiar semantics we experience with synchronous code. To address these limitations, Node.js provides a popular solution called promises.
While promises provide a significant improvement over raw callbacks, the async/await syntax builds upon promises and offers added benefits when it comes to code readability and maintenance. The syntax allows you to write asynchronous code in a more synchronous and linear fashion, making it easier to understand and maintain.
Choosing promises over callbacks is indeed a wise decision, especially if you haven’t already embraced them. However, if your project doesn’t require the fine-grained control and interoperability that JavaScript promises offer, then the async/await syntax can be a slightly more preferable choice:
Encountering unexpected errors or behavior in your app can be unpleasant, and as a natural part of the development process, it’s something that can’t be entirely avoided when writing code.
Taking responsibility for handling errors is crucial as a developer, and it’s important to not only use promises (or async/await) in our applications but also to leverage their error-handling support provided by promise chaining, or try-catch blocks in an async-await implementation.
Additionally, you can use the throw statement along with native JavaScript error objects such as Error, SyntaxError, TypeError, and others to manually throw an error at any desired location in your code.
Since the most recent Node.js release (v22), there have been many major enhancements that can improve your application’s architecture, particularly in the areas of real-time communication and file management:
node --watch), which reloads your Node.js process when a file change is detected, is now fully stable. This functionality is a great alternative to external tools like Nodemon, speeding your development process by keeping everything in Node.jsglob – The node:fs module now includes the glob and globSync methods, which provide pattern-based file path matching. This makes it easier to find and manage files that fit specified criteria, resulting in more efficient file operationsCreating a Node.js application is less about picking a single “correct” structure and more about making deliberate architectural choices as your system grows. The practices covered here aren’t strict rules, but a set of proven patterns you can apply based on your project’s needs. Start simple, stay consistent, and evolve your architecture as complexity increases.
 Monitor failed and slow network requests in production
Deploying a Node-based web app or website is the easy part. Making sure your Node instance continues to serve resources to your app is where things get tougher. If you’re interested in ensuring requests to the backend or third-party services are successful, try LogRocket.

LogRocket lets you replay user sessions, eliminating guesswork around why bugs happen by showing exactly what users experienced. It captures console logs, errors, network requests, and pixel-perfect DOM recordings — compatible with all frameworks.
LogRocket's Galileo AI watches sessions for you, instantly identifying and explaining user struggles with automated monitoring of your entire product experience.
LogRocket instruments your app to record baseline performance timings such as page load time, time to first byte, slow network requests, and also logs Redux, NgRx, and Vuex actions/state. Start monitoring for free.

useEffect breaks AI streaming responses in ReactSee why useEffect breaks AI streaming in React, and how moving stream state outside React fixes flicker and stale updates.

A real-world debugging session using Claude to solve a tricky Next.js UI bug, exploring how AI helps, where it struggles, and what actually fixed the issue.

CSS wasn’t built for dynamic UIs. Pretext flips the model by measuring text before rendering, enabling accurate layouts, faster performance, and better control in React apps.

Why do real-time frontends break at scale? Learn how event-driven patterns reduce drift, race conditions, and inconsistent UI state.
Hey there, want to help make our blog better?
Join LogRocket’s Content Advisory Board. You’ll help inform the type of content we create and get access to exclusive meetups, social accreditation, and swag.
Sign up now

