Editor’s note: This article was last updated on 14 October 2022 to include information on common caching packages, such as node-cache and Memcached.

Caching is a technique used in web development to handle performance bottlenecks related to how data is managed, stored, and retrieved. A cache layer or server acts as a secondary storage layer, usually faster and highly performant to temporarily store a subset of data. It is expected that data stored in a cache does not change often.
The idea is that requests made in the future for frequently accessed data that is stored in a cache can be quickly served up and is usually faster than accessing the data’s primary storage location (usually a database). A cache layer generally provides a more efficient way of reusing previously retrieved or computed data.
In this article, we’ll cover the following:
The Replay is a weekly newsletter for dev and engineering leaders.
Delivered once a week, it's your curated guide to the most important conversations around frontend dev, emerging AI tools, and the state of modern software.
Caching is generally recommended for cases in which the state of the data at a particular point in the app rarely changes. Think lists of products, country calling codes, or store locations. By way of example, for a recent feature, I needed to fetch a list of banks from an external API. The most efficient method was to make that API call once and store the response in a cache.
This means that, subsequently, we won’t need to make that same API call over the internet; rather, we can just retrieve the data from our cache since we wouldn’t expect it to suddenly change. Caching the data or the API response at that layer improves our app performance by a significant degree.
With caching systems, data retrieval processes are already optimized because data is stored in-memory. This is in contrast to the on-disk storage mechanisms found in most traditional databases, wherein reads and writes (in terms of queries) are not as fast when compared to in-memory storage systems.
In-memory databases are generally used by applications that manage a large amount of data and depend on rapid response time. With that in mind, we can sum up the some major benefits of in-memory databases:
On the other hand, in-memory databases are more volatile than traditional databases because we can easily lose data if, for example, the RAM crashes. Traditional databases perform great in this regard because data can still be restored from the disks in the event of any issues.
The type or approach to caching data is hugely dependent on the kinds of cache (which can either fall into application level or local caching, database integrated caching, and standalone or remote caching) and on the aim of the application cache setup in question. While application level or local caching is beneficial because the database can update its cache automatically when the underlying data changes, the cache can be limited in terms of size and availability of memory or resources.
Local cache stores frequently access data within the application layer. This approach removes network traffic that is associated with retrieving data, making data retrieval faster when compared to other caching architectures. However, because we know that most applications use multiple servers, the work of managing and syncing the data across them becomes a huge issue if each server comes with its own cache.
In addition, data stored in a local cache can be easily lost in the event of an outage. This can negate the cache data. Most of these disadvantages are mitigated with remote caches. With remote caches, there exists separate instances dedicated to storing data in-memory. For example Redis, Memcached, and so on.
Remote caches are stored on isolated and dedicated servers, usually built on key-value stores. They can provide a substantial number of requests per second and are also highly available with low latency, intended for mission-critical workloads. In this post, we are going to be making use of remote caches.
Two common approaches to caching are the cache aside and write-through caching paradigms.
The cache aside pattern, also known as lazy loading, is the most common caching pattern available. It works in such a way that the cache is updated after the data is requested. This way, in order to read data from the database, the cache is first checked to determine whether the data is available. If the data is available (also known as a cache hit), the cached data is returned and the response is issued to the caller.
On the other hand, if the data is not available (also known as a cache miss), the database is queried for the data. The cache is then populated with the data retrieved from the database. The main catch for this approach is that it offers a straightforward way of caching for a framework that handles lazy caching under the hood or custom code. Additionally, there are immediate performance gains with this approach.
Another advantage is that the cache contains only data that the application requests, which helps keep the cache size small and less expensive. On the other hand, a common disadvantage to this approach is that data is loaded into the cache only after a cache miss, because initially there is no data stored in the cache. Also, there is some overhead in the initial response times of queries because round trips to the cache and database are required.
Alternatively, with the write-through cache pattern, the cache is updated immediately when the primary database is updated. With this pattern, the order of how the cache is populated is usually reversed. The approach is that the cache is updated immediately after the primary database is updated. With the write-through caching strategy, when the application or backend process updates the primary database, the data is also updated in the cache.
In cases where there is a cache-miss due to data expiration inside the cache or the data is absent, the lazy loading pattern is used to update the cache. Therefore, the write-through pattern is always used alongside the lazy loading pattern.
One advantage of this pattern is that there are fewer database reads, therefore the performance of the database is top tier. Another advantage is that it offers better application performance and user experience is guaranteed because there is a high chance that the data will be found in the cache.
A disadvantage to this approach is that even infrequently accessed data is written to the cache, leading to a larger and more expensive cache. In summary, to implement an industry standard caching strategy, both patterns are recommended, as well as setting an appropriate expiration limit for the data to keep it up to date.
In this post, we will be focusing on using Redis as our caching server, but other industry caching servers that can equally be used include node-cache, memcache, flat-cache, cacache, etc. Let’s briefly explore node-cache and Memcache below.
Node-cacheNode-cache is a simple internal Node internal caching module that has set, get, and delete methods similar to other caching libraries. It is available on npm and can be installed with the npm install node-cache --save command.
As a widespread practice, these keys can have a timeout (TTL) after which they automatically expire and are deleted from the cache. To initialize this library, see below:
const NodeCache = require( "node-cache" );
const myCache = new NodeCache();
We can then proceed to store a key using the set method. The format for setting a key/value pair with a TTL (in seconds) is shown below:
myCache.set( key, val, [ ttl ] )
If successful, it will return true:
obj = { name: "Alexander", age: 42 };
data = myCache.set( "key", obj, 20000 );
//true
More details and information regarding the available methods and how to use them can be found in the GitHub repo.
Memcached, however, is a free and open source, high-performant, distributed memory object caching system. It is an in-memory key-value store for small chunks of arbitrary data like strings, objects, and more. Memcached is a fully featured Node.js client built with scaling, performance, and high availability at the core.
To install Memcached, we can run:
npm install memcached
In other to set up the client, the constructor takes two different arguments: server locations and options. The syntax is shown below:
var Memcached = require('memcached');
var memcached = new Memcached (Server locations, options);
Note: A link to the public methods can be found in the documentation.
The speed at which our application can process data is a major performance consideration when designing our application architecture. As engineers, we need to explicitly determine which portions of our data processing/handling cycle should be cached.
Caching systems are not used in isolation. Caching is basically a layer of abstraction that involves an intermediary storage mechanism in conjunction with a backend system (in our case, Node.js) and, usually, a traditional database. The point is to enable an efficient data retrieval process, and caching systems are optimized for that particular purpose.
For Node.js apps, caching strategies should address the following concerns:
Large applications have to process, transform, and store large datasets. Because data is absolutely fundamental to these apps’ functionality, the manner in which we handle the data determines how our application will perform in the wild.
Web applications eventually grow to cater to a large amount of data. Usually, we need to store this data in storage systems, e.g., databases. When it comes to data retrieval, at times it would be faster for us to fetch this data from an intermediate storage mechanism instead of performing several database queries.
When we have many users, there is a need to find alternative solutions to retrieve data instead of always reading from the disk. Application storage systems have limits when it comes to I/O so it would make sense for us to carefully understand the best mechanism to store and retrieve our data in the fastest possible way. Welcome to the world of caching with Redis.
Redis is a preferred caching solution because its entire database is stored in-memory, and it uses a disk database for data persistence. Because Redis is an in-memory database, its data access operations are faster than any other disk-based database, which makes Redis the perfect choice for caching.
Its key-value data storage system is another plus because it makes storage and retrieval much simpler. Using Redis, we can store and retrieve data in the cache using the SET and GET methods, respectively. Besides that, Redis also works with complex data types like lists, sets, strings, hashes, bitmaps, and so on.
The process of caching with Redis is quite simple. When we receive a user request to a route that has caching enabled, we first check whether the requested data is already stored in the cache. If it is, we can quickly retrieve it from the Redis cache and send the response back.
If the data is not stored in the cache, however — which we call a “cache miss” — we have to first retrieve the data from the database or from an external API call and send it to the client. We also make sure to store the retrieved data in the cache so that the next time the same request is made, we can simply send the cached data back to the user.
Now that we have a clear idea of what we are going to do, let’s get started with the implementation.
Queries sometimes require several operations, like retrieving data from a database, performing calculations, retrieving additional data from third-party services, and so on. All these may impact overall application performance. The goal of caching is to improve the efficiency of these data access operations.
In this section, we’ll look at how to use Redis to create a simple cache for a Node.js application, then inspect how it impacts its performance. The steps are highlighted below:
Creating a simple custom cache service will allow us to:
Now, let’s go! You can use the GitHub repo to follow along as we proceed.
First, we’ll quickly bootstrap a simple Node.js application. We can do so by running npm init, which creates a package.json file for us:
{
  "name": "performance_at_scale_node.js",
  "version": "1.0.0",
  "description": "A sample app to showcase Redis caching and how it affects an app overall performance benchmark",
  "main": "app.js",
  "scripts": {
    "start": "node app.js"
  },
  "keywords": [
    "Node.js",
    "Redis",
    "Performance",
    "Cache",
    "Caching",
    "JavaScript",
    "Backend",
    "LogRocket",
    "Frontend_Monitoring"
  ],
  "author": "Alexander Nnakwue",
  "license": "MIT",
  "dependencies": {
    "@hapi/joi": "^15.0.1",
    "axios": "^0.21.1",
    "body-parser": "^1.19.0",
    "dotenv": "^8.2.0",
    "express": "^4.17.1",
    "global": "^4.4.0",
    "redis": "^3.0.2",
    "util": "^0.12.3"
  }
}
In the file above, we have installed some dependencies we need for our application. We have installed Redis for caching, Axios for HTTP requests, @hapi/joi for schema/(req.body) validation, global to require global variables, Express for our basic Express server, and a few others.
Next, let’s set up a simple Express server in the root of our project directory; we can name this anything we want. See the Express server in the app.js file below:
require('dotenv').config()
const express = require('express')
const bodyParser = require('body-parser')
const config = require('./config')
const routes = require('./app/routes')

const app = express()
require("./cacheManager");

app.use(bodyParser.json())
// parse application/x-www-form-urlencoded
app.use(bodyParser.urlencoded({ extended: true }))

// parse application/json
app.use(bodyParser.json())
app.get('/', (req, res) => {
    // eslint-disable-next-line no-tabs
    res.status(200).send('Welcome to the Node.js Cache and Performance App')
})
// add routes here
routes(app)

// catch 404 and forward to error handler
app.use((req, res, next) => {
    const err = new Error('Not Found')
    err.status = 404
    res.send('Route not found')
    next(err)
})
app.listen(process.env.PORT || config.port, () => {
    console.log(`${config.name} listening on port ${config.port}!`)
})

module.exports = app
In the server file above, we can see that we are importing a cacheManager file, which basically handles everything that has to do with asynchronous caching in Redis using the util module.
Let’s see the contents of that file:
"use strict";

const redis = require("redis");
const {promisify} = require("util");
const config = require('./config')
const redisClient = redis.createClient(
    {
        host: config.redis_host,
        port: config.redis_port
    }
);
const password = config.redis_password || null;
if(password && password != "null"){
    redisClient.auth(password, (err,res) => {
        console.log("res",res);
        console.log("err",err);
    });
}
try{
    redisClient.getAsync = promisify(redisClient.get).bind(redisClient);
    redisClient.setAsync = promisify(redisClient.set).bind(redisClient);
    redisClient.lpushAsync = promisify(redisClient.lpush).bind(redisClient);
    redisClient.lrangeAsync = promisify(redisClient.lrange).bind(redisClient);
    redisClient.llenAsync = promisify(redisClient.llen).bind(redisClient);
    redisClient.lremAsync = promisify(redisClient.lrem).bind(redisClient);
    redisClient.lsetAsync = promisify(redisClient.lset).bind(redisClient);
    redisClient.hmsetAsync = promisify(redisClient.hmset).bind(redisClient);
    redisClient.hmgetAsync = promisify(redisClient.hmget).bind(redisClient);
    redisClient.clear = promisify(redisClient.del).bind(redisClient);
}catch (e) {
    console.log("redis error", e);
}

redisClient.on("connected", function () {
    console.log("Redis is connected");
});
redisClient.on("error", function (err) {
    console.log("Redis error.", err);
});
setInterval(function() {
    console.log("Keeping alive - Node.js Performance Test with Redis");
    redisClient.set('ping', 'pong');
}, 1000 * 60 * 4);

global.cache = redisClient;
module.exports = redisClient;
We can see from the file above that we have created a Redis client and connected to a Redis cluster with the config available in our env variable. Also, we are setting a keep-alive script that runs every four minutes:
09:02:42 web.1   |  Keeping alive - Node.js Performance Test with Redis
09:06:42 web.1   |  Keeping alive - Node.js Performance Test with Redis
09:10:42 web.1   |  Keeping alive - Node.js Performance Test with Redis
09:14:42 web.1   |  Keeping alive - Node.js Performance Test with Redis
09:18:42 web.1   |  Keeping alive - Node.js Performance Test with Redis
09:22:42 web.1   |  Keeping alive - Node.js Performance Test with Redis
09:26:42 web.1   |  Keeping alive - Node.js Performance Test with Redis
09:30:42 web.1   |  Keeping alive - Node.js Performance Test with Redis
09:34:42 web.1   |  Keeping alive - Node.js Performance Test with Redis
09:38:42 web.1   |  Keeping alive - Node.js Performance Test with Redis
09:42:42 web.1   |  Keeping alive - Node.js Performance Test with Redis
09:46:42 web.1   |  Keeping alive - Node.js Performance Test with Redis
The config file that holds all our env variables is shown below:
require('dotenv').config()
const { env } = process
module.exports = {
    name: env.APP_NAME,
    baseUrl: env.APP_BASE_URL,
    port: env.PORT,
    redis_host: env.REDIS_HOST,
    redis_port: env.REDIS_PORT,
    redis_password: env.REDIS_PASSWORD,
    paystack_secret_key: env.PAYSTACK_SECRET_KEY
}
Now that we are done with all the setup, we can proceed to the most important part of this exercise: the actual business logic that allows us to apply Redis caching strategies. See the folder structure of our app below:
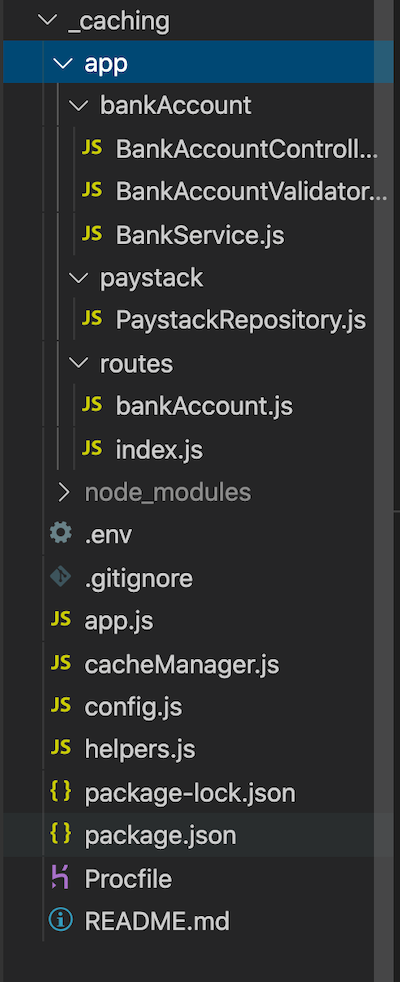
Inside the app folder, we can see a file called paystackRepository.js inside the paystack folder. This file calls the Paystack API, which fetches a list of banks and resolves bank account numbers. A link to the documentation for this Paystack API feature can be found here.
The contents of the paystackRepository.js file are below:
const axios = require("axios");
const config = require('../../config')
const {handleAxiosError} = require("../../helpers");
const _axios = axios.create({
    baseURL: "https://api.paystack.co",
    headers: {
        Authorization: `Bearer ${config.paystack_secret_key}`
    }
});

exports.banks = async () => {
    try {
        return {
            data: (await _axios
                .get(`bank`)).data.data
        };
    } catch (error) {
        console.log('An Error Occurred', error, handleAxiosError(error));
        return {error: error.message};
    }
};

exports.resolveAccountNumber = async (bankCode, accountNumber) => {
    try {
        return {
            data: (await _axios
                .get(`bank/resolve`, {
                    params: {
                        bank_code: bankCode,
                        account_number: accountNumber
                    }
                })).data.data
        };
    } catch (error) {
        console.log('An Error Occurred', error, handleAxiosError(error));
        return {error: error.message};
    }
};
From the file above, we can see that we are using Axios with the PAYSTACK_SECRET_KEY header stored in our env variable to make HTTP requests to Paystack’s API.
Inside the bankAccount folder, let’s have a look at the BankService.js file. It calls the paystackRepository.js file to fetch a list of banks and resolve bank account numbers, as we reviewed above. We are also caching the results after making the first API call to eliminate the need for subsequent calls:
"use strict";

const paystackRepository = require("../paystack/PaystackRepository");

exports.fetchAllBanks = async () => {
    // incase we are calling this endpoint a second time, we do not need to make a new API request
    let banks = await cache.getAsync("bank-list");
    console.log("Data from cache", banks);
    if(banks)
        return {data: JSON.parse(banks)};
  const {error, data} = await paystackRepository.banks();
  if(error) return {error};
  // Store the bank list in a cache, since it rarely changes
  let cacheResponse = await cache.setAsync("bank-list", JSON.stringify(data));
  console.log("Cache", cacheResponse);
  return {
      data
  }
};

exports.resolveAccount = async (bankName, accountNumber) => {
    // Relying on the cached data is faster, as it rarely changes
let banks = JSON.parse(await cache.getAsync("bank-list"));

console.log(banks, 'banks')
    // Incase the data is not stored in the cache yet (but we expect it to be), make an API call to get bank lists
    if(!banks){
        const {error, data} = await paystackRepository.banks();
        if(error)return {error};
        banks = data;
    }
    const bank = banks.find(bank => {
        return bank.name == bankName
    })
    if(!bank)
        return {error: "Bank Not Found"};
    console.log(bank.code)
    const {error, data} =  await paystackRepository.resolveAccountNumber(bank.code, accountNumber);
    if(error)return {error };
    return {
        data: {
            accountNumber,
            bankName,
            accountName: data.account_name
        }
    }
};

exports.resolveAccountPerfTest = async (bankName, accountNumber) => {
    // if there were no cache mechanism in place we needed to go fetch the bank lists compulsorily at every API call
    let banks;
    if(bankName && accountNumber) {
        const {error, data} = await paystackRepository.banks();
        if(error)return {error};
        banks = data;
    }

    const bank = banks.find(bank => {
        return bank.name == bankName
    })
    if(!bank)
        return {error: "Bank Not Found"};
    const {error, data} =  await paystackRepository.resolveAccountNumber(bank.code, accountNumber);
    if(error)return {error };
    return {
        data: {
            accountNumber,
            bankName,
            accountName: data.account_name
        }
    }
};
For the fetchAllBanks service, we are getting the bank list from Redis, but not without first saving the results to the Redis cache upon making the initial API request. Additionally, we can see that we have duplicated the resolveAccount method and removed the Redis implementation on the second method named resolveAccountPerfTest.
Next, we can navigate to the controller file, where we actually use these methods:
"use strict";
const bankService = require("./BankService");
const {
    sendErrorResponse,
    sendResponse
  } = require("../../helpers");

exports.fetchAllBanks = async (req, res, next) => {
    const {error, data} = await bankService.fetchAllBanks();
    if(error)
        return sendErrorResponse({res, message: error});
    return sendResponse({res, responseBody: data});
};

exports.resolveAccountNumber = async (req, res) => {
    const {bankName, accountNumber} = req.body;
    const {error, data} = await bankService.resolveAccount(bankName, accountNumber);
    if(error)
        return sendErrorResponse({res, message: error});
    return sendResponse({res, responseBody: data});
};

exports.resolveAccountPerfTest = async (req, res) => {
    const {bankName, accountNumber} = req.body;
    const {error, data} = await bankService.resolveAccountPerfTest(bankName, accountNumber);
    if(error)
        return sendErrorResponse({res, message: error});
    return sendResponse({res, responseBody: data});
};
Finally, before we test our implementation, we can take a peek at the routes file, located in the routes folder:
"use strict";

const router = require("express").Router();
const accountValidator = require("../bankAccount/BankAccountValidator");
const accountController = require("../bankAccount/BankAccountController");

router.get("/banks", accountController.fetchAllBanks);
router.post("/resolve", accountValidator.resolveAccount, accountController.resolveAccountNumber);
// TEST ROUTE TO SIMULATE PERFORMANCE METRICS BASED ON CACHING OUR ROUTES
router.post("/resolve/perf/test", accountValidator.resolveAccount, accountController.resolveAccountPerfTest);

module.exports = router;
To understand the implementation details of other imported files, refer to the source code on GitHub. Also, note that we have deployed our app on Render so as to test our implementation in a simulated live environment. The base URL is https://node-js-caching.onrender.com. While it’s not strictly required, feel free to read up on deploying your own Node.js app to Render as well.
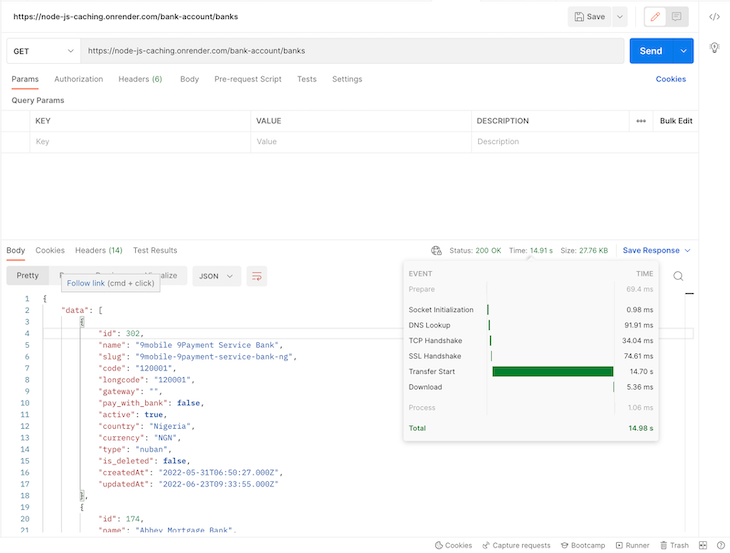
Now it’s time to test our API endpoints to witness the performance benefits of caching firsthand. Before we begin, when I first tested out the API, it took a whooping 14.91s to return a response. I’m assuming it was due to cold starts. See the image below:
After the first request, I deleted the bank lists from the cache and made another fresh request. This is the result:
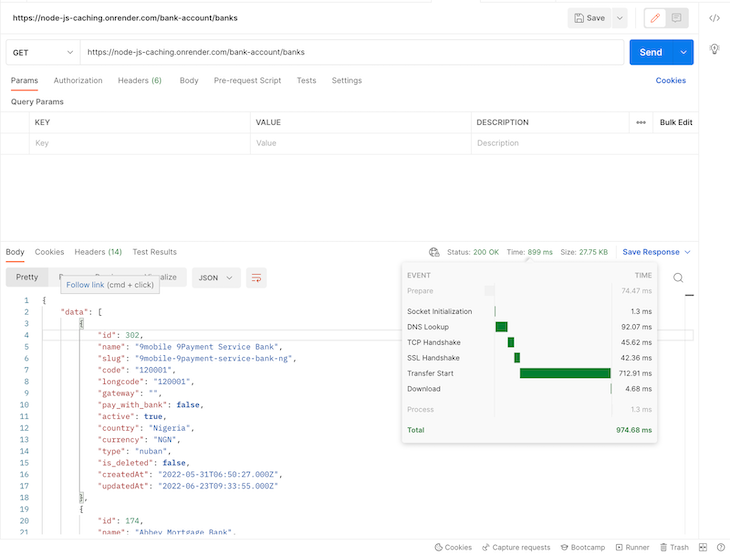
As we can see from the screenshot above, we got a faster response cycle on the second request, which came in at about 899ms. Way faster, right? Note that after this initial request, we now have our bank lists in our Redis cache.
Making the request a second time does not go all the way to query the external Paystack API; it simply fetches the data from our cache, which is way more efficient. See below:
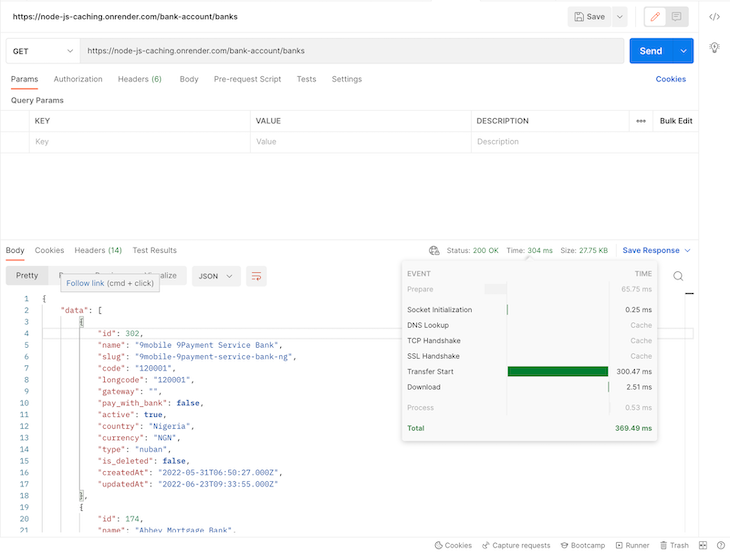
As we can see, after caching the banks list, we got a much faster response from our API — just about 304ms.
In summary, the idea is to compare how making an external API call to a third-party service performs against caching the results rather than making that same API call again. We’ve now seen the results for ourselves.
As another example, I used Redis to store a one-time password (OTP) token generated on a backend app. This method offers a faster lookup than saving that token to a database and querying the record when a user inputs a value on the client app. Here’s a sample snippet:
exports.verifyOTP = async (req,res) => {
const {otp} = req.body
// get the OTP stored in the cache earlier
const getOTPDetails = await cache.getAsync('otpKey');
const otpCode = JSON.parse(getDetails).code;
if (Number(otp) == Number(otpCode) ) {
    return sendResponse(res, "OTP Verified Successfully", 201)
}
return sendErrorResponse(res, "Unable to verify OTP. Please check the code sent to your email gain", 400)
}
Also, don’t forget that the OTP must have been set in the cache at the point of generating or requesting the OTP.
Caching is a near-mandatory operation for any data-intensive application. It improves app response time and even reduces costs associated with bandwidth and data volumes. It helps to minimize expensive database operations, third-party API calls, and server-to-server requests by saving a copy of previous request results locally on the server.
In some cases, we might need to delegate caching to another application or key-value storage system to allow us to store and use data as we need it. Redis is one such option that we can also use for caching. It supports some nice features, including data structures such as strings, hashes, lists, sets, sorted sets with range queries, bitmaps, HyperLogLogs, and others.
In this tutorial, we reviewed a quick introduction to caching strategies to improve our Node.js application performance. While there are other tools for this purpose, we chose Redis because it is open source and very popular in the industry. Now we can use Redis to cache frequently queried data in our applications and gain a considerable performance improvement. Until next time! 🙂
 Monitor failed and slow network requests in production
Deploying a Node-based web app or website is the easy part. Making sure your Node instance continues to serve resources to your app is where things get tougher. If you’re interested in ensuring requests to the backend or third-party services are successful, try LogRocket.

LogRocket lets you replay user sessions, eliminating guesswork around why bugs happen by showing exactly what users experienced. It captures console logs, errors, network requests, and pixel-perfect DOM recordings — compatible with all frameworks.
LogRocket's Galileo AI watches sessions for you, instantly identifying and explaining user struggles with automated monitoring of your entire product experience.
LogRocket instruments your app to record baseline performance timings such as page load time, time to first byte, slow network requests, and also logs Redux, NgRx, and Vuex actions/state. Start monitoring for free.

When should you move API logic out of Next.js? Learn when Route Handlers stop scaling and how ElysiaJS helps.

Explore how Dokploy streamlines app deployment with Docker, automated builds, and simpler infrastructure compared to traditional CI/CD workflows.

A side-by-side look at Astro and Next.js for content-heavy sites, breaking down performance, JavaScript payload, and when each framework actually makes sense.

AI-generated tests can speed up React testing, but they also create hidden risks. Here’s what broke in a real app.re
Hey there, want to help make our blog better?
Join LogRocket’s Content Advisory Board. You’ll help inform the type of content we create and get access to exclusive meetups, social accreditation, and swag.
Sign up now

