In recent years, EDA(event-driven architecture) has been on the rise due to the popularity of microservices. Microservices are made up of small independent units deployed independently communicating together to make up a full-fledged application. Maintaining resilient communications with these services can be a hassle due to their individuality and modularity. This is why message brokers are needed.
A message broker, simply put, is an intermediary software that relays messages from one or more services to other services. An example of such software is Cloud Pub/Sub.
Cloud Pub/Sub is a fully managed message broker by Google which relays information passed from a service/services to other subscribing services using the publisher-subscriber model. Pub/Sub makes it easy for teams to easily set up communication channels between services and not have to worry about individual service uptime, retry policies, and idempotency.
In this article, we will be taking a look at how we can implement inter-service communications using Cloud Pub/Sub in Node.js.
This tutorial uses the following:
Run the following commands in any terminal of choice to initialize the project directory:
$ git clone -b boilerplate http://github.com/enkaypeter/cloud-pub-sub-tut/
$ cd cloud-pub-sub-tut && yarn
Packages installed:
req.body object.env file from our Node application via the process.env objectTo initialize Pub/Sub in our Node app, we will need to get a service account configured with Pub/Sub access on our GCP (Google Cloud Platform) console. We will do so in the following steps:
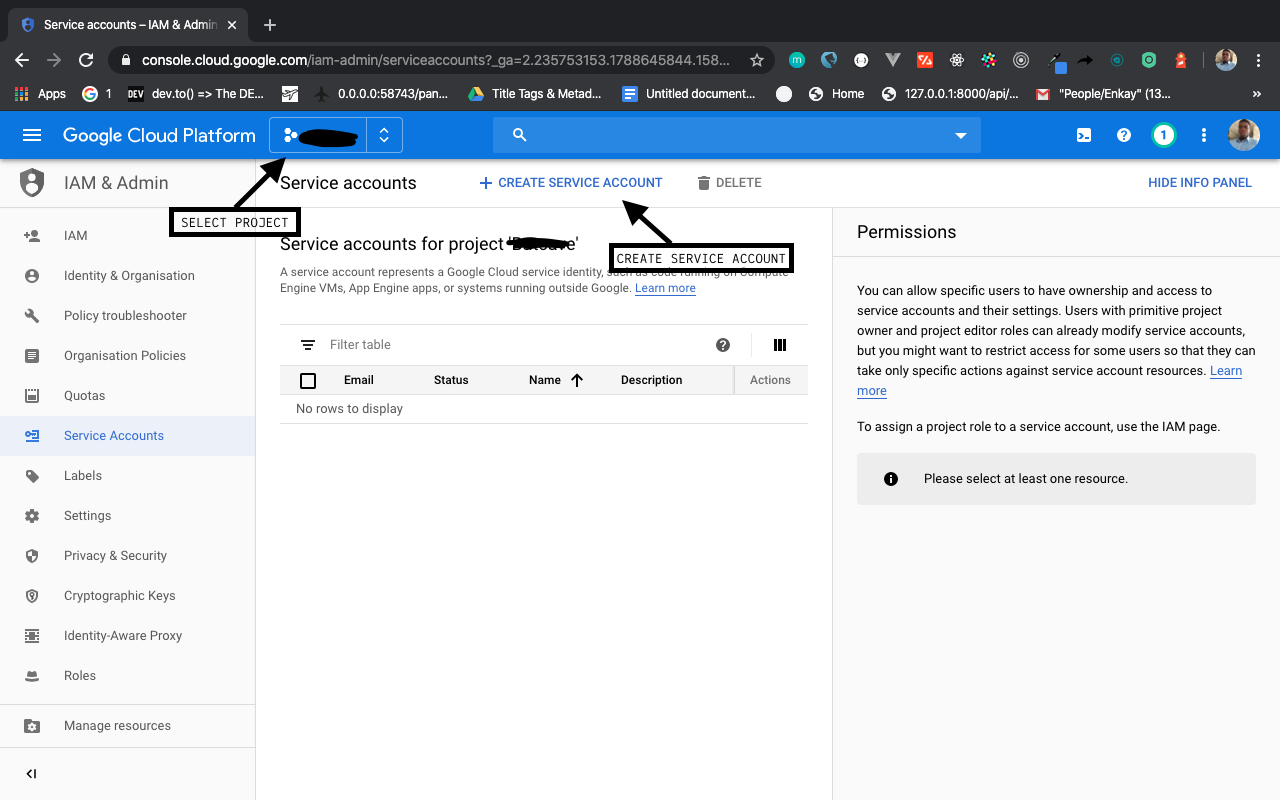
Enter a service account name e.g pub-sub-key and click on create.
 Click on Continue to give grant access to the service account
In this section, we will define a couple of terms that will be used throughout this article. We will also take a look at a typical message flow from the publisher to subscriber.
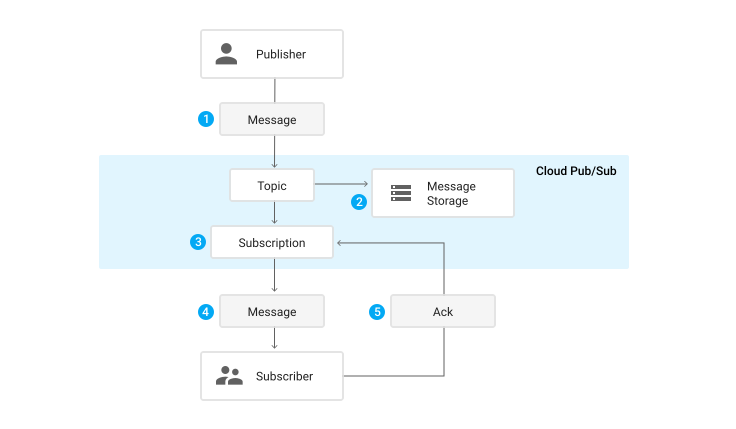
To understand properly how a message is being passed from a publisher to subscriber, we will take a look at a flow diagram the Pub/Sub documentation:
In this section, we will state our problem domain and proposed solution (proof of concept) which we will be building together as we go further.
Say for instance an e-commerce software/solution with multiple services. An order service, delivery service, and notification service. The orders service receives the user’s order, processes it, and sends it to the delivery service for processing. The delivery services will then process it and from time to time notifies (notification service) the user on the delivery status of the package.
Implementing this software architecture by making regular HTTP calls between these services will cause an anomalous system behavior when edge-cases such as service downtimes, the addition of more services, etc. are introduced.
Google Pub/Sub being a message broker can receive this message from the order service, and act as a relay between the order service and the other services (delivery, notification). Pub/Sub has message retry policies that help curb missing orders due to service downtime/failure. It also makes it possible for teams to add more services to the application stack and still keep the entire system in rhythm by making it possible for new and existing services to subscribe to one or more topics.
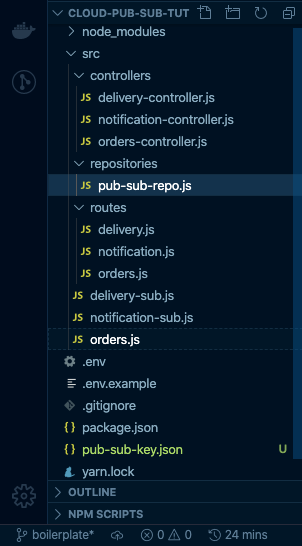
In this section, we will build out our publisher and subscribers (push and pull) logic which will contain three entry point files — orders.js (publisher), delivery-sub.js (subscriber A), and notification-sub.js (subscriber B). These three files signify our three services in our microservice architecture. Each service has their respective routes and controllers but shares the same pub-sub repository. The pub-sub repository houses re-usable pub-sub functions for publishing messages and receiving published messages. A pictorial representation of the boilerplate branch can be seen below:
This is where we define all the functions that’ll enable us to carry out all our Pub/Sub related tasks e.g publishing a message and listening for push or pull subscriptions:
// src/repositories/pub-sub-repo.js

module.exports = {
    publishMessage: async (pubSubClient, topicName, payload) => {
        const dataBuffer = Buffer.from(JSON.stringify(payload));
        const messageId = await pubSubClient.topic(topicName).publish(dataBuffer);
        console.log(`Message ${messageId} published.`);
        return messageId;
    }
 ...
};
The snippet above shows the publishMessage function which accepts three parameters, the pubSubClient, topicName, and payload. This function serializes the JSON payload into a buffer (which is the Pub/Sub desired message format) then publishes it to the specified topic on execution:
// src/repositories/pub-sub-repo.js

module.exports = {
  ...

  listenForPullMessages: (pubSubClient, subscriptionName,  timeout) => {
      const subscription = pubSubClient.subscription(subscriptionName);
      let messageCount = 0;
      const messageHandler = message => {
          console.log(`Received message ${message.id}:`);
          console.log(`\tData: ${message.data}`);
          console.log(`\tAttributes: ${message.attributes}`);
          messageCount += 1;
          message.ack();
      };
      subscription.on('message', messageHandler);
      setTimeout(() => {
          subscription.removeListener('message', messageHandler);
          console.log(`${messageCount} message(s) received.`);
      }, timeout * 1000);
  }

  ...

};
The snippet above shows a subscriber function that pulls messages broadcasted to a subscription tied to a topic. On execution, this function listens to messages fanned-out from the publisher for t * 1000ms ( if t=60; the listener will listen for 60 seconds which equals 1 minute):
// src/repositories/pub-sub-repo.js

module.exports = {
  ...

  listenForPushMessages: (payload) => {
    const message = Buffer.from(payload, 'base64').toString(
        'utf-8'
    );
    let parsedMessage = JSON.parse(message);
    console.log(parsedMessage);
    return parsedMessage;
  }

  ...

}
The snippet above accepts a message from a configured subscriber endpoint and parses the buffer into JSON format for consumption by the individual subscribers.
The base logic for our publisher lies in the src/controllers/orders-controllers.js file. This acts as the orders service which accepts orders from users, processes the order and then sends a message to concerned services (delivery and notifications) notifying them of a new order:
// src/controllers/orders-controller.js

const { PubSub } = require("@google-cloud/pubsub");
const pubsubRepository = require("../repositories/pub-sub-repo");

const pubSubClient = new PubSub();
const topicName = "orders_topic";
const { publishMessage } = pubsubRepository;

module.exports = {
    ...

    createOrders: async (req, res) => {
        let ordersObj = req.body;
        let messageId = await publishMessage(pubSubClient, topicName, ordersObj);
        return res.status(200).json({
            success: true,
            message: `Message ${messageId} published :)`
        })
    }

};
The snippet above shows the createOrders method which accepts the orders request body and publishes the object to the orders_topic.
There are two subscribers that represent two standalone services — delivery and notifications. We will be building the delivery service alone in this section because the same steps can be recreated for notifications service:
// src/controllers/delivery-controller.js

const { PubSub  } = require("@google-cloud/pubsub");
const pubSubClient = new PubSub();
const subscriptionName = "delivery_sub";
const timeout = 60;
const pubsubRepository = require("../repositories/pub-sub-repo");
const { listenForPullMessages, listenForPushMessages } = pubsubRepository;
module.exports = {
    ...

    pullDelivery: (req, res) => {
        try {
            listenForPullMessages(pubSubClient, subscriptionName, timeout);
        } catch (error) {
            return res.status(500).json({
                success: false,
                message: "Couldn't receive orders object :(",
                data: error
            })
        }

    },
    pushDelivery: async (req, res) => {
        try {
            let messageResponse = await listenForPushMessages(req.body.message.data);
            return res.status(200).json({
                success: true,
                message: "Message received successfully :)",
                data: messageResponse
            })

        } catch (error) {
            return res.status(500).json({
                success: false,
                message: "Couldn't receive orders object :(",
                data: error
            })
        }
    }
};
The pullDelivery function executes the listenForPushMessages function from the pubsubRepository which accepts three arguments; the pubSubClient, the name of the subscription (the notifications service will be called notifications_sub), and a timeout of 60 seconds.
The pushDelivery function, since it’s a webhook, accepts the message gotten from pub/sub as an argument to the listenForPushMessages function for deserialization into JSON.
In this section, we’ll head over to our Google Cloud Console to create a topic and subscribers. We will also go learn how to run our three services respectively for a proof of concept.
To create a topic we will navigate to the Pub/Sub section on the cloud console and create the orders_topic like so:
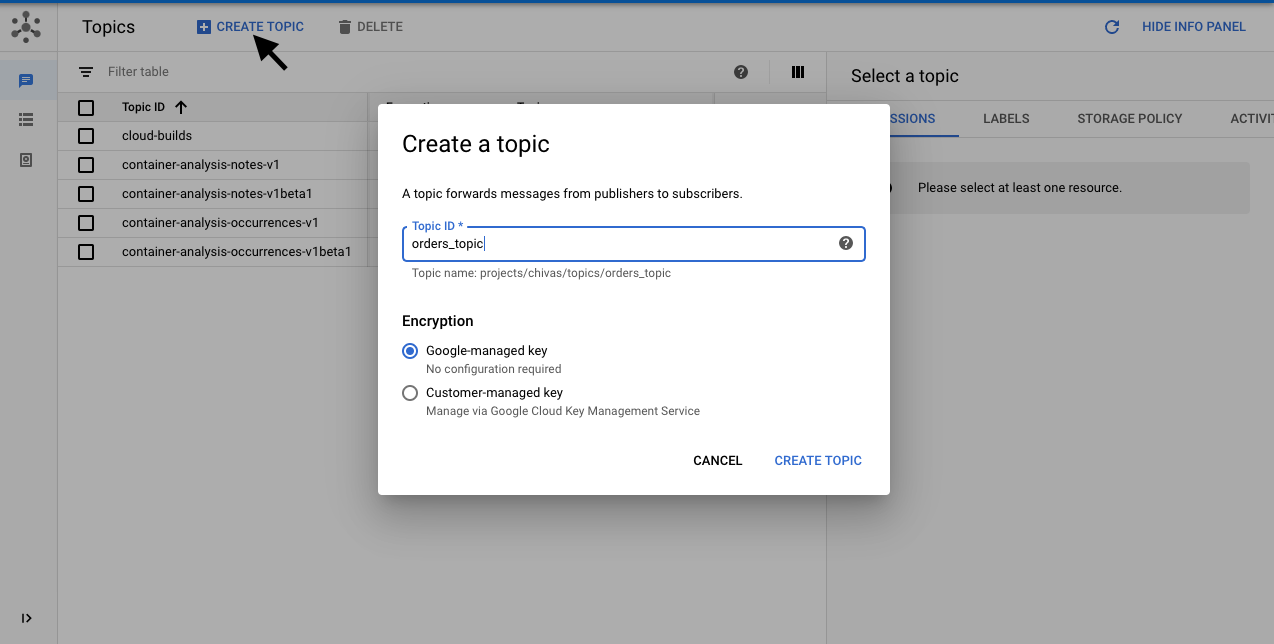
After you click on create topic, you’ll be routed to the newly created orders_topic page where you’ll create a subscription as seen below:
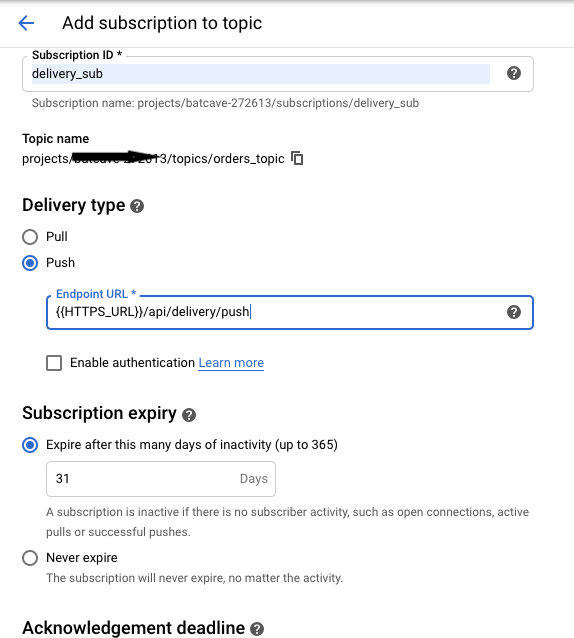
HTTPS_URL represents the host URL where our delivery service is hosted on. Pub/Sub requires all push endpoints to be deployed on HTTPS. For our notifications service, we will just repeat the step above and replace Subscription ID with “notification_sub” and Endpoint URL with {{HTTPS_URL}}/api/delivery/push.
To get a {{HTTPS_URL}} we will be deploying our subscribers with ngrok in the next section
To demonstrate three micro-services we created three entry-points (orders.js, notifications-sub.js, and delivery-sub.js) in our project directory as opposed to having just on app.js file.
These files have already been created and bootstrapped in our project repository. Below is how our orders services is defined:
// src/orders.js

const express = require('express');
const morgan = require('morgan');
const bodyParser = require('body-parser');
require('dotenv').config();
const app = express();
const ordersRoute = require('./routes/orders');
const helmet = require('helmet');
const cors = require('cors');
app.use(bodyParser.urlencoded({ extended: false }));
app.use(bodyParser.json());
const { MAIN_PORT, NODE_ENV } = process.env;
NODE_ENV !== "production" ? app.use(morgan('dev')) : app.use(morgan('combined'));
app.use(helmet());
app.use(cors());
app.use('/api/orders', ordersRoute);


app.listen(MAIN_PORT);
if (NODE_ENV !== "production" ) {
    console.log(`Orders service is running at http://localhost:${MAIN_PORT}`);
}
If you’re still in the boilerplate branch, please switch to the master branch like so by running the command below
$ git fetch origin master && git checkout master
Before we run our application, we need to create our .env file and copy in our service account key into our project directory. The .env file should look something like this:
MAIN_PORT=8001
PORT_1=8002
PORT_2=8003

GCP_PROJ_ID=PROJECT_ID
GOOGLE_APPLICATION_CREDENTIALS=FILENAME.json
Where PROJECT_ID = GCP project id and FILENAME = service account file name as both created in the service account setup section.
Now that this is out of the way, let’s set up six terminals to run our three services concurrently. On a Mac machine using iTerm2, you can create six terminals by splitting a single-window into horizontal halves using CMD+SHIFT+D. Then split each horizontal halve into three places vertically by using CMD+D twice on each horizontal halve. If all goes well your terminal should look like the image below:
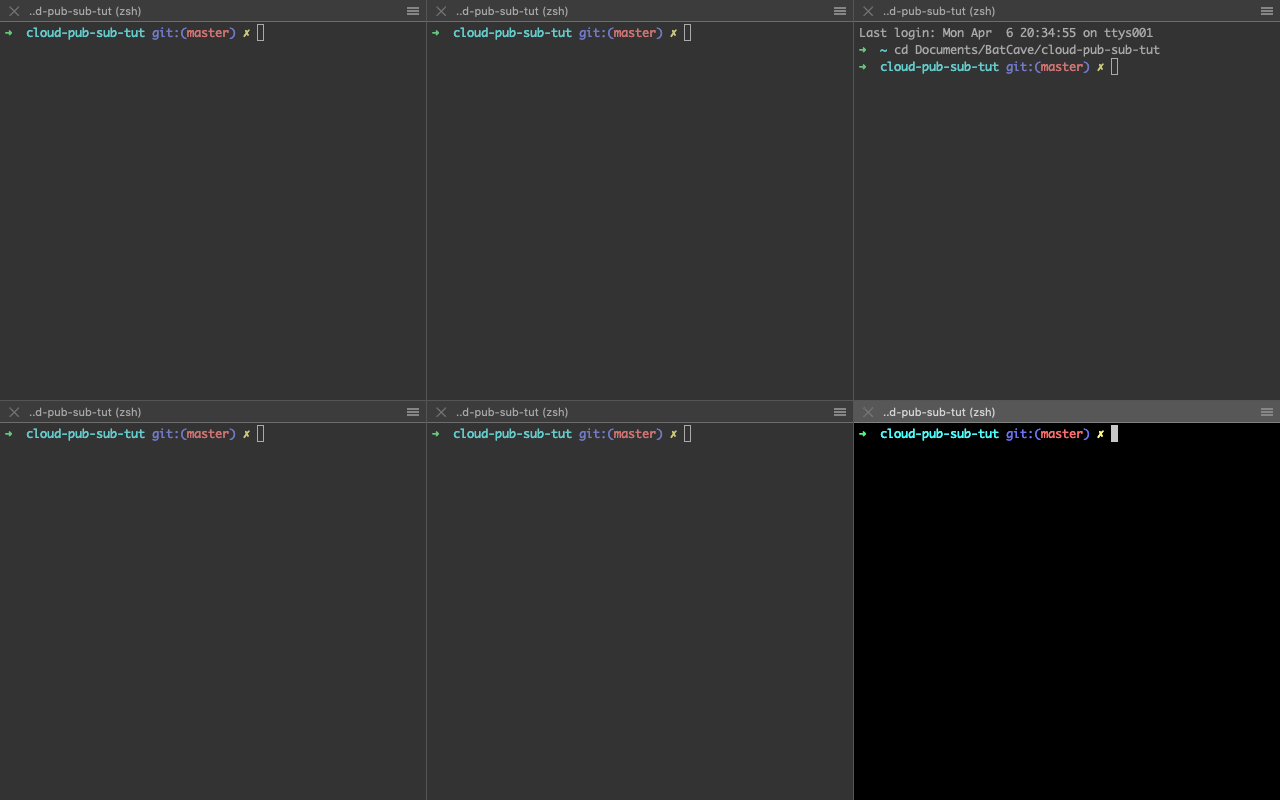
Next up we will run our services locally in the upper half of the terminal by running the following commands on each section like so:
//upper terminal 1 (order service)
$ yarn start:main
//upper terminal 2 (delivery service)
$ yarn start:delivery
//upper terminal 3 (notification service)
$ yarn start:notification
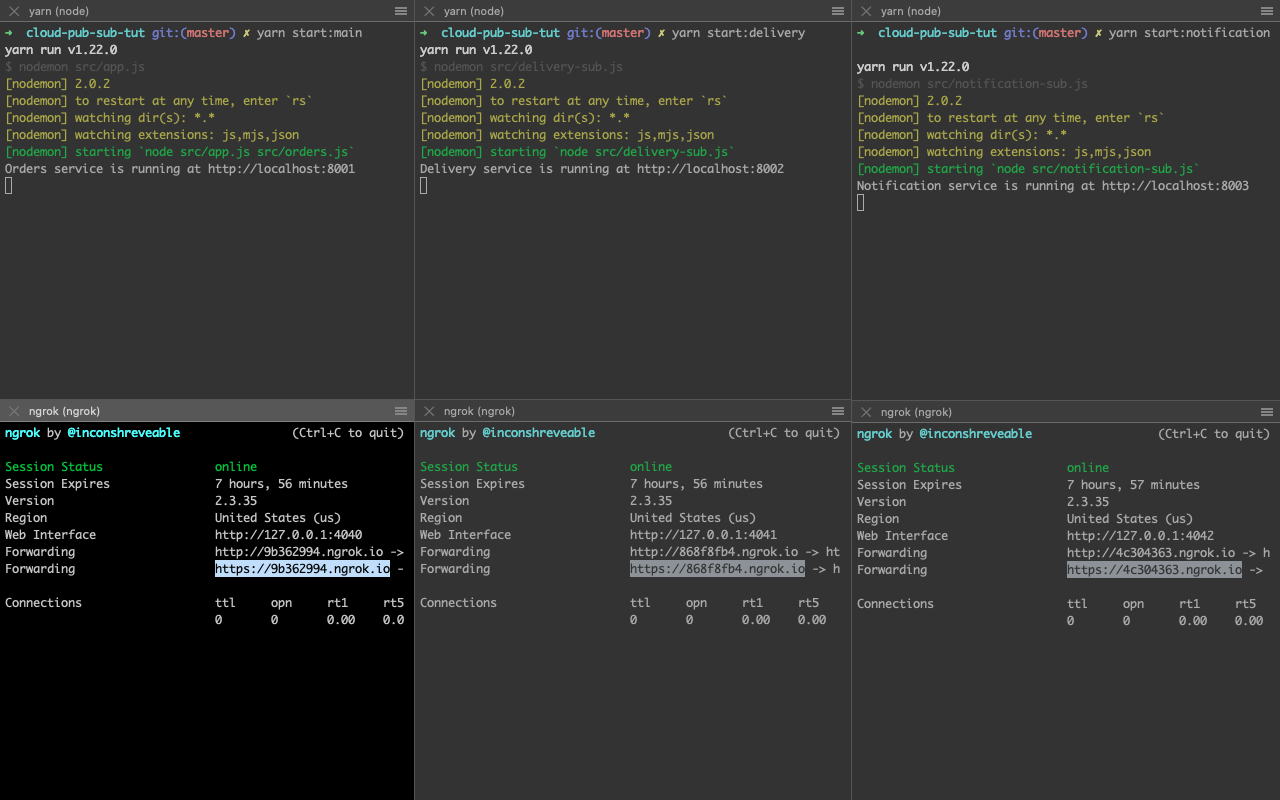
Then in the lower half, we will provision public URLs for our localhost servers using ngrok by running the following commands in each section like so:
//upper terminal 1 (order service)
$ ngrok http 8001
//upper terminal 2 (delivery service)
$ ngrok http 8002
//upper terminal 3 (notification service)
$ ngrok http 8003
Running the commands in the snippet above should give you a terminal that looks like the image below:
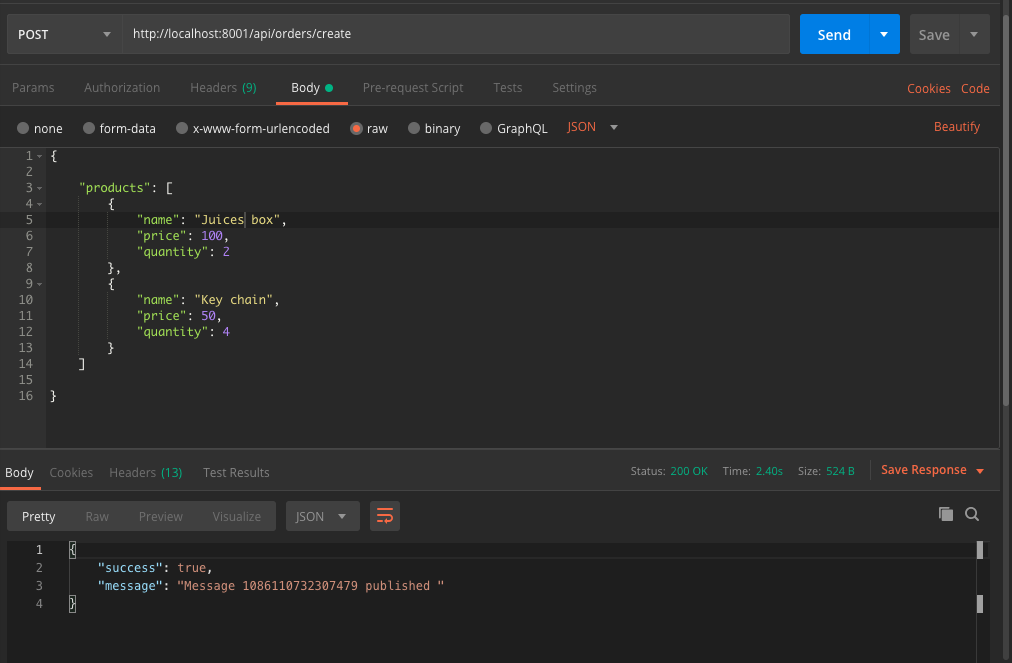
A sample order request and response on the orders service can be seen in the image below:
In this tutorial, we’ve learned what Cloud Pub/Sub is and how to build a simple case to demonstrate its usage in a service-oriented/microservice architecture. Should you want to get more information on the Cloud Pub/Sub, you can visit the official documentation. For more Pub/Sub related content, you can check out the Pub/Sub Made Easy series on YouTube.
The source code for this tutorial is available on GitHub as well. Feel free to clone it, fork it, or submit an issue.
 Monitor failed and slow network requests in production
Deploying a Node-based web app or website is the easy part. Making sure your Node instance continues to serve resources to your app is where things get tougher. If you’re interested in ensuring requests to the backend or third-party services are successful, try LogRocket.

LogRocket lets you replay user sessions, eliminating guesswork around why bugs happen by showing exactly what users experienced. It captures console logs, errors, network requests, and pixel-perfect DOM recordings — compatible with all frameworks.
LogRocket's Galileo AI watches sessions for you, instantly identifying and explaining user struggles with automated monitoring of your entire product experience.
LogRocket instruments your app to record baseline performance timings such as page load time, time to first byte, slow network requests, and also logs Redux, NgRx, and Vuex actions/state. Start monitoring for free.

Learn how to build smooth staggered animations in CSS using modern features like sibling-index(), complete with practical examples, fallbacks, and accessibility tips.

Compare the top AI development tools and models of July 2026. View updated rankings, feature breakdowns, and find the best fit for you.

Learn how to detect unused and ghost dependencies in JavaScript projects using Knip, a project-level linter that keeps your dependency graph accurate.

Learn how Storybook MCP enables AI agents to understand your component library, generate accurate UI, and validate code using documentation, stories, and automated tests.
Hey there, want to help make our blog better?
Join LogRocket’s Content Advisory Board. You’ll help inform the type of content we create and get access to exclusive meetups, social accreditation, and swag.
Sign up now

