Editor’s note: This article was last reviewed and updated by Popoola Temitope on 4 December 2024. The updates include an exploration of when to use React Context, an explanation of conditional fetching with useContext, and an overview of the React contextType function.

The React Context API was introduced in React v16 as a way to share data in a component tree without needing to pass props down at every level.
The Context API is ideal for data that is considered “global” but not large or complex enough for a dedicated state manager like Redux or MobX, such as the user’s current language, current theme, or even data from a multi-step form before being sent to an API.
React Context is used to share global data or state between components, making it a great choice in the following areas:
To demonstrate React Context, we’ll build a to-do app that uses the Context API to manage tasks on the list, and also for theming.
In our tutorial, we will use Create React App to have a modern configuration with no hassle, but you are welcome to set up a new app from scratch using webpack.
Begin by opening your terminal and running the following command:
npx create-react-app react-context-todo --template typescript
To easily create a TypeScript project with CRA, you need to add the flag --template typescript, otherwise the app will only support JavaScript.
Next, let’s structure the project as follows:
src
├── @types
│   └── todo.d.ts
├── App.tsx
├── components
│   ├── AddTodo.tsx
│   └── Todo.tsx
├── containers
│   └── Todos.tsx
├── context
│   └── todoContext.tsx
├── index.tsx
├── react-app-env.d.ts
└── styles.css
Here, there are two files to underline:
context/todoContext.tsx file, which exports the created context for the to-do functionality and its providertodo.d.ts in the @types file contains the type definitions for parts of the app that concern the to-do list implementationHaving dedicated type definition files is a best practice because it improves the structure of your project. The declared types can either be used by reference without importing them, or explicitly by importing them into another file — though they have to be exported first. Ideally, we’d want to import the types so we don’t pollute the global namespace.
With this in place, we can now get our hands dirty and code something meaningful.
TypeScript types allow you to define what a variable or function should expect as a value to help the compiler catch errors before runtime:
// @types.todo.ts
export interface ITodo {
  id: number;
  title: string;
  description: string;
  status: boolean;
}
export type TodoContextType = {
  todos: ITodo[];
  saveTodo: (todo: ITodo) => void;
  updateTodo: (id: number) => void;
};
As you can see, the interface ITodo defines the shape of a to-do object. Next, we have the type TodoContextType that exports an array of to-dos and the methods to add or update a to-do.
React Context allows you to share and manage state across your components without passing down props. The context will provide the data to just the components that need to consume it:
// context/todoContext.tsx
import * as React from 'react';
import { TodoContextType, ITodo } from '../@types/todo';

export const TodoContext = React.createContext<TodoContextType | null>(null);

const TodoProvider: React.FC<{children: React.ReactNode}> = ({ children }) => {
  const [todos, setTodos] = React.useState<ITodo[]>([
    {
      id: 1,
      title: 'post 1',
      description: 'this is a description',
      status: false,
    },
    {
      id: 2,
      title: 'post 2',
      description: 'this is a description',
      status: true,
    },
  ]);
Here, we start by creating a new context and setting its type to match TodoContextType or null. We set the default value to null temporarily when creating the context; the intended values will be assigned to the provider.
Next, we create the component TodoProvider, which provides the context to the component consumers. Here, we initialize the state with some data to have todos to work:
// context/todoContext.tsx
const saveTodo = (todo: ITodo) => {
  const newTodo: ITodo = {
    id: Math.random(), // not really unique - but fine for this example
    title: todo.title,
    description: todo.description,
    status: false,
  }
  setTodos([...todos, newTodo])
}

const updateTodo = (id: number) => {
  todos.filter((todo: ITodo) => {
    if (todo.id === id) {
      todo.status = true
      setTodos([...todos])
    }
  })
}
The function saveTodo will create a new to-do based on the interface ITodo and then append the object to the array of to-dos. The next function, updateTodo, will look for the ID of the to-do passed as a parameter in the array of to-dos and then update it:
// context/todoContext.tsx
 return (
    <TodoContext.Provider value={{ todos, saveTodo, updateTodo }}>
      {children}
    </TodoContext.Provider>
  );
};

export default TodoProvider;
Next, we pass the values to the context to make them consumable for the components:
// context/todoContext.tsx
import React from 'react';
import { TodoContextType, ITodo } from '../@types/todo';

export const TodoContext = React.createContext<TodoContextType | null>(null);

const TodoProvider: React.FC<{children: React.ReactNode}> = ({ children }) => {
  const [todos, setTodos] = React.useState<ITodo[]>([
    {
      id: 1,
      title: 'post 1',
      description: 'this is a description',
      status: false,
    },
    {
      id: 2,
      title: 'post 2',
      description: 'this is a description',
      status: true,
    },
  ]);
  const saveTodo = (todo: ITodo) => {
    const newTodo: ITodo = {
      id: Math.random(), // not really unique - but fine for this example
      title: todo.title,
      description: todo.description,
      status: false,
    };
    setTodos([...todos, newTodo]);
  };
  const updateTodo = (id: number) => {
    todos.filter((todo: ITodo) => {
      if (todo.id === id) {
        todo.status = true;
        setTodos([...todos]);
      }
    });
  };
  return <TodoContext.Provider value={{ todos, saveTodo, updateTodo }}>{children}</TodoContext.Provider>;
};

export default TodoProvider;
With this, we are now able to consume the context. So, let’s create the components in the next section.
useContext HookThe useContext Hook is a crucial tool in React development for efficient state management and data transfer between components. It enables components to access React context values without passing props through intermediary components.
When used with TypeScript, the useContext Hook adds an extra layer of type safety, ensuring correct types are used throughout the application. The Hook is part of the React Hooks API and consumes values from the React Context, returning the current context value for that context. In the next section, we will see how to import and use the useContext Hook in our component.
Below, we have a form component that allows us to handle the data entered by the user using the useState Hook. Once we get the form data, we use the saveTodo function, pulled from the context object, to add a new to-do:
// components/AddTodo.tsx
import * as React from 'react';
import { TodoContext } from '../context/todoContext';
import { TodoContextType, ITodo } from '../@types/todo';

const AddTodo: React.FC = () => {
  const { saveTodo } = React.useContext(TodoContext) as TodoContextType;
  const [formData, setFormData] = React.useState<ITodo | {}>();
  const handleForm = (e: React.FormEvent<HTMLInputElement>): void => {
    setFormData({
      ...formData,
      [e.currentTarget.id]: e.currentTarget.value,
    });
  };
  const handleSaveTodo = (e: React.FormEvent, formData: ITodo | any) => {
    e.preventDefault();
    saveTodo(formData);
  };
  return (
    <form className="Form" onSubmit={(e) => handleSaveTodo(e, formData)}>
      <div>
        <div>
          <label htmlFor="name">Title</label>
          <input onChange={handleForm} type="text" id="title" />
        </div>
        <div>
          <label htmlFor="description">Description</label>
          <input onChange={handleForm} type="text" id="description" />
        </div>
      </div>
      <button disabled={formData === undefined ? true : false}>Add Todo</button>
    </form>
  );
};
export default AddTodo;
Note that I use typecasting on the useContext Hook to prevent TypeScript from throwing errors because the context will be null at the beginning:
// components/Todo.tsx
import * as React from 'react';
import { ITodo } from '../@types/todo';

type Props = {
  todo: ITodo;
  updateTodo: (id: number) => void;
};

const Todo: React.FC<Props> = ({ todo, updateTodo }) => {
  const checkTodo: string = todo.status ? `line-through` : '';
  return (
    <div className="Card">
      <div className="Card--text">
        <h1 className={checkTodo}>{todo.title}</h1>
        <span className={checkTodo}>{todo.description}</span>
      </div>
      <button onClick={() => updateTodo(todo.id)} className={todo.status ? `hide-button` : 'Card--button'}>
        Complete
      </button>
    </div>
  );
};
export default Todo;
As you can see here, we have a presentational component that shows a single to-do. It receives the todo object and the function to update it as parameters that need to match the Props type defined above:
// containers/Todos.tsx
import * as React from 'react';
import { TodoContextType, ITodo } from '../@types/todo';
import { TodoContext } from '../context/todoContext';
import Todo from '../components/Todo';

const Todos = () => {
  const { todos, updateTodo } = React.useContext(TodoContext) as TodoContextType;
  return (
    <>
      {todos.map((todo: ITodo) => (
        <Todo key={todo.id} updateTodo={updateTodo} todo={todo} />
      ))}
    </>
  );
};

export default Todos;
This component shows the list of to-dos when the page loads. It pulls the todos and the function updateTodo from the to-do context. Next, we loop through the array and pass the object we want to display to the Todo component.
From this step onward, we will be able to provide the to-do context in the App.tsx file to finish building the app. So, let’s use the context provider in the next part.
// App.tsx
import * as React from 'react'
import TodoProvider from './context/todoContext'
import Todos from './containers/Todos'
import AddTodo from './components/AddTodo'
import './styles.css'
export default function App() {
return (
<TodoProvider>
<main className='App'>
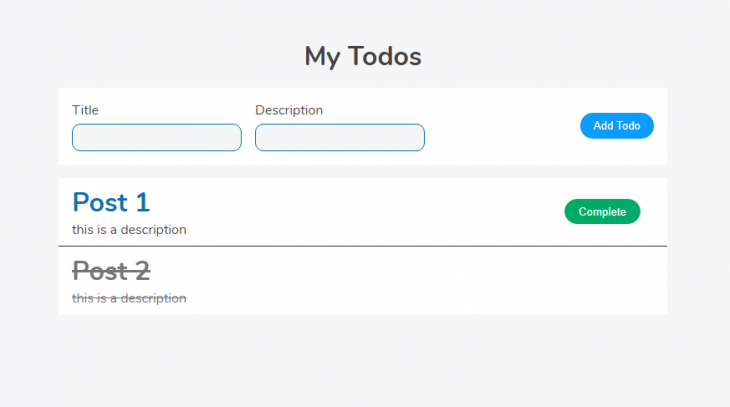
<h1>My Todos</h1>
<AddTodo />
<Todos />
</main>
</TodoProvider>
)
}
Here, we import the TodoProvider component that wraps the consumers of the to-do context. That said, we can now access the todos array and the function to add or update a to-do using the useContext Hook in other components.
With this, we can now open the project on the terminal and run either of the following commands:
yarn start

npm start
If everything works, you’ll be able to see this in the browser:
http://localhost:3000
When managing complex shared states within React Context, combining the useReducer Hook with TypeScript helps manage the state at a higher level and share it across components, enhancing code robustness and developer experiences.
The benefits include type safety, code auto-completion, and refactoring support. Using the useReducer Hook also helps centralize state modifications and ensures a predictable state transition.
We’ll rewrite our simple to-do application but this time, we’ll use the context reducer with TypeScript. First, we will start by defining action types for the reducer:
// @types/todo.d.ts
export type TodoAction =
| { type: 'ADD_TODO'; payload: ITodo }
| { type: 'UPDATE_TODO'; payload: number };
The next step is to create a reducer function that will handle state changes based on dispatched actions. In this case, actions are either adding a new todo or updating an existing todo’s status:
// reducers/todoReducer.ts
export const todoReducer = (state: ITodo[], action: TodoAction): ITodo[] => {
    switch (action.type) {
      case 'ADD_TODO':
        return [...state, action.payload];

      case 'UPDATE_TODO':
        return state.map((todo) =>
          todo.id === action.payload ? { ...todo, status: true } : todo
        );

      default:
        return state;
    }
};
Now, in the todoContext, let’s provide it with an initial state and the reducer function:
// context/todoContext.tsx
import * as React from 'react';
import { ITodo, TodoAction } from '../@types/todo';
import { todoReducer } from '../reducers/todoReducer';

export const TodoContext = React.createContext<{
  todos: ITodo[];
  dispatch: React.Dispatch<TodoAction>;
} | null>(null);

// TodoProvider component with the useReducer hook
const TodoProvider: React.FC<{children: React.ReactNode}> = ({ children }) => {
  const [todos, dispatch] = React.useReducer(todoReducer, [
    {
      id: 1,
      title: 'post 1',
      description: 'this is a description',
      status: false,
    },
    {
      id: 2,
      title: 'post 2',
      description: 'this is a description',
      status: true,
    },
  ]);
  return (
    <TodoContext.Provider value={{ todos, dispatch }}>
      {children}
    </TodoContext.Provider>
  );
};
export default TodoProvider;
Now our React application is configured with a context reducer using TypeScript, ensuring type safety and a structured approach to managing global state. Let’s proceed to consume the context in our components.
Update the code in the AddTodo.tsx file with the code below:
// components/AddTodo.tsx
import * as React from 'react';
import { TodoContext } from '../context/todoContext';
import { ITodo } from '../@types/todo';

const AddTodo: React.FC = () => {
  const { dispatch } = React.useContext(TodoContext)!;
  const [formData, setFormData] = React.useState<ITodo | {}>();

  const handleForm = (e: React.FormEvent<HTMLInputElement>): void => {
    setFormData({
      ...formData,
      [e.currentTarget.id]: e.currentTarget.value,
    });
  };

  const handleSaveTodo = (e: React.FormEvent, formData: ITodo | any) => {
    e.preventDefault();
    dispatch({ type: 'ADD_TODO', payload: formData });
  };

  return (
    <form className="Form" onSubmit={(e) => handleSaveTodo(e, formData)}>
      <div>
        <div>
          <label htmlFor="name">Title</label>
          <input onChange={handleForm} type="text" id="title" />
        </div>
        <div>
          <label htmlFor="description">Description</label>
          <input onChange={handleForm} type="text" id="description" />
        </div>
      </div>
      <button disabled={formData === undefined ? true : false}>Add Todo</button>
    </form>
  );
};
export default AddTodo;
In this example, the useContext Hook is used to get the dispatch function from the TodoContext. The component then uses the dispatch function to provide the functionality to add new todos.
Update the code in Todo.tsx file with the code below:
// components/Todo.tsx
import * as React from 'react';
import { ITodo } from '../@types/todo';

type Props = {
  todo: ITodo;
  updateTodo: () => void;
};
const Todo: React.FC<Props> = ({ todo, updateTodo }) => {
  const checkTodo: string = todo.status ? `line-through` : '';

  return (
    <div className="Card">
      <div className="Card--text">
        <h1 className={checkTodo}>{todo.title}</h1>
        <span className={checkTodo}>{todo.description}</span>
      </div>
      <button onClick={() => updateTodo()} className={todo.status ? `hide-button` : 'Card--button'}>
        Complete
      </button>
    </div>
  );
};
export default Todo;
Here the component receives the todo object and updates it as parameters that must match the defined Props type:
// containers/Todos.tsx
import * as React from 'react';
import { ITodo } from '../@types/todo';
import { TodoContext } from '../context/todoContext';
import Todo from '../components/Todo';
const Todos = () => {
  const { todos, dispatch } = React.useContext(TodoContext)!;
  return (
    <>
      {todos.map((todo: ITodo) => (
        <Todo key={todo.id} updateTodo={() => dispatch({ type: 'UPDATE_TODO', payload: todo.id })} todo={todo} />
      ))}
    </>
  );
};
export default Todos;
We display the list of todos and update the to-do using the dispatch function we pull out from the TodoContext.
In your App.tsx file, ensure it is wrapped with the TodoProvider to be able to access the todos array and the function to add or update a to-do using the useContext Hook in other components:
// App.tsx
import * as React from 'react'
import TodoProvider from './context/todoContext'
import Todos from './containers/Todos'
import AddTodo from './components/AddTodo'
import './styles.css'

export default function App() {
  return (
    <TodoProvider>
      <main className='App'>
        <h1>My Todos</h1>
        <AddTodo />
        <Todos />
      </main>
    </TodoProvider>
  )
}
Now run the development server using npm start or yarn start, and we will see that everything works the same way in our previous example without using the context reducer.
In this section, we’ll take another look at one more application of the Context API, theming:
// @types/theme.d.ts
export type Theme = 'light' | 'dark';
export type ThemeContextType = {
  theme: Theme;
  changeTheme: (theme: Theme) => void;
};
};
We create the types necessary for implementing theming: Theme specifies the possible theme modes and ThemeContextType specifies the properties that will be available in the theme context as we consume it.
Next, we create a themeContext.tsx file that exports the raw theme context and its provider:
// context/themeContext.tsx
import * as React from 'react';
import { Theme, ThemeContextType } from '../@types/theme';

export const ThemeContext = React.createContext<ThemeContextType | null>(null);

const ThemeProvider: React.FC<{children: React.ReactNode}> = ({ children }) => {
  const [themeMode, setThemeMode] = React.useState<Theme>('light');
  return (
    <ThemeContext.Provider value={{ theme: themeMode, changeTheme: setThemeMode }}>
      {children}
    </ThemeContext.Provider>
  );
};

export default ThemeProvider;
After creating the context, we create a ThemeWrapper component that will both consume it and toggle the theme on the app:
// components/ThemeWrapper.tsx
import React from 'react';
import { ThemeContextType, Theme } from '../@types/theme';
import { ThemeContext } from '../context/themeContext';

const ThemeWrapper: React.FC<{children: React.ReactNode}> = ({ children }) => {
  const { theme, changeTheme } = React.useContext(ThemeContext) as ThemeContextType;
  const handleThemeChange = (event: React.ChangeEvent<HTMLSelectElement>) => {
    changeTheme(event.target.value as Theme);
  };

  return (
    <div data-theme={theme}>
      <select name="toggleTheme" onChange={handleThemeChange}>
        <option value="light">Light</option>
        <option value="dark">Dark</option>
      </select>
      {children}
    </div>
  );
};
export default ThemeWrapper;
With ThemeWrapper ready, we can now import it into App.tsx and test it out:
// App.tsx
import * as React from 'react';
import TodoProvider from './context/todoContext';
import ThemeProvider from './context/themeContext';
import Todos from './containers/Todos';
import AddTodo from './components/AddTodo';
import ThemeWrapper from './components/ThemeWrapper';
import './styles.css';

export default function App() {
  return (
    <ThemeProvider>
      <TodoProvider>
        <ThemeWrapper>
          <main className="App">
            <h1>My Todos</h1>
            <AddTodo />
            <Todos />
          </main>
        </ThemeWrapper>
      </TodoProvider>
    </ThemeProvider>
  );
}
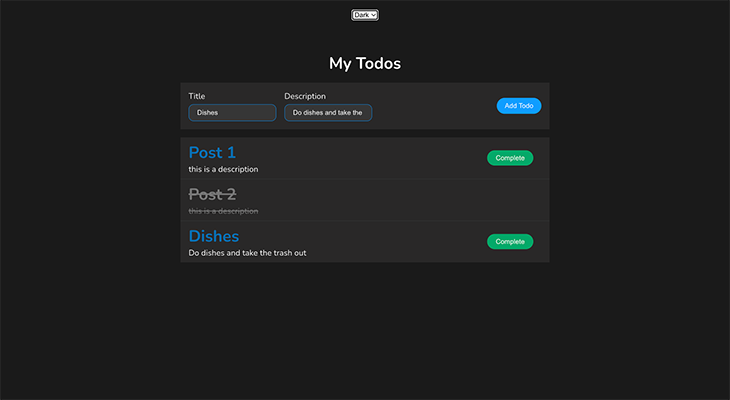
Once the data-theme attribute is modified by the change handler of the select element, the prewritten CSS file takes care of the rest.
Despite its many advantages, developers often face challenges when using React Context with TypeScript.
TypeScript can struggle to correctly infer types, especially with complex structures or nested contexts. To improve type safety, define types explicitly for context values or use the as keyword for type assertion:
// Using the context with type assertion
const todoContext = useContext(TodoContext) as TodoContextType;

// type assertion
export const TodoContext = React.createContext<TodoContextType>();
null or undefined valuesIn situations where the default context value depends on other variables or cannot be determined during context creation, it is necessary to assign undefined/null as the default value or TypeScript will throw type errors.
The problem can be resolved by defining the context type as nullable/undefined or using optional chaining or non-null assertions for safe access:
// defining the context type as nullable
export const TodoContext = React.createContext<TodoContextType | null>(null);

// non-null assertions
const { todos, dispatch } = React.useContext(TodoContext)!;

// using optional chaining
const safeValue = todos?.property;
Another way to address this issue is to use a helper function:
// context/todoContext.tsx
export const useTodoContext = () => {
  const context = useContext(TodoContext);

  if (!context) {
    throw new Error('useTodoContext must be used inside the TodoProvider');
  }

  return context;
};
The function uses the useContext Hook to get the current value of the TodoContext. If it’s null or undefined, it throws an error, indicating the need to use the useTodoContext function within the TodoProvider.
If it’s available, it returns it, ensuring the consuming component receives the context value and TypeScript can infer the correct types:
const TodoList: React.FC = () => {
  // Use the useTodoContext helper to obtain the context value safely
  const { todos, dispatch } = useTodoContext();

  // ... rest of the component code
};
Now, todos and dispatch have the correct types and null/undefined issues are handled.
It can be difficult to ensure type safety in reducer functions, particularly when working with complex state structures.
Using discriminated unions to manage various action circumstances and establish clear and exact definitions for action types guarantees type safety in the reducer and aids TypeScript with appropriately interpreting types:
type TodoAction =
  | { type: 'ADD_TODO'; payload: ITodo }
  | { type: 'UPDATE_TODO'; payload: number };
Excessive React Context usage can negatively impact re-renders and performance:
import React, { useContext } from 'react';

// Counter 1: Renders a counter using context
const Counter1 = () => {
  const counter = useContext(CounterContext);
  console.log('Counter1 rendered');

  return (
    <div>
      <p>Counter1 Counter: {counter}</p>
    </div>
  );
};

// Counter 2: Renders another counter using context
const Counter2 = () => {
  const counter = useContext(CounterContext);
  console.log('Counter2 rendered');

  return (
    <div>
      <p>Counter2 Counter: {counter}</p>
    </div>
  );
};

const App = () => {
  const [counter, setCounter] = useState(0);
  console.log('App rendered');

  return (
    <CounterContext.Provider value={counter}>
      <div>
        <button onClick={() => setCounter((prevCounter) => prevCounter + 1)}>
          Increment Counter
        </button>
        <Counter1 />
        <Counter2 />
      </div>
    </CounterContext.Provider>
  );
};

export default App;
The example shows that two components (Counter1 and Counter2) use the same context (CounterContext) to access a counter value. The App component renders both components, but when the counter is incremented, both re-render, a common issue with excessive context usage, potentially causing performance issues.
To address this, use context judiciously for global or deeply shared data, consider alternative state management solutions like Redux, or optimize context updates using memoization techniques:
const Counter1 = React.memo(() => {
  const counter = useContext(CounterContext);
  console.log('Counter1 rendered');

  return (
    <div>
      <p>Counter1 Counter: {counter}</p>
    </div>
  );
});

const Counter2 = React.memo(() => {
  const counter = useContext(CounterContext);
  console.log('Counter2 rendered');

  return (
    <div>
      <p>Counter2 Counter: {counter}</p>
    </div>
  );
});
React.memo optimizes components by preventing unnecessary re-renders when props remain unchanged, thereby mitigating performance issues due to excessive context updates.
useContextConditional fetching in useContext is a pattern where you retrieve data or access a value from a context only under certain conditions. This approach helps avoid unnecessary computations, rendering, or accessing values from the context when they are not needed:
import React, { useContext } from 'react';
interface User {
  name: string;
}
const UserContext = React.createContext<User | null>(null);
interface ProfileProps {
  showProfile: boolean;
}
function Profile({ showProfile }: ProfileProps) {
  const user = showProfile ? useContext(UserContext) : null;
  return (
    <div>
      {user ? <p>Welcome, {user.name}!</p> : <p>Profile is hidden.</p>}
    </div>
  );
}
export default Profile;
From the code above, the UserContext value is retrieved only when the variable showProfile is true, which helps avoid unnecessary access to the context value.
contextType?React’s contextType is a context property used in class components to access context values without the need for the <Consumer> component. By assigning a context object to the contextType property, React makes the current value of the context accessible through the this.context property within the class. This helps avoid the nested renders required when using the <Consumer> component.
To demonstrate how to use contextType, let’s create a context object that will hold the global data. To do this, inside the @types folder, create mycontext.ts and add the following code:
import React from 'react';
type MyContextType = string;
const MyContext = React.createContext<MyContextType>('default value');
export default MyContext;
In your class component, to access the context data, you need to import the context state object and assign it to the static contextType API. Then, the context data can be accessed using the this.context property, as used in the component below:
import React from 'react';
import MyContext from './MyContext';
class MyComponent extends React.Component {
  static contextType = MyContext;
  context!: React.ContextType<typeof MyContext>;
  render() {
    return <div>Context Value: {this.context}</div>;
  }
}
export default MyComponent;
In your main component, you can pass data to MyComponent class using the code below:
import React from 'react';
import MyContext from './MyContext';
import MyComponent from './MyComponent';
function App() {
  return (
    <MyContext.Provider value="Hello, TypeScript!">
      <MyComponent />
    </MyContext.Provider>
  );
}
export default App;
In this guide, we explored how to effectively use React Context with TypeScript by building a demo to-do app. We covered setting up the app, creating types, establishing context, and implementing components. Additionally, we addressed common TypeScript issues in React Context, such as handling null or undefined values, ensuring reducer function type safety, and avoiding context overuse to maintain performance.
Thanks for reading!

LogRocket lets you replay user sessions, eliminating guesswork by showing exactly what users experienced. It captures console logs, errors, network requests, and pixel-perfect DOM recordings — compatible with all frameworks, and with plugins to log additional context from Redux, Vuex, and @ngrx/store.
With Galileo AI, you can instantly identify and explain user struggles with automated monitoring of your entire product experience.
Modernize how you understand your web and mobile apps — start monitoring for free.
Install LogRocket via npm or script tag. LogRocket.init() must be called client-side, not
server-side
$ npm i --save logrocket

// Code:

import LogRocket from 'logrocket';
LogRocket.init('app/id');
// Add to your HTML:

<script src="https://cdn.lr-ingest.com/LogRocket.min.js"></script>
<script>window.LogRocket && window.LogRocket.init('app/id');</script>

Discover how React Fiber works under the hood. Learn how React builds the DOM, handles concurrent rendering, and works alongside React 19 features and the new React Compiler.

Learn how to use Skybridge, an open-source React framework, to build and deploy cross-platform AI apps and interactive UI widgets for ChatGPT, Claude, and MCP clients from a single codebase.

Learn how to set up Meilisearch, index documents, and build keyword, semantic, and hybrid search with AI-powered retrieval.

Compare pnpm and npm across security defaults, disk usage, dependency strictness, and workspace policy to decide which package manager fits your project.
Hey there, want to help make our blog better?
Join LogRocket’s Content Advisory Board. You’ll help inform the type of content we create and get access to exclusive meetups, social accreditation, and swag.
Sign up now

