Editor’s note: This post was last updated 29 July 2021 for accuracy, and the code repository was reviewed by the author.

GraphQL and TypeScript have both exploded in adoption, and when the two are combined with React, they create the ideal developer experience.
GraphQL has transformed the way we think about APIs and utilizes an intuitive key/value pair matching where the client can request the exact data needed to display on a web page or on a mobile app screen. TypeScript extends JavaScript by adding static typing to variables, resulting in fewer bugs and more readable code.
This article walks you through building a client-side application with React and Apollo using the public SpaceX GraphQL API to display information about launches. We will automatically generate TypeScript types for our queries and execute these queries using React Hooks. We’ll be covering these topics:
The article will assume you have some familiarity with React, GraphQL, and TypeScript, and will focus on integrating them to build a functioning application. If you need additional practice with them, you can find plenty of quality coding tutorials to get you up to speed.
If you get stuck at any point, you can refer to the source code or see the live app.

The Replay is a weekly newsletter for dev and engineering leaders.
Delivered once a week, it's your curated guide to the most important conversations around frontend dev, emerging AI tools, and the state of modern software.
A GraphQL API is required to be strongly typed, and the data is served from a single endpoint. By calling a GET request on this endpoint, the client can receive a fully self-documented representation of the backend, with all available data and the corresponding types.
With the GraphQL Code Generator, we scan our web app directory for query files and match them with the information provided by the GraphQL API to create TypeScript types for all request data. By using GraphQL, we get the props of our React components typed automatically and for free. This leads to fewer bugs and a much faster iteration speed on your products.
We will use create-react-app with the TypeScript setting to bootstrap our application. Initialize your app by executing the following command:
npx create-react-app graphql-typescript-react --template typescript
// NOTE - you will need Node v8.10.0+ and NPM v5.2+
By using the --template typescript flag, CRA will generate your files as .ts and .tsx, and it will create a tsconfig.json file.
Navigate into the app directory:
cd graphql-typescript-react
Now we can install our additional dependencies. Our app will use Apollo to execute GraphQL API requests. The additional libraries needed for Apollo are @apollo/client and graphql.
apollo-boost contains the tools needed to query the API and cache data locally in memory; react-apollo provides bindings for React; react-apollo-hooks wraps Apollo queries in a React Hook; graphql-tag is used to build our query documents; and graphql is a peer dependency that provides details of the GraphQL implementation:
yarn add @apollo/client graphql
graphql-code-generator is used to automate our TypeScript workflow. We will install the codegen CLI to generate the configuration and plugins we need:
yarn add -D @graphql-codegen/cli
Set up the codegen configuration by executing the following command:
npx graphql-codegen init
This will launch a CLI wizard. Do the following steps:
https://spacexdata.herokuapp.com/graphql../src/components/**/*.{ts,tsx} so that it will search all our TypeScript files for query declarations.src/generated/graphql.tsx (.tsx is required by the Apollo plugin).codegen.yml file.codegen.Now install the plugins the CLI tool added to your package.json by running the yarn command in your CLI.
We will also make one update to our codegen.yml file so that it will also generate typed React Hook queries by adding the withHooks: true configuration option. Your configuration file should look like the following:
overwrite: true
schema: 'https://spacexdata.herokuapp.com/graphql'
documents: './src/components/**/*.ts'
generates:
  src/generated/graphql.tsx:
    plugins:
      - 'typescript'
      - 'typescript-operations'
      - 'typescript-react-apollo'
    config:
      withHooks: true
A primary benefit of GraphQL is that it utilizes declarative data fetching. We are able to write queries that live alongside the components that use them, and the UI is able to request exactly what it needs to render.
When working with REST APIs, we would need to find documentation that may or may not be up to date. If there were ever any problems with REST, we would need to make requests against the API and console.log the results to debug the data.
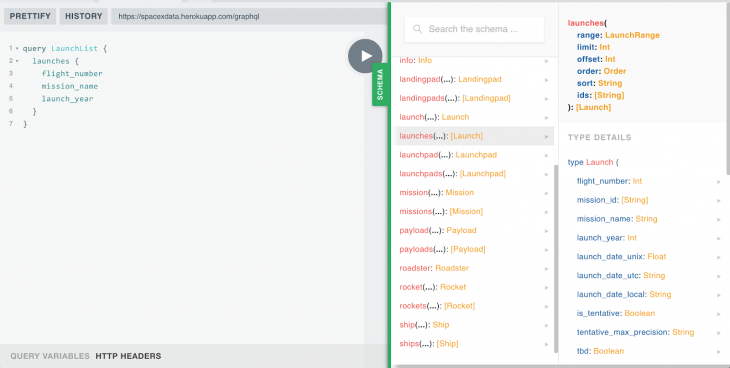
GraphQL solves this problem by allowing you to visit the URL and see a fully defined schema and execute requests against it, all in the UI. Visit https://spacexdata.herokuapp.com/graphql to see exactly what data you will be working with.

While we have a large amount of SpaceX data available to us, we will display just the information about launches. We’ll have two primary components:
launches a user can click to learn more about them.launch.For our first component, we’ll query against the launches key and request the flight_number, mission_name, and launch_year. We’ll display this data in a list, and when a user clicks one of the items, we’ll query against the launch key for a larger set of data for that rocket. Let’s test our first query in GraphQL playground.

To write our queries, we first create a src/components folder and then create a src/components/LaunchList folder. Inside this folder, create index.tsx, LaunchList.tsx, query.ts, and styles.css files. Inside the query.ts file, we can transfer the query from the playground and place it inside a gql string:
import { gql } from '@apollo/client';

export const QUERY_LAUNCH_LIST = gql`
  query LaunchList {
    launches {
      flight_number
      mission_name
      launch_year
    }
  }
`;
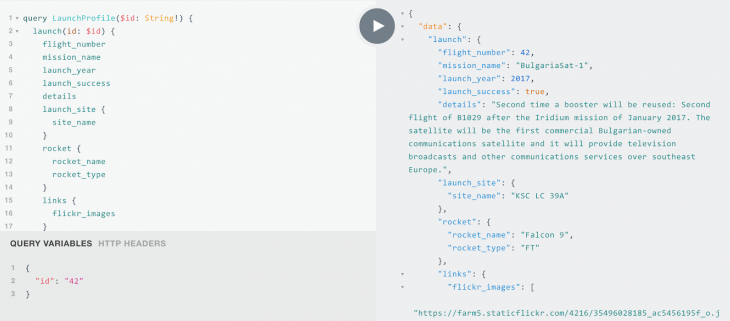
Our other query will get more detailed data for a single launch based on the flight_number. Since this will be dynamically generated by user interaction, we will need to use GraphQL variables. We can also test queries with variables in the playground.
Next to the query name, you specify the variable, prepended with a $ and its type. Then, inside the body, you can use the variable. For our query, we set the id of the launch by passing it the $id variable, which will be of type String!.

We pass in the id as a variable, which corresponds to the flight_number from the LaunchList query. The LaunchProfile query will also contain nested objects/types, where we can get values by specifying the keys inside brackets.
For example, the launch contains a rocket definition (type LaunchRocket), which we will ask for the rocket_name and rocket_type. To get a better understanding of the fields available for LaunchRocket, you are able to use the schema navigator on the side to understand the available data.
Now let’s transfer this query to our application. Create a src/components/LaunchProfile folder with index.tsx, LaunchProfile.tsx, query.ts, and styles.css files. Inside the query.ts file, we paste our query from the playground.
import { gql } from '@apollo/client';

export const QUERY_LAUNCH_PROFILE = gql`
  query LaunchProfile($id: String!) {
    launch(id: $id) {
      flight_number
      mission_name
      launch_year
      launch_success
      details
      launch_site {
        site_name
      }
      rocket {
        rocket_name
        rocket_type
      }
      links {
        flickr_images
      }
    }
  }
`;
Now that we have defined our queries, you are finally able to generate your TypeScript interfaces and the typed Hooks. In your terminal, execute:
yarn codegen
Inside src/generated/graphql.ts, you will find all the types needed to define your application, along with the corresponding queries to fetch the GraphQL endpoint to retrieve that data.
This file tends to be large, but it is filled with valuable information. I recommend taking the time to skim through it and understand all the types our codegen created based entirely on the GraphQL schema.
For example, inspect type Launch, which is the TypeScript representation of the Launch object from GraphQL that we were interacting with in the playground. Also scroll to the bottom of the file to see the code generated specifically for the queries that we will be executing — it has created components, HOCs, typed props/queries, and typed hooks.
In our src/index.tsx, we need to initialize the Apollo client and use the ApolloProvider component to add our client to React’s context.
We initialize a new ApolloClient and give it the URI of our GraphQL API, and then we wrap our <App /> component in the context providers. Your index file should look like the following:
import * as React from 'react';
import ReactDOM from 'react-dom';
import { ApolloClient, ApolloProvider, InMemoryCache } from '@apollo/client';
import './index.css';
import App from './App';

const client = new ApolloClient({
  uri: 'https://spacexdata.herokuapp.com/graphql',
  cache: new InMemoryCache(),
});

ReactDOM.render(
  <ApolloProvider client={client}>
  <App />
  </ApolloProvider>,
  document.getElementById('root'),
);
We now have everything in place we need to execute GraphQL queries through Apollo.
Inside the src/components/LaunchList/index.tsx, we will create a function component that uses the generated useLaunchListQuery hook. The query hooks return data, loading, and error values. We will check for loading and an error in the container component and pass the data to our presentational component.
We will keep the separation of concerns by using this component as a container/smart component, and we will pass the data to a presentation/dumb component that simply displays what it has been given. We will also show basic loading and error states while we wait for the data.
Your container component should look like the following:
import * as React from 'react';
import { useLaunchListQuery } from '../../generated/graphql';
import LaunchList from './LaunchList';

const LaunchListContainer = () => {
  const { data, error, loading } = useLaunchListQuery();

  if (loading) {
    return <div>Loading...</div>;
  }

  if (error || !data) {
    return <div>ERROR</div>;
  }

  return <LaunchList data={data} />;
};

export default LaunchListContainer;
Our presentational component will use our typed data object to build the UI. We create an ordered list with <ol>, and we map through our launches to display the mission_name and launch_year.
Our src/components/LaunchList/LaunchList.tsx will look like this:
import * as React from 'react';
import { LaunchListQuery } from '../../generated/graphql';
import './styles.css';

interface Props {
  data: LaunchListQuery;
}

const className = 'LaunchList';

const LaunchList: React.FC<Props> = ({ data }) => (
  <div className={className}>
    <h3>Launches</h3>
    <ol className={`${className}__list`}>
      {!!data.launches &&
        data.launches.map(
          (launch, i) =>
            !!launch && (
              <li key={i} className={`${className}__item`}>
                {launch.mission_name} ({launch.launch_year})
              </li>
            ),
        )}
    </ol>
  </div>
);

export default LaunchList;
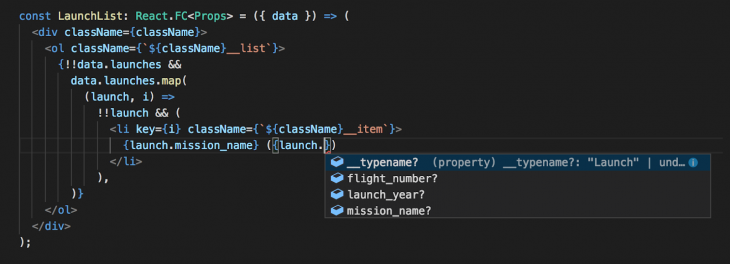
If you are using VS Code, the IntelliSense will show you exactly the values available and provide an autocomplete list since we are using TypeScript. It will also warn us if the data we are using can be null or undefined.

Seriously, how amazing is that? Our editor will code for us. Also, if you need the definition of a type or function, you can Cmd + t, hover it with the mouse, and it will give you all the details.
We will also add some CSS styling, which will display our items and allow them to scroll when the list overflows. Inside src/components/LaunchList/styles.css, add the following code:
.LaunchList {
  height: 100vh;
  overflow: hidden auto;
  background-color: #ececec;
  width: 300px;
  padding-left: 20px;
  padding-right: 20px;
}

.LaunchList__list {
  list-style: none;
  margin: 0;
  padding: 0;
}

.LaunchList__item {
  padding-top: 20px;
  padding-bottom: 20px;
  border-top: 1px solid #919191;
  cursor: pointer;
}
Now we’ll build our profile component to display more details about the launch. The index.tsx file for this component is mostly the same, except we’re using the Profile query and components. We also pass a variable to our React hook for the id of the launch. For now, we’ll hardcode it to '42' and then add dynamic functionality once we have our app laid out.
Inside src/components/LaunchProfile/index.tsx, add the following code:
import * as React from 'react';
import { useLaunchProfileQuery } from '../../generated/graphql';
import LaunchProfile from './LaunchProfile';

const LaunchProfileContainer = () => {
  const { data, error, loading } = useLaunchProfileQuery({ variables: { id: '42' } });

  if (loading) {
    return <div>Loading...</div>;
  }

  if (error) {
    return <div>ERROR</div>;
  }

  if (!data) {
    return <div>Select a flight from the panel</div>;
  }

  return <LaunchProfile data={data} />;
};

export default LaunchProfileContainer;
We now need to create our presentation component. It will display the launch name and details at the top of the UI and then have a grid of launch images below the description.
The src/components/LaunchProfile/LaunchProfile.tsx component will look like the following:
import * as React from 'react';
import { LaunchProfileQuery } from '../../generated/graphql';
import './styles.css';

interface Props {
  data: LaunchProfileQuery;
}

const className = 'LaunchProfile';

const LaunchProfile: React.FC<Props> = ({ data }) => {
  if (!data.launch) {
    return <div>No launch available</div>;
  }

  return (
    <div className={className}>
      <div className={`${className}__status`}>
        <span>Flight {data.launch.flight_number}: </span>
        {data.launch.launch_success ? (
          <span className={`${className}__success`}>Success</span>
        ) : (
          <span className={`${className}__failed`}>Failed</span>
        )}
      </div>
      <h1 className={`${className}__title`}>
        {data.launch.mission_name}
        {data.launch.rocket &&
          ` (${data.launch.rocket.rocket_name} | ${data.launch.rocket.rocket_type})`}
      </h1>
      <p className={`${className}__description`}>{data.launch.details}</p>
      {!!data.launch.links && !!data.launch.links.flickr_images && (
        <div className={`${className}__image-list`}>
          {data.launch.links.flickr_images.map((image, i) =>
            image ? (
              <img
                src={image}
                className={`${className}__image`}
                key={image}
                alt={`${data.launch?.mission_name} ${i}`}
              />
            ) : null,
          )}
        </div>
      )}
    </div>
  );
};

export default LaunchProfile;
The final step is to style up this component with CSS. Add the following to your src/components/LaunchProfile/styles.css file:
.LaunchProfile {
  height: 100vh;
  max-height: 100%;
  width: calc(100vw - 300px);
  overflow: hidden auto;
  padding-left: 20px;
  padding-right: 20px;
}

.LaunchProfile__status {
  margin-top: 40px;
}

.LaunchProfile__title {
  margin-top: 0;
  margin-bottom: 4px;
}

.LaunchProfile__success {
  color: #2cb84b;
}

.LaunchProfile__failed {
  color: #ff695e;
}

.LaunchProfile__image-list {
  display: grid;
  grid-gap: 20px;
  grid-template-columns: repeat(2, 1fr);
  margin-top: 40px;
  padding-bottom: 100px;
}

.LaunchProfile__image {
  width: 100%;
}
Now that we have completed a static version of our components, we can view them in the UI. We’ll include our components in the src/App.tsx file and also convert <App /> to a function component. We use a function component to make it simpler and allow us to use hooks when we add the click functionality.
import * as React from 'react';
import LaunchList from './components/LaunchList';
import LaunchProfile from './components/LaunchProfile';

import './App.css';

const App = () => {
  return (
    <div className="App">
      <LaunchList />
      <LaunchProfile />
    </div>
  );
};

export default App;
To get the styling we want, we will change src/App.css to the following:
.App {
  display: flex;
  width: 100vw;
  height: 100vh;
  overflow: hidden;
}
Execute yarn start in your terminal, navigate to http://localhost:3000 in your browser, and you should see a basic version of your app!
Now we need to add functionality to fetch the full launch data when a user clicks on an item in the panel. We will create a hook in the App component to track the flight ID and pass it to the LaunchProfile component to refetch the launch data.
In our src/App.tsx, we will add useState to maintain and update the state of the ID. We will also use useCallback named handleIdChange as a click handler to update the ID when a user selects one from the list. We pass the id to LaunchProfile, and we pass handleIdChange to the <LaunchList />.
Your updated <App /> component should now look like the following:
const App = () => {
  const [id, setId] = React.useState(42);
  const handleIdChange = React.useCallback(newId => {
    setId(newId);
  }, []);

  return (
    <div className="App">
      <LaunchList handleIdChange={handleIdChange} />
      <LaunchProfile id={id} />
    </div>
  );
};
Inside the LaunchList.tsx component, we need to create a type for handleIdChange and add it to our props destructuring. Then, on our <li> flight item, we will execute the function in the onClick callback.
export interface OwnProps {
  handleIdChange: (newId: number) => void;
}

interface Props extends OwnProps {
  data: LaunchListQuery;
}

// ...
const LaunchList: React.FC<Props> = ({ data, handleIdChange }) => (

// ...
<li
  key={i}
  className={`${className}__item`}
  onClick={() => handleIdChange(launch.flight_number!)}
>
Inside LaunchList/index.tsx, be sure to import the OwnProps declaration from LaunchList/LaunchList.tsx to type the props being passed to the container component, and then spread the props into the <LaunchList data={data} {...props} />.
The final step is to refetch the data when the id changes. Inside the Launch/Profile/index.tsx file, we will use the useEffect, which manages the React lifecycle, and trigger a fetch when the id changes. The following are the only changes required to implement the fetch:
interface OwnProps {
  id: number;
}

const LaunchProfileContainer: React.FC<OwnProps> = ({ id }) => {
  const { data, error, loading, refetch } = useLaunchProfileQuery({
    variables: { id: String(id) },
  });
  React.useEffect(() => {
    refetch({ id: String(id) });
  }, [refetch, id]);
Since we have separated the presentation from the data, we don’t need to make any updates to our <LaunchProfile /> component; we only need to update the index.tsx file so that it refetches the full launch data when the selected flight_number changes.
Now you have it! If you followed the steps, you should have a fully functioning GraphQL app. If you got lost anywhere, you can find a working solution in the source code.
Once the app is configured, we can see that development speed is incredibly fast. We can build a data-driven UI with ease. GraphQL allows us to define the data that we need in components, and we can seamlessly use it as props within our components. The generated TypeScript definitions give extremely high confidence in the code we write.
If you are looking to dive deeper into the project, the next steps would be to add pagination and more data connectivity using additional fields from the API. To paginate the launch list, you would take the length of your current list and pass the offset variable to the LaunchList query.
I encourage you to explore it deeper and write your own queries so that you can solidify the concepts presented.
If you found this article helpful, follow me on Medium for more articles on React, Node.js, and JavaScript! You can also find me on Twitter.

LogRocket lets you replay user sessions, eliminating guesswork by showing exactly what users experienced. It captures console logs, errors, network requests, and pixel-perfect DOM recordings — compatible with all frameworks, and with plugins to log additional context from Redux, Vuex, and @ngrx/store.
With Galileo AI, you can instantly identify and explain user struggles with automated monitoring of your entire product experience.
Modernize how you understand your web and mobile apps — start monitoring for free.
Install LogRocket via npm or script tag. LogRocket.init() must be called client-side, not
server-side
$ npm i --save logrocket

// Code:

import LogRocket from 'logrocket';
LogRocket.init('app/id');
// Add to your HTML:

<script src="https://cdn.lr-ingest.com/LogRocket.min.js"></script>
<script>window.LogRocket && window.LogRocket.init('app/id');</script>

Broken npm packages often fail due to small packaging mistakes. This guide shows how to use Publint to validate exports, entry points, and module formats before publishing.

Discover what’s new in The Replay, LogRocket’s newsletter for dev and engineering leaders, in the February 11th issue.

Cut React LCP from 28s to ~1s with a four-phase framework covering bundle analysis, React optimizations, SSR, and asset/image tuning.

Rich Harris (creator of Svelte) joined PodRocket this week to unpack his Performance Now talk, Fine Grained Everything.
Would you be interested in joining LogRocket's developer community?
Join LogRocket’s Content Advisory Board. You’ll help inform the type of content we create and get access to exclusive meetups, social accreditation, and swag.
Sign up now
3 Replies to "Build a GraphQL + React app with TypeScript"
Hi – thanks for the article, very informative.
I noticed a couple of minor points:
1. At the step “The final step is to refetch the data when the id changes. Inside the LaunchList/index.tsx file…” this should refer to LaunchProfile/index.tsx.
2. When running the final code, I get:
“`
./src/components/LaunchProfile/index.tsx
Line 16: React Hook React.useEffect has a missing dependency: ‘refetch’. Either include it or remove the dependency array react-hooks/exhaustive-deps
“`
This can be fixed by adding `refetch` to the dependency list.
3. The following step is fairly obvious, but maybe worth showing the actual code changes since all the other steps do this? “Inside LaunchList/index.tsx, be sure to import the OwnProps declaration to type the props being passed to the container component, and then spread the props into the .”
Thanks again!
The only working sample with Typescript I found! Thanks
Awsome tutorial! I think with the new version of react apollo, we need to update the article accordingly!
There are 2 small issues that I found:
– After running `$(npm bin)/graphql-codegen init`, it will complain about `@graphql-codegen/typescript-react-apollo` not found. We need to manually update it from `1.17.8` to `2.0.6`
– We should use `@apollo/client` and `@apollo/react-hooks` instead of `apollo-boost`, `react-apollo`, `react-apollo-hooks`. Then it would be come
“`js
import React from ‘react’;
import ReactDOM from ‘react-dom’;
import { ApolloClient, ApolloProvider, InMemoryCache, NormalizedCacheObject } from ‘@apollo/client’;
import { ApolloProvider as ApolloHooksProvider } from ‘@apollo/react-hooks’;
import ‘./index.css’;
import App from ‘./App’;
const client = new ApolloClient({
uri: ‘https://spacexdata.herokuapp.com/graphql’,
cache: new InMemoryCache()
});
ReactDOM.render(
,
document.getElementById(‘root’),
);
“`