globalPropertiesEditor’s note: This guide to accessing properties globally in Vue.js with globalProperties was last updated on 26 April 2023 to reflect new changes to Vue 3 and add sections further exploring prototypes in Vue.

Vue.js is a widely used JavaScript framework that enables developers to create single-page applications and build UIs. Its flexibility is a notable advantage, allowing developers to customize the framework with additional functionality. As a part of that flexibility, it provides an easy way to access properties and methods globally throughout the entire application using prototypes which has become app.config.globalProperties in Vue 3.
This article will introduce you to using app.config.globalProperties in Vue.js to add custom properties and methods to the Vue instance and how they can be accessed from any component within the application instead of using multiple imports in your workflow.
Jump ahead
This post is suited for developers of all stages, including beginners. However, there are a few things you should already have before going through this tutorial. Make sure you have an up-to-date version of Node.js installed. You can verify whether you do by running the command below in your terminal/command prompt:
node -v
v18.16.0 # Current LTS at the time of writing
You will need a code editor — I highly recommend VS Code. You will also need Vue installed on your machine. To install Vue, run the following command:
npm init vue@latest
This command will install and execute create-vue, the official Vue project scaffolding tool. You will be presented with prompts for several optional features:
✔ Project name: … <your-project-name>
✔ Add TypeScript? … No / Yes
✔ Add JSX Support? … No / Yes
✔ Add Vue Router for Single Page Application development? … No / Yes
✔ Add Pinia for state management? … No / Yes
✔ Add Vitest for Unit testing? … No / Yes
✔ Add Cypress for both Unit and End-to-End testing? … No / Yes
✔ Add ESLint for code quality? … No / Yes
✔ Add Prettier for code formatting? … No / Yes

Scaffolding project in ./<your-project-name>...
Done.
If you are unsure about an option, simply choose No by hitting enter for now. Once the project is created, follow the instructions to install dependencies and start the dev server:
cd <your-project-name>
npm install
npm run dev
You should now have your first Vue project running.
In Vue, a prototype is an object that contains properties and methods that can be added to the Vue instance or component, allowing them to be accessed throughout the application. Prototypes are added to the Vue constructor function and can be accessed using the Vue.prototype object. When a new Vue instance is created, it inherits all the properties and methods defined in the prototype object. However, in more recent Vue 3 applications, the Vue.prototype property has been replaced with app.config.globalProperties.
While working in your Vue project, the fastest way to access a new component in another one or a nested one is to import the needed component or resource. However, this can quickly become inefficient since you will have to repeat import statements and even register components for each import (if they are components). Luckily, Vue provides a more efficient way to handle this for cases where you have globally defined a data object or an incoming HTTP request. This app.config.globalProperties from Vue 3’s application API, replacing Vue 2’s Vue.prototype.
To create a global property in your Vue application and access it through a property statement instead of an import statement, Vue provides an application API — app.config.globalProperties. This way, you define the global property or data object, telling Vue to remember it as one, and then access from any component instance in your Vue application.
As a global property, it’s advised to use this object as little as possible in your projects. However, if a global property is defined and it conflicts with a component’s own property, the components property will take higher priority. The definition of a global property in your Vue application will look like this:
app.config.globalProperties.blogName = ‘LogRocket’
Here, blogName is the property or data name, and the LogRocket string is the value. With this definition, Vue.js gets this property (the blogName, in our case) available to every Vue instance in the entire project, even before the instance is created.
To follow through with this section, you must have read this post from the start and installed a Vue 3 project. To illustrate the syntax example in the section above, open up your ./src/main.js file and add a global property so the whole file looks like this:
import { createApp } from "vue";
import App from "./App.vue";
import "./assets/main.css";

const app = createApp(App);

// define global properties
app.config.globalProperties.blogName = "Logrocket";

app.mount("#app");
Now that you have defined a property, open ./src/App.vue and copy in the code block below:
<!-- ./src/App.vue -->
<script>
export default {
  data() {
    return {
      msg: this.blogName,
    };
  },
  beforeCreate() {
    console.log(this.blogName);
  },
};
</script>
<template>
  <header>
    <img
      alt="Vue logo"
      class="logo"
      src="./assets/logo.svg"
      width="125"
      height="125"
    />
    <div class="wrapper">
      <h1>Welcome to {{ msg }}</h1>
    </div>
  </header>
</template>
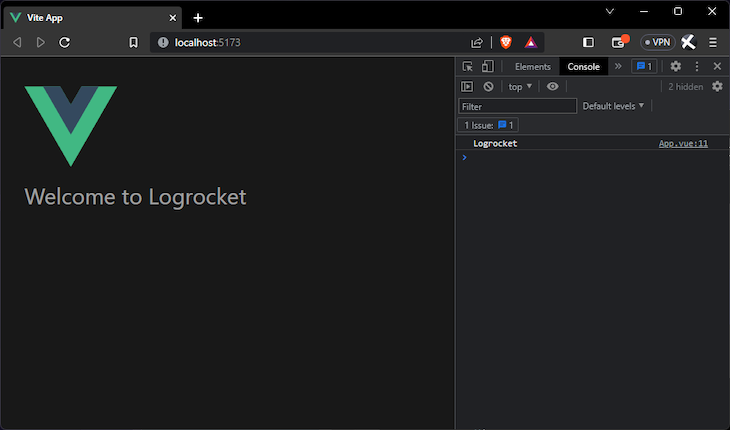
Here, you can see that the beforeCreate lifecycle hook method was used to validate the instantiation claims about the global properties. If you run the application in your dev server with npm run dev, you will see the saved name "LogRocket" displayed in your browser console and rendered in the template. Here’s what that looks like:
A lot of data values, properties, and utilities like HTTP resources can be made global properties with Vue app.config.globalProperties. In this section, I will introduce a few of them.
Vue.js allows you to add methods as global properties. With that, every instance in which the global property is used gets access to the logic set up in the property definition. This includes access to using this to access data, computed properties, and even other methods inside any Vue instance in the project. A quick example is using a string reversal function. In your ./src/main.js file, add the new global property under the old one:
// ./src/main.js
// ...
app.config.globalProperties.reverseString = function (value) {
  this[value] = this[value].split("").reverse().join("");
};
// ...
Then, copy the code block below into your ./src/App.vue file:
<!-- ./src/App.vue -->
<script>
export default {
  data() {
    return {
      msg: this.blogName,
    };
  },
  beforeCreate() {
    console.log(this.blogName);
  },
  created() {
    console.log(this.msg);
    this.reverseString("msg");
    console.log(this.msg);
  },
};
</script>
<template>
  <header>
    <img
      alt="Vue logo"
      class="logo"
      src="./assets/logo.svg"
      width="125"
      height="125"
    />
    <div class="wrapper">
      <h1>Welcome to {{ msg }}</h1>
    </div>
  </header>
</template>
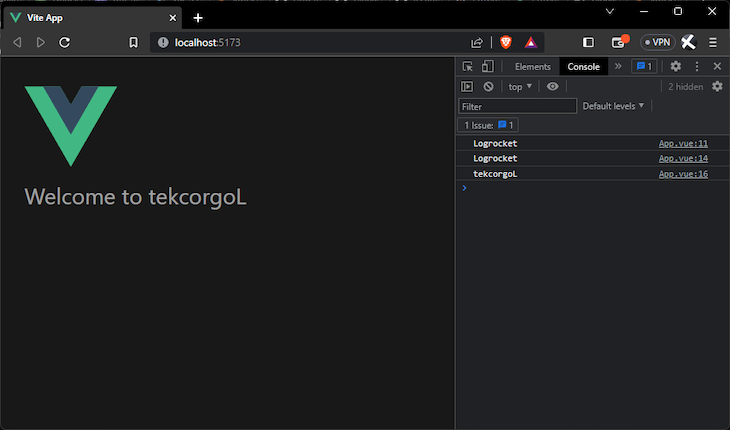
Here, the created lifecycle hook was used for logging the reverseString function, and if you run your application in the dev server, you will see that "LogRocket" is printed in reverse:
If your application has communications with a third-party API, you will normally have to import Axios on each component you want to make a get request from. In the terminal, stop the server and install Axios with the npm install axios command. Now, head to your app.vue file where you want to make a get request and copy this code block inside:
<!-- ./src/App.vue -->
<script>
import axios from "axios";
export default {
  data() {
    return {
      msg: this.blogName,
      users: [],
    };
  },
  beforeCreate() {
    console.log(this.blogName);
  },
  created() {
    axios.get("https://jsonplaceholder.typicode.com/users").then((res) => {
      this.users = res.data;
    });
  },
};
</script>
<template>
  <header>
    <img
      alt="Vue logo"
      class="logo"
      src="./assets/logo.svg"
      width="125"
      height="125"
    />
    <div class="wrapper">
      <h1>Welcome to {{ msg }}</h1>
    </div>
  </header>
  <main>
    <ul>
      <li v-for="user in users" :key="user.id">
        <p>{{ user.name }}</p>
      </li>
    </ul>
  </main>
</template>
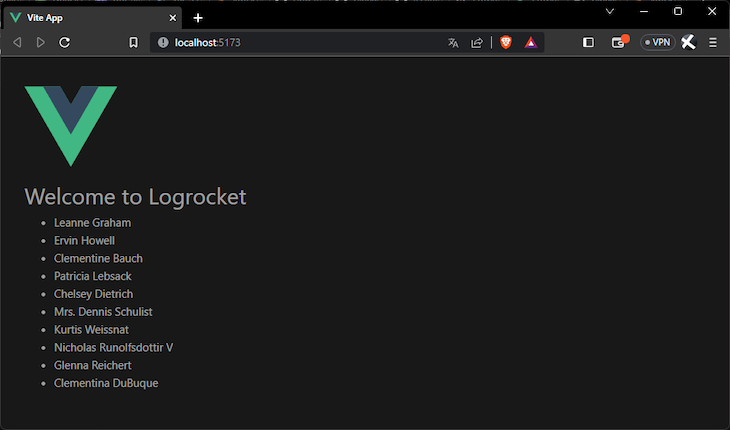
With this, we have something like this:

You will notice that for every component from which you want to make a get request, you will have to repeat this import statement. To solve this, Vue lets you use the globalProperties feature to import one time in any Vue instance in your project. Now, open your main.js file and copy the code block below inside it:
// ./src/main.js
import { createApp } from "vue";
import App from "./App.vue";
import "./assets/main.css";
import axios from "axios";
const app = createApp(App);
// define global properties
app.config.globalProperties.blogName = "Logrocket";
app.config.globalProperties.reverseString = function (value) {
  this[value] = this[value].split("").reverse().join("");
};
app.config.globalProperties.axios = axios;
app.mount("#app");
In your app.vue file, delete the import statement and use the $axios alias you already created, like this:
<!-- ./src/App.vue -->
<script>
export default {
  data() {
    return {
      msg: this.blogName,
      users: [],
    };
  },
  beforeCreate() {
    console.log(this.blogName);
  },
  created() {
    this.axios.get("https://jsonplaceholder.typicode.com/users").then((res) => {
      this.users = res.data;
    });
  },
};
</script>
<template>
  <header>
    <img
      alt="Vue logo"
      class="logo"
      src="./assets/logo.svg"
      width="125"
      height="125"
    />
    <div class="wrapper">
      <h1>Welcome to {{ msg }}</h1>
    </div>
  </header>
  <main>
    <ul>
      <li v-for="user in users" :key="user.id">
        <p>{{ user.name }}</p>
      </li>
    </ul>
  </main>
</template>
And, it still works:
You can find the complete code for this tutorial here on GitHub.
You have now been introduced to the concept of using the app.config.globalProperties application API in Vue to make properties globally available to all Vue instances in your project. You were also shown the advantages of using globalProperties, including, but not limited to, a more efficient workflow. Happy hacking!
Debugging Vue.js applications can be difficult, especially when users experience issues that are difficult to reproduce. If you’re interested in monitoring and tracking Vue mutations and actions for all of your users in production, try LogRocket.

LogRocket lets you replay user sessions, eliminating guesswork by showing exactly what users experienced. It captures console logs, errors, network requests, and pixel-perfect DOM recordings — compatible with all frameworks.
With Galileo AI, you can instantly identify and explain user struggles with automated monitoring of your entire product experience.
Modernize how you debug your Vue apps — start monitoring for free.

Debug RSC hydration mismatches in production with Next.js instrumentation, Suspense isolation, HTML diffing, and CI smoke tests.

Explore why npm dependencies are a major supply chain security risk and how to protect JavaScript apps from compromised packages and transitive threats.

Enabled React Compiler v1.0 on a production Next.js app. Here’s every warning, breakage, and silent opt-out I documented — and what actually worked.

We built the same app in TanStack Start RSC and Next.js RSC. TanStack shipped 40% less JS and built 4x faster — but Next.js is still the safer production bet.
Would you be interested in joining LogRocket's developer community?
Join LogRocket’s Content Advisory Board. You’ll help inform the type of content we create and get access to exclusive meetups, social accreditation, and swag.
Sign up now
