Editor’s note: This article was last updated 19 April 2023 to reflect changes made in Vue 3’s Composition API.

Vue is a progressive JavaScript framework created by Evan You and the Vue core team. It includes contributions from over 370 open source community lovers, is used by more than 870,000 people, and has over 37k stars on GitHub at the time of writing.
Vue offers an approachable core library that focuses only on the view layer of the MVC model. Vue benefits from an ecosystem of supporting libraries that can help you tackle complexity in large single-page applications.
In this article, we’ll explore the available hooks for use in your Vue workflow and introduce the whole lifecycle of a Vue application from creation to destruction. Let’s get started!
Jump ahead:
setup() hookThis article is suitable for all stages of Vue developers, including beginners. To follow along, you’ll need Node.js ≥v10.x installed on your machine. You can verify if you have it installed by running the following command in your terminal or the command prompt:
node -v
You’ll also need to install npm ≥v6.7, a code editor (I highly recommend Visual Studio Code), Vue 3, and the Vue CLI 3.0. First, uninstall the old Vue CLI version:
npm uninstall -g vue-cli
Then, install the new one with the code below:
npm install -g @vue/cli
Download the starter project, unzip the downloaded project, and navigate into the unzipped file. To keep all the dependencies up-to-date, run the command below:
npm install
Next, start the dev server as follows:
npm run dev
To start a new Vue application, create a new application instance with the createApp function. Every app requires a root component that will contain other components as its children.
The root component is passed as an object in the createApp function. Whenever you create a new Vue project, the application instance is activated by default in the main.js file with the following code:
createApp(App).mount('#app')
Signifying an application instance that contains the app component, this syntax is a bit different with variants like single-file applications.
Every application instance goes through a series of initialization steps: when it is created, setting up data observation, compiling the template, mounting the instance to the DOM, and finally, updating the DOM during data changes.
This process is known as the lifecycle of an application instance. As an application instance goes through this process of creating and updating the DOM, some functions are run inside of it by default. Vue components are created and exist inside of these functions, which are known as lifecycle hooks.
The Composition API is a feature introduced in Vue 3 that provides a better way to organize and reuse logic in Vue components by grouping related functionality together in composition functions. The Vue Composition API allows developers to encapsulate complex logic and separate concerns in a more modular and testable way, making it easier to maintain and scale their codebases.
Vue 3 was designed to be compatible with previous versions, so both Vue 2 and Vue 3 can use similar lifecycle hooks. However, if you choose to use the Composition API, which is useful for bigger Vue projects, we access these hooks in a slightly different way.
One unique feature of the Composition API is that we have to import lifecycle hooks into our project before we can use them:
import { onBeforeMount } from 'vue';
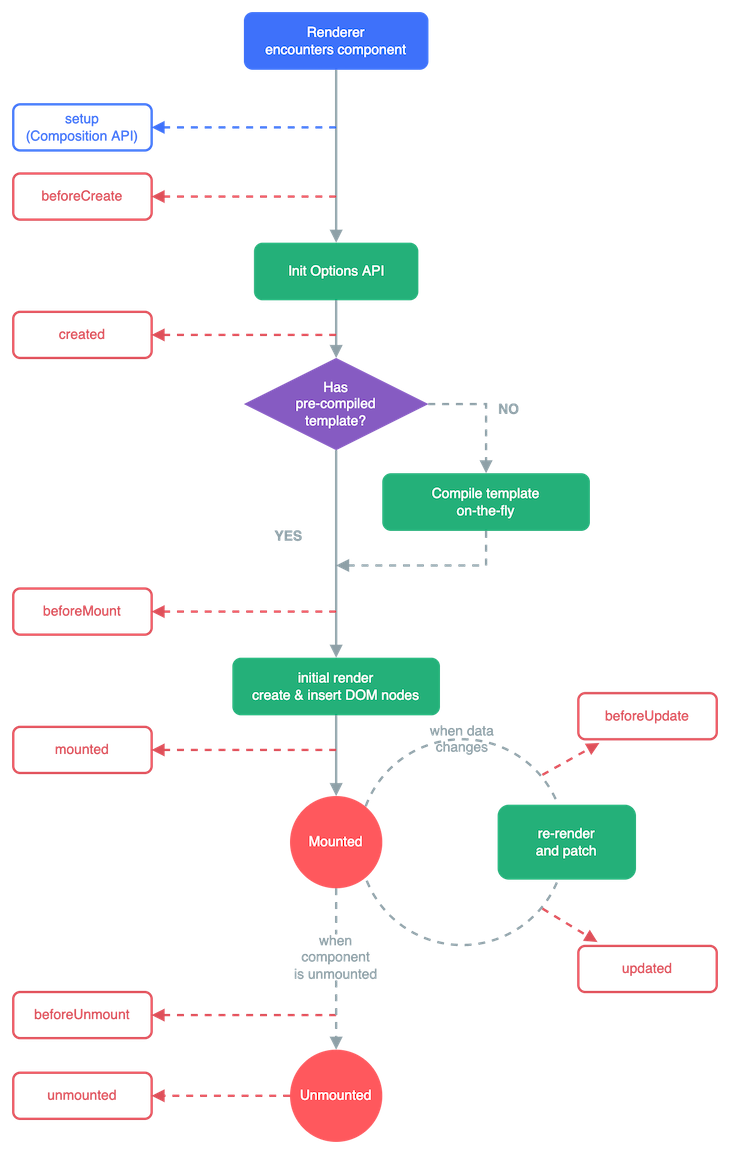
In this article, we’ll classify the various types of lifecycle methods according to their functionality: creation, mounting, updating, and destruction hooks. We’ll introduce each hook and discuss what actions are permissible at each stage with sample illustrations. If you’ve followed this article from the beginning, you should already have a Vue starter application up and running.
We’ll use the test component, which is located in the components folder inside of the src folder. It should look something like the following:
// src/components/Test.vue

<template>
  <div class="greetings">
    <h1 class="green">{{ msg }}</h1>
  </div>
</template>
<script>
export default{
  props:{
  msg: {
    type: String,
    required: true
  }
}
}
</script>
We’ll use the script section alone for the various hook illustrations.
setup() hookCalled immediately after the application instance has been initialized, the setup() hook is the very first lifecycle hook that gets called in Vue.
With the introduction of the Composition API, both the beforeCreate and created hooks, which were used in the Options API, are now replaced with the setup() hook. The setup() hook is useful for tasks that need to be done once the component is fully set up, like fetching data from an API or setting up event listeners:
setup(){
  alert("The creation hook has been initialized")
}
The code above will output the interface below:
Notice that the alert statement is executed before the component is loaded.
This function is called before the Vue engine creates the app component. Also, in the setup() hook, you have access to pass data from the parent component down to the child component, as shown in the example below:
<template>
  <div class="greetings">
    <h1 class="green">{{output}}</h1>
  </div>
</template>
<script>
export default{
  props:{
  msg: {
    type: String,
    required: true
  }
},
setup(props){
  const output = `${props.msg} - Creation hook`
  return{output};
}
}
</script>
Developers often use mounting hooks to handle component mounting and rendering. These hooks provide access to modify the component before and after the initial render, but they don’t run during server-side rendering.
onbeforeMount()After the setup() hook is run, the onbeforeMount() lifecycle hook is called. In this moment, immediately before the instance is mounted on the DOM, the template and the scoped styles are all compiled. But, you still can’t manipulate the DOM because the element property isn’t available.
Here, you should store initializations that you don’t want lying around in your component:
  onBeforeMount(() => {
    alert('onBeforeMount has been called')
  })
onMounted()After the onbeforeMount Hook is called and right after the instance has been mounted, the onMounted() lifecycle hook is called. The app component, or any other component in the project, becomes functional. The data is fit into the template, and the DOM element is replaced by the element with the data, so it can now be manipulated. The element property is now available for us:
onMounted( () => {
   alert('OnMounted has been called');
})
The onMounted() Hook is the default location where any project created with the Vue CLI will be. The mounting is already done in the main.js file, like we saw in the beginning. Because the instance is already mounted by default for you, you may not get to use the other hooks.
Updating hooks are triggered whenever reactive data is modified, leading to a DOM update.
onBeforeUpdate()After the mounting hooks, onBeforeUpdate() is called whenever there is a change made to the data that requires updating the DOM. This stage is great for any logic before data changes, like removing an event listener:
const hello = ref('welcome to Vue JS');
onBeforeUpdate(() => {
  alert('onBeforeUpdate has been called');
})
onMounted ( () =>{
  hello.value = 'lalalalallalalalalaalal';
})
onUpdated()The onUpdated() lifecycle hook is called just after a DOM update has occurred, meaning immediately after the onbeforeUpdate hook is called.
You can perform DOM related operations here, however, it is not advisable to change the state inside of the hook because Vue already provides a platform specifically for that:
  onUpdated(() => {
    alert('onUpdated has been called')
  })
We can use destruction hooks to perform actions when a component is destroyed, like data cleanup or handling analytics. In Vue, destruction hooks are executed on the client side and can be used to clean up loose ends in your component.
onBeforeUnmount()The onBeforeUnmount Hook is called right before a component instance is to be unmounted. In this stage, you can remove event listeners, delete variables, and clean up the components before it finally unmounts:
  onBeforeUnmount(() => {
      console.log('OnBeforeUnmount has been called')
    })
onUnmounted()The onUnmounted Hook is called when a component is considered unmounted. This occurs after all of its child components have been unmounted and all associated reactive effects have been stopped, including render effects and computed watchers created during setup():
  onUnmounted(() => {
      console.log('OnUnmounted has been called');
  });
In this article, we introduced the various lifecycle hooks in Vue, discussing when and how we should use them. Now, you know how to add custom logic at different stages of your application’s lifecycle instance, controlling the flow from creation to destruction. Hopefully, this will deepen your understanding of the everyday features you use in Vue. Happy coding!
Debugging Vue.js applications can be difficult, especially when users experience issues that are difficult to reproduce. If you’re interested in monitoring and tracking Vue mutations and actions for all of your users in production, try LogRocket.

LogRocket lets you replay user sessions, eliminating guesswork by showing exactly what users experienced. It captures console logs, errors, network requests, and pixel-perfect DOM recordings — compatible with all frameworks.
With Galileo AI, you can instantly identify and explain user struggles with automated monitoring of your entire product experience.
Modernize how you debug your Vue apps — start monitoring for free.

Learn how to protect full-stack projects from NPM supply chain attacks with a practical security checklist.

Explore 15 essential MCP servers for web developers to enhance AI workflows with tools, data, and automation.

Learn how contrast-color() automatically picks accessible text colors using native CSS, without JavaScript.

Learn how to build a harness-style AI workflow using Claude Code with specialized Dev, QE, and Ops subagents, gated handoffs, MCP telemetry, and LEARNING.md.
Hey there, want to help make our blog better?
Join LogRocket’s Content Advisory Board. You’ll help inform the type of content we create and get access to exclusive meetups, social accreditation, and swag.
Sign up now

