Testing is probably the most essential part of writing code. Tests provide a safety net for catching bugs and regressions before your users catch them. Thye also give developers the confidence to push changes to production without any major issues. For backend applications, we can write unit tests using JUnit if using Java or Jest if using Node.js to give developers the confidence that the product is ready to be pushed to production. For mobile applications, we can write visual regression tests to check if there is a misalignment in the UI.
In this post, we will take a look at writing visual regression tests for React Native applications using React Native Owl.
Jump ahead:
The Replay is a weekly newsletter for dev and engineering leaders.
Delivered once a week, it's your curated guide to the most important conversations around frontend dev, emerging AI tools, and the state of modern software.
Before we get started with React Native Owl, we need to set up a new React Native project. To bootstrap a new project, run the following code:
npx [email protected] init rnOwlRegression --version 0.69.0
This will create a new project named rnOwlRegression in the folder where this command is run. The important thing to note is we use the --version flag to specify which version of React Native to install. This is because, at the time of writing, React Native Owl doesn’t support v0.70.X+. To run the project, run the following commands:
npm run android // for running the android app
npm run ios // for running the ios app
Our basic setup is ready. Now, let’s install some necessary packages to help us build the app quickly. Run the following commands to install React Native Paper, React Native Masonry List, and React Navigation:
npm i react-native-paper react-native-masonry-list @react-navigation/native
We will use the following:
There are a few more steps that we need to do to set up the navigation properly. The complete steps are listed here.
According to the React Native Owl GitHub, React Native Owl is a visual regression testing library for React Native that enables developers to introduce visual regression tests to their apps. To install React Native Owl, run the following command:
npm install --save-dev react-native-owl
You can use the --save-dev flag because it is a dev dependency and doesn’t need to be shipped with the app. The above command will install React Native Owl in your project. The next step is to create a config file for React Native Owl. So, create an owl.config.json at the root level of the project. Below is a sample config file:
{
  "ios": {
    "workspace": "ios/rnOwlRegression.xcworkspace",
    "scheme": "rnOwlRegression",
    "configuration": "Release",
    "device": "iPhone 13",
  },
  "android": {
    "packageName": "com.rnowlregression"
  }
  "report": true
}
You can refer to this page for more information about all the available config options. Now, we’re ready to write visual regression tests. But first, let’s quickly build the UI for the app.
Functionally, our app is pretty simple. The home screen has a button called Open Gallery. On clicking this button, the app will navigate to Gallery Screen, where photos will be loaded from the Pexels API.
This is what our App.js looks like:
/*App.js*/
import React from 'react';
import {Provider as PaperProvider} from 'react-native-paper';
import {NavigationContainer} from '@react-navigation/native';
import {createNativeStackNavigator} from '@react-navigation/native-stack';
import {HomeScreen} from './screens/Home';
import {Gallery} from './screens/Gallery';
const Stack = createNativeStackNavigator();
function App() {
  return (
    <NavigationContainer>
      <PaperProvider>
        <Stack.Navigator>
          <Stack.Screen name="Home" component={HomeScreen} />
          <Stack.Screen name="Gallery" component={Gallery} />
        </Stack.Navigator>
      </PaperProvider>
    </NavigationContainer>
  );
}
export default App;
This is standard boilerplate code. Here we define two routes, Home and Gallery. The Home route mounts the HomeScreen component, and the Gallery route mounts the Gallery component. We are using the Stack navigator from react-navigation. Now, let’s write the HomeScreen component:
/* HomeScreen.js */
import React from 'react';
import {Button} from 'react-native-paper';
import {View, StyleSheet} from 'react-native';
export const HomeScreen = ({navigation}) => {
  const navigateToGallery = () => {
    navigation.navigate('Gallery');
  };
  return (
    <View style={styles.container}>
      <Button mode="contained" onPress={navigateToGallery} testID="openGallery">
        Open Gallery
      </Button>
    </View>
  );
};
const styles = StyleSheet.create({
  container: {
    flex: 1,
    flexDirection: 'column',
    justifyContent: 'center',
    alignItems: 'center',
  },
});
The HomeScreen has a button that, when clicked, navigates the user to the Gallery route. One important thing to note is the testID attribute is passed to the Button component. This is critical for writing tests. We will see why later in this post. And now, for the final piece, here’s the Gallery component:
import React, {useEffect, useState} from 'react';
import {API_KEY} from '@env';
import MasonryList from 'react-native-masonry-list';
import {Button} from 'react-native-paper';
import {StyleSheet, View} from 'react-native';
export const Gallery = () => {
  const [photos, setPhotos] = useState([]);
  useEffect(() => {
    const getPhotos = async () => {
      const res = await fetch('https://api.pexels.com/v1/curated', {
        method: 'GET',
        headers: {
          Authorization: API_KEY,
          'Content-Type': 'application/json',
        },
      });
      const {photos: photoSource} = await res.json();
      const photoUrls = photoSource.map(({src}) => {
        return {uri: src.medium};
      });
      setPhotos(photoUrls);
    };
    getPhotos();
  }, []);
  return (
    <View style={styles.container}>
        <MasonryList images={photos} />
    </View>
  );
};
const styles = StyleSheet.create({
  container: {
    flex: 1,
    flexDirection: 'column',
  },
});
This is definitely a chunkier component, but it is pretty straightforward. When the component loads, photos are loaded from the Pexels API and passed to the MasonryList component. Let’s write our first test!
First, create a __tests__ folder at the root of our project (if not already present). Then, create a Home.owl.js file inside it. This is where we will write visual tests. Let’s start with a very basic one:
/* Home.owl.js */
import { takeScreenshot } from 'react-native-owl';
jest.setTimeout(50000);
describe('Home.tsx', () => {
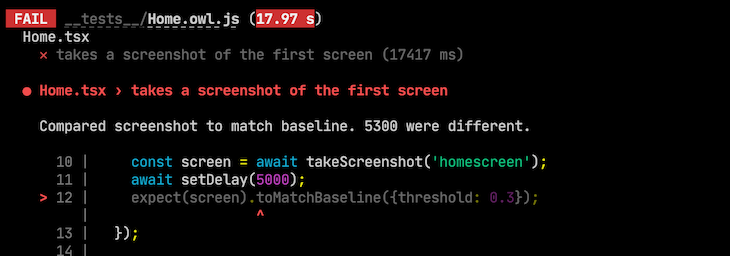
it('takes a screenshot of the first screen', async () => {
const screen = await takeScreenshot('homescreen');
expect(screen).toMatchBaseline();
});
In the test above, we load the HomeScreen and take a screenshot. We match it with the baseline; if it matches, the test passes. If it doesn’t match, it will fail. To run the test, we need to build the app. To do this, run the following command:
npx owl build --platform ios --config ./owl.config.json
This will generate a build that we can use to test the app. Once successfully generated, run the command below:
npx owl test --platform ios
This will automatically load the app we built in the previous step in the emulator and start the test.
Before running this command, make sure that the emulator is up and running.
If there are no preset baselines, it will create new baselines. These baselines are against which the app will be tested. To see the baselines, navigate to .owl/baseline/<ios | android> in the project folder. The .owl folder also contains the diff , latest, and report folders:
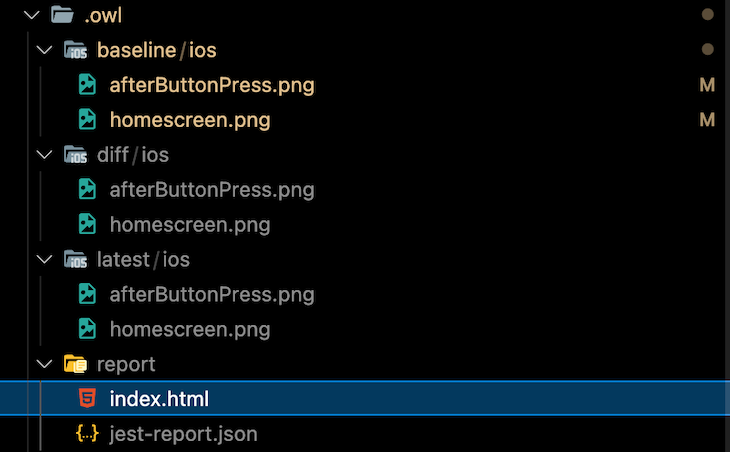
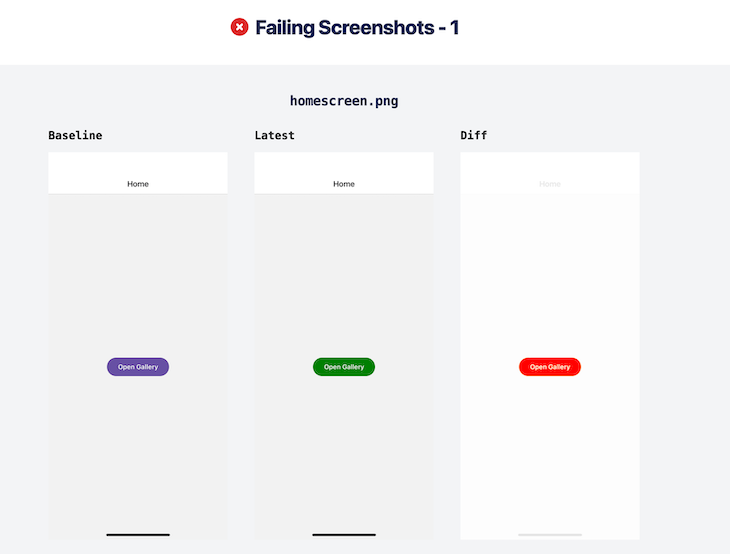
The latest folder will contain images of the latest test run. The diff folder will contain images of the difference between the latest and the baselines highlighted in red. The report folder will contain a nicely put HTML report.
This report shows the baseline, the latest, and the diff in one view. This helps to look at the visual regression easily. Now that we have the baselines, we can rerun the test:
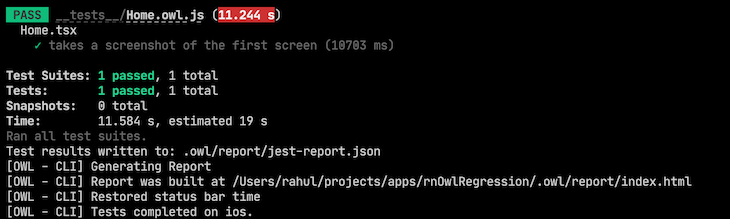
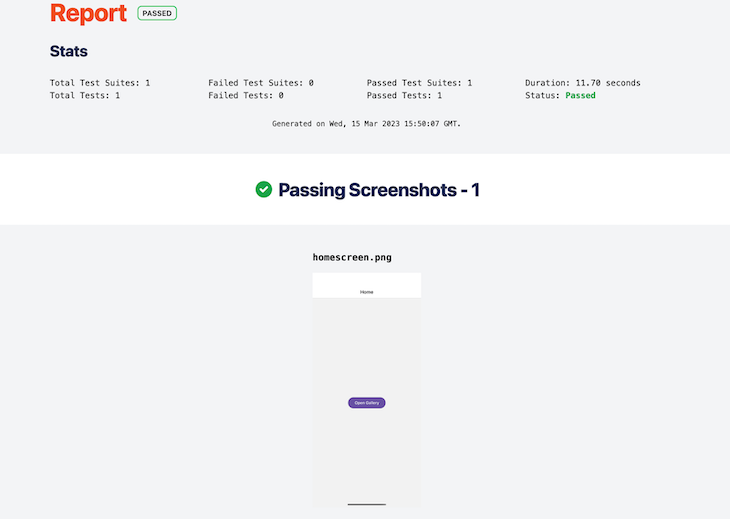
Voila! They’re all green. This is what the report looks like:
Now, let’s try to change the button’s color to green and see if the test fails. And, as expected, the test fails:
This is what the report looks like:
Gallery pageNow, let’s add one more test for the Gallery page:
import {press, takeScreenshot} from 'react-native-owl';

const setDelay = delay => new Promise(resolve => setTimeout(resolve, delay));

jest.setTimeout(50000);

describe('Home.tsx', () => {
  it('takes a screenshot of the first screen', async () => {
    const screen = await takeScreenshot('homescreen');
    expect(screen).toMatchBaseline();
  });

  it('presses a button, then takes a screenshot', async () => {
    await setDelay(5000);
    await press('openGallery');
    await setDelay(5000);
    const screen = await takeScreenshot('afterButtonPress');
    expect(screen).toMatchBaseline();
  });
});
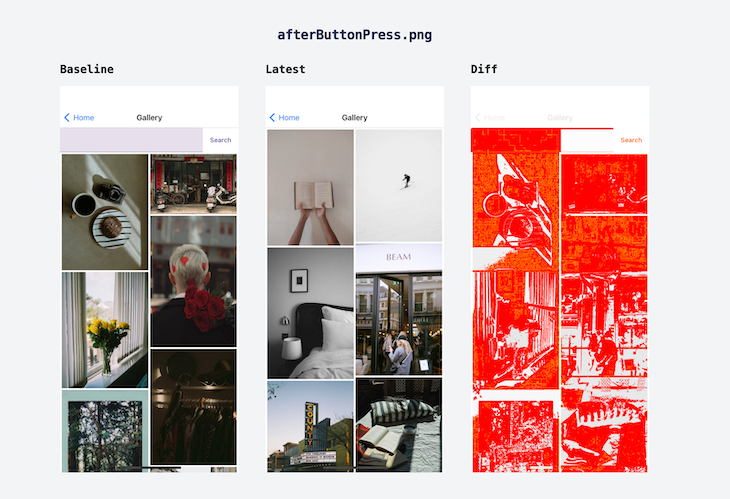
The new test presses the Open Gallery button and waits five seconds before taking a screenshot. Then, it matches it with the baseline. If it matches, the test passes; if it doesn’t, it fails. Here, you will see that we use the testID that we passed to the Button component for simulating a button click. We pass the testID to the press function that react-native-owl exposes.
It also provides APIs like changeText, longPress, scrollTo, and more to simulate various gestures. To learn more about that, visit the docs here. If we run the test again, it fails because a different set of photos is loaded from the API. Here’s what that looks like:
To update the baseline images, you can run the following command:
npx owl test --platform ios --update
This will run the app in the emulator and take new baseline images. That’s it! You are now ready to catch bugs before your users do.
So, to conclude, React Native Owl definitely looks promising. It is still in early development and is still a few features away from being my first recommendation. Here are a few things that I noticed while playing around with it:
If you have time shown in the app’s status bar, your test will fail. This is because the baseline time will differ from the test runtime. Because the baselines and the test screenshots need to match exactly, the tests will fail. This can be avoided by hiding the time in the status bar while running tests.
With React Native Owl, apps seldom serve static content. Say you have a banner that shows some dynamic content. Maybe a new offer, newly added content, etc. Because there may be new offers since the baseline was created, the test will fail.
You cannot pass a custom Jest config because the library uses its own Jest config. This can be fixed by allowing users to pass the Jest config in the owl.config.json file. This also has support for v0.70.X and up. That’s it! Thank you for reading. The code is available on my GitHub Repo.

LogRocket's Galileo AI watches sessions for you and and surfaces the technical and usability issues holding back your React Native apps.
LogRocket also helps you increase conversion rates and product usage by showing you exactly how users are interacting with your app. LogRocket's product analytics features surface the reasons why users don't complete a particular flow or don't adopt a new feature.
Start proactively monitoring your React Native apps — try LogRocket for free.

Learn how to build a full React Native auth system using Better Auth and Expo — with email/password login, Google OAuth, session persistence, and protected routes.

Compare the top AI development tools and models of June 2026. View updated rankings, feature breakdowns, and find the best fit for you.

Learn how Bloom filters reduce database lookups for username availability checks while preserving correctness at scale.

Learn how to test Nuxt apps with Vitest, @nuxt/test-utils, runtime mocks, server route mocks, and Playwright e2e tests.
Would you be interested in joining LogRocket's developer community?
Join LogRocket’s Content Advisory Board. You’ll help inform the type of content we create and get access to exclusive meetups, social accreditation, and swag.
Sign up now
