You can call JavaScript’s default print function on the window object to print it. While this is convenient for printing the entire document in a window, it lacks customizability. You can’t easily print one specific section, and often, the styles applied to the document get lost in the process.

This limitation prompts developers to explore alternative solutions like the react-to-print library, which offers greater flexibility in generating printable content that retains your styles. In this tutorial, we’ll explore ReactToPrint and how it can help us generate a printable document with more custom options.
The Replay is a weekly newsletter for dev and engineering leaders.
Delivered once a week, it's your curated guide to the most important conversations around frontend dev, emerging AI tools, and the state of modern software.
The print function is a straightforward tool for basic printing. However, it falls short when you need more control over what and how you print, especially when aiming to maintain the original styles of your content.
For example, let’s say you want to print a ticket for a booking on your app. You’d have to first display the ticket in its document before printing it out.
ReactToPrint generates the HTML, which the browser then converts to PDF. That is to say, you can customize it to print out the document you want, while it also preserves all your styles and lays them out correctly in the Print dialog.
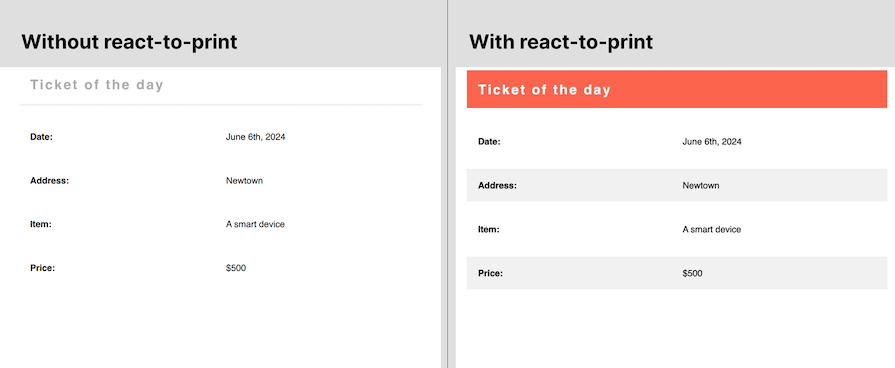
Below is an example of how a document could look without and with ReactToPrint, respectively:

ReactToPrint doesn’t automatically let you print your document as a PDF, which is why it will always lay out your document in the Print dialog for it to be printed out. This is where the use of third-party libraries like html2pdf.js comes in handy. We’ll see more on this subsequently.
The react-to-print library comes with support for both class components and functional components. So, if for some reason your components are still class-based and switching to functional components in your React project would be expensive, then you can still easily use the ReactToPrint component.
However, if migrating from class components to function components is feasible for your project, then I recommend this approach. You can use this migration guide from React to do so.
Using the react-to-print library in function components is pretty straightforward. All you’d have to use is the useReactToPrint Hook and pass in the component you want to print:
import "./styles.css";
import { useRef } from "react";
import { useReactToPrint } from "react-to-print";

export default function App() {
  const componentRef = useRef();
  const handlePrint = useReactToPrint({
    content: () => componentRef.current,
  });

  return (
    <>
      <div className="App" ref={componentRef}>
        <div className="header">
          <span className="logo">REAs</span>
          <nav>
            <span>Blog</span>
            <span>Categories</span>
            <span>Tags</span>
          </nav>
        </div>
        <div className="hero-section">
          <h1>The Joys of Buying Over Building</h1>
        </div>
        <main>
          <h2 className="features-title">Some features</h2>
          <div className="features">
            <span className="active">House 1</span>
            <span>House 2</span>
            <span>House 3</span>
          </div>
          <p>
            In the grand game of acquiring a new abode, the age-old debate
            between buying an existing house and building a brand-new one
            continues to captivate prospective homeowners. Both options have
            their merits, but let's take a lighthearted stroll through the perks
            of opting for a pre-built dwelling.
          </p>
          <p>
            Then there's the joy of exploring neighborhoods with character and
            history. Buying a house often means settling into an established
            community, complete with charming local spots and friendly
            neighbors. Sure, you might not have personally picked out every
            detail of your home, but there's a unique charm in discovering the
            stories embedded in its walls and the quirks that come with a house
            that's been lived in.
          </p>
          <p>
            In the end, whether you're swiping right on a charming existing home
            or swaying to the rhythm of your own construction symphony, the
            decision between buying and building is a personal one. But hey,
            there's something undeniably delightful about stepping into a house
            and immediately feeling at home – no hard hat required.
          </p>
          <p className="lower">Article generated by ChatGPT</p>
        </main>
      </div>
      <button onClick={handlePrint}>Print article</button>
    </>
  );
}
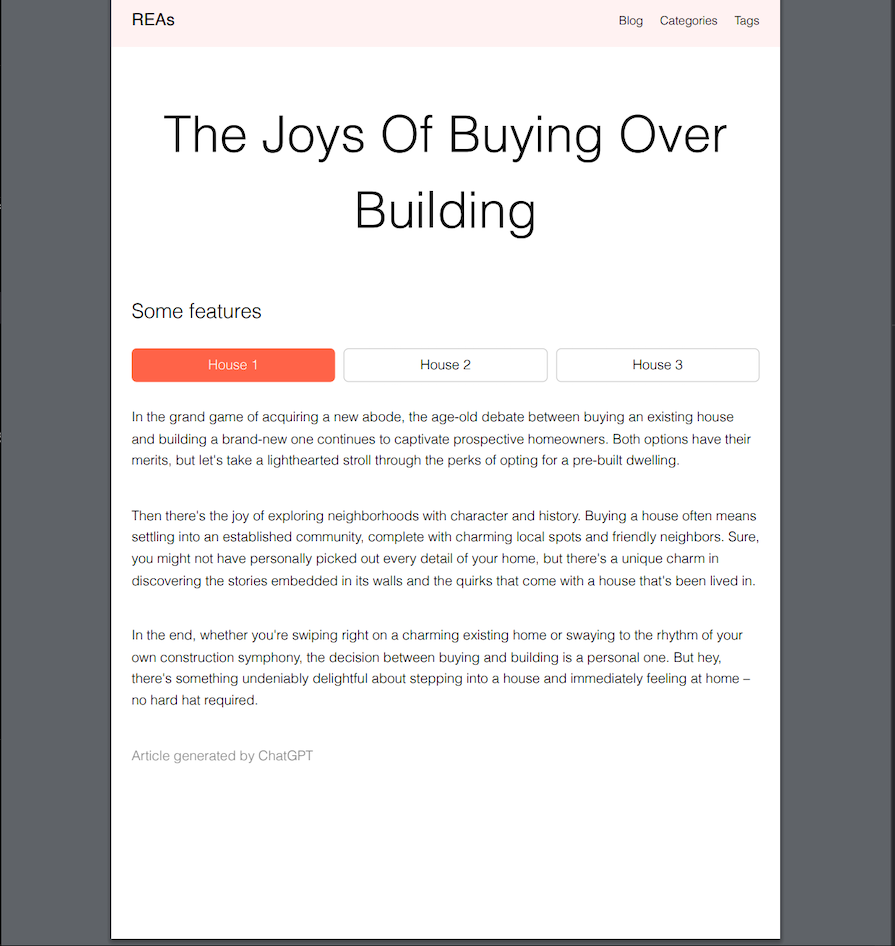
The above is a simple example of printing an article from a webpage, which will then look like the below:

Notice how the button is not a part of the document in the Print dialog. This is because it’s not part of the component sent to the useReactToPrint Hook as the component to print.
With the help of React refs, we can target the specific component or element we intend to print. So, you could also assign the componentRef to any of the paragraphs, and that is what will reflect in the Print dialog.
forwardRef functionIn the previous example, we have the trigger button — which triggers the handlePrint function — and the component to print in the same component. While there is nothing wrong with this approach, it’s relatively unlikely that you’d have this exact scenario in a real-world application.
It’s more likely that the component to print would be its own component, separate from the current component. Most times, the application code is set up this way for the sake of reusability. In such cases, you’d need the forwardRef function:
// components/Article.js
const Article = forwardRef((props, ref) => {
  return (
      <div className="App" ref={ref}>
        <div className="header">
          <span className="logo">REAs</span>
          <nav>
            <span>Blog</span>
            <span>Categories</span>
            <span>Tags</span>
          </nav>
        </div>
        <div className="hero-section">
          <h1>The Joys of Buying Over Building</h1>
        </div>
        <main>
          <h2 className="features-title">Some features</h2>
          <div className="features">
            <span className="active">House 1</span>
            <span>House 2</span>
            <span>House 3</span>
          </div>
          <p>
            In the grand game of acquiring a new abode, the age-old debate
            between buying an existing house and building a brand-new one
            continues to captivate prospective homeowners. Both options have
            their merits, but let's take a lighthearted stroll through the perks
            of opting for a pre-built dwelling.
          </p>
          <p>
            Then there's the joy of exploring neighborhoods with character and
            history. Buying a house often means settling into an established
            community, complete with charming local spots and friendly
            neighbors. Sure, you might not have personally picked out every
            detail of your home, but there's a unique charm in discovering the
            stories embedded in its walls and the quirks that come with a house
            that's been lived in.
          </p>
          <p>
            In the end, whether you're swiping right on a charming existing home
            or swaying to the rhythm of your own construction symphony, the
            decision between buying and building is a personal one. But hey,
            there's something undeniably delightful about stepping into a house
            and immediately feeling at home – no hard hat required.
          </p>
          <p className="lower">Article generated by ChatGPT</p>
        </main>
      </div>
  )
})

// App.js
const App = () => {
  const componentRef = useRef();
  const handlePrint = useReactToPrint({
    content: () => componentRef.current
  });

  return (
      <div>
        <Article ref={componentRef} />
        <button onClick={handlePrint}>Print article</button>
      </div>
  )
}
The forwardRef function is a built-in React function that lets you receive a ref to your component and pass it down to a child, as we’ve just done in the Article component.
react-to-print with third-party PDF librariesI mentioned earlier that all that react-to-print does is generate the HTML, which the browser converts to PDF. It doesn’t deal whatsoever with how the document is ultimately printed, like in what format and size or with what filename.
ReactToPrint only goes as far as triggering the Print dialog with the right HTML document. However, there are some cases where you may need more control over how the PDF gets printed out, or you may want to skip the Print dialog entirely and just head straight to downloading the PDF on behalf of the user.
In such cases, you’d need a third-party library that would take the HTML generated by react-to-print and convert it to PDF. There are many options out there, but let’s take a look at the html2pdf library. This library is a fork of the html2pdf.js library, which is currently very buggy.
Let’s apply this to our earlier example:
// App.js
const App = () => {
  const componentRef = useRef();
  const handlePrint = useReactToPrint({
    content: () => componentRef.current,
    print: async (printIframe) => {
      const document = printIframe.contentDocument;
      if (document) {
        const html = document.getElementsByClassName("App")[0];
        const options = {
          margin: 0,
          filename: "the-joys-of-buying-over-building.pdf",
        };
        const exporter = new Html2Pdf(html, options);
        await exporter.getPdf(options);
      }
    },
  });

  return (
      <div>
        <Article ref={componentRef} />
        <button onClick={handlePrint}>Print article</button>
      </div>
  )
}
The useReactToPrint object has a print property that allows you pass a function. This function contains a printIframe param, which contains the content document generated by react-to-print. Remember, this document is based on the component or element passed to the content property of the useReactToPrint Hook.
So, the condition above is just to check that the generated document exists. If it does, you want to target the particular element you intend to print and pass it as the first param of the Html2Pdf constructor.
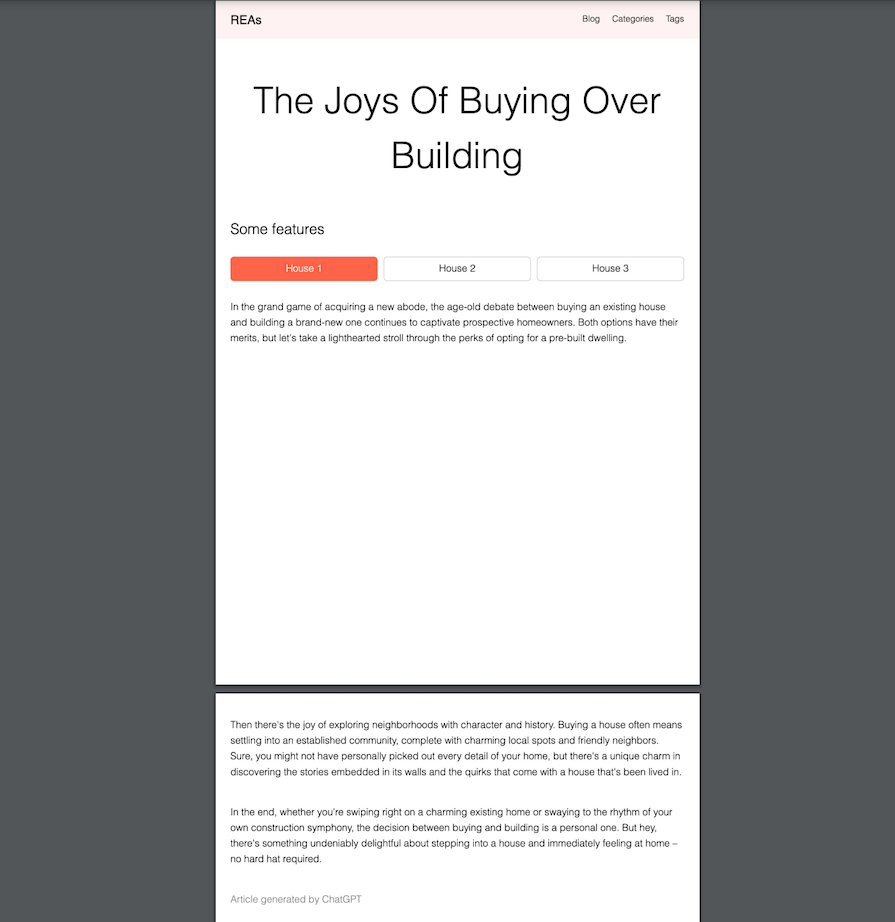
The html2pdf library also provides a class name to apply page breaks to your elements. Let’s say we want the second paragraph of our example article to start on a new page on the PDF, no matter how long the first page is. We would need to attach html2pdf__page-break as a class name to the first paragraph. We’d have:
// components/Article.js
const Article = forwardRef((props, ref) => {
  return (
      <div className="App" ref={ref}>
        <div className="header">
          <span className="logo">REAs</span>
          <nav>
            <span>Blog</span>
            <span>Categories</span>
            <span>Tags</span>
          </nav>
        </div>
        <div className="hero-section">
          <h1>The Joys of Buying Over Building</h1>
        </div>
        <main>
          <h2 className="features-title">Some features</h2>
          <div className="features">
            <span className="active">House 1</span>
            <span>House 2</span>
            <span>House 3</span>
          </div>
          <p className='html2pdf__page-break'>
            In the grand game of acquiring a new abode, the age-old debate
            between buying an existing house and building a brand-new one
            continues to captivate prospective homeowners. Both options have
            their merits, but let's take a lighthearted stroll through the perks
            of opting for a pre-built dwelling.
          </p>
          <p>
            Then there's the joy of exploring neighborhoods with character and
            history. Buying a house often means settling into an established
            community, complete with charming local spots and friendly
            neighbors. Sure, you might not have personally picked out every
            detail of your home, but there's a unique charm in discovering the
            stories embedded in its walls and the quirks that come with a house
            that's been lived in.
          </p>
          <p>
            In the end, whether you're swiping right on a charming existing home
            or swaying to the rhythm of your own construction symphony, the
            decision between buying and building is a personal one. But hey,
            there's something undeniably delightful about stepping into a house
            and immediately feeling at home – no hard hat required.
          </p>
          <p className="lower">Article generated by ChatGPT</p>
        </main>
      </div>
  )
})

// App.js
const App = () => {
  const componentRef = useRef();
  const handlePrint = useReactToPrint({
    content: () => componentRef.current
  });

  return (
      <div>
        <Article ref={componentRef} />
        <button onClick={handlePrint}>Print article</button>
      </div>
  )
}
Here’s how the result of the code above would look:

There are other options that can be passed to the Html2Pdf constructor. One of these options is the jsPDF option, which lets you customize the format of the PDF, including its orientation, width, and height:
  const handlePrint = useReactToPrint({
    content: () => componentRef.current,
    print: async (printIframe) => {
      const document = printIframe.contentDocument;
      if (document) {
        const html = document.getElementsByClassName("App")[0];
        const options = {
          margin: 0,
          filename: "the-joys-of-buying-over-building.pdf",
          jdPDF: { unit: "mm", format: "a4", orientation: "portrait" }
        };
        const exporter = new Html2Pdf(html, options);
        await exporter.getPdf(options);
      }
    },
  });
The unit property specifies the unit of measurement for specifying the dimensions in the PDF document. In the example above, we used millimeters. Other possible values include inches in, pixels px, and points pt.
The format property defines the size of the PDF document. The example specified above is the standard ISO A4 paper size commonly used across different countries. Other possible values include letter, legal, a3. You can explicitly set a width and height in pixels as an array for the format property.
The orientation property determines whether the PDF document should be displayed in portrait or landscape orientation.
Finally, let’s return to the ticket example mentioned earlier. Imagine you have some sort of booking app that allows users to purchase tickets for an event or trip. The idea is to not show the ticket, but rather to simply provide the option to download the ticket after a successful booking:
import { useRef, forwardRef } from "react";
import { useReactToPrint } from "react-to-print";
import Html2Pdf from "js-html2pdf";

export default function App() {
  const componentRef = useRef();
  const handlePrint = useReactToPrint({
    content: () => componentRef.current,
    onPrintError: (error) => console.log(error),
    print: async (printIframe) => {
      console.log(printIframe);
      const document = printIframe.contentDocument;
      if (document) {
        const ticketElement = document.getElementsByClassName("ticket")[0];
        ticketElement.style.display = "block";
        const options = {
          margin: 0,
          filename: "ticket.pdf",
          jsPDF: { unit: "px", format: [600, 800], orientation: "portrait" },
        };
        const exporter = new Html2Pdf(ticketElement, options);
        await exporter.getPdf(options);
      }
    },
  });
  return (
    <div>
      <button onClick={handlePrint}>Print sample ticket</button>
      <TicketSample ref={componentRef} />
    </div>
  );
}

const TicketSample = forwardRef((props, ref) => {
  return (
    <div className={"ticket"} ref={ref}>
      <div className={"ticket-header"}>
        <h2>Ticket of the day</h2>
      </div>
      <div className={"details"}>
        <p>
          <strong>Date:</strong> June 6th, 2024
        </p>
        <p>
          <strong>Address:</strong> Newtown
        </p>
        <p>
          <strong>Item:</strong> A smart device
        </p>
        <p>
          <strong>Price:</strong> $500
        </p>
      </div>
    </div>
  );
});
Remember that to enable users to download a PDF without using the Print dialog, you would need to add a button on the webpage to trigger. In the example above, we provided a button with “Print sample ticket” text.
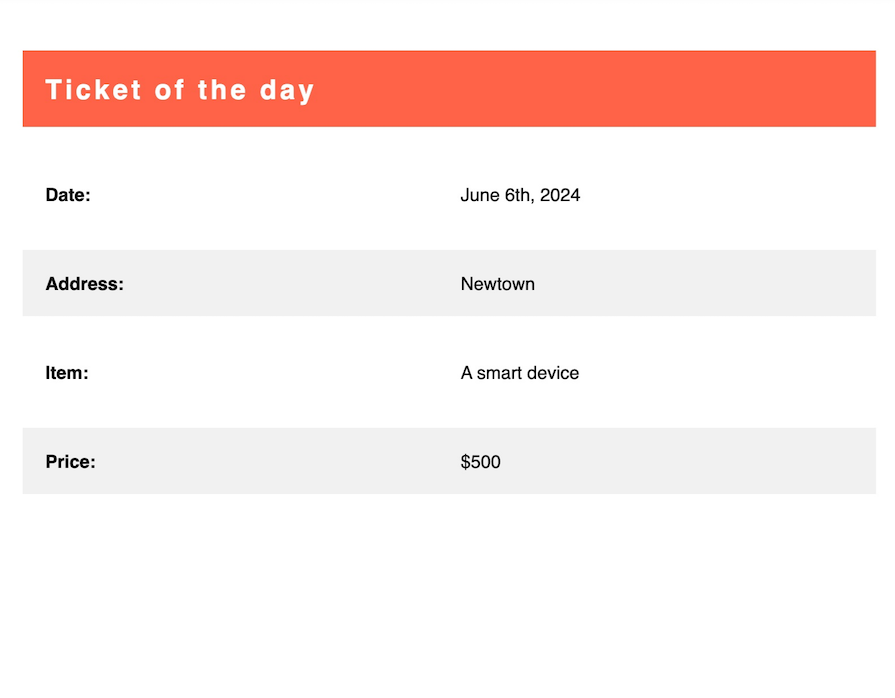
The html2pdf library then converts the HTML document generated by ReactToPrint into a PDF before triggering a download of the PDF. Here’s how the downloaded ticket would look:

By default, the display property of the ticketElement is set to none. This would hide the Ticket component completely.
However, you want to make sure that you set it to block in the print function. This would have no effect on the actual element represented on the DOM — in other words, they won’t make the ticket visible. The block setting only affects the ticket element in the generated HTML document.
In this article, we saw how useful the react-to-print library is when it comes to generating a printable document. We also saw how well it integrates with third-party PDF libraries to bypass the default print behavior of browsers.
Overall, ReactToPrint is a great tool for easily adding a print feature to your React application while preserving the neat and consistent look of your document. For a different approach to generating PDF documents in a React environment, check out our guide to the react-pdf library.
Thanks for reading, and happy hacking.
Install LogRocket via npm or script tag. LogRocket.init() must be called client-side, not
server-side
$ npm i --save logrocket

// Code:

import LogRocket from 'logrocket';
LogRocket.init('app/id');
// Add to your HTML:

<script src="https://cdn.lr-ingest.com/LogRocket.min.js"></script>
<script>window.LogRocket && window.LogRocket.init('app/id');</script>

@container scroll-state: Replace JS scroll listeners nowCSS @container scroll-state lets you build sticky headers, snapping carousels, and scroll indicators without JavaScript. Here’s how to replace scroll listeners with clean, declarative state queries.

Explore 10 Web APIs that replace common JavaScript libraries and reduce npm dependencies, bundle size, and performance overhead.

Russ Miles, a software development expert and educator, joins the show to unpack why “developer productivity” platforms so often disappoint.

Discover what’s new in The Replay, LogRocket’s newsletter for dev and engineering leaders, in the February 18th issue.
Would you be interested in joining LogRocket's developer community?
Join LogRocket’s Content Advisory Board. You’ll help inform the type of content we create and get access to exclusive meetups, social accreditation, and swag.
Sign up now