Editor’s note: This post was last updated on 24 October 2023 to include information about React callback refs, as well as common mistakes to avoid when working with refs.

React empowers us to reimagine a view as a component’s state, simplifying the solution to frontend challenges. While the library encourages a declarative and component-centric approach, it also offers escape hatches, like refs, enabling direct access to DOM properties. These tools prove invaluable when tasks such as auto-focusing a text box during component rendering demand direct DOM manipulation.
In this article, we will learn about React refs and explore why React allows developers to access the DOM, even though it’s meant to abstract code from DOM manipulation.
The Replay is a weekly newsletter for dev and engineering leaders.
Delivered once a week, it's your curated guide to the most important conversations around frontend dev, emerging AI tools, and the state of modern software.
Refs in React are short for references. As the name suggests, they allow you to reference and interact with DOM nodes or React components directly. Refs come in handy when you need to reference some information in a component, but you don’t want that information to trigger new renders.
Common use cases of React refs include:
In React, Refs can be created by using either the createRef method or the useRef Hook.
useRef HookYou can create refs using the useRef Hook, which is available as part of the React library. Here’s an example of creating a reference in a functional component:
import React, { useRef } from "react";

function ActionButton() {
  const buttonRef = useRef(null);

  function handleClick() {
    console.log(buttonRef.current);
  }

  return (
    <button onClick={handleClick} ref={buttonRef}>
      Click me
    </button>
  );
};
export default ActionButton;
In the code snippet above, we used the useRef() Hook to create a reference to the button element, which we named buttonRef. This reference enables us to access the current value of buttonRef using buttonRef.current. One advantage of using a ref is that it maintains its state across renders, making it a valuable tool for storing and updating values without causing unnecessary re-renders.
createRef HookTo create a ref in a class component, we use React.createRef(). Here’s an example:
import React, { Component } from "react";

class ActionButton extends Component {
  constructor(props) {
    super(props);
    this.buttonRef = React.createRef();
  }

  handleClick = () => {
    console.log(this.buttonRef.current);
  }

  render() {
    return (
      <button onClick={this.handleClick} ref={this.buttonRef}>
        Click me
      </button>
    );
  }
}

export default ActionButton;
In the code snippet above, we use React.createRef() to create a reference that we named buttonRef. We then assign the reference to the button element.
useRef and createRefThere are some key differences between the useRef Hook and the createRef method in React. Firstly, createRef is generally used when creating a ref in a class component, whereas useRef is used in function components.
Secondly, createRef returns a new ref object each time it is called, while useRef returns the same ref object on every render.
Another important difference is that createRef does not accept an initial value, so the current property of the ref will be initially set to null. In contrast, useRef can accept an initial value, and the current property of the ref will be set to that value.
The concept of declarative views in React revolutionized the way developers build user interfaces. Instead of directly manipulating the DOM through imperative code, React allows developers to describe what the UI should look like based on the current state. However, there are scenarios where you still need to interact with the DOM or access the underlying rendered components. That’s where React refs come in handy.
Here are a few use cases for using React refs.
You can achieve focus in an element programmatically by calling focus() on the node instance. Because the DOM exposes this as a function call, the best way to do this in React is to create a ref and manually do it when we think it’s suitable, as shown below:
import React, { useState } from "react";
const InputModal = ({ initialValue }) => {
  const [value, setValue] = useState(initialValue);
  const onChange = (e) => {
    setValue(e.target.value);
  };
  const onSubmit = (e) => {
    e.preventDefault();
  };
  return (
    <div className="modal--overlay">
      <div className="modal">
        <h1>Insert a new value</h1>
        <form action="?" onSubmit={onSubmit}>
          <input type="text" onChange={onChange} value={value} />
          <button>Save new value</button>
        </form>
      </div>
    </div>
  );
};
export default InputModal;
In this modal, we allow the user to modify a value already set in the screen below. It would be a better UX if the input was on focus when the modal opens, which would enable a smooth keyboard transition between the two screens. The first thing we need to do is get a reference for input:
import React, { useRef, useState } from "react";
const InputModal = ({ initialValue }) => {
  const [value, setValue] = useState(initialValue);
  const inputRef = useRef(null);
  const onChange = (e) => {
    setValue(e.target.value);
  };
  const onSubmit = (e) => {
    e.preventDefault();
  };
  return (
    <div className="modal--overlay">
      <div className="modal">
        <h1>Insert a new value</h1>
        <form action="?" onSubmit={onSubmit}>
          <input ref={inputRef} type="text" onChange={onChange} value={value} />
          <button>Save new value</button>
        </form>
      </div>
    </div>
  );
};
export default InputModal;
Next, when modal mounts, we imperatively call focus on our input ref within a useEffect Hook:
import React, { useEffect, useRef, useState } from "react";
const InputModal = ({ initialValue }) => {
  const [value, setValue] = useState(initialValue);
  const inputRef = useRef(null);
  useEffect(() => {
    inputRef.current.focus();
  }, [])
  const onChange = (e) => {
    setValue(e.target.value);
  };
  const onSubmit = (e) => {
    e.preventDefault();
  };
  return (
    <div className="modal--overlay">
      <div className="modal">
        <h1>Insert a new value</h1>
        <form action="?" onSubmit={onSubmit}>
          <input ref={inputRef} type="text" onChange={onChange} value={value} />
          <button>Save new value</button>
        </form>
      </div>
    </div>
  );
};
export default InputModal;
So, when you open the modal, you should see the text box focused by default:
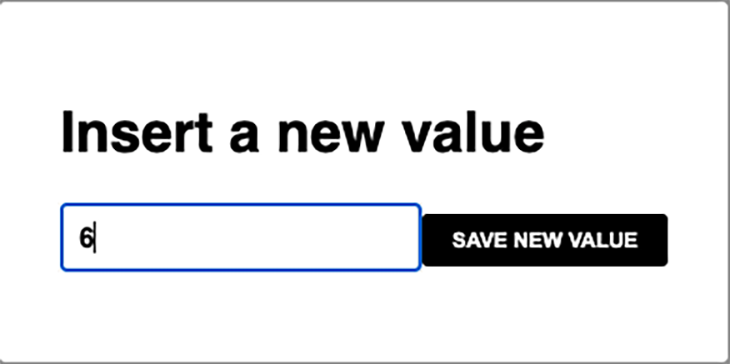
Remember that you need to access the element through the current property.
Check out the CodeSandbox for the example above.
Similarly, you want to know if any element dispatching an event should trigger some action on your app. For example, our modal component could be closed if the user clicked outside of it, like so:
import React, { useEffect, useRef, useState } from "react";
const InputModal = ({ initialValue, onClose, onSubmit }) => {
  const [value, setValue] = useState(initialValue);
  const inputRef = useRef(null);
  const modalRef = useRef(null);
  useEffect(() => {
    inputRef.current.focus();
    document.body.addEventListener("click", onClickOutside);
    return () => document.removeEventListener("click", onClickOutside);
  }, []);
  const onClickOutside = (e) => {
    const element = e.target;
    if (modalRef.current && !modalRef.current.contains(element)) {
      e.preventDefault();
      e.stopPropagation();
      onClose();
    }
  };
  const onChange = (e) => {
    setValue(e.target.value);
  };
  const onSub = (e) => {
    e.preventDefault();
    onSubmit(value);
    onClose();
  };
  return (
    <div className="modal--overlay">
      <div className="modal" ref={modalRef}>
        <h1>Insert a new value</h1>
        <form action="?" onSubmit={onSub}>
          <input ref={inputRef} type="text" onChange={onChange} value={value} />
          <button>Save new value</button>
        </form>
      </div>
    </div>
  );
};
export default InputModal;
Here, we check if the element click is outside the modal limits. It will work like this:
If it is, then we are preventing further actions and calling the onClose callback because the modal component expects to be controlled by its parent. Remember to check if the DOM element’s current reference still exists, as state changes in React are asynchronous.
To achieve this, we are adding a global click listener on the body element. It’s important to remember to clean the listener when the element is unmounted.
React is a great library, but there are many other useful libraries and utilities outside of its ecosystem that have been used on the web for years. For example, by using refs, we can seamlessly combine React with a top-notch animation library. It’s always beneficial to leverage the stability and resolution provided by these external tools to tackle specific issues.
One such library is the GreenSock Animating Platform, or GSAP, which is widely used for animation examples. To use it, we simply need to pass a DOM element to any of its methods. Let’s enhance the appearance of our modal by adding some animations with GSAP:
import React, { useEffect, useRef, useState } from "react";
import gsap from "gsap";
const InputModal = ({ initialValue, onClose, onSubmit }) => {
  const [value, setValue] = useState(initialValue);
  const inputRef = useRef(null);
  const modalRef = useRef(null);
  const overlayRef = useRef(null);
  const onComplete = () => {
    inputRef.current.focus();
  };
  const timeline = gsap.timeline({ paused: true, onComplete });
  useEffect(() => {
    timeline
      .from(overlayRef.current, {
        duration: 0.25,
        autoAlpha: 0,
      })
      .from(modalRef.current, {
        duration: 0.25,
        autoAlpha: 0,
        y: 25,
      });
    timeline.play();
    document.body.addEventListener("click", onClickOutside);
    return () => {
      timeline.kill();
      document.removeEventListener("click", onClickOutside);
    };
  }, []);
  const onClickOutside = (e) => {
    const element = e.target;
    if (modalRef.current && !modalRef.current.contains(element)) {
      e.preventDefault();
      e.stopPropagation();
      onClose();
    }
  };
  const onChange = (e) => {
    setValue(e.target.value);
  };
  const onSub = (e) => {
    e.preventDefault();
    onSubmit(value);
    onClose();
  };
  return (
    <div className="modal--overlay" ref={overlayRef}>
      <div className="modal" ref={modalRef}>
        <h1>Insert a new value</h1>
        <form action="?" onSubmit={onSub}>
          <input ref={inputRef} type="text" onChange={onChange} value={value} />
          <button>Save new value</button>
        </form>
      </div>
    </div>
  );
};
export default InputModal;
At the constructor level, we are setting up the initial animation values, which will modify the styles of our DOM references. The timeline only plays when the component mounts. When the element is unmounted, we’ll clean the DOM state and actions by terminating any ongoing animation with the kill() method supplied by the Timeline instance.
Now, we’ll turn our focus to the input after the timeline has been completed.
useRef Hook?There are some instances where you would want to use the useRef Hook, including the following:
useRef Hook when you need to interact with a specific DOM element in your component, such as setting the focus on an input field or measuring an element’s sizeuseRef to store that value. For example, if you have a timer in your component, you could use useRef to store the current time without triggering a re-renderuseRef to store the result of that computationforwardRefAs we’ve discussed, refs are useful for specific actions. The examples shown are more simple than what we would find in a web application codebase nowadays — components are more complex, and we barely use plain HTML elements directly.
It’s common to include more than one node to encapsulate more logic around the view behavior. Here’s an example:
import React from 'react'

const LabelledInput = (props) => {
  const { id, label, value, onChange } = props

  return (
    <div class="labelled--input">
      <label for={id}>{label}</label>
      <input id={id} onChange={onChange} value={value} />
    </div>
  )
}

export default LabelledInput
The issue now is that passing a ref to this component will return its instance, a React component reference, and not the input element we want to focus on, like in our first example. Luckily, React provides an inbuilt solution for this called forwardRef, which allows you to define internally what element the ref will point at:
import React from 'react'

const LabelledInput = (props, ref) => {
  const { id, label, value, onChange } = props

  return (
    <div class="labelled--input">
      <label for={id}>{label}</label>
      <input id={id} onChange={onChange} value={value} ref={ref}/>
    </div>
  )
}

export default React.forwardRef(LabelledInput)
See this example in action.
To achieve this, we’ll pass a second argument to our function and place it in the desired element. Now, when a parent component passes a ref value, it will obtain the input, which is helpful to avoid exposing the internals and properties of a component and breaking its encapsulation. The example of our form that we saw failing to achieve focus will now work as expected.
In React, there is another way to use refs: callback refs. Callback refs provide customization for a component’s behavior during component mounting and unmounting.
Unlike traditional refs, which store direct references to DOM elements, callback refs use functions that receive the DOM element or component instance as their argument. This approach offers several advantages:
To use a callback ref, define a function within your component and pass it as the ref attribute to an element. Here’s an example:
import React, { useRef, useEffect } from 'react';

function MyComponent() {
  const myRef = useRef(null);

  // Callback ref function
  const handleRef = (element) => {
    if (element) {
      // Access the DOM element
      console.log('Accessing the DOM element:', element);

      // Perform actions on mount
      console.log('Component mounted');
    } else {
      // Perform actions on unmount
      console.log('Component unmounted');
    }
  };

  return (
    <div>
      {/* Attach the callback ref */}
      <div ref={handleRef}>This is a DOM element.</div>
    </div>
  );
}

export default MyComponent;
In this example, we define the handleRef function as a callback ref. When the component mounts, handleRef is called with the DOM element as its argument. You can access the DOM element or perform any necessary actions. When the component unmounts, the callback ref is called again with null, allowing you to perform cleanup or additional actions.
Callback refs differ from normal refs in how they are defined and how they provide access to elements or component instances. Callback refs use functions to grant more flexibility and customization, while normal refs store direct references using the .current property.
React refs are a powerful feature that allows you to access and manipulate the DOM directly. However, they can also lead to various common mistakes if not used carefully.
Overusing refs is a common mistake that can make your code more difficult to read and maintain. It can also lead to performance problems, as refs can cause unnecessary re-renders. As a rule of thumb, use refs only when you need to directly access the DOM node or manipulate its properties.
Here is an example of how to overuse refs:
import React, { useRef } from 'react';

function MyComponent() {
  const firstNameRef = useRef(null);
  const lastNameRef = useRef(null);
  const emailRef = useRef(null);

  const handleSubmit = (event) => {
    event.preventDefault();

    const firstName = firstNameRef.current.value;
    const lastName = lastNameRef.current.value;
    const email = emailRef.current.value;

    // Do something with the form values
  };

  return (
    <form onSubmit={handleSubmit}>
      <input type="text" ref={firstNameRef} placeholder="First Name" />
      <input type="text" ref={lastNameRef} placeholder="Last Name" />
      <input type="email" ref={emailRef} placeholder="Email" />
      <button type="submit">Submit</button>
    </form>
  );
}

export default MyComponent;
Using refs to directly access the input values is not in line with React’s best practices. Here’s a better approach using controlled components and state:
import React, { useState } from 'react';

function MyComponent() {
  const [formData, setFormData] = useState({
    firstName: '',
    lastName: '',
    email: '',
  });

  const handleSubmit = (event) => {
    event.preventDefault();
    console.log(formData);
  };

  const handleInputChange = (event) => {
    const { name, value } = event.target;
    setFormData({ ...formData, [name]: value });
  };

  return (
    <form onSubmit={handleSubmit}>
      <input
        type="text"
        name="firstName"
        value={formData.firstName}
        placeholder="First Name"
        onChange={handleInputChange}
      />
      <input
        type="text"
        name="lastName"
        value={formData.lastName}
        placeholder="Last Name"
        onChange={handleInputChange}
      />
      <input
        type="email"
        name="email"
        value={formData.email}
        placeholder="Email"
        onChange={handleInputChange}
      />
      <button type="submit">Submit</button>
    </form>
  );
}

export default MyComponent;
To avoid potential errors, it’s crucial to initialize refs properly by creating them using React.createRef() for class components or useRef() for functional components and assigning them to the intended targets.
Here is an example of how to correctly initialize refs:
// Initializing refs correctly
class MyComponent extends React.Component {
  myRef = React.createRef();
  // ...
}


// Initializing refs correctly in a functional component
function MyFunctionalComponent() {
  const myRef = useRef();
  // ...
}
Failing to clean up refs properly can result in memory leaks. When a component unmounts, React removes the corresponding DOM elements from the page. However, if the component still maintains a reference to the DOM element through a ref, the JavaScript engine won’t garbage collect the element, even though it’s no longer visible or interactive.
This can lead to memory leaks over time. To prevent this, ensure that you set the ref to null or remove it when the component unmounts to avoid memory leaks.
Here’s a code sample that demonstrates how to set a ref to null when a component unmounts:
import React, { useRef, useEffect } from 'react';

function MyComponent() {
  const myRef = useRef();

  useEffect(() => {
    // Cleanup when the component unmounts
    return () => {
      myRef.current = null;
    };
  }, []);

  return (
    <div>
      <h1>My Component</h1>
      <div ref={myRef}>This is a DOM element.</div>
    </div>
  );
}

export default MyComponent;
React refs are a powerful and versatile feature that empowers developers to break away from the confines of a purely declarative paradigm when necessary. This “escape hatch” allows us to interact with the DOM, integrate with third-party libraries, manage focus and selection, create animations, and facilitate custom component communication without compromising the fundamental principles of React.
While refs can be helpful in specific scenarios, it’s essential to exercise caution and use them sparingly, as overuse can lead to complex and less maintainable code.
For more information, read the official React documentation about refs.

Learn about TypeScript v6’s breaking changes, new ES2025 features, and deprecated options. A complete migration guide from v5 to prepare for v7.

Learn how Vite+ unifies Vite, Vitest, Oxlint, Oxfmt, Rolldown, and Node.js management in one CLI.

AI companies are buying developer tools as coding agents turn runtimes, package managers, and linters into strategic infrastructure.

Learn how AI-assisted development governance uses rules, agents, hooks, and protocols to help AI coding tools produce safer, more consistent code.
Hey there, want to help make our blog better?
Join LogRocket’s Content Advisory Board. You’ll help inform the type of content we create and get access to exclusive meetups, social accreditation, and swag.
Sign up now

