Editor’s note: This article was last updated by Popoola Temitope in January 2025 to cover troubleshooting common CORS errors such as the preflight request failure and the Referrer-Policy error.

Over the past few years, Next.js has become a go-to framework for not only frontend development but also API development. When building APIs, it is critical to spend some time on Cross-Origin Resource Sharing (CORS).
In this complete guide, we will explore several methods for using CORS in Next.js, enabling you to handle cross-origin requests effectively and securely.
CORS is a security mechanism that enables a server to specify which origins are allowed to access and load resources in a web browser. In this context, an “origin” refers to the combination of the protocol, domain, and port number a request comes from.
In detail, CORS is a protection system implemented by web browsers to enforce restrictions on cross-origin requests. Its main goal is to protect user security and prevent unauthorized access to resources and data.
To enforce CORS, browsers and servers exchange a set of specific HTTP headers. Before making certain types of cross-origin requests, the browser sends a preflight request using the HTTP OPTIONS method to the server. The server then responds with some CORS headers, indicating whether the cross-origin should be permitted or denied.
If the preflight request is successful, the actual cross-origin request is performed by the browser. Otherwise, it gets blocked because of a CORS policy error.
The main CORS headers include:
Access-Control-Allow-Origin: Specifies the origin that has access to the resourceAccess-Control-Allow-Methods: Added to the preflight response to indicate the permitted HTTP methods, such as GET, POST, PUT, etc.Access-Control-Allow-Headers: Returned in response to a preflight request to specify the HTTP headers that are allowed in the current requestAccess-Control-Allow-Credentials: Indicates whether the browser should include credentials, such as cookies or HTTP authentication, in the cross-origin requestCORS allows frontend applications to access resources from a different domain, ensuring secure cross-origin communication. By default, Next.js relies on a same-origin approach, imposing a strict policy. If you want to change that, you must configure it manually.
Next.js has supported API development since v9.4. As mentioned earlier, APIs in Next.js do not involve CORS headers by default, following a same-origin policy instead. This means they can only be accessed in the browser by pages within the same domain.
However, there are scenarios where you may want to access those endpoints from other origins. For example, if you had an application hosted on a different domain that needed to access those APIs in the frontend, it would be blocked by those cross-origin restrictions.
To avoid that issue, you need to enable CORS by configuring the appropriate headers on the Next.js server. This way, you can explicitly allow cross-origin requests for specific origins. Applications hosted on the trusted domains will then be able to make requests to your Next.js API routes.
Now, let’s explore how to configure CORS headers in Next.js!
Before moving to the next section, be sure to meet the prerequisites below:
To follow this tutorial, it doesn’t matter if your project is based on the Pages Router or the App Router; the proposed solutions will work in both scenarios.
To get started, let’s create a simple Next.js API endpoint. Navigate to the src/pages/api folder, create a new file named hello.js, and add the following code:
export default function handler(req, res) {
    if (req.method === 'GET') {
      res.status(200).json({ message: 'Hello, World!' });
    } else {
      res.setHeader('Allow', ['GET']);
      res.status(405).end(`Method ${req.method} Not Allowed`);
    }
  }
If you make a request to the endpoint from your frontend application, you will encounter the following CORS errors:
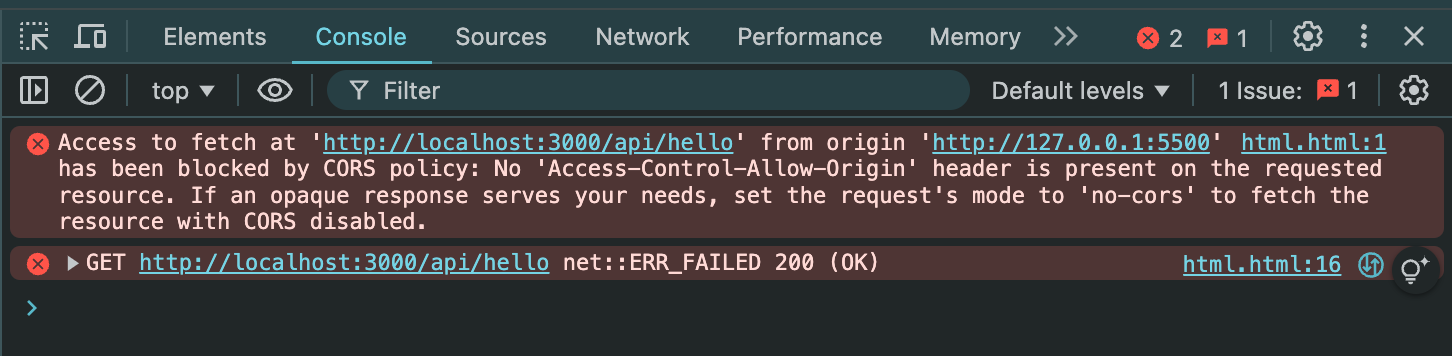
The most common approach to CORS is to set it up globally on all API endpoints. There are many ways to achieve this in Next.js. Here, you will explore three methods for using CORS in Next.js.
headers configYou can manually set the CORS headers in Next.js by using the headers key in next.config.js:
// next.config.js

/** @type {import('next').NextConfig} */
const nextConfig = {
    async headers() {
        return [
            {
                // matching all API routes
                source: "/api/:path*",
                headers: [
                    { key: "Access-Control-Allow-Credentials", value: "true" },
                    { key: "Access-Control-Allow-Origin", value: "*" }, // replace this your actual origin
                    { key: "Access-Control-Allow-Methods", value: "GET,DELETE,PATCH,POST,PUT" },
                    { key: "Access-Control-Allow-Headers", value: "X-CSRF-Token, X-Requested-With, Accept, Accept-Version, Content-Length, Content-MD5, Content-Type, Date, X-Api-Version" },
                ]
            }
        ]
    }
}

module.exports = nextConfig
headers() is an async function that must return an array of objects. When the incoming request matches the source path regex, the server will produce a response containing the custom HTTP headers.
Note that the source must follow a specific syntax. If an incorrect path regex is used, Next.js will throw an Invalid header found error and fail with a `source` parse failed message.
Next.js middleware enables you to perform specific operations before a request is completed. This also includes setting the CORS HTTP headers in the response. Based on your project structure, initialize a middleware.js file inside the pages, app, or src folder as shown below:
// src/middleware.js
// or
// src/app/middleware.js
// or
// src/pages/middleware.js

import { NextResponse } from "next/server";

export function middleware() {
    // retrieve the current response
    const res = NextResponse.next()

    // add the CORS headers to the response
    res.headers.append('Access-Control-Allow-Credentials', "true")
    res.headers.append('Access-Control-Allow-Origin', '*') // replace this your actual origin
    res.headers.append('Access-Control-Allow-Methods', 'GET,DELETE,PATCH,POST,PUT')
    res.headers.append(
        'Access-Control-Allow-Headers',
        'X-CSRF-Token, X-Requested-With, Accept, Accept-Version, Content-Length, Content-MD5, Content-Type, Date, X-Api-Version'
    )

    return res
}

// specify the path regex to apply the middleware to
export const config = {
    matcher: '/api/:path*',
}
Make sure to adapt the CORS policy specified in this snippet to your needs.
Note that the matcher config accepts a regex path, forcing the middleware to run only on specific paths. If an incorrect value is used, Next.js will fail and display an Invalid middleware found error message.
If your app relies on the App Router, you can remove the config export and place this file directly in the src/app/api path. In both cases, the middleware function will be applied to all API endpoints under the /api path.
Chances are good that your Next.js project is hosted on Vercel, as Vercel is the development team behind Next.js. You can configure the CORS headers in a Next.js app deployed on Vercel by initializing a vercel.json file in the root folder of your project like so:
{
  "headers": [
    {
      "source": "/api/(.*)",
      "headers": [
        { "key": "Access-Control-Allow-Credentials", "value": "true" },
        { "key": "Access-Control-Allow-Origin", "value": "*" },
        { "key": "Access-Control-Allow-Methods", "value": "GET,DELETE,PATCH,POST,PUT" },
        { "key": "Access-Control-Allow-Headers", "value": "X-CSRF-Token, X-Requested-With, Accept, Accept-Version, Content-Length, Content-MD5, Content-Type, Date, X-Api-Version" }
      ]
    }
  ]
}
As you can see, the headers key has a similar syntax to the equivalent one in next.config.js. What changes is the format of the source field.
Alternatively, you can also set up CORS with the following Vercel serverless function:
const enableCors = fn => async (req, res) => {
  res.setHeader('Access-Control-Allow-Credentials', true)
  res.setHeader('Access-Control-Allow-Origin', '*') // replace this your actual origin
  res.setHeader('Access-Control-Allow-Methods', 'GET,DELETE,PATCH,POST,PUT')
  res.setHeader(
    'Access-Control-Allow-Headers',
    'X-CSRF-Token, X-Requested-With, Accept, Accept-Version, Content-Length, Content-MD5, Content-Type, Date, X-Api-Version'
  )

  // specific logic for the preflight request
  if (req.method === 'OPTIONS') {
    res.status(200).end()
    return
  }

  return await fn(req, res)
}

const handler = (req, res) => {
  const currentDate = new Date()
  res.end(currentDate.toString())
}

module.exports = enableCors(handler)
Et voilà! You now know how to use CORS on all your Next.js API endpoints!
Now that we have covered the basics for enabling CORS in Next.js, let’s explore some advanced cross-origin policies that can further enhance your security setup.
Cross-Origin-Opener-Policy in ReactThe Cross-Origin-Opener-Policy (COOP) header is used to secure your site by isolating browsing contexts like a tab or window. This prevents a webpage from sharing a browsing context with cross-origin documents. This can be useful in protecting your site from attacks like cross-site scripting (XSS) and data stolen through shared browsing contexts.
To set this header in a Next.js application, you can add it to the headers section of your next.config.js:
// next.config.js

/** @type {import('next').NextConfig} */
const nextConfig = {
    async headers() {
        return [
            {
                // matching all API routes
                source: "/api/:path*",
                headers: [
                    // other headers omitted for brevity...
                    { key: "Cross-Origin-Opener-Policy", value: "same-origin" }
                ]
            }
        ]
    }
}

module.exports = nextConfig
Strict-Origin-When-Cross-Origin configurationThe Strict-Origin-When-Cross-Origin policy provides more privacy and security when compared to policies like no-referrer-when-downgrade. This is done by sending the full URL only when the origin of the request matches the origin of the resource. For cross-origin requests, only the origin is sent.
To set this header in your Next.js application, include it in your headers section:
// next.config.js

/** @type {import('next').NextConfig} */
const nextConfig = {
    async headers() {
        return [
            {
                // matching all API routes
                source: "/api/:path*",
                headers: [
                    // other headers omitted for brevity...
                    { key: "Referrer-Policy", value: "strict-origin-when-cross-origin" }
                ]
            }
        ]
    }
}

module.exports = nextConfig
Now, assume your frontend app needs to perform a GET API call to /api/hello-world. This is what the preflight request will look like:
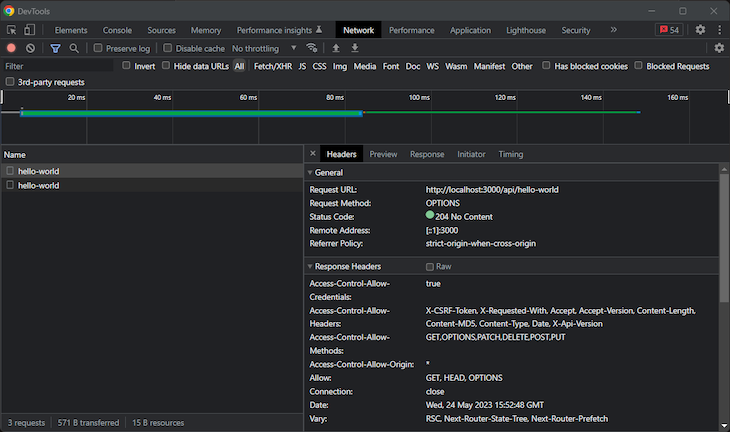
By the 2xx HTTP status code, you can tell that the preflight request was performed successfully. The browser is now allowed to execute the actual cross-origin request:
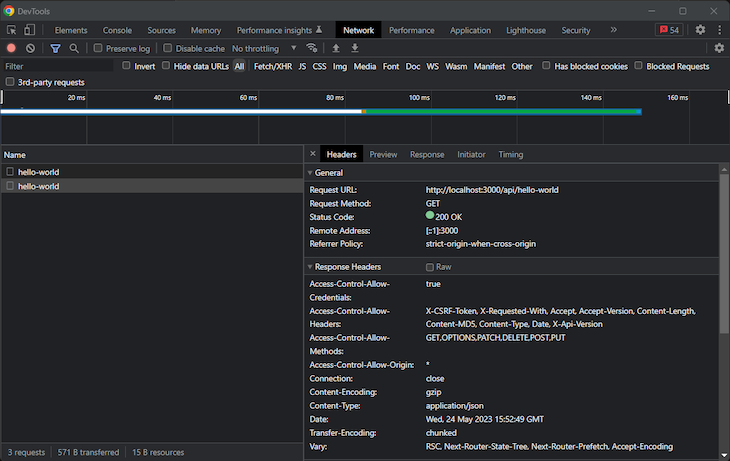
Focus on the CORS headers in the Response Headers section. They match the ones defined in the approaches above.
Before wrapping up, here are some CORS Next.js tips and tricks you should know.
ALLOW header values from the env variablesCORS policies may change over time. Therefore, you should not hardcode them. Instead, you can set up some environment variables as shown below:
ACCESS_CONTROL_ALLOW_CREDENTIALS="true"
ACCESS_CONTROL_ALLOW_ORIGIN="*"
ACCESS_CONTROL_ALLOW_METHODS="GET,OPTIONS,PATCH,DELETE,POST,PUT"
ACCESS_CONTROL_ALLOW_HEADERS="X-CSRF-Token, X-Requested-With, Accept, Accept-Version, Content-Length, Content-MD5, Content-Type, Date, X-Api-Version"
Then, use them in your code:
res.headers.append('Access-Control-Allow-Credentials', process.env.ACCESS_CONTROL_ALLOW_CREDENTIALS)
res.headers.append('Access-Control-Allow-Origin', process.env.ACCESS_CONTROL_ALLOW_ORIGIN) // replace this your actual origin
res.headers.append('Access-Control-Allow-Methods', process.env.ACCESS_CONTROL_ALLOW_METHODS)
res.headers.append('Access-Control-Allow-Headers', process.env.ACCESS_CONTROL_ALLOW_HEADERS)
Great! The CORS definition logic no longer involves hardcoded strings.
The Access-Control-Allow-Origin header is a binary option that accepts either a single origin or all origins. You would use an asterisk * to set this header to accept all domains, but this wildcard cannot be used when credentials are included in the request.
If you want to permit multiple but not all CORS origins, you need to write custom logic. Keep in mind that you can only implement this approach with the middleware solution. The other two options for enabling CORS in Next.js involve static files that do not accept custom behavior.
Update the middleware.js file as shown below:
import { NextResponse } from "next/server";

// the list of all allowed origins
const allowedOrigins = [
  'http://localhost:3000',
  'https://example-1.com',
  'https://example-2.com',
  // ...
  'https://example-99.com',
];

export function middleware(req) {
    // retrieve the current response
    const res = NextResponse.next()

    // retrieve the HTTP "Origin" header
    // from the incoming request
    req.headers.get("origin")

    // if the origin is an allowed one,
    // add it to the 'Access-Control-Allow-Origin' header
    if (allowedOrigins.includes(origin)) {
      res.headers.append('Access-Control-Allow-Origin', origin);
    }

    // add the remaining CORS headers to the response
    res.headers.append('Access-Control-Allow-Credentials', "true")
    res.headers.append('Access-Control-Allow-Methods', 'GET,DELETE,PATCH,POST,PUT')
    res.headers.append(
        'Access-Control-Allow-Headers',
        'X-CSRF-Token, X-Requested-With, Accept, Accept-Version, Content-Length, Content-MD5, Content-Type, Date, X-Api-Version'
    )

    return res
}

// specify the path regex to apply the middleware to
export const config = {
    matcher: '/api/:path*',
}
All you have to do is check whether the current Origin header sent by the browser matches one of those allowed. If so, specify the Origin variable in the appropriate CORS header to enable cross-origin requests from it.
Suppose you want to define a particular CORS policy for the /api/special-data endpoint. To do so, you could add a new entry to the array returned by headers() in next.config.js:
// next.config.js

/** @type {import('next').NextConfig} */
const nextConfig = {
    async headers() {
        return [
            {
                // matching all API routes
                source: "/api/:path*",
                headers: [
                   // omitted for brevity...
                ]
            },
            {
                source: "/api/special-data",
                headers: [
                    { key: "Access-Control-Allow-Credentials", value: "false" },
                    { key: "Access-Control-Allow-Origin", value: "https://example.com" },
                    { key: "Access-Control-Allow-Methods", value: "GET,DELETE,PATCH,POST,PUT" },
                    { key: "Access-Control-Allow-Headers", value: "Accept, Accept-Version, Content-Length, Content-MD5, Content-Type, Date" },
                ]
            }
        ]
    }
}

module.exports = nextConfig
Note that the source field of the second entry matches the endpoint of the desired API. This means that Next.js will prefer it to the more generic first entry.
Otherwise, you could update middleware.js and adapt its logic based on the request’s pathname:
import { NextResponse } from "next/server";

export function middleware(req) {
    // retrieve the current response
    const res = NextResponse.next()

    // if the incoming is for the desired API endpoint
    if (req.nextUrl.pathname === '/special-data') {
        res.headers.append('Access-Control-Allow-Credentials', "false")
        res.headers.append('Access-Control-Allow-Origin', 'https://example.com')
        res.headers.append('Access-Control-Allow-Methods', 'GET,DELETE,PATCH,POST,PUT')
        res.headers.append('Access-Control-Allow-Headers', 'Accept, Accept-Version, Content-Length, Content-MD5, Content-Type, Date')
    } else {
        // generic CORS policy omitted for brevity....
    }

    return res
}

// specify the path regex to apply the middleware to
export const config = {
    matcher: '/api/:path*',
}
If you are an App Router user, you can get the same result by creating a middleware.js file in the src/app/special-data folder.
Fantastic! The single-origin restriction is no longer an issue!
Next.js has recently introduced several new features to make managing CORS easier.
crossOriginThe crossOrigin configuration option allows you to specify how the resource should be fetched with a CORS request:
// next.config.js

/** @type {import('next').NextConfig} */
const nextConfig = {
    crossOrigin: 'anonymous', // or 'use-credentials'
    // other configurations...
}

module.exports = nextConfig
The nextjs-cors package provides middleware to enable CORS in Next.js applications easily. First, install the package:
npm install nextjs-cors
Then, use it in your API routes like so:
import NextCors from 'nextjs-cors';

export default async function handler(req, res) {
    await NextCors(req, res, {
        // Options
        methods: ['GET', 'HEAD', 'PUT', 'PATCH', 'POST', 'DELETE'],
        origin: '*', // replace this with your actual origin
        optionsSuccessStatus: 200, // some legacy browsers (IE11, various SmartTVs) choke on 204
    });

    res.json({ message: 'Hello Next.js!' });
}
CORS is designed to prevent unauthorized access to resources from different origins or domains in your application. However, if the CORS headers are not configured correctly, they can result in errors when APIs or resources are accessed across different domains.
Let’s explore some common CORS errors and how to resolve them on your application server.
This type of error occurs when the CORS header is not properly configured or when the requesting website’s origin does not match the one specified in the server’s Access-Control-Allow-Origin header.
To resolve this error, ensure that the Access-Control-Allow-Origin header is properly configured in your application’s CORS settings to allow requests from specific websites, as demonstrated in the code below:
"Access-Control-Allow-Origin", "https://example.com"
You can also set the value of the Access-Control-Allow-Origin header to * to make your application’s APIs or resources publicly accessible.
A preflight request failure occurs when the browser sends an OPTIONS request to the server to verify if the actual request (like GET, POST, PUT, etc.) is allowed by the server, but the server’s response is either missing or incorrect. This can result in a CORS error when the actual request is blocked by the browser.
To resolve the preflight request failure, ensure that the server includes the necessary CORS headers in its response to the OPTIONS preflight request, as shown below:
"Access-Control-Allow-Origin", "https://www.example.com"
"Access-Control-Allow-Methods", "GET, POST, PUT"
"Access-Control-Allow-Headers", "Content-Type, Authorization"
Referrer-Policy errorA Referrer-Policy error occurs when there is a conflict or inconsistency in how the Referrer-Policy is configured, causing the server to process the request incorrectly or fail altogether.
To resolve this error, ensure that the server’s Referrer-Policy header is set to an appropriate value, such as strict-origin-when-cross-origin, origin-when-cross-origin, or another valid option.
Cross-Origin-Opener-Policy errorA Cross-Origin-Opener-Policy error occurs when the COOP header is missing or misconfigured, which can cause issues with your application’s security and interaction with cross-origin resources. COOP helps isolate a web application from cross-origin resources to protect against side-channel attacks like Spectre.
To resolve this error, ensure that the Cross-Origin-Opener-Policy header is set to an appropriate value, such as same-origin, same-origin-allow-popups, or noopener-allow-popups, depending on your application’s requirements. You can configure the header using any of the code below:
"Cross-Origin-Opener-Policy","same-origin"
// or
"Cross-Origin-Opener-Policy","same-origin-allow-popups"
//or
"Cross-Origin-Opener-Policy","noopener-allow-popups"
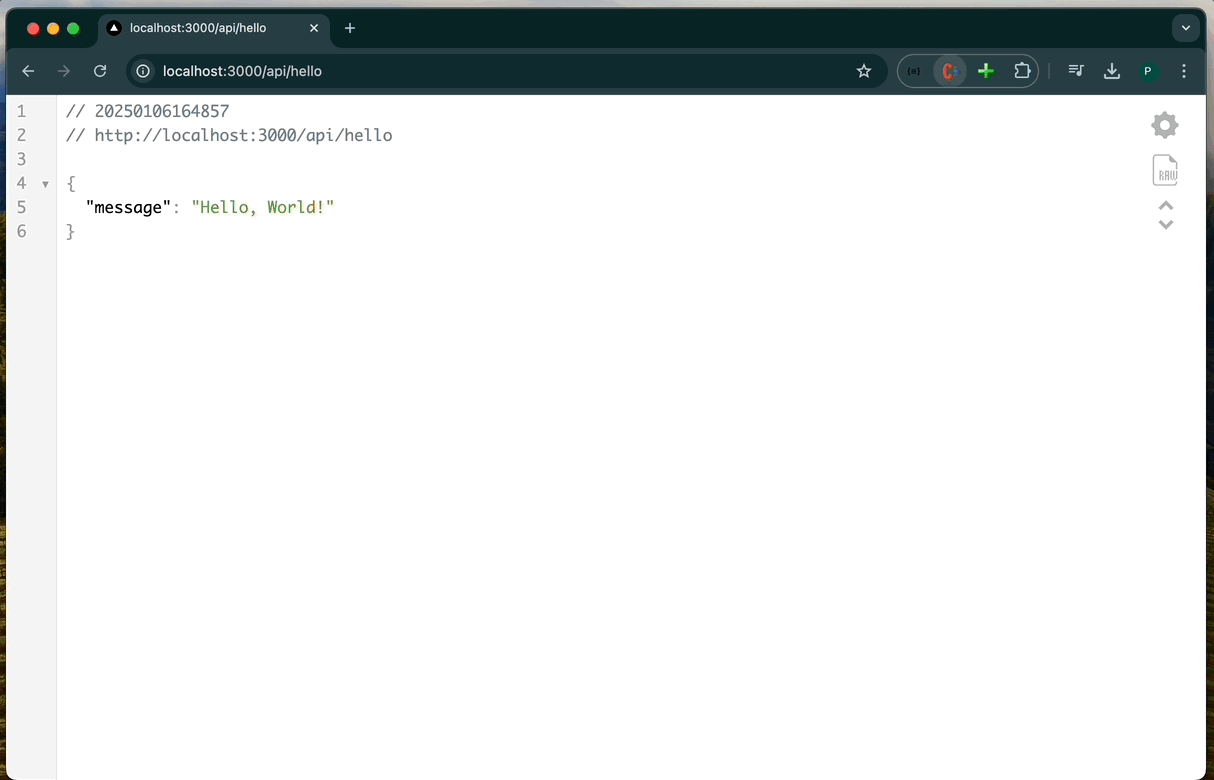
The Allow CORS: Access-Control-Allow-Origin Chrome extension is a valuable tool for testing an API’s CORS configuration, making it easier to identify and resolve CORS errors in their applications. To use this tool, install the extension in Chrome and enable it.
Next, open http://localhost:3000/api/hello and test the API’s CORS header configuration by following the steps shown below:
In this guide, we learned what CORS is and its significance for enhancing the security of backend applications. More specifically, we examined the most critical CORS headers and how to configure them in Next.js.
There are several ways to deal with CORS in Next.js. These configurations require minimal code but provide substantial security benefits.
Thanks to the Next.js capabilities, configuring CORS has never been easier. Make your site more secure today.
Debugging Next applications can be difficult, especially when users experience issues that are difficult to reproduce. If you’re interested in monitoring and tracking state, automatically surfacing JavaScript errors, and tracking slow network requests and component load time, try LogRocket.
LogRocket captures console logs, errors, network requests, and pixel-perfect DOM recordings from user sessions and lets you replay them as users saw it, eliminating guesswork around why bugs happen — compatible with all frameworks.
LogRocket's Galileo AI watches sessions for you, instantly identifying and explaining user struggles with automated monitoring of your entire product experience.
The LogRocket Redux middleware package adds an extra layer of visibility into your user sessions. LogRocket logs all actions and state from your Redux stores.


Modernize how you debug your Next.js apps — start monitoring for free.

Debug RSC hydration mismatches in production with Next.js instrumentation, Suspense isolation, HTML diffing, and CI smoke tests.

Explore why npm dependencies are a major supply chain security risk and how to protect JavaScript apps from compromised packages and transitive threats.

Enabled React Compiler v1.0 on a production Next.js app. Here’s every warning, breakage, and silent opt-out I documented — and what actually worked.

We built the same app in TanStack Start RSC and Next.js RSC. TanStack shipped 40% less JS and built 4x faster — but Next.js is still the safer production bet.
Hey there, want to help make our blog better?
Join LogRocket’s Content Advisory Board. You’ll help inform the type of content we create and get access to exclusive meetups, social accreditation, and swag.
Sign up now

