Images are the backbone of today’s digital content. From sharing selfies and memes to capturing landscapes, memories, and more, images are everywhere. They are part of big social networks as well as the media, blogs, and countless other sources of news and entertainment.

From a development perspective, effective image handling plays an important role in optimizing a website or app’s performance and providing a better user experience. AWS offers services called Lambda, CloudFront, and S3 that allow us to build a robust solution for image manipulation and delivery on the fly and scale seamlessly with ease.
In this guide, we’ll explore serverless infrastructure and build an image resizing and delivery service using Lambda and CloudFront. If you’re familiar with TypeScript and interested in cloud computing, this guide will help you deploy a service for image manipulation and delivery that scales smoothly to your needs.
In the world of serverless cloud computing, AWS Lambda and AWS CloudFront each play a significant role in revolutionizing application development and delivery.
AWS Lambda allows developers to execute code without the need of managing servers. Lambda enables applications to scale based on the size of incoming requests for any amount of traffic.
Meanwhile, CloudFront is an AWS content delivery network (CDN) that accelerates the delivery of static and dynamic content globally. It caches content on the edge — in other words, using a global network of “edge locations,” or data centers — to enable services to reduce latency on delivery.
Integrating CloudFront with Lambda@Edge enables real-time customization, advanced caching, and personalized content delivery.
Together, Lambda and CloudFront enable developers to deploy applications and services that scale by workload size, using a global caching mechanism to enable faster loads and higher performance. Ultimately, using these services together leads to better user experiences.
The AWS Cloud Development Kit (CDK) is a cloud-infrastructure-as-code framework. It allows developers to write and deploy infrastructure using common programming languages like TypeScript, Go, Java, and others.
CDK follows the “infrastructure as code” (IaC) mechanism, which updates the infrastructure as the code changes. This allows for more reliable deployment, reducing the risk of configuration drifts. It also supports modern coding practices, enhancing the modularity and maintainability of the code and improving DX.
AWS CDK uses CloudFormation to deploy and provision infrastructure over AWS. CloudFormation allows for predictable and repeatable deployments, with rollback on errors.
Using AWS CDK, teams can streamline resource deployment, increase productivity, and adopt best practices in cloud infrastructure deployment and management.
Let’s review what we need for the on-the-fly image processor we will create. You can check out the source code in this GitHub repo.
First, we’ll set up an S3 bucket to hold our assets — the originals as well as the resized ones. We’ll also enable static hosting for the bucket.
Next, we‘ll create a CloudFront distribution linked to a domain name for the static S3 hosting. If the image is cached, we show the image, while if the image is not cached, then we call the S3 bucket. Meanwhile, if the image does not exist for the specified dimensions, we redirect the user to the Lambda function.
Finally, we need a Lambda function that will be responsible for the image processing. This includes fetching the original image, resizing the image to the desired dimensions, and saving the resized image in the S3 bucket.
Let’s proceed with the steps to initialize your CDK project for image optimization with Lambda and CloudFront. First, create a new directory:
mkdir image-optimization-cdk-lambda-cloudfront
Next, initialize an AWS CDK project:
cd image-optimization-cdk-lambda-cloudfront
cdk init app --language typescript
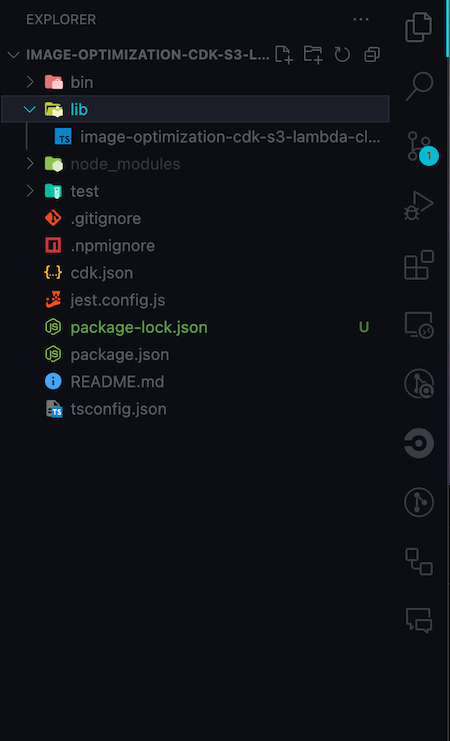
After initializing the CDK project, open it in your preferred code editor. Navigate to the directory containing your CDK project and then go to the directory where you want to define your CDK stacks and resources. Typically, for a CDK TypeScript project, this would be the lib directory.
Your project structure should look like the following image:

Context type for the CDK projectBecause this tutorial only requires one environment, we’ll use a basic context for this CDK app project. Firstly, create a file to hold the Context type:
touch types.ts
Then, add the following code to the file:
export type CDKContext = {
  appName: string;
  region: string;
  mediaDomain: string;
};
Finally, add the following global variable to the lib/image-optimization-cdk-s3-lambda-cloudfront-stack.ts file:
const CONTEXT: CDKContext = {
  appName: "ImageOptimizationCdkS3LambdaCloudfront",
  region: "ap-south-1",
  mediaDomain: "s3-resizer.nitishxyz.dev", //use your own domain here
};
Creating an S3 bucket with CDK streamlines the process of setting up storage for your images and assets. By leveraging AWS CDK’s infrastructure-as-code approach, you ensure consistency and reproducibility in your deployments. Let’s explore how to create an S3 bucket using AWS CDK.
Inside the lib directory, create a new file named s3-stack.ts:
touch lib/s3-stack.ts
Create a new construct for s3-stack and, in addition, create the S3 bucket:
import { Construct } from "constructs";
import * as cdk from 'aws-cdk-lib';
import * as s3 from "aws-cdk-lib/aws-s3";

export class S3StackConstruct extends Construct {
  readonly bucket: s3.Bucket;
  readonly bucketArn: s3.Bucket["bucketArn"];
  constructor(scope: Construct, id: string, context: CDKContext) {

    // Create a S3 bucket
    const bucket = new s3.Bucket(this, `cdk-s3-bucket-storage`, {
      bucketName: `cdk-s3-bucket-storage`,
      enforceSSL: true,
      removalPolicy: cdk.RemovalPolicy.RETAIN,
      objectOwnership: s3.ObjectOwnership.OBJECT_WRITER,
      websiteIndexDocument: "index.html",
      websiteErrorDocument: "error.html",
    });

    this.bucket = bucket;
    this.bucketArn = bucket.bucketArn;
  }
}
The above code will create a new bucket named cdk-s3-bucket-storage.
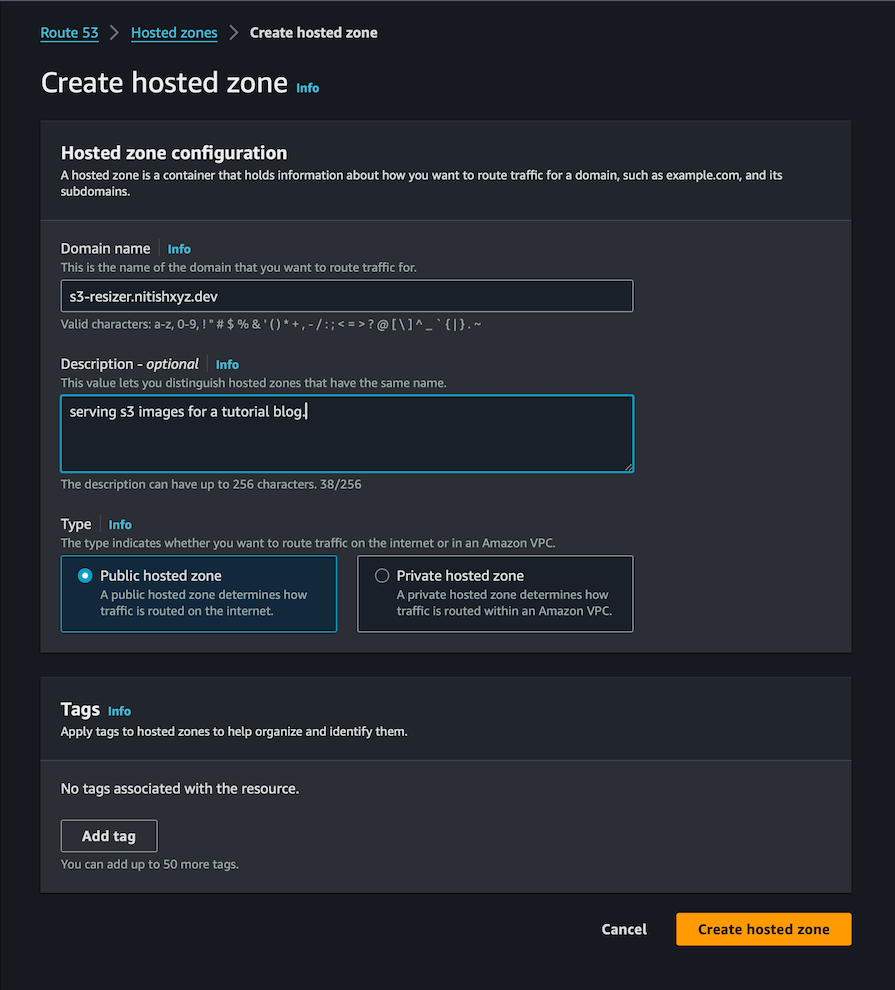
We need to create a hosted zone in Amazon Route 53 over AWS Console for use within our app. The following images map out the whole flow for creating a new hosted zone.
First, navigate to Route 53 > Hosted zones in AWS Console. Click on Create hosted zone:

Next, enter the domain name and a description, then click on Create hosted zone:

The above configuration will allow us to use the hosted zone with the domain name we just created in our CDK code. We will use this domain to access the CloudFront distribution — in other words, the cached images.
Next, we will create a CloudFront distribution and link it to the hosted zone that we created above. Use the following code to look up the hosted zone for our domain name:
const hostedZone = route53.HostedZone.fromLookup(this, "HostedZone", {
    domainName: DOMAIN,
});
Then we’ll create a new DnsValidatedCertificate for the hosted zone:
const certificate = new acm.DnsValidatedCertificate(this, "Certificate", {
      domainName: DOMAIN,
      hostedZone,
      region: "us-east-1",
});
Note that if your default region is in us-east-1, you won’t need to specify the region. Now, let’s create the CloudFront distribution with the origin source set to our bucket:
const distribution = new cloudfront.CloudFrontWebDistribution(
      this,
      "Distribution",
      {
        originConfigs: [
          {
            customOriginSource: {
              domainName: bucket.bucketWebsiteDomainName,
              originProtocolPolicy: cloudfront.OriginProtocolPolicy.HTTP_ONLY,
            },
            behaviors: [
              {
                isDefaultBehavior: true,
              },
              {
                pathPattern: "*.jpg",
                cachedMethods:
                  cloudfront.CloudFrontAllowedCachedMethods.GET_HEAD,
              },
              {
                pathPattern: "*.jpeg",
                cachedMethods:
                  cloudfront.CloudFrontAllowedCachedMethods.GET_HEAD,
              },
              {
                pathPattern: "*.png",
                cachedMethods:
                  cloudfront.CloudFrontAllowedCachedMethods.GET_HEAD,
              },
            ],
          },
        ],
        viewerCertificate: cloudfront.ViewerCertificate.fromAcmCertificate(
          certificate,
          {
            aliases: [DOMAIN],
            securityPolicy: cloudfront.SecurityPolicyProtocol.TLS_V1_2_2021,
            sslMethod: cloudfront.SSLMethod.SNI,
          }
        ),
      }
    );
In above code, we also added caching behaviors for the paths that end with jpg, jpeg, and png. We also added the SSL certificate to the domain linked to CloudFront distribution.
Next, we’ll create a Lambda function to dynamically resize and optimize images upon request. We’ll utilize the sharp library within a Node.js Lambda function for efficient image processing:
Create a new file that will hold the lambda code for image processing, using the following command:
mkdir -p lambda/s3resizer && touch lambda/s3resizer/index.ts
Now, add some dependencies that will be required by the Lambda function:
npm install --save [email protected] [email protected] [email protected]
Let’s briefly review the purpose of each dependency:
sharp: A high-performance Node.js image processing library known for its speed, memory efficiency, and versatility. It offers features like resizing, cropping, rotating, and applying filters to imagesmime: A utility module in Node.js that helps determine the MIME type of a given file based on its filename or file contentfile-type: A library module in Node.js used to detect the file type of a Buffer (an array of binary data) or a Uint8Array (an array of 8-bit unsigned integers). It examines the binary contents of a file and attempts to determine its MIME type and file extension based on the file’s magic numbers and patternsNext, add the following code to the index.ts file, which we created above:
/* Amplify Params - DO NOT EDIT
        API_SUPTHOAPP_GRAPHQLAPIENDPOINTOUTPUT
        API_SUPTHOAPP_GRAPHQLAPIIDOUTPUT
        API_SUPTHOAPP_GRAPHQLAPIKEYOUTPUT
        ENV
        REGION
        STORAGE_S3SUPTHOAPPSTORAGE_BUCKETNAME
Amplify Params - DO NOT EDIT */

"use strict";

import { APIGatewayProxyEvent } from "aws-lambda";
import * as AWS from "aws-sdk";
import { Readable } from "stream";

const stream = require("stream");
const sharp = require("sharp");
const mime = require("mime/lite");
const fileType = require("file-type");

const BUCKET = process.env.BUCKET_NAME || "cdk-s3-bucket";
const CDN_URL = process.env.URL || "https://s3-resizer.nitishxyz.dev";
const s3 = new AWS.S3();

type Params = { width?: number; height?: number };

async function detectHEIF(imageStream: Readable) {
  return new Promise(async (resolve, reject) => {
    try {
      // Read the first few bytes from the image stream
      const buffer = await sharp(imageStream).toBuffer();

      // Determine the file type based on the buffer
      const type = await fileType.fromBuffer(buffer);

      // Check if the file type is HEIF
      if (type && (type.mime === "image/heif" || type.mime === "image/heic")) {
        resolve(true);
      }

      resolve(false);
    } catch (error) {
      reject(error);
    }
  });
}

export const handler = async (event: APIGatewayProxyEvent) => {
  if (event.queryStringParameters == null) {
    return {
      statusCode: 404,
      body: JSON.stringify("INVALID_QUERYSTRING"),
    };
  }

  // read key from querystring
  const key = event.queryStringParameters?.key;

  // if key is not provided, stop here
  if (!key) {
    return {
      statusCode: 404,
      body: JSON.stringify("INVALID_KEY"),
    };
  }

  let size: string | undefined = "360w";

  const key_components = key.split("/");

  // extract file name
  const file = key_components.pop();
  // extract file size
  size = key_components.pop();

  // if file is not provided, stop here

  if (!file) {
    return {
      statusCode: 404,
      body: JSON.stringify("INVALID_FILE"),
    };
  }

  // if size is not provided, stop here
  if (!size) {
    return {
      statusCode: 404,
      body: JSON.stringify("Invalid image size."),
    };
  }

  var params: Params = {};

  // extract size from given string
  if (size.slice(-1) == "w") {
    // extract width only
    params.width = parseInt(size.slice(0, -1), 10);
  } else if (size.slice(-1) == "h") {
    // extract height only
    params.height = parseInt(size.slice(0, -1), 10);
  } else {
    // extract width & height
    var size_components = size.split("x");

    // if there aren't 2 values, stop here
    if (size_components.length != 2)
      return {
        statusCode: 404,
        body: JSON.stringify("Invalid image size."),
      };

    params = {
      width: parseInt(size_components[0], 10),
      height: parseInt(size_components[1], 10),
    };

    if (isNaN(params.width!) || isNaN(params.height!))
      return {
        statusCode: 404,
        body: JSON.stringify("Invalid image size."),
      };
  }

  // check if target key already exists
  var target = null;
  await s3
    .headObject({
      Bucket: BUCKET,
      Key: key,
    })
    .promise()
    .then((res) => (target = res))
    .catch(() => console.log("File doesn't exist."));

  // if file exists and the request is not forced, stop here
  const forced = typeof event.queryStringParameters?.force !== "undefined";
  if (target != null && !forced) {
    // 301 redirect to existing image
    return {
      statusCode: 301,
      headers: {
        location: CDN_URL + "/" + key,
      },
      body: "",
    };
  }

  // add file name back to get source key
  key_components.push(file);

  try {
    console.log(
      "existing file key_components",
      key_components,
      key_components.join("/")
    );
    const readStream = getS3Stream(key_components.join("/"));

    const stream2SharpParams = {
      ...params,
      isHeic: false,
    };

    // check if file is af heic format
    let isHeic = mime.getType(key_components.join("/")) === "image/heic";
    if (!isHeic) {
      isHeic = (await detectHEIF(readStream).catch((err) => {
        return false;
      })) as boolean;
    }

    if (isHeic) {
      stream2SharpParams.isHeic = true;
    }

    const resizeStream = stream2Sharp(stream2SharpParams);

    const { writeStream, success } = putS3Stream(key);

    // trigger stream
    readStream.pipe(resizeStream).pipe(writeStream);

    // wait for the stream
    await success;

    // 301 redirect to new image
    return {
      statusCode: 301,
      headers: {
        location: CDN_URL + "/" + key,
      },
      body: "",
    };
  } catch (err) {
    let message = "SOMETHING_WENT_WRONG";
    if (err instanceof Error) {
      message = err.message;
    }

    return {
      statusCode: 500,
      body: message,
    };
  }
};

const getS3Stream = (key: string) => {
  return s3
    .getObject({
      Bucket: BUCKET,
      Key: key,
    })
    .createReadStream();
};

const putS3Stream = (key: string) => {
  const pass = new stream.PassThrough();
  const chunks: Buffer[] = [];

  pass.on("data", (chunk: Buffer) => {
    chunks.push(chunk);
  });

  const putObjectPromise = new Promise((resolve, reject) => {
    pass.on("end", () => {
      const buffer = Buffer.concat(chunks);
      s3.putObject(
        {
          Body: buffer,
          Bucket: BUCKET,
          Key: key,
          ContentType: "image/jpeg",
          ACL: "public-read",
        },
        (err, data) => {
          if (err) {
            reject(err);
          } else {
            resolve(data);
          }
        }
      );
    });
  });

  return {
    writeStream: pass,
    success: putObjectPromise,
  };
};

const stream2Sharp = (params: Params) => {
  return sharp()
    .toFormat("jpeg")
    .jpeg({
      quality: 100,
      mozjpeg: true,
    })
    .rotate()
    .resize(
      Object.assign(params, {
        withoutEnlargement: true,
      })
    );
};
In the code above, we firstly read the queryStringParameters to get the key from the Lambda execution URL:
  // read key from querystring
  const key = event.queryStringParameters?.key;
The code above requires the key in the following format:
path/size/imageName
For example, public/360w/test.jpg. Then, we extract the filename and size from the key:
  // extract file name
  const file = key_components.pop();
  // extract file size
  size = key_components.pop();
After this, we validate the size of the image so that the code stops execution if the sizing is not in correct format.
Next, we’ll check if the image already exists:
 // check if target key already exists
  var target = null;
  await s3
    .headObject({
      Bucket: BUCKET,
      Key: key,
    })
    .promise()
    .then((res) => (target = res))
    .catch(() => console.log("File doesn't exist."));
If the file exists, then we redirect it to the CloudFront domain:
  if (target != null && !forced) {
    // 301 redirect to existing image
    return {
      statusCode: 301,
      headers: {
        location: CDN_URL + "/" + key,
      },
      body: "",
    };
  }
If it doesn’t, we proceed with the rest of the script. Next, we’ll check for the original image with the requested key:
const readStream = getS3Stream(key_components.join("/"));
After this, we resize the image:
const resizeStream = stream2Sharp(stream2SharpParams);
If the resizeStream function succeeds, then we’ll upload the image to our S3 bucket:
const { writeStream, success } = putS3Stream(key);
// trigger stream
readStream.pipe(resizeStream).pipe(writeStream);
// wait for the stream
await success;
Now the Lambda function is complete!
However, what our S3 Stack lacks is a way to deploy this Lambda function and redirect to it if the image with the requested size isn’t cached or doesn’t exist in the bucket. Add the following code to the s3-stack file to deploy the function:
const resizerLambda = new NodejsFunction(this, "resizerLambda", {
      functionName: `${context.appName}-resizerLambda`,
      entry: path.join(__dirname, "../lambda/s3Resizer/index.ts"),
      handler: "handler",
      runtime: lambda.Runtime.NODEJS_18_X,
      timeout: cdk.Duration.seconds(30),
      memorySize: 1024,
      ephemeralStorageSize: cdk.Size.gibibytes(1),
      bundling: {
        nodeModules: ["sharp"],
        commandHooks: {
          beforeBundling(_inputDir: string, _outputDir: string) {
            return [];
          },
          beforeInstall(inputDir: string, outputDir: string) {
            return [];
          },
          afterBundling(_inputDir: string, outputDir: string) {
            return [
              `cd ${outputDir}`,
              `rm -rf node_modules/sharp`,
              `rm -rf node_modules/sharp-cli`,
              `SHARP_IGNORE_GLOBAL_LIBVIPS=1 npm install --arch=x64 --platform=linux --libc=glibc sharp`,
            ];
          },
        },
      },
});
The bundling part is required to bundle the sharp library so it can be used over the AWS Lambda architecture.
Next, we’ll add the apiGateway layer so we can access this Lambda function through a URL:
const apiGateWay = new apigw.LambdaRestApi(this, "apiGateWay", {
      handler: resizerLambda,
});
API Gateway URLs are generated in a specific format. We need the URL so that we can enable the redirection from our S3 bucket if any errors occur:
const backendURL = `${apiGateWay.restApiId}.execute-api.${context.region}.amazonaws.com`;
Add the following routing rules to the S3 config:
websiteRoutingRules: [
        {
          hostName: backendURL,
          httpRedirectCode: "307",
          protocol: s3.RedirectProtocol.HTTPS,
          replaceKey: s3.ReplaceKey.prefixWith("prod/?key="),
          condition: {
            httpErrorCodeReturnedEquals: "403",
          },
        },
      ],
Add the following to provide Lambda with Read and Write access to S3. Also, add a bucket name and a CloudFront DOMAIN to the AWS Lambda environment:
bucket.grantReadWrite(resizerLambda);
    bucket.grantPut(resizerLambda);
    bucket.grantPutAcl(resizerLambda);
    resizerLambda.addToRolePolicy(
      new iam.PolicyStatement({
        resources: ["arn:aws:logs:*:*:*"],
        actions: [
          "logs:CreateLogGroup",
          "logs:CreateLogStream",
          "logs:PutLogEvents",
        ],
      })
    );
    const DOMAIN = context.mediaDomain;
    resizerLambda.addEnvironment("BUCKET_NAME", bucket.bucketName);
    resizerLambda.addEnvironment("URL", `https://${DOMAIN}`);
That’s it! We’ve successfully build the infrastructure for our on-the-fly image resizer and server mechanism with S3, CloudFront, and Lambda.
The last important part of this project is deploying the whole infrastructure to the cloud. We’ll use GitHub Actions for this step. If you have a Linux machine, you can do it locally as well.
Let’s take care of one thing before using GitHub Actions to deploy our project. In the default S3 deployment, the first statement in the policy disallows anyone or any service to access S3 except for the AWS admin console. Because of this, we need to do a little hack to remove the statement from bucket’s policy.
So, create a new scripts/updateS3Policy.js file and add the following content:
const fs = require("fs");
const path = require("path");
async function main() {
  console.log(`Updating S3 bucket policy`);
  const fileName = path.join(
    __dirname,
    `../cdk.out/ImageOptimizationCdkS3LambdaCloudfrontStack.template.json`
  );
  fs.readFile(fileName, "utf8", (err, data) => {
    if (err) {
      console.error(`Error reading file: ${err}`);
      return;
    }
    let json = JSON.parse(data);
    const resources = json.Resources;
    if (!resources) {
      console.error(`No "Resources" found in the JSON file`);
      return;
    }
    const bucketPolicyResource = Object.values(resources).find(
      (resource) => resource.Type === "AWS::S3::BucketPolicy"
    );
    if (
      !bucketPolicyResource ||
      !bucketPolicyResource.Properties ||
      !bucketPolicyResource.Properties.PolicyDocument
    ) {
      console.error(
        `No bucket policy found in the JSON file for "Type": "AWS::S3::BucketPolicy"`
      );
      return;
    }
    const statementArray =
      bucketPolicyResource.Properties.PolicyDocument.Statement;
    if (!Array.isArray(statementArray) || statementArray.length === 0) {
      console.error(
        `No statements found in the bucket policy for "Type": "AWS::S3::BucketPolicy"`
      );
      return;
    }
    // Perform actions with the statement array here
    console.log("Statement Array:", statementArray);
    statementArray.shift();
    const updatedJson = JSON.stringify(json, null, 2);
    fs.writeFile(fileName, updatedJson, "utf8", (err) => {
      if (err) {
        console.error(`Error writing file: ${err}`);
        return;
      }
      console.log(`First statement removed from ${fileName}`);
    });
  });
}
main();
Running this script will remove the first statement from the bucket’s policy.
Now, add an entry to the script in the package.json file:
"deploy:ci": "rm -rf cdk.out && cdk bootstrap && cdk synth && node scripts/updateS3Policy.js && cdk --app cdk.out deploy --all --require-approval never"
Running this script will remove any existing output of the cdk synth command and run it again. Then, run the above updateS3Policy.js script again to remove the statement from the policy and then deploy the infrastructure to the cloud.
Now, to the GitHub Action. Create a new file in the .github/workflows file:
mkdir -p .github/workflows && touch .github/workflows/deploy.yml
Add the following to the yml file:
name: CDK Deployment
on:
  push:
    branches:
      - none
jobs:
  deploy:
    runs-on: ubuntu-latest
    steps:
      - name: Checkout code
        uses: actions/checkout@v2
      - name: Configure AWS credentials
        uses: aws-actions/configure-aws-credentials@v1
        with:
          aws-access-key-id: ${{ secrets.AWS_ACCESS_KEY_ID }}
          aws-secret-access-key: ${{ secrets.AWS_SECRET_ACCESS_KEY }}
          aws-region: ap-south-1
      - name: Install dependencies
        run: npm install
      - name: Deploy infrastructure
        run: |
          if [[ "${{ github.ref }}" == "refs/heads/dev" ]]; then
          export AWS_ACCESS_KEY_ID="${{ secrets.AWS_ACCESS_KEY_ID }}"
            export AWS_SECRET_ACCESS_KEY="${{ secrets.AWS_SECRET_ACCESS_KEY }}"
            export AWS_REGION=${{ secrets.AWS_REGION }}
            export AWS_DEFAULT_ACCOUNT=${{ secrets.AWS_DEFAULT_ACCOUNT }}
          fi
          npm run deploy:ci
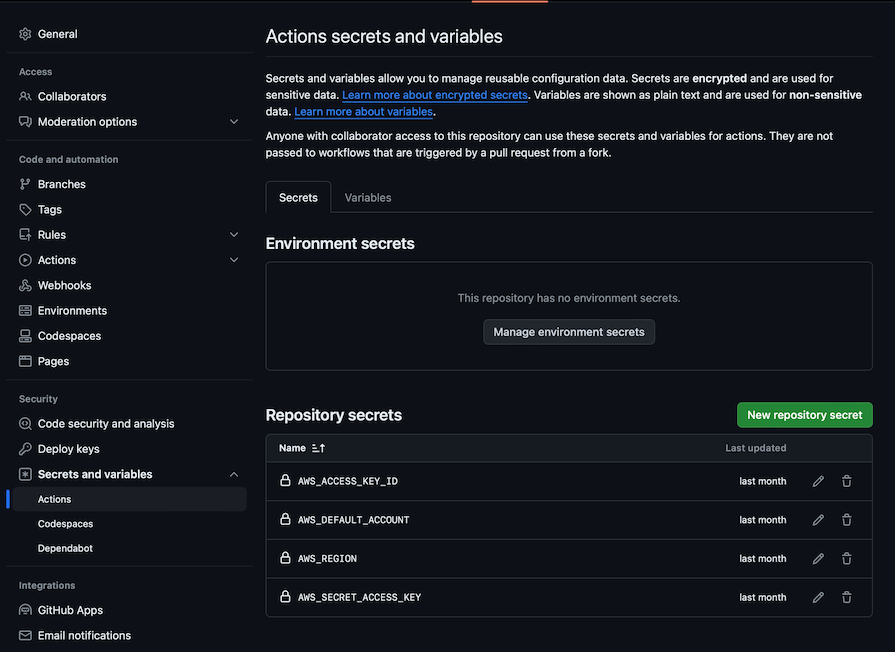
Before we can actually test this, we’ll need to add four GitHub Actions secrets to your repository:
AWS_ACCESS_KEY_IDAWS_SECRET_ACCESS_KEYAWS_DEFAULT_ACCOUNTAWS_REGIONHere’s how your Secrets and variables list should look:

Once done, we will be able to deploy our infrastructure to the AWS account with a git push command. You can get the complete code for this tutorial in this GitHub repo. You can also use GitHub Codespaces to edit and deploy your infrastructure easily.
In the guide, implementing our image manipulation feature and then delivering the new image showcased the powerful combination of the three major services offered by AWS: S3, Lambda, and CloudFront.
Using the sharp library, we built a small serverless app deployed over Lambda that checked for the requested image in the requested size. If the specified resource is not available, our app resizes the image to the requested dimensions, stores it in S3, and delivers with CloudFront.
CloudFront’s global caching mechanism ensures that, after the image is cached over the CDN, all requests will be much faster. Furthermore, the architecture outlined in this guide promotes using serverless infrastructure for on-the-fly image manipulation and delivery that’s fast, cost-effective, and scales as needed to traffic requirements.
By deploying such solutions, developers can focus on building their applications while leaving the underlying infrastructure and scaling requirements to AWS.
Install LogRocket via npm or script tag. LogRocket.init() must be called client-side, not
server-side
$ npm i --save logrocket

// Code:

import LogRocket from 'logrocket';
LogRocket.init('app/id');
// Add to your HTML:

<script src="https://cdn.lr-ingest.com/LogRocket.min.js"></script>
<script>window.LogRocket && window.LogRocket.init('app/id');</script>
Would you be interested in joining LogRocket's developer community?
Join LogRocket’s Content Advisory Board. You’ll help inform the type of content we create and get access to exclusive meetups, social accreditation, and swag.
Sign up now
Learn how to integrate MediaPipe’s Tasks API into a React app for fast, in-browser object detection using your webcam.

Integrating AI into modern frontend apps can be messy. This tutorial shows how the Vercel AI SDK simplifies it all, with streaming, multimodal input, and generative UI.

Interviewing for a software engineering role? Hear from a senior dev leader on what he looks for in candidates, and how to prepare yourself.

Set up real-time video streaming in Next.js using HLS.js and alternatives, exploring integration, adaptive streaming, and token-based authentication.