Images are an important component of most applications that handle user-generated content. However, excessively large or unoptimized image files can negatively impact performance and user experience. A robust image processing solution can be invaluable for UGC management.

sharp is a high-performance image processing module for Node.js. This module assists with UGC management by offering an easy solution for reading, enhancing, and saving image files. sharp compresses images faster than most other Node.js modules, like ImageMagick, Jimp, or Squoosh, and produces high-quality results.
sharp converts large common image formats to smaller, web-friendly images. sharp can read JPEG, PNG, WebP, AVIF, TIFF, GIF, and SVG image formats. This module can produce images in JPEG, PNG, WebP, AVIF, and TIFF formats as well as uncompressed raw pixel data.
In this tutorial, we’ll analyze and modify an image using the sharp Node.js library. The only prerequisite for this tutorial is a system set up with Node.js and npm.
We’ll cover the following:
To set up a sharp image project, start by creating a new directory in the editor’s terminal:
mkdir sharp_project
Next, migrate to a new directory:
cd sharp_project
Now, initialize npm:
npm init -y
Next, install sharp:
npm install sharp
Now, open the directory using your favorite IDE. In this tutorial, we’ll use VS Code.
code .
We’ll use the following two images:


To convert an image to grayscale, create a new file in the editor’s terminal:
touch _grayscale.js
Next, copy the following code:
const sharp = require('sharp')

const convertTograyscale = () => {
  sharp('./images/robo.jpg')
  .grayscale() // or .greyscale()
  .toFile(__dirname + '/processed_images/grayscale_robo.jpg')
}

convertTograyscale()
In this example, we start by creating an instance of the sharp module. We use the sharp() instance within the require() function scope to read the path to our image.
To carry out the processing task, we define the convertTograyscale() function. Then, we chain the sharp module’s grayscale() method to the sharp instance to alter the image’s appearance. We save the altered image in the processed_images folder using the toFile() method.
Now, we run the file code on the terminal:
node _grayscale.js
The newly created grayscale image, grayscale_robo.jpg, can be found in the processed_image folder:

To tint an image, start by creating a new file:
touch _tint.js
Now, copy the following code:
const sharp = require('sharp')

const tintImage = () => {
  sharp ('./images/robo.jpg')
  .tint({r: 255, g: 0, b: 0})
  .toFile(__dirname + '/processed_images/tint_robo.jpg')
}

tintImage()
We use the tint() method of the sharp module to alter the color of the image. With this method, we can specify the intensity of the red, green, and blue chroma values. The scale for this method is 0 to 255, with higher chroma values resulting in a more saturated tint. For this example, we use the 255 maximum value for the red parameter: r.
Save the file and run the following command:
node _tint.js
Here’s the newly created tinted image, tint_robo.jpg:

To extract the image metadata, start by creating a new file:
touch _metadata.js
Next, copy the following code:
const sharp = require('sharp')

const imageMetadata = () => {
  const metadata = sharp('./images/robo.jpg').metadata()

  console.log(metadata)
}

imageMetadata()
We use the metadata() function to extract the image metadata. We save the metadata variable and log to the terminal using console.log().
Now, we run the following command:
node _metadata.js
This produces the following output:
{
  format: 'jpeg',
  width: 1920,
  height: 1080,
  space: 'srgb',
  channels: 3,
  depth: 'uchar',
  density: 72,
  chromaSubsampling: '4:2:0',
  isProgressive: false,
  hasProfile: false,
  hasAlpha: false,
  orientation: 1,
  exif: <Buffer 45 78 69 66 00 00 4d 4d 00 2a 00 00 00 08 00 05 01 12 00 03 00 00 00 01 00 01 00 00 01 1a 00 05 00 00 00 01 00 00 00 4a 01 1b 00 05 00 00 00 01 00 00 ... 88 more bytes>,
  iptc: <Buffer 50 68 6f 74 6f 73 68 6f 70 20 33 2e 30 00 38 42 49 4d 04 04 00 00 00 00 00 00 38 42 49 4d 04 25 00 00 00 00 00 10 d4 1d 8c d9 8f 00 b2 04 e9 80 09 98 ... 4 more bytes>
}
To rotate an image, start by creating a new file:
touch _rotate.js
Now, add the following code:
const sharp = require('sharp');

const rotateImage = () => {
  sharp('./images/robo.jpg')
  .rotate(250)
  .toFile(__dirname + '/processed_images/rotate_robo.jpg')
}

rotateImage()
In this example, the rotateImage() function reads the image and returns it rotated by 250deg. We use the rotate() method within the function scope, which is chained to the sharp module. The rotate() method takes the rotation angle as an input and saves it as a new image: rotate_robo.jpg.
Now, run the file code:
node _rotate.js
Here’s the rotated image:

To resize an image, first create a new file:
touch _resize.js
Next, copy the following code:
const sharp = require('sharp')

const resizeImage = () => {
  const resize = sharp('./images/robo.jpg')
  .resize(350, 260)
  .toFile(__dirname + '/processed_images/resize_robo.jpg')

  console.log(resize)
}

resizeImage()
To resize the image, we first chain the resize() function to the sharp instance. Then, we save it in the processed_images folder. This procedure alters the overall dimensions without cropping or distorting the image.
Now, we run the following command:
node _resize.js
This produces the following output:
{
  format: 'jpeg',
  width: 350,
  height: 260,
  channels: 3,
  premultiplied: false,
  size: 12042
}
const formatImage = () => {
  sharp('./images/robo.jpg')
  .toFormat('png', {palette: true})
  .toFile(__dirname + '/processed_images/format_robo.png')
}

formatImage()
To change the sharp instance’s file format from JPEG to PNG, we use the format() method. We also give the format() method an option to compress the image.
Each formatImage() accepts a separate object with various properties. The palette property, for example, is only valid on PNG images. Only JPEG pictures can use the mozjpeg property, and only WebP images can use the lossless property. The toFile() method is used to save the compressed image in the processed_images folder.
To crop an image, start by creating a new file:
touch _crop.js
Next, copy the following code:
const sharp = require('sharp')

const cropImage = () => {
  sharp('./images/robo.jpg')
  .extract({left: 740, width: 500, height: 300, top: 340})
  .toFile(__dirname + '/processed_images/crop_robo.png')
}

cropImage()
To crop the image, we first chain the extract() function to the sharp instance. Then, we save it in the processed_images folder. With this procedure, we can specify: the horizontal space to be cropped to the left of the image (left), the desired image width, the desired image height, and the vertical space to be cropped above the image (top).
In this example, we generate a cropping box 500px wide by 300px high and positioned 740px from the image’s left border and 340px from the image’s top border. With the extract method, any part of the image that fits inside the box will be retained. Anything outside the box will be removed.
Now, copy the following code:
node _crop.js
Here’s the copped image:

To combine two or more images, first create a new file:
touch _composite.js
Next, copy the following code:
const sharp = require('sharp')

const compositeImage = () => {
  sharp ('./images/fall.jpg')
  .composite([{input: './images/robo.jpg', left: 900, top: 750}])
  .toFile(__dirname + '/processed_images/composite_robo.jpg')
}

compositeImage()
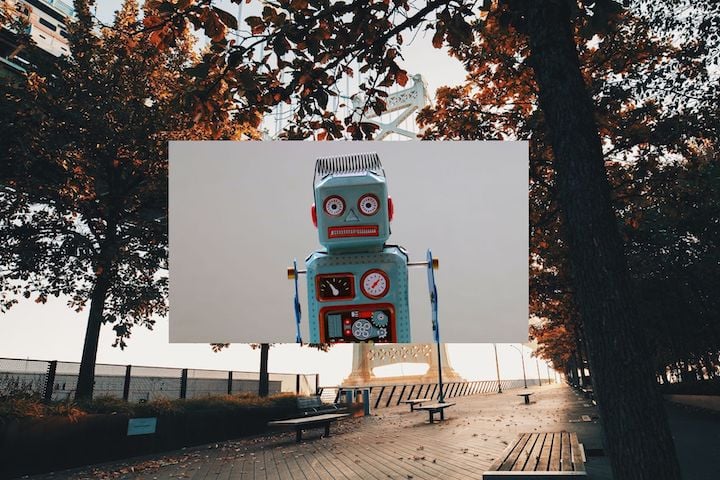
To create a composite image, we first chain the composite() function to the sharp instance. We also add a new image file, fall.jpg, to the sharp module. In this example, fall.jpg is the processed image (or background image).
The sharp module’s composite() method takes an array as an input. The image to be composited, robo.jpg, is read by a single object in the array. It is important to note that the composite image must have smaller dimensions than the processed image. We can specify the following object attributes:
input: the image that will be placed over the processed imagetop: the vertical position of the image composited over the processed imageleft: the horizontal position of the image composited over the processed imageSave the resulting image, and run the following command:
node _composite.js
Here’s the composite image:
To blur an image, start by creating a new file:
touch _blur.js
Next, add the following code:
const sharp = require('sharp')

const blurImage = () => {
  sharp('./images/robo.jpg')
  .blur(9)
  .toFile(__dirname + '/processed_images/blur_robo.jpg')
}

blurImage()
In our example, we use the blur() method of the sharp module to apply a Gaussian blur to the image. This technique uses the Gaussian function to give the pixels at the edge of the image less weight, resulting in reduced image detail and image noise. For this example, the Gaussian .blur() sigma is 9.
Save the file, and run the following command:
node _blur.js
Here’s the blurred image:

To sharpen an image, start by creating a new file:
touch _sharpen.js
Next, add the following code:
const sharp = require('sharp')

const sharpenImage = () => {
  sharp ('./images/robo.jpg')
  .sharpen(13)
  .toFile(__dirname + '/processed_images/sharpen_robo.jpg')
}

sharpenImage()
To sharpen the image, we use the sharpen() function. If no parameters are specified, this technique will produce a quick, moderately sharpened version of the original image. However, if a parameter is specified, this function will perform a slower, more precise sharpening. For this example, the sharpen() sigma is 13.
Now, copy the following code:
node _sharpen.js
Here’s the sharpened image:

To flip (or horizontally reverse) an image, start by creating a new file:
touch _flip.js
Next, copy the following code:
const sharp = require('sharp')
const flipImage = async () => {
  await sharp('./images/robo.jpg')
  .flip()
  .toFile(__dirname + '/processed_images/flip_robo.jpg');
}
flipImage()
We chain the flip() method to the sharp instance to flip the image over the x-axis.
Now, run the following program:
node _flip.js
Here’s the flipped image:

To flop (or vertically reverse) an image, start by creating a new file:
touch _flop.js
Next, add the following code:
const sharp = require('sharp')
const flopImage = async () => {
  await sharp('./images/robo.jpg')
  .flop()
  .toFile(__dirname + '/processed_images/flop_robo.jpg');
}
flopImage()
We chain the flop() method to the sharp instance to flop the image over the y-axis.
Now, run the following command:
node _flop.js
Here’s the flopped image:

sharp does not currently have a method for adding text to an image. However, as a workaround, we can draw text using SVG and then use the composite() method to add the text image to the original image.
Start by creating a new file:
touch _text.js
Next, copy the following code:
const sharp = require('sharp');

const addText = () => {
  const width = 900;
  const height = 500;
  const text = "E.T, go home";

  const svgText = `
  <svg width="${width}" height="${height}">
    <style>
      .title { fill: red; font-size: 85px}
    </style>
    <text x="45%" y="40%" text-anchor="middle" class="title">${text}</text>
  </svg>`

  const svgBuffer = Buffer.from(svgText);

  sharp ('./images/robo.jpg')
  .composite([{input: svgBuffer, left: 1150, top: 90}])
  .toFile(__dirname + '/processed_images/text_robo.jpg')
}

addText()
For our workaround, we use an addText() function with four variables: the desired text area width, the desired text area height, the text string that will be drawn using SVG (in this example, E.T, go home), and a transparent container, svgText, that will hold the text.
The SVG element has two child elements: style and text. The style element uses CSS to alter the appearance of the text. The fill and font-size properties modify the color and the size of the text, respectively.
The text element has four attributes: horizontal position (x), vertical position (y), alignment (text-anchor), and class. This last attribute, class, specifies how the CSS styles should be applied to the text element. ${text} interpolates the string E.T, go home from the variable text.
Next, we use the Buffer.from() function to create a Buffer object from the svgText variable and then store it in the svgBuffer variable.
To add the text to the image, we chain the composite() function to the sharp instance and use the svgText variable as the input. In this example, robo.jpg is the processed image (or background image).
Now, run the following command:
node _text.js
Here’s the image with text:

You may wish to store your processed image(s) in a database while working with the sharp library. This operation may be carried out in two ways:
Before we launch into the two ways to store the image, you’ll want to create a new file named touch_database.js.
A Promise is an object that represents the success or failure of an asynchronous operation and its generated value. sharp returns a Promise that can be used to perform actions whenever we’re done processing the image.
const sharp = require('sharp')

const usingPromise = () => {
  sharp('./images/robo.jpg')
  .extract({left: 740, width: 500, height: 300, top: 340})
  .then(() => {


    // Write code to store the image to the database


  })
  .catch((err) => console.warn(err));
}

usingPromise()
Promises provide two techniques for dealing with its result. A successful result is handled by the .then() method. In this example, after the image is successfully processed, the .then() method executes the code to save the image to the database. If the image process fails, the failure result is handled by .catch().
The async keyword simplifies working with asynchronous, Promise-based code, which makes the code appear and behave like synchronous code.
const usingAsync = async() => {
  try{
    const image = await sharp('./images/robo.jpg')
    .extract({left: 740, width: 500, height: 300, top: 340})
    .toFile(__dirname + '/processed_images/crop_robo.png')

    // Write code to store image to the database

    return image

  }catch(e){
     // handles error if any
  }
}
usingAsync()
Inside the async function the try…catch block is used to handle errors. The await keyword is used before a call to a function that returns a Promise.
In this tutorial, we reviewed how to use the sharp library to process images in Node.js. We used the grayscale(), tint(), rotate(), resize(), crop(), blur(), sharpen(), flip(), and flop() methods to alter the image’s appearance, style, and shape. We extracted the image metadata using the metadata() method. We combined two images using the composite() method. We also used the composite()method to add text to the image with an SVG workaround. Lastly, we used the format() method to change the image type and compress the image.
To improve the efficiency and performance of your Node.js application even further, here are some additional recommendations.
 Monitor failed and slow network requests in production
Deploying a Node-based web app or website is the easy part. Making sure your Node instance continues to serve resources to your app is where things get tougher. If you’re interested in ensuring requests to the backend or third-party services are successful, try LogRocket.

LogRocket lets you replay user sessions, eliminating guesswork around why bugs happen by showing exactly what users experienced. It captures console logs, errors, network requests, and pixel-perfect DOM recordings — compatible with all frameworks.
LogRocket's Galileo AI watches sessions for you, instantly identifying and explaining user struggles with automated monitoring of your entire product experience.
LogRocket instruments your app to record baseline performance timings such as page load time, time to first byte, slow network requests, and also logs Redux, NgRx, and Vuex actions/state. Start monitoring for free.
Hey there, want to help make our blog better?
Join LogRocket’s Content Advisory Board. You’ll help inform the type of content we create and get access to exclusive meetups, social accreditation, and swag.
Sign up now
Not sure if low-code is right for your next project? This guide breaks down when to use it, when to avoid it, and how to make the right call.

Compare Firebase Studio, Lovable, and Replit for AI-powered app building. Find the best tool for your project needs.

Discover how to use Gemini CLI, Google’s new open-source AI agent that brings Gemini directly to your terminal.

This article explores several proven patterns for writing safer, cleaner, and more readable code in React and TypeScript.


