Editor’s note: This article was last updated on 28 July 2023 to include additional information about debugging our serverless app.
Did you know that you can write and deploy your code on the cloud without having to worry about provisioning, maintaining, and scaling the underlying infrastructure? In this tutorial, we’ll learn how to build a serverless application using TypeScript and the Serverless Framework. The full code for the project is available on GitHub. Feel free to clone the project to follow along.
We’ll cover the following:
Serverless computing is an execution paradigm for cloud computing in which the cloud provider allocates machine resources on-demand, managing servers on behalf of its clients.
The term serverless is misleading in the sense that servers still employ cloud service providers to run code for developers. The code is often executed within stateless containers that can be triggered by events like HTTP requests, queuing services, monitoring alerts, file uploads, scheduled events, database events, and more.
Building serverless apps in TypeScript offers several benefits that contribute to more efficient and reliable development, including the following:
The Serverless Framework is an open source command-line interface (CLI) and hosted dashboard that enables comprehensive serverless application lifecycle management. The framework allows you to design, deploy, debug, and protect serverless applications with minimal overhead and cost, all while providing the required infrastructure resources, like AWS, Azure, Google, etc.
The Serverless Framework provides structure, automation, and support for best practices out of the box, allowing you to focus on developing sophisticated, event-driven, serverless systems made of functions and events.
The Serverless Framework also has several advantages over other application frameworks. For one, it manages your code as well as your infrastructure and supports multiple languages, like Node.js, Python, Java, and more. The framework has a hosted dashboard that allows you to import existing projects, track performance, troubleshoot, configure CI/CD and deployment policies, and get end-to-end serverless application lifecycle management.
AWS Lambda is an event-driven, serverless computing platform from Amazon Web Services that runs code in response to events and automatically maintains the computing resources needed by that code.
For the examples in this tutorial, we’ll use AWS Lambda to run and manage our serverless functions. To get started, create an AWS free tier account. Then, follow the steps in the official serverless docs to create an IAM User and Access Key. With everything set up, let’s install the AWS CLI and set up our credentials.
To create and manage resources from your terminal, the Serverless Framework needs access to your cloud provider account. To install the AWS CLI, you can follow the steps in the official docs. Then, set up your credentials by running the following command:
aws configure
The command above will prompt you for your AWS credentials. Once you add them, hit the enter button.
With the command below, we’ll install the Serverless package globally and initialize a new serverless TypeScript project:
# Install serverless package globally
npm install -g serverless
#Initialize a new serverless project
serverless create --template aws-nodejs-typescript --path aws-serverless-typescript-api
The command above installs the serverless package, then initializes a new serverless project with the following folder structure and some boilerplate code:
aws-serverless-typescript-api
 ┣ src
 ┃ ┣ functions
 ┃ ┃ ┣ hello
 ┃ ┃ ┃ ┣ handler.ts
 ┃ ┃ ┃ ┣ index.ts
 ┃ ┃ ┃ ┣ mock.json
 ┃ ┃ ┃ ┗ schema.ts
 ┃ ┃ ┗ index.ts
 ┃ ┗ libs
 ┃ ┃ ┣ api-gateway.ts
   handler-resolver.ts
 ┃ ┃ ┗ lambda.ts
 ┣ .npmignore
┣ .nvmrc
 ┣ README.md
 ┣ package.json
 ┣ serverless.ts
 ┣ tsconfig.json
 ┗ tsconfig.paths.json
Delete the hello function folder, then install all the packages required to run the application with the command below:
npm install
serverless plugin install -n serverless-offline
#OR
yarn
Now, let’s install the other required dependencies for our project. Run the command below to install the uuid module:
#shell
npm install uuid
The module will be used to generate random IDs for the todo list items in our database.
Next, we’ll open the src folder and create a folder structure for our project. Create the following folders in the src folder:
Models: Will define our schema and connect it to our databaseService: Will create our business handler functionsFunctions/todo: Will create our todos functionsAfter creating the folders above, you should have a new project structure like the one below:
aws-serverless-typescript-api
 ┣ src
 ┃ ┣ functions
 ┃ ┃ ┗ todo
 ┃ ┣ libs
 ┃ ┃ ┣ api-gateway.ts
 ┃ ┃ ┣ handler-resolver.ts
 ┃ ┃ ┗ lambda.ts
 ┃ ┣ model
 ┃ ┗ service
 ┣ .npmignore
 ┣ .nvmrc
 ┣ README.md
 ┣ package.json
 ┣ serverless.ts
 ┣ tsconfig.json
 ┗ tsconfig.paths.json
Now, let’s add some actual configuration in our configuration serverless.ts file. Replace the code in the serverless.ts file with the following code snippet:
import type { AWS } from '@serverless/typescript';
import { createTodo, getTodo, getAllTodos, updateTodo, deleteTodo } from '@functions/todo';
const serverlessConfiguration: AWS = {
  service: 'aws-serverless-typescript-api',
  frameworkVersion: '3',
  plugins: ['serverless-esbuild', 'serverless-offline', 'serverless-dynamodb-local'],
  provider: {
    name: 'aws',
    runtime: 'nodejs14.x',
    apiGateway: {
      minimumCompressionSize: 1024,
      shouldStartNameWithService: true,
    },
    environment: {
      AWS_NODEJS_CONNECTION_REUSE_ENABLED: '1',
      NODE_OPTIONS: '--enable-source-maps --stack-trace-limit=1000',
    },
    iam: {
      role: {
        statements: [{
          Effect: "Allow",
          Action: [
            "dynamodb:DescribeTable",
            "dynamodb:Query",
            "dynamodb:Scan",
            "dynamodb:GetItem",
            "dynamodb:PutItem",
            "dynamodb:UpdateItem",
            "dynamodb:DeleteItem",
          ],
          Resource: "arn:aws:dynamodb:us-west-2:*:table/TodosTable",
        }],
      },
    },
  },
  // import the function via paths
  functions: { getAllTodos, createTodo, getTodo, updateTodo, deleteTodo },
  package: { individually: true },
  custom:{
    esbuild: {
      bundle: true,
      minify: false,
      sourcemap: true,
      exclude: ['aws-sdk'],
      target: 'node14',
      define: { 'require.resolve': undefined },
      platform: 'node',
      concurrency: 10,
    },
    dynamodb:{
      start:{
        port: 5000,
        inMemory: true,
        migrate: true,
      },
      stages: "dev"
    }
  },
  resources: {
    Resources: {
      TodosTable: {
        Type: "AWS::DynamoDB::Table",
        Properties: {
          TableName: "TodosTable",
          AttributeDefinitions: [{
            AttributeName: "todosId",
            AttributeType: "S",
          }],
          KeySchema: [{
            AttributeName: "todosId",
            KeyType: "HASH"
          }],
          ProvisionedThroughput: {
            ReadCapacityUnits: 1,
            WriteCapacityUnits: 1
          },

        }
      }
    }
  }
};
module.exports = serverlessConfiguration;
Let’s review the major configurations we’ve set up for our project. First, information about our project is defined in the service section aws-serverless-typescript-api. frameworkVersion is the version of the Serverless Framework our project is running on. Version 3 is the latest release at the time of writing.
In Plugins, we define the plugins we need to overwrite or extend the functionality of our project. We have two plugins, serverless-esbuild and serverless-offline that enable our project to run locally. serverless-dynamodb enables us to run DynamoDB locally.
In Provider, we configure the cloud provider used for our project. We defined some properties of the cloud provider, like the name, runtime, apiGateway, and iam statements to give our Lambda functions read and write permissions to our DynamoDB resource table.
In Resources, we add our cloudFormation resource templates for our DynamoDB database. Here, we define properties like tableName and AttributeDefinitions, where we specified the primary key todosId of our table, and ProvisionedThroughput, where we set the number of units our table can read and write in one second.
Finally, in Custom, we define our custom configuration. We defined port 5000 for our DynamoDB database.
In the src/model folder, we’ll create an index.ts file and connect to DynamoDB with the code snippet below:
import * as AWS from "aws-sdk";
import { DocumentClient } from "aws-sdk/clients/dynamodb";

export default const dynamoDBClient = (): DocumentClient => {
  if (process.env.IS_OFFLINE) {
    return new AWS.DynamoDB.DocumentClient({
      region: "localhost",
      endpoint: "http://localhost:5000",
    });
  }
  return new AWS.DynamoDB.DocumentClient();
};
In the code above, we connected to our DynamoDB database using the AWS.DynamoDB.DocumentClient method. Now, we need a downloadable version of Amazon DynamoDB so that we can run the application locally. To do this, you need to install serverless-dynamodb, then DynamoDB:
npm install serverless-dynamodb
Now, we will make Serverless aware of the serverless DynamoDB we are using. You can do this by replacing all occurances of serverless-dynamodb-local with serverless-dynamodb in the code.
You can now install DynamoDB with the following command:
sls dynamodb install
Next, we can create our model. In the src/model folder, create a Todo.ts file and add the following code snippet:
export default interface Todo {
    todosId: string;
    title: string;
    description: string;
    status: boolean;
    createdAt: string;
}
Now, we have defined an interface for our todo object. All of the to-do list items saved in our TodosTable will be in that form.
Now, we want to create the service for our Lambda functions by creating a service.ts file in the /src/service folder. Then, we’ll import DocumentClinet from aws-sdk, import our Todo model, and create a TodosService class with a constructor method.
First, inject the DocumentClient into our TodoService class, then create a global variable for our table name with the code snippet below:
import { DocumentClient } from "aws-sdk/clients/dynamodb";
import Todo from "../model/Todo";

export default class TodoService {

    private Tablename: string = "TodosTable";

    constructor(private docClient: DocumentClient) { }
    ...
Then, create the getAllTodos method, which returns a promise of all the to-do items in our database:
    ...
    async getAllTodos(): Promise<Todo[]> {
        const todos = await this.docClient.scan({
            TableName: this.Tablename,
        }).promise()
        return todos.Items as Todo[];
     }
     ...
Next, create the createTodo method, which will allow us to add new to-do list items to our database. The handler function takes in a todo object as an argument, which is of type Todo model:
   ...
   async createTodo(todo: Todo): Promise<Todo> {
        await this.docClient.put({
            TableName: this.Tablename,
            Item: todo
        }).promise()
        return todo as Todo;

    }
    ...
Next, we’ll create a getTodo method that takes in the todo ID as an argument, returning the todo with the ID on the request parameter:
   ...
    async getTodo(id: string): Promise<any> {

        const todo = await this.docClient.get({
            TableName: this.Tablename,
            Key: {
                todosId: id
            }
        }).promise()
        if (!todo.Item) {
            throw new Error("Id does not exit");
        }
        return todo.Item as Todo;

    }
    ...
To update the to-do list items in our database, we created an updateTodo method. Like the getTodo method, the updateTodo method also takes the todo id as an argument, updating the status of the todo with the ID in the request parameter:
   ...
      async updateTodo(id: string, todo: Partial<Todo>): Promise<Todo> {
        const updated = await this.docClient
            .update({
                TableName: this.Tablename,
                Key: { todosId: id },
                UpdateExpression:
                    "set #status = :status",
                ExpressionAttributeNames: {
                    "#status": "status",
                },
                ExpressionAttributeValues: {
                    ":status": true,
                },
                ReturnValues: "ALL_NEW",
            })
            .promise();
        return updated.Attributes as Todo;
    }
    ...
Next, create a deleteTodo method, which also takes todo id as an argument to delete the to-do from our database:
 ...
    async deleteTodo(id: string): Promise<any> {
        return await this.docClient.delete({
            TableName: this.Tablename,
            Key: {
                todosId: id
            }
        }).promise();
       }
     }
    ...
In our TodosService methods, we used the DynamoDB docClient method to create our CRUD operations.
Finally, create an index.ts file in the /src/service folder. Create and export an instance of our TodosService with the code snippet below:
import dynamoDBClient from "../model/index";
import TodoService from "./service"
const todosService = new TodoService(dynamoDBClient());
export default todosService;
Now, we’ll create our AWS Lambda functions. First, create a handlers.ts file in the /src/functions/todo folder. From AWS Lambda, import APIGatewayProxyEvent, APIGatewayProxyResult, and formatJSONResponse to return a JSON-formatted response to the client side, as well as middyfy to handle our middlewares, v4 to generate random strings, and our todosService:
import { APIGatewayProxyEvent, APIGatewayProxyResult } from "aws-lambda";
import { formatJSONResponse } from '@libs/api-gateway';
import { middyfy } from '@libs/lambda';
import { v4 } from "uuid";
import todosService from '../../services'
...
Next, we’ll create our getAllTodos Lambda function. We wrap our function inside the middyfy function to perform all middleware-related operations on our function. With the code snippet below, we call the getAllTodos method, await the result, and return the to-dos to the client:
...
export const getAllTodos = middyfy(async (): Promise<APIGatewayProxyResult> => {
    const todos = await todosService.getAllTodos();
    return formatJSONResponse ({
        todos
    })
})
...
Next, we’ll create our own createTodo function, where we’ll listen to APIGatewayProxyEvent to get the data in our request body. Then, we’ll call the createTodo method and pass in a todo object.
We get the title and description from the request body and add other details by default with the code snippet below:
...
export const createTodo = middyfy(async (event: APIGatewayProxyEvent): Promise<APIGatewayProxyResult> => {
    try {
        const id = v4();
        const todo = await todosService.createTodo({
            todosId: id,
            title: event.body.title,
            description: event.body.description,
            createdAt: new Date().toISOString(),
            status: false
        })
        return formatJSONResponse({
            todo
        });
    } catch (e) {
        return formatJSONResponse({
            status: 500,
            message: e
        });
    }
}
...
Next, we create our getTodo function to consume the getTodo resource. We get the todo ID from the request parameter using the pathParameters event. Then, we return the to-do to the client with the code snippet below:
...
export const getTodo = middyfy(async (event: APIGatewayProxyEvent): Promise<APIGatewayProxyResult> => {
    const id = event.pathParameters.id;
    try {
        const todo = await todosService.getTodo(id)
        return formatJSONResponse({
            todo, id
        });
    } catch (e) {
        return formatJSONResponse({
            status: 500,
            message: e
        });
    }
})
...
Now, let’s create our updateTodoLambda function. Like the getTodo function, updateTodo will get the ID of the todo from the request parameter, then call the deleteTodo method from our todosService class, deleting a to-do item with the following code:
...
export const updateTodo = middyfy(async (): Promise<APIGatewayProxyResult> => {
    const id = event.pathParameters.id;
    try {
        const todo = await todosService.updateTodo(id)
        return formatJSONResponse({
            todo, id
        });
    } catch (e) {
        return formatJSONResponse({
            status: 500,
            message: e
        });
    }
})
...
Next, we create our deleteTodo Lambda function, which will also get the todo ID from the request parameter and call the deleteTodo method from our todosService class, deleting a to-do item:
...
export const deleteTodo = middyfy(async (event: APIGatewayProxyEvent): Promise<APIGatewayProxyResult> => {
    const id = event.pathParameters.id;
    try {
        const todo = await todosService.deleteTodo(id)
        return formatJSONResponse({
            todo, id
        });
    } catch (e) {
        return formatJSONResponse({
            status: 500,
            message: e
        });
    }
})
Next, we want to configure and export our Lambda functions, making them available to our serverless.ts file. Create an index.ts file in the functions/todo folder and add the code snippet below:
import { handlerPath } from '@libs/handler-resolver';
export const getAllTodos = {
    handler: `${handlerPath(__dirname)}/handler.getAllTodos`,
    events: [
        {
            http: {
                method: 'get',
                path: 'todo/',
            },
        },
    ],
};

export const createTodo = {
    handler: `${handlerPath(__dirname)}/handler.createTodo`,
    events: [
        {
            http: {
                method: 'post',
                path: 'todo',
            },
        },
    ],
};

export const getTodo = {
    handler: `${handlerPath(__dirname)}/handler.getTodo`,
    events: [
        {
            http: {
                method: 'get',
                path: 'todo/{id}',
            },
        },
    ],
};

export const updateTodo = {
    handler: `${handlerPath(__dirname)}/handler.updateTodo`,
    events: [
        {
            http: {
                method: 'put',
                path: 'todo/{id}',
            },
        },
    ],
};

export const deleteTodo = {
    handler: `${handlerPath(__dirname)}/handler.deleteTodo`,
    events: [
        {
            http: {
                method: 'delete',
                path: 'todo/{id}',
            },
        },
    ],
};
In the code above, we define the properties of our Lambda functions, including the http method and path for all our functions.
Finally, with the code snippet below, let’s configure the Lambda functions in our serverless.ts file, making them available to our Serverless Framework:
...
import { createTodo, getTodo, getAllTodos, updateTodo, deleteTodo } from '@functions/todo';

//locate the function object, e.g. function: {} Add the code below.
 functions: { getAllTodos, createTodo, getTodo, updateTodo, deleteTodo },
At this point, we’ve successfully created our AWS Lambda functions.
Now, we’ll test our application using Insomnia. You can also use Postman. First, run the command below to start the application locally:
serverless offline start
You should see an output like the one below:

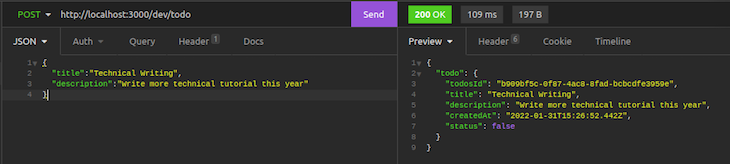
Add the todo endpoint with the POST /dev/todo route:
Now, test the other endpoints.
Debugging an application is an essential part of the development process, and it is just as important as building the application itself. One of the significant advantages of using the Serverless Framework with TypeScript is that the compiler automatically watches your files for changes. Whenever you save a file after making modifications, the compiler detects the changes and triggers a server restart if necessary.
If for any reason the changes are not reflected, you can always restart the server manually:
serverless offline start
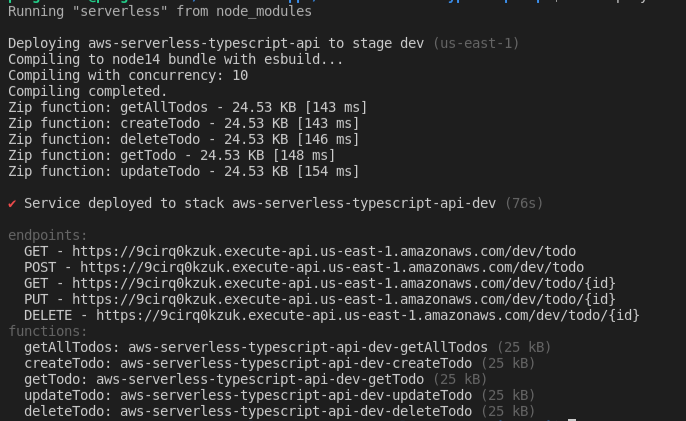
To deploy our Lambda function to AWS, use the command below:
serverless deploy
Once the deployment is completed, you should see our serverless endpoints and functions in the terminal like in the image below:
Regardless of the type of application you want to build, the Serverless Framework can simplify the process for you. If you want to use stacks other than Node.js or TypeScript, the Serverless Framework has support for languages like Java, Go, PowerShell, C#, Python, and Ruby.
Now that you’re familiar with the Serverless Framework, feel free to fork the repository and add additional features to the project. I hope you learned a lot from this tutorial. If you enjoyed it or have any questions, feel free to share, comment, or reach out to me on Twitter.

LogRocket lets you replay user sessions, eliminating guesswork by showing exactly what users experienced. It captures console logs, errors, network requests, and pixel-perfect DOM recordings — compatible with all frameworks, and with plugins to log additional context from Redux, Vuex, and @ngrx/store.
With Galileo AI, you can instantly identify and explain user struggles with automated monitoring of your entire product experience.
Modernize how you understand your web and mobile apps — start monitoring for free.
Would you be interested in joining LogRocket's developer community?
Join LogRocket’s Content Advisory Board. You’ll help inform the type of content we create and get access to exclusive meetups, social accreditation, and swag.
Sign up now
Learn how OpenAPI can automate API client generation to save time, reduce bugs, and streamline how your frontend app talks to backend APIs.

Discover how the Interface Segregation Principle (ISP) keeps your code lean, modular, and maintainable using real-world analogies and practical examples.

<selectedcontent> element improves dropdowns

Learn how to implement an advanced caching layer in a Node.js app using Valkey, a high-performance, Redis-compatible in-memory datastore.


2 Replies to "Building a serverless app with TypeScript"
This article is really helpful as a whole to understand the environment and codebase. But the code has some small issues, syntax, types or typos that at prevent it from being executed. Manual fixes had to be made in order to run the project.
Lots of manual fixes starting from the beginning. Create folder “Models”, example uses “model”, file names like “services/service.ts” are actually “services/todoService”, and zero mention of “models/database”. But yea, if you’re experienced this isn’t too much of an issue. It would be incredibly confusing if this was your first touchpoint.