If you’ve ever worked on an app where you’re constantly publishing changes and fixing errors, then you know how painful it is to wait for preview builds and tests to run before you merge a pull request to your production branch.

In this tutorial, we’ll show you how to automate that process with GitHub Actions. We’ll build a sample Vue.js app, write some tests, and then push to our remote repository. We’ll trigger an action to run our tests and any other checks, then merge to the production branch automatically when all checks pass. This will trigger a build to production Netlify.
We’ll cover the following in detail:
GitHub Actions are instructions you create in your repository to automate certain processes in your project. GitHub Actions enable you to build, test, and deploy your code directly from GitHub.
Released in November 2019, GitHub Actions bills itself as “an API for cause and effect on GitHub.” It enables you to automate workflows based on specified events — such as push, new release, issue creation, etc. — and places those workflows in a repository so you can share, reuse, and fork your software development practices.
Netlify is a static deployment platform for automating modern web projects. Its features include continuous deployment, serverless form handling, AWS Lambda support, and more.
Netlify makes it easy to ship your web applications in three quick steps:
First, we’ll scaffold the app using the Vue CLI.
We won’t focus too much on how Vue.js works or how to test Vue apps. For a deeper dive, check out our tutorial on testing Vue components with Vue Testing Library.
Install the Vue CLI using this command:
npm install -g @vue/cli # for NPM
yarn add global @vue/cli # for yarn
Create a new project using the Vue CLI by running vue create auto-deploy and selecting the options below:

Open the project folder in your code editor and delete the /src/components/HelloWorld.vue component. For this demo, we’ll use the /src/App.vue component to build a simple to-do app and write tests for it.
In the App.vue file, replace the content of the file with the code snippet below:
<template>
  <div id="app">
    <img alt="Vue logo" src="./assets/logo.png" />
    <h1>Todo app</h1>
    <div id="add-todos">
      <input v-model="task" type="text" class="task-input" />
      <button class="add-task-button" @click="addTask">Add Task</button>
    </div>
    <div id="todos">
      <ul>
        <li v-for="(todo, index) in todos" :key="index" class="todo-item">
          <span>{{ todo }}</span>
          <button class="delete-task-button" @click="deleteTask(todo)">Delete</button>
        </li>
      </ul>
    </div>
  </div>
</template>

<script>
export default {
  name: "App",
  data() {
    return {
      task: "",
      todos: []
    };
  },
  methods: {
    addTask() {
      if (this.task !== "") {
        this.todos.push(this.task);
        this.task = "";
      }
    },
    deleteTask(todoItem) {
      this.todos = this.todos.filter(item => item !== todoItem);
    }
  }
};
</script>

<style>
#app {
  font-family: Avenir, Helvetica, Arial, sans-serif;
  -webkit-font-smoothing: antialiased;
  -moz-osx-font-smoothing: grayscale;
  text-align: center;
  color: #2c3e50;
  margin-top: 60px;
  padding: 20px;
  max-width: 500px;
  margin: auto;
}
.task-input {
  margin-right: 10px;
}
.todo-item {
  display: flex;
  justify-content: space-between;
  padding: 10px 20px;
  border: 1px solid #b9b9b9;
  margin-top: 4px;
}
</style>
The snippet above is for a basic to-do app from the initial content in the component. When you visit localhost:8080 in your browser, your app should look like this:
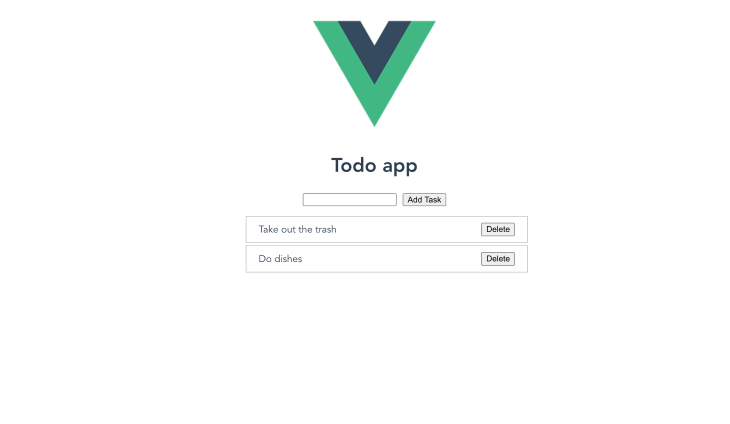
Now you can add to-do items and delete them.
Since we selected the unit tests option when creating the project, the Vue CLI automatically set up the configurations for us and installed a package called vue-test-utils. This crate provides utility functions similar to those of the APIs in Vue. We can use these utility functions to interact with the components.
If you look at the package.json file in the root folder, you should see this command under the scripts key:
"test:unit": "vue-cli-service test:unit"
This is the command for running our unit tests. If you try running the command at this point, you’ll see a prewritten test run in your terminal. This is to ensure that everything is working properly and our test config is correct.
Now, we’re going to delete the /tests/ folder and create a new one in the project’s root directory called __tests__. Jest checks for test specifications in two folders: /tests/unit and __tests__. It’s all a matter of preference. For this tutorial, we’ll use the __tests__ folder.
Create an App.spec.js file in the newly created folder and add the code below:
import { mount } from "@vue/test-utils";
import App from "@/App.vue";
describe("App.vue", () => {
  it("should add a task when button is clicked", async () => {
    const wrapper = mount(App);
    const task = "Do laundry";
    wrapper.find("input.task-input").setValue(task);
    await wrapper.find("button.add-task-button").trigger("click");
    expect(wrapper.vm.$data.todos.indexOf(task)).toBeGreaterThan(-1);
  });
  it("should render the tasks", () => {
    const todos = ["pick up groceries", "buy guitar pick"];
    const wrapper = mount(App, {
      data() {
        return {
          todos
        };
      }
    });
    expect(wrapper.find("div#todos>ul").text()).toContain(todos[0]);
  });
  it("should delete a task when the delete button is clicked", async () => {
    const todos = ["Order pizza for dinner"];
    const wrapper = mount(App, {
      data() {
        return {
          todos
        };
      }
    });
    await wrapper.find("button.delete-task-button").trigger("click");
    expect(wrapper.vm.$data.todos.indexOf(todos[0])).toEqual(-1);
  });
});
The code above is a test suite to ensure our component behaves exactly as we want it to. We validated that adding new tasks and deleting tasks works and that the tasks actually rendered on the page.
Now that we have the app up and running with tests included, let’s deploy our new app on Netlify so we can set up deployment from GitHub Actions.
Be sure to create a new repository for your app on GitHub and push the code. We’ll be using GitHub for the rest for this guide.
Head the official Netlify website to create an account, then sign in.
On your dashboard, click the New site from Git button and connect your GitHub account to Netlify.
Select the repository for your new app and use the same configurations from the image below:
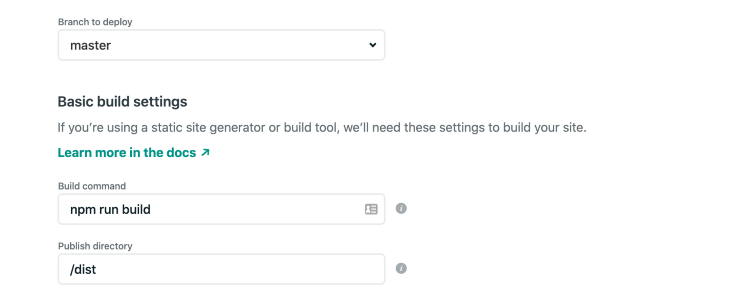
Click the Deploy site button and wait for your app to be ready.
You can open your app using the link automatically generated by Netlify.
Netlify provides an autodeploy feature out of the box, but we don’t want to use that; we want GitHub Actions to handle the deployment on our behalf after running tests. In some cases, you may not want to deploy the changes at that instant — for example, if a feature is still in development and not ready to be rolled out.
We want to stop Netlify from automatically building and deploying our app whenever a push is made because Netlify deploys whenever a build is successful. We also want to factor in our tests, so we’ll use GitHub Actions to do that.
The first step is to stop builds on Netlify. To do that, go to Your site’s settings > Build & deploy > Continuous Deployment. Click the Edit settings button under the Build settings section and stop builds:

Now that we’ve disabled builds on Netlify, we need to set some secret keys provided to us by Netlify. These keys will allow us deploy our site outside Netlify.
The two main keys we need are a personal access token and the API ID of our newly created site.
The API ID of the site is located under Your site’s settings > General > Site details:
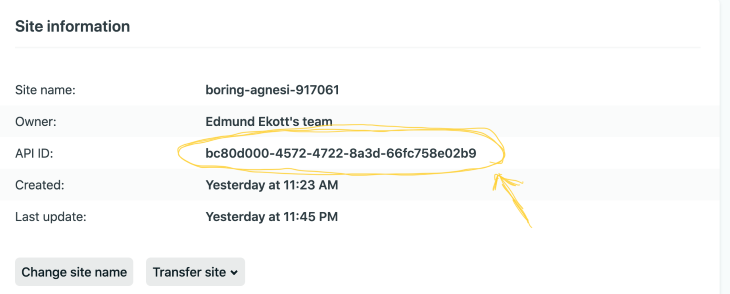
You’ll want to take note of that because we’re going to be copying and pasting to the app’s repository on GitHub. Don’t worry, its safe — you’ll see.
Next, we’ll generate a personal access token. Follow the steps below.
Go to your account’s settings.
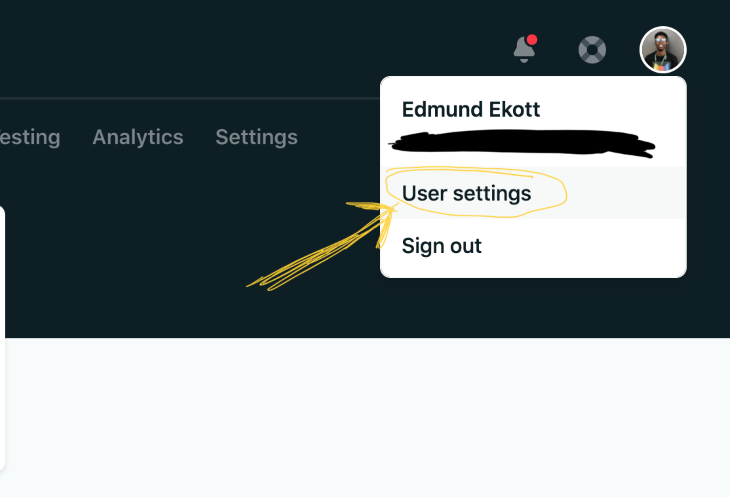
Under Applications > Personal access tokens, create a new access token and give it a descriptive name. Be sure to copy the token before leaving the page.
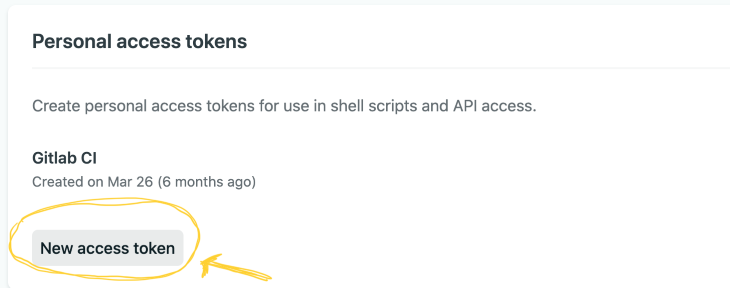
The tokens are only displayed once. If you forgot to copy them, you’ll have to create new ones.
Open your app’s repository, navigate to Settings > Secrets, and create two secrets. The first, NETLIFY_AUTH_TOKEN is for the personal access token you just copied. The second, NETLIFY_SITE_ID, is for your site’s API ID, which is located under your site’s information.
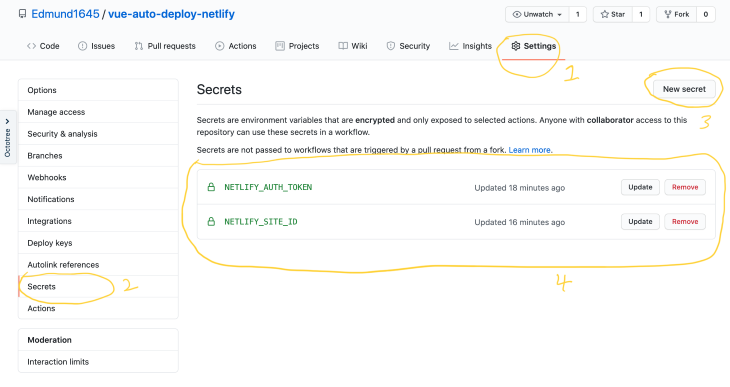
Your secrets should look like the screenshot above. You’ll also notice that the values for these secrets are never exposed and access to them is limited.
It’s time to set up GitHub Actions to build, test and deploy our Vue.js app for us.
To show how to use GitHub actions, we’re going to create two workflows. The first will run on pull requests to the master branch and build, test, and merge the code to master. The second will run on commits to the master branch to build, test, and deploy our app this time.
I separated the workflows because there may be situations where you want to push a commit straight to the master branch from your local machine — hot fixes and whatnot. We want to make sure we don’t break anything no mater what we do.
In your code editor, create a directory structure — like this: .github/workflows/ — in the your project’s root folder and add a file named autodeploy.yml in the /workflows folder.
Copy the snippet below and paste in the autodeploy.yml file:
name: Auto Deploy
on:
  push:
    branches: [master] # run on pushes to master
jobs:
  build-and-test:
    runs-on: ubuntu-latest
    steps:
      - uses: actions/checkout@v2 # setup the repository in the runner
      - name: Setup Node.js # setup Node.js in the runner
        uses: actions/setup-node@v1
        with:
          node-version: '12'
      - uses: actions/cache@v2
        with:
          path: ~/.npm
          key: ${{ runner.os }}-node-${{ hashFiles('**/package-lock.json') }}
          restore-keys: ${{ runner.os }}-node-
      - run: npm ci # install dependencies
      - run: npm run build --if-present # build the project
      - run: npm run test:unit # run the tests
      # deploy site to netlify using secrets created on repository
      - uses: netlify/actions/cli@master
        env:
          NETLIFY_AUTH_TOKEN: ${{ secrets.NETLIFY_AUTH_TOKEN }}
          NETLIFY_SITE_ID: ${{ secrets.NETLIFY_SITE_ID }}
        with:
          args: deploy --dir=dist --prod
          secrets: '["NETLIFY_AUTH_TOKEN", "NETLIFY_SITE_ID"]'
In the workflow file above, we created a job build-and-test with a set of sequential steps to be followed:
Commit and push the changes to GitHub, then navigate to the Actions tab on the repository. You should see the workflow running. Once it’s done, you can check your site’s dashboard on Netlify to determine whether the deploy was published successfully.
Building this workflow is not as straightforward as the previous one because we have to consider when to automatically merge requests and when not to.
Before we get into creating the workflow file, we need to create one more secret on our repository to grant the action permission to make requests on our behalf. For this, we need a personal access token on GitHub.
Click this link to go straight to the access tokens page on your GitHub account, click the “Generate new token” button, and give it a descriptive note, such as “automerge.”
In the Scopes section, select only the repo and workflow scopes.


Click the Generate token button and copy the token before leaving the page.
Add a new secret on your app’s repository named PERSONAL_TOKEN and return to your code editor.
In the /workflows folder, create a file named automerge.yml and paste the content of the snippet below:
name: Auto Merge
on:
  pull_request:
    branches: [master] # run on pull requests to master branch
jobs:
  build-and-test:
    runs-on: ubuntu-latest
    steps:
      - uses: actions/checkout@v2 # setup repository in runner
      - name: Setup Node.js # setup Node.js un runner
        uses: actions/setup-node@v1
        with:
          node-version: '12'
      - uses: actions/cache@v2
        with:
          path: ~/.npm
          key: ${{ runner.os }}-node-${{ hashFiles('**/package-lock.json') }}
          restore-keys: ${{ runner.os }}-node-
      - run: npm ci # install dependencies
      - run: npm run build --if-present # build project
      - run: npm run test:unit # run tests
  mergepal-merge: # merge when build and testing is successful
    runs-on: ubuntu-latest
    needs:
      - build-and-test
    steps:
      - uses: actions/checkout@v2
      - uses: maxkomarychev/[email protected]
        with:
          token: ${{secrets.PERSONAL_TOKEN}}
Now that we successfully created the workflow to automatically merge pull requests, we need to set some conditions in place so everything works as intended.
Create a file named .mergepal.yml in your app’s root folder and paste the the code from the snippet below:
whitelist:
  - good-to-go
blacklist:
  - wip
method: merge #available options "merge" | "squash" | "rebase"
The file we just created is a configuration file for mergepal, a reusable action we added to our workflow. The configurations determines when and how the pull requests should be merged.
whitelist can be used to list a number of labels on GitHub that will cause our pull requests to automatically mergeblacklist option will prevent the pull requests from being merged automaticallymethod enables you to specify the merge method for pull requests just like you have on GitHubThere are just two more things to do: create new labels on GitHub and push the local repository to GitHub.
Go to the Pull requests tab on your repository and create a new table, like these:
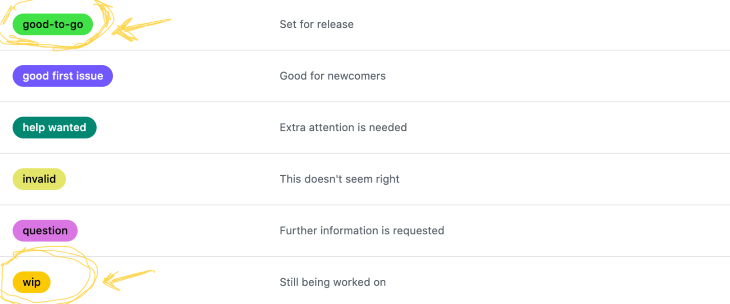
The last step is to go back to your code editor and push the project to the GitHub repository. The autodeploy workflow should have been triggered.
To test the automerge, create a new branch with changes locally and push the branch to GitHub. Create a pull request and test set one of the newly created labels before submitting.
Here’s a screenshot of the workflow in action:
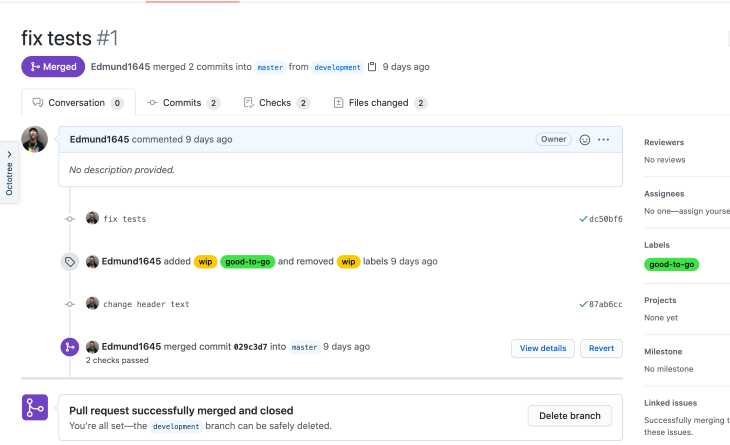
You can access the repository on GitHub.
Debugging Vue.js applications can be difficult, especially when there are dozens, if not hundreds of mutations during a user session. If you’re interested in monitoring and tracking Vue mutations for all of your users in production, try LogRocket.

LogRocket is like a DVR for web and mobile apps, recording literally everything that happens in your Vue apps, including network requests, JavaScript errors, performance problems, and much more. Instead of guessing why problems happen, you can aggregate and report on what state your application was in when an issue occurred.
The LogRocket Vuex plugin logs Vuex mutations to the LogRocket console, giving you context around what led to an error and what state the application was in when an issue occurred.
Modernize how you debug your Vue apps — start monitoring for free.
Would you be interested in joining LogRocket's developer community?
Join LogRocket’s Content Advisory Board. You’ll help inform the type of content we create and get access to exclusive meetups, social accreditation, and swag.
Sign up now
Get to know RxJS features, benefits, and more to help you understand what it is, how it works, and why you should use it.

Explore how to effectively break down a monolithic application into microservices using feature flags and Flagsmith.

Native dialog and popover elements have their own well-defined roles in modern-day frontend web development. Dialog elements are known to […]

LlamaIndex provides tools for ingesting, processing, and implementing complex query workflows that combine data access with LLM prompting.