Variables are one of the fundamental components of programming languages. In JavaScript, a variable stores the value of data types such as integers, strings, and more. The value or data type of a variable can be changed later.

In this article, we will learn about environment variables, why they are useful, and how to use them in React Native.
Variables can play different roles in React Native. For example, you can use CSS variables in React Native to store and implement custom styles.
An environment variable — or as it is popularly known, an env variable — is a variable whose value is set from outside the program. It is a variable that is embedded during build time and used to store information like API endpoints, directory paths, and so on.
If you want to reduce repetition in your code or manage your variables better, using an env variable helps you DRY code. All you have to do is write or define your variable in your root folder. Then, you can import the variable in your component before calling it.
While env variables are very useful in React Native, it is not advisable to use them to store sensitive information like API keys, authentication keys, or passwords. They are not secure for various reasons.
For example, env variables do not encrypt their values. They are also embedded into the application’s build, which means that anyone can view them by inspecting your app’s files.
There are different env files that you could decide to use for your env variables. These different files include:
.env — The default file used to store your dev, production, and test variables.env.local — Overrides all environment files except the test file (including the default .env file).env.development — Specific to the development environment.env.development.local — Overrides the .env.development environment file.env.production — Specific to the production environment.env.production.local — Overrides the .env.production environment file.env.test — Specific to the test environment.env.test.local — Overrides the .env.test environment fileIn summary, the .env.development, .env.production, and .env.test files are environment-specific files. Meanwhile, the .env.development.local, .env.production.local, .env.test.local files are the local overrides of those respective files.
If the environment settings are not explicitly specified, the default .env file is used.
Before explicitly setting your env files, you should understand the order of importance in which the machine handles the different env files.
Let’s review how these files are prioritized when you run npm start, npm run build, or npm test. The files in the list below are organized from higher-priority on the left to lower-priority on the right:
npm start: .env.development.local > .env.development > .env.local > .envnpm run build: .env.production.local > .env.production > .env.local > .envnpm test: .env.test.local > .env.test > .envNote that there are no .env.local files in the test environment because this type of file is not supported in the test environment.
process.env?process.env is a global variable that the Node application injects during runtime. This variable shows the full state of the application’s environment during initialization.
In other words, process.env shows your application’s environment during runtime and allows you to utilize that environment.
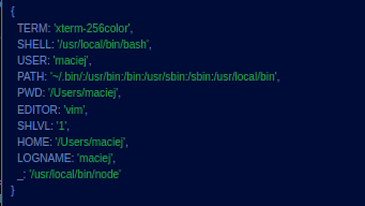
The process.env property returns an object that contains the user’s environment. This environment includes the user’s path, term, editor, and so on.
To understand better, use console.log() on process.env in your application and check your console to see what it logs. You should see something like the following:
However, in React Native, a console.log of process.env will only log "NODE_ENV" and show your application’s environment, like so:

This is because your React Native application is running on a device or an emulator environment and not a Node.js process.
Let’s take a look at an example of creating env variables in React Native.
Your first step is to go to your root folder and create a .env file. Within this file, write the API endpoint without any parentheses, as seen below:
BASE_URL=https://api-dev.application.com
Then, inside your component, call the env variable as shown in the example below:
import React, { useState, useEffect } from "react";
import { View, Text } from "react-native";

const App = () => {
  const postUrl = process.env.BASE_URL
  return (
    <View
      style={{
        flex: 1,
        justifyContent: "center",
        alignItems: "center"
      }}
    >
      <Text>ENV URL: {postUrl} </Text> // https://api-dev.endpoint.com
    </View>
  );
};
export default App;
Notice how we defined the env variables in process.env. in the example above. This step allows us to use process.env. to access the env variables.
It is pertinent to note that all our custom env variables in React Native must begin with REACT_APP_. Any variables without the REACT_APP_ prefix will be ignored, and we will not be able to access them in our application.
NODE_ENV?NODE_ENV is a built-in env variable that is used to state whether a particular environment is a development, testing, or production environment.
To use NODE_ENV to check which environment you are currently working on, you can do the following in your App.js file:
const environment = process.env.NODE_ENV
console.log(environment)
If you’re working in a development environment (i.e., when you run npm start), console.log(environment) will log development.
If you’re working in a testing environment (i.e., when you run npm test), console.log(environment) will log test.
If you’re working in a production environment (i.e., when you run npm build to push to production), console.log(environment) will log production.
NODE_ENV cannot be overridden manually, which can help keep developers from deploying a slow development build to production by accident.
You can use env variables to render information conditionally based on the environment. For example, we can switch between API endpoints in development, testing, and production using NODE_ENV.
You may be wondering why environment-based rendering for API endpoints and other information is even necessary. One important reason is so that we can make changes or hot fixes in production or add new features in development without breaking the production build.
Let’s say we already have a live version of our application, but we want to add a new feature or make some other change. We do not want to make this change in the production environment because we might break the application.
Instead, we will have to switch to the development environment, make the necessary changes, and test. We could also switch to the staging environment to make sure everything is okay and nothing breaks before we push to production.
We will be building out a very simple React Native application to help demonstrate how we can use env variables to switch between API endpoints in different environments. To follow along with the rest of this article, you should know how to work with React Native.
dotenv packageThere are many React Native component libraries and packages that help provide a smooth dev experience. Some packages can help us easily access our env variables in React Native, including dotenv, react-native-config, and so on.
For the purposes of this article, we will be using the dotenv package. The dotenv package allows you inject your env variable into a React Native environment.
To install dotenv with NPM, run the command below:
$ npm install react-native-dotenv
To install dotenv with yarn, run the command below:
$ yarn add react-native-dotenv
After installing the package, spin up your application. Then, let’s configure the plugins.
To configure the installed package, go to your .babelrc file located in your root folder — or create a .babelrc file, if it doesn’t already exist — and add the following:
{
  plugins: [
    [
      "module:react-native-dotenv",
      {
        envName: "APP_ENV",
        moduleName: "@env",
        path: ".env"
      }
    ]
  ]
};
Here, we configured our dotenv package. We also assigned a path to the .env file, where our env variables will be stored. Finally, we assigned a module named @env, from which we can import our env variables.
.env fileNext, let’s create our .env file in our root folder. The .env file is a text file we will use to define our variables, as shown below.
REACT_APP_DEV_MODE=https://api-dev.application.com
REACT_APP_PROD_MODE=https://api-prod.application.com
REACT_APP_STAGE_MODE=https://api-stage.application.com
REACT_APP_TEST_MODE=https://api-test.application.com
As you can see above, we defined our custom env variables using the REACT_APP_ prefix.
This naming convention is good for uniformity. However, if you are working with React, the REACT_APP_ prefix is also a requirement; any variable aside from NODE_ENV will be ignored unless it uses this prefix.
@env moduleNext, let’s go over to our App.js file and import the variables from the @env module, which we configured earlier in our babel.config.js file.
import React from "react";
import { REACT_APP_DEV_MODE, REACT_APP_PROD_MODE } from "@env"
After we have imported our variables, we can call them and fetch our API endpoints with them.
import React from 'react';
import { View, Text, StyleSheet } from 'react-native';
import { REACT_APP_DEV_MODE } from '@env';

const App = () => {
    return (
        <View style={styles.screen}>
            <Text>Url: {REACT_APP_DEV_MODE}</Text> // https://api-dev.application.com
        </View>
    );
};

const styles = StyleSheet.create({
    screen: {
        flex: 1,
        justifyContent: 'center',
        alignItems: 'center'
    }
});
export default App;
We have seen how to configure our dotenv package, create our env variables, and call env variables from our @env module. Finally, let us use this knowledge to switch between API endpoints in different environments.
Earlier, we learned that we can use NODE_ENV to check which React Native environment we are in. We can then switch between API endpoints conditionally based on that environment.
The below code shows how to achieve this:
// using the @env package
import { REACT_APP_DEV_MODE, REACT_APP_PROD_MODE } from '@env';

const url =
        process.env.NODE_ENV === 'development'
            ? REACT_APP_DEV_MODE
            : REACT_APP_PROD_MODE;
In the code above, we first dynamically checked the process.env environment to see which environment we’re working on. Then, using a conditional, we assigned the URL to the correct variable for the corresponding environment.
Earlier, we briefly mentioned that you shouldn’t store your secrets like API keys in your .env file because anyone can access it by inspecting your app’s files.
Since that has been established, you may be wondering how to hide your env file before pushing to, for example, a version control system with Git. This is possible with the help of the gitignore file.
The gitignore file allows us to add files in our React app that we want Git to ignore while pushing our codes to a remote repo like Github or Gitlab. Some of these files could include the node_modules file — which is large in size — and the .env file where we are storing our private keys.
To hide your env file, go to the gitignore file in your root folder. React Native creates this file when it creates the application. You should see a bunch of files that are being ignored by your app. Simply add the .env file to the list:
/* .env */

.env
After adding the .env file, create a new .env.local file and add the code below:
/* .env.local */

REACT_APP_DEV_MODE=YOUR_DEV_KEY
REACT_APP_PROD_MODE=YOUR_PROD_KEY
Now, when we push to the remote repository, we will only be able to see the .env.local file and not our main .env file. Since it is also an environment file, the variables will be injected during build time and can be accessed the same way.
Lastly, we will explore how to expand env variables that are already in our application. Expanding env variables here means using the already-existing variables stored in our .env file.
Let’s look at the code below:
const firstName = "Chimezie"
const lastName = "Innocent"
const fullName = lastName + " " + firstName // Innocent Chimezie
By concatenating the two string variables, we can define a new variable just as we have seen above. We can achieve a similar result in our .env file as demonstrated below:
/* .env */

FIRST_NAME=Innocent
LAST_NAME=Chimezie
NAME=$npm_package_name //awesomeproject
FULL_NAME=$FIRST_NAME // Innocent

// OR

FULL_NAME=${FIRST_NAME} // Innocent
However, this feature is only available for react-scripts v1.1.0 or higher.
In this article, we saw why using env variables in React Native is important. We also learned how to create custom env variables and use them to dynamically switch between API endpoints in different environments. Finally, we explored how to hide our private API keys and even expand our existing env variables.
I hope this article has helped you understand React Native env variables better. Thank you for reading!

LogRocket's Galileo AI watches sessions for you and and surfaces the technical and usability issues holding back your React Native apps.
LogRocket also helps you increase conversion rates and product usage by showing you exactly how users are interacting with your app. LogRocket's product analytics features surface the reasons why users don't complete a particular flow or don't adopt a new feature.
Start proactively monitoring your React Native apps — try LogRocket for free.

Discover how React Fiber works under the hood. Learn how React builds the DOM, handles concurrent rendering, and works alongside React 19 features and the new React Compiler.

Learn how to use Skybridge, an open-source React framework, to build and deploy cross-platform AI apps and interactive UI widgets for ChatGPT, Claude, and MCP clients from a single codebase.

Learn how to set up Meilisearch, index documents, and build keyword, semantic, and hybrid search with AI-powered retrieval.

Compare pnpm and npm across security defaults, disk usage, dependency strictness, and workspace policy to decide which package manager fits your project.
Would you be interested in joining LogRocket's developer community?
Join LogRocket’s Content Advisory Board. You’ll help inform the type of content we create and get access to exclusive meetups, social accreditation, and swag.
Sign up now

