Three, two, one — action! Pick up your phone, open up your favorite app, click the app icon, it opens up, logs you in, then boom … it keeps loading. You probably think it’s still fetching data, so you give it a minute, and then one turns to two, two to three, three to five — still loading. No info, no error, just loading. Out of frustration, you close the app and either look for an alternative or possibly give it another try before giving up.

Network connectivity is incredibly important, especially for the specific parts of our application that depend heavily on the connection state. It’s proper for us as developers to handle those aspects of our application well. By monitoring the user’s internet connection, we can trigger a message that informs the user of the issues with their connection — and, most importantly, triggers a function that loads the needed data once the internet connection is back, giving the user the seamless experience we aim for.
We don’t want a shaky connection to be the downfall of our app — even though the quality of our users’ internet connection isn’t necessarily under our control — but we can put some checks in place that inform our users of this issue, and take action based on the connection state.
We’ll go into this practically in the following sections:
“Connection states” throughout this article refer to active connection, offline, unstable, etc. Let’s dive into it, yeah?
The sample application we’ll build in this section has come to save the day (we’re using the Superhero API for a reason). We’ll fetch data from the Superhero API and display it to the user.
Let’s pause there. Our goal is to monitor connectivity, right?
While that is correct, we also need to monitor the device’s internet connection. When the connection is off, we need to display a message to the user informing them of the situation, and, when the internet connectivity is restored, we must immediately make a call to the API and get our data.
As a way of ensuring our app does not keep fetching data on every change in the connection status, we’ll also introduce an additional variable whose duty is to inform the app whether or not we’ve called the function that loads our data.
Before we launch into the code, there are a few things we need to put in place on our sample site before we can make use of the Superhero API.
First of all, head over to the Superhero API site. You are required to sign in with Facebook in order to get the access token that we’ll use to query the API.
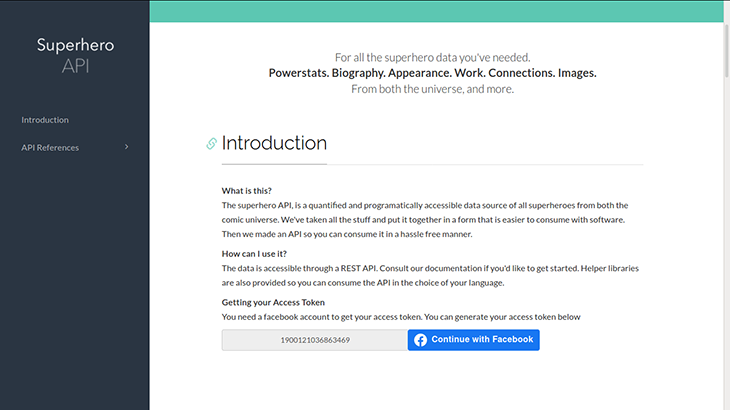
After logging in, you can copy the access token and use it in the app.
The second thing to do is pick a character. Superman? Definitely.
As seen in the docs, the Superhero API provides us an ID for each superhero. This ID is then used in our API query and returns information on that particular hero. The ID for Superman is 644, so note that down.
With these two things done, we are free to set up our project and start querying the API.
Run the following command to create a new codebase for the project.
flutter create handling_network_connectivity
Import the following dependencies in our pubspec.yaml file:
http: To make a GET request to the Superhero API and retrieve character data for our chosen superherostacked: This is the architectural solution we’ll use in this package, which makes use of Provider under the hood and gives us access to some really cool classes to spice up our development processstacked_services: Ready-to-use services made available by the stacked packagebuild_runner: Gives access to run commands for auto-generating files from annotationsstacked_generator: Generates files from stacked annotationslogger: Prints important information to the debug consoledependencies: cupertino_icons: ^1.0.2 flutter: sdk: flutter stacked: ^2.2.7 stacked_services: ^0.8.15 logger: ^1.1.0 dev_dependencies: build_runner: ^2.1.5 flutter_lints: ^1.0.0 flutter_test: sdk: flutter stacked_generator: ^0.5.6 flutter: uses-material-design: true
With this out of the way, we are set to begin actual development.
From the Superhero API documentation, we see that a call to a particular superheroId returns that superhero’s biography, power stats, background, appearance, image, and more.
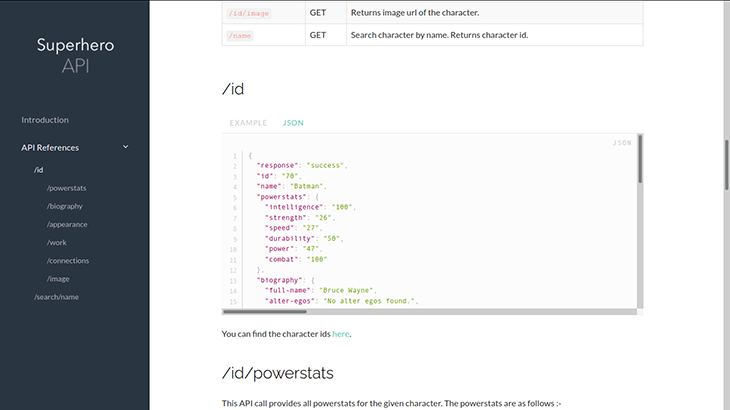
In this article, we will only deal with the biography, powerstats, and image fields, but you can decide to add more data if you want. Thus, we’ll need to create models to convert the JSON response into our Object data.
Create a folder in the lib directory. Name the folder models; all models will be created in this folder. Create a new file named biography.dart, into which we will create the biography model class using the sample response from the documentation.
class Biography {
  String? fullName;
  String? alterEgos;
  List<String>? aliases;
  String? placeOfBirth;
  String? firstAppearance;
  String? publisher;
  String? alignment;
  Biography(
      {this.fullName,
      this.alterEgos,
      this.aliases,
      this.placeOfBirth,
      this.firstAppearance,
      this.publisher,
      this.alignment});
  Biography.fromJson(Map<String, dynamic> json) {
    fullName = json['full-name'];
    alterEgos = json['alter-egos'];
    aliases = json['aliases'].cast<String>();
    placeOfBirth = json['place-of-birth'];
    firstAppearance = json['first-appearance'];
    publisher = json['publisher'];
    alignment = json['alignment'];
  }
  Map<String, dynamic> toJson() {
    final Map<String, dynamic> data = {};
    data['full-name'] = fullName;
    data['alter-egos'] = alterEgos;
    data['aliases'] = aliases;
    data['place-of-birth'] = placeOfBirth;
    data['first-appearance'] = firstAppearance;
    data['publisher'] = publisher;
    data['alignment'] = alignment;
    return data;
  }
}
Next, create the Powerstats model:
class Powerstats {
  String? intelligence;
  String? strength;
  String? speed;
  String? durability;
  String? power;
  String? combat;
  Powerstats(
      {this.intelligence,
      this.strength,
      this.speed,
      this.durability,
      this.power,
      this.combat});
  Powerstats.fromJson(Map<String, dynamic> json) {
    intelligence = json['intelligence'];
    strength = json['strength'];
    speed = json['speed'];
    durability = json['durability'];
    power = json['power'];
    combat = json['combat'];
  }
  Map<String, dynamic> toJson() {
    final Map<String, dynamic> data = {};
    data['intelligence'] = intelligence;
    data['strength'] = strength;
    data['speed'] = speed;
    data['durability'] = durability;
    data['power'] = power;
    data['combat'] = combat;
    return data;
  }
}
The next model is the Image model:
class Image {
  String? url;
  Image({this.url});
  Image.fromJson(Map<String, dynamic> json) {
    url = json['url'];
  }
  Map<String, dynamic> toJson() {
    final Map<String, dynamic> data = {};
    data['url'] = url;
    return data;
  }
}
Lastly, we have the overall SuperheroResponse model, which links all of these models together.
import 'package:handling_network_connectivity/models/power_stats_model.dart';
import 'biography_model.dart';
import 'image_model.dart';
class SuperheroResponse {
  String? response;
  String? id;
  String? name;
  Powerstats? powerstats;
  Biography? biography;
  Image? image;
  SuperheroResponse(
      {this.response,
      this.id,
      this.name,
      this.powerstats,
      this.biography,
      this.image});
  SuperheroResponse.fromJson(Map<String, dynamic> json) {
    response = json['response'];
    id = json['id'];
    name = json['name'];
    powerstats = json['powerstats'] != null
        ? Powerstats.fromJson(json['powerstats'])
        : null;
    biography = json['biography'] != null
        ? Biography.fromJson(json['biography'])
        : null;
    image = json['image'] != null ? Image.fromJson(json['image']) : null;
  }
  Map<String, dynamic> toJson() {
    final Map<String, dynamic> data = {};
    data['response'] = response;
    data['id'] = id;
    data['name'] = name;
    if (powerstats != null) {
      data['powerstats'] = powerstats!.toJson();
    }
    if (biography != null) {
      data['biography'] = biography!.toJson();
    }
    if (image != null) {
      data['image'] = image!.toJson();
    }
    return data;
  }
}
With this in place, we can move forward to the next step, which is creating the services that will handle various aspects of our app.
Create a new folder in the lib directory and name it app. In this folder, create a file to hold all of our necessary configurations, like routes, services, and logging, and name it app.dart. For this to work, we need to create the basic folder structure for these configurations, but we’ll fully flesh them out as we proceed.
Now, create a new folder called UI. We’ll have a single screen in our demo app, the homeView, which will display the data.
Inside the UI directory, create two folders:
shared, which will contain our shared UI components, like snackbars, bottomsheets etc., that we’ll use throughout the appviews, which will contain the actual view files
Within the view directory, create a new folder named homeView and create two new files, home_view.dart for the business logic and functionalities, and home_viewmodel.dart, for the UI code.
Within the home_viewmodel.dart class, create an empty class that extends the BaseViewModel.
class HomeViewModel extends BaseViewModel{}
In the home_view.dart file, create a stateless widget and return the ViewModelBuilder.reactive() function from the Stacked package. The stateless widget returns the ViewModelBuilder.reactive() constructor, which will bind the view file with the viewmodel, granting us access to the logic and functions we declared in the viewmodel file.
Here is the homeView now:
class HomeView extends StatelessWidget {
 const HomeView({Key? key}) : super(key: key);
 @override
 Widget build(BuildContext context) {
  return ViewModelBuilder<HomeViewModel>.reactive(
   viewModelBuilder: () => HomeViewModel(),
   onModelReady: (viewModel) => viewModel.setUp(),
   builder: (context, viewModel, child) {
    return Scaffold();
   },
  );
 }
}
Next, we’ll create the base structure of our services. Create a new folder called services in the lib directory. This folder is where we’ll create the three new files and their base structures.
We’ll offer three services:
ApiService: handles all outbound connections from our applicationclass ApiService {}SuperheroService: handles the call to the Superhero API, parses the response using our model classes, and returns the data to our viewmodel
class SuperheroService{}ConnectivityService: is responsible for monitoring the user’s active internet connectionclass ConnectivityService{}Next, set up our routes and register the services. We’ll make use of the @StackedApp annotation, which comes from the Stacked package. This annotation grants us access to two parameters: routes and dependencies. Register the services in the dependencies block, and declare the routes in the route block.
We’ll register the SnackbarService and ConnectivityService as Singletons — and not LazySingletons — because we want them loaded, up, and running once the app starts instead of waiting until first instantiation.
import 'package:handling_network_connectivity/services/api_service.dart';
import 'package:handling_network_connectivity/services/connectivity_service.dart';
import 'package:handling_network_connectivity/ui/home/home_view.dart';
import 'package:stacked/stacked_annotations.dart';
import 'package:stacked_services/stacked_services.dart';
@StackedApp(
  routes: [
    AdaptiveRoute(page: HomeView, initial: true),
  ],
  dependencies: [
    Singleton(classType: SnackbarService),
    Singleton(classType: ConnectivityService),
    LazySingleton(classType: ApiService),
    LazySingleton(classType: SuperheroService)
  ],
  logger: StackedLogger(),
)
class AppSetup {}
Run the Flutter command below to generate the files needed.
flutter pub run build_runner build --delete-conflicting-outputs
This command generates the app.locator.dart and app.router.dart files into which our dependencies and routes are registered.
The first service to set up is the ApiService. It’s a pretty clean class that we’ll use to handle our outbound/remote connections using the http package.
Import the http package as http and create a method. The get method accepts a url parameter, which is the url to which we’ll point our request. Make the call to the url using the http package, check if our statusCode is 200, and, if it’s true, we return the decodedResponse.
We then wrap the entire call with a try-catch block in order to catch any exceptions that might be thrown. That’s basically everything in our ApiService. We’re keeping it sweet and simple, but you can definitely adjust as you see fit.
import 'dart:async';
import 'dart:convert';
import 'dart:io';
import 'package:http/http.dart' as http;
class ApiService {
  Future<dynamic> get(url) async {
    try {
      final response = await http.get(url);
      if (response.statusCode == 200) {
        return json.decode(response.body);
      }
    } on SocketException {
      rethrow;
    } on Exception catch (e) {
      throw Exception(e);
    }
  }
}
Next on the list, create a class to handle the constants relating to the API call. This will make things much easier when we finally make the calls.
In the lib directory, create a new folder named utils and a new file titled api_constants.dart. This will hold all constants, making our API calls cleaner and easier.
class ApiConstants {
  static const scheme = 'https';
  static const baseUrl = 'superheroapi.com';
  static const token = '1900121036863469';
  static const superHeroId = 644;
  static get getSuperhero =>
      Uri(host: baseUrl, scheme: scheme, path: '/api/$token/$superHeroId');
}
After this, the SuperheroesService, which makes the call to the remote API, gets the data and parses it using the models we created earlier.
import '../app/app.locator.dart';
import '../models/superhero_response_model.dart';
import '../utils/api_constant.dart';
import 'api_service.dart';
class SuperheroService {
  final _apiService = locator<ApiService>();

  Future<SuperheroResponseModel?> getCharactersDetails() async {
    try {
      final response = await _apiService.get(ApiConstants.getSuperhero);
      if (response != null) {
        final superheroData = SuperheroResponseModel.fromJson(response);
        return superheroData;
      }
    } catch (e) {
      rethrow;
    }
  }
}
Next is setting up the ConnectivityService class. We created an empty class for it earlier, when we set up the services folder. This class checks for available internet connections within the application.
First, we’ll create a method called checkInternetConnection in the ConnectivityService class. We will use this method to check if the device has a connection to the internet.
Dart provides us with a handy InternetAddress.lookup() function, which we can make use of when checking for internet availability. When there is a stable internet connection, the function returns a notEmpty response and also contains the rawAddress related to the URL we passed. If there is no internet connection, these two functions fail and we can safely say there is no internet connection available at the moment.
Create a boolean variable and call it hasConnection. By default, the hasConnection variable will be set to false. When a call to the InternetAddress.lookup() function passes, we set the hasConnection variable to true; when the call fails, we set it to false.
As an additional check, when there is a SocketException, which also signifies no internet connection, we set the hasConnection variable to false. Finally, we return hasConnection as the result of our function.
import 'dart:async';
import 'dart:io';
import 'package:connectivity_plus/connectivity_plus.dart';
class ConnectivityService {
  Connectivity connectivity = Connectivity();
  bool hasConnection = false;
  ConnectivityResult? connectionMedium;
  StreamController<bool> connectionChangeController =
      StreamController.broadcast();
  Stream<bool> get connectionChange => connectionChangeController.stream;
  ConnectivityService() {
    checkInternetConnection();
  }
  Future<bool> checkInternetConnection() async {
    bool previousConnection = hasConnection;
    try {
      final result = await InternetAddress.lookup('google.com');
      if (result.isNotEmpty && result[0].rawAddress.isNotEmpty) {
        hasConnection = true;
      } else {
        hasConnection = false;
      }
    } on SocketException catch (_) {
      hasConnection = false;
    }
    if (previousConnection != hasConnection) {
      connectionChangeController.add(hasConnection);
    }
    return hasConnection;
  }
}
With the ConnectivityService setup, we can easily check if there is an internet connection available within the application. The checkInternetConnection method will be used in subsequent sections to monitor the UI and update the screen based on the result.
Before we build the view, let’s set up our custom snackbars. We’ll have two types of snackbars: successes and errors. For this, we’ll create an enum of SnackbarType to hold these two types.
In the utils folder inside the lib directory, create a new file called enums.dart. We’ll declare the snackbar types in this file.
enum SnackbarType { positive, negative }
Next is to actually configure the snackbar UI (colors, styling, etc.). Inside the shared folder in the UI directory, create the a new file called setup_snackbar_ui.dart. It will hold two config registrations, for the success snackbar type and the error snackbar type.
import 'package:flutter/material.dart';
import 'package:handling_network_connectivity/app/app.locator.dart';
import 'package:handling_network_connectivity/utils/enums.dart';
import 'package:stacked_services/stacked_services.dart';

Future<void> setupSnackBarUI() async {
  await locator.allReady();
  final service = locator<SnackbarService>();
  // Registers a config to be used when calling showSnackbar
  service.registerCustomSnackbarConfig(
    variant: SnackbarType.positive,
    config: SnackbarConfig(
      backgroundColor: Colors.green,
      textColor: Colors.white,
      snackPosition: SnackPosition.TOP,
      snackStyle: SnackStyle.GROUNDED,
      borderRadius: 48,
      icon: const Icon(
        Icons.info,
        color: Colors.white,
        size: 20,
      ),
    ),
  );
  service.registerCustomSnackbarConfig(
    variant: SnackbarType.negative,
    config: SnackbarConfig(
      backgroundColor: Colors.red,
      textColor: Colors.white,
      snackPosition: SnackPosition.BOTTOM,
      snackStyle: SnackStyle.GROUNDED,
      borderRadius: 48,
      icon: const Icon(
        Icons.info,
        color: Colors.white,
        size: 20,
      ),
    ),
  );
}
Head over to the main.dart file and call the functions to setup the locator and the snackbarUI in the main block.
import 'package:flutter/material.dart';
import 'package:handling_network_connectivity/app/app.router.dart';
import 'package:handling_network_connectivity/ui/shared/snackbars/setup_snackbar_ui.dart';
import 'package:stacked_services/stacked_services.dart';
import 'app/app.locator.dart';
Future main() async {
  WidgetsFlutterBinding.ensureInitialized();
  setupLocator();
  await setupSnackBarUI();
  runApp(const MyApp());
}
class MyApp extends StatelessWidget {
  const MyApp({Key? key}) : super(key: key);
  @override
  Widget build(BuildContext context) {
    return MaterialApp(
      debugShowCheckedModeBanner: false,
      title: 'Connectivity',
      onGenerateRoute: StackedRouter().onGenerateRoute,
      navigatorKey: StackedService.navigatorKey,
    );
  }
}
With this done, we are good to go and can actually start building the UI and monitoring connections.
We want to monitor the internet connection for the homeView screen and then take action based on the connection state. Since we want it to be constantly updated on connection changes, we’ll make use of a stream.
Stacked provides us a pretty handy way to handle streams using the StreamViewModel. We link our stream to the checkInternetConnectivity function and use it to control the state of the view.
Follow these steps to link the stream to control the state of the view:
checkInternetConnectivity method from the ConnectivityService class and then yields the result continually as a Stream of boolconnectionStatus to give the state of the connection at each point — the actual state, not a stream of statesstatus to listen to the stream
connectionState to the event that it receives, and then call notifyListeners, updating the connectionStatus state in the processhasCalled, set it to false by default, and then, after a call has successfully been made, set it to true to prevent the app from re-fetching
hasCalled variable and if it’s false, we trigger a re-fetchSuperheroService and get the data. Assign the data to an instance of the SuperheroResponseModel class, which we will use in the view to display the dataWith these steps done, we are fully done with setting up our view model and monitoring network connectivity!
class HomeViewModel extends StreamViewModel {
  final _connectivityService = locator<ConnectivityService>();
  final _snackbarService = locator<SnackbarService>();
  final _superheroService = locator<SuperheroService>();
  final log = getLogger('HomeViewModel');

  //7
  SuperheroResponseModel? superHeroDetail;
  // 3
  bool connectionStatus = false;
  bool hasCalled = false;
  bool hasShownSnackbar = false;

  // 1
 Stream<bool> checkConnectivity() async* {
    yield await _connectivityService.checkInternetConnection();
  }

  // 2
  @override
  Stream get stream => checkConnectivity();

  // 4
  bool get status {
    stream.listen((event) {
      connectionStatus = event;
      notifyListeners();
  // 5 & 6
      if (hasCalled == false) getCharacters();
    });
    return connectionStatus;
  }

  Future<void> getCharacters() async {
    if (connectionStatus == true) {
      try {
        detail = await runBusyFuture(
          _superheroService.getCharactersDetails(),
          throwException: true,
        );
        // 6b:  We set the 'hasCalled' boolean to true only if the call is successful, which then prevents the app from re-fetching the data
        hasCalled = true;
        notifyListeners();
      } on SocketException catch (e) {
        hasCalled = true;
        notifyListeners();
        // 8
        _snackbarService.showCustomSnackBar(
          variant: SnackbarType.negative,
          message: e.toString(),
        );
      } on Exception catch (e) {
        hasCalled = true;
        notifyListeners();
        // 8
        _snackbarService.showCustomSnackBar(
          variant: SnackbarType.negative,
          message: e.toString(),
        );
      }
    } else {
      log.e('Internet Connectivity Error');
      if (hasShownSnackbar == false) {
      // 8
        _snackbarService.showCustomSnackBar(
          variant: SnackbarType.negative,
          message: 'Error: Internet Connection is weak or disconnected',
          duration: const Duration(seconds: 5),
        );
        hasShownSnackbar = true;
        notifyListeners();
      }
    }
  }

}
Let’s proceed to build the view.
Finally, we can bring the pieces together to build the UI. We will build two things for this UI:
Since we built the bare bones of the UI screen earlier, we can dive right into styling now.
In the Scaffold widget, let’s create an AppBar with a backgroundColor that changes based on the status boolean variable in the view model.
Scaffold(
            appBar: AppBar(
              backgroundColor: viewModel.status ? Colors.green : Colors.red,
              centerTitle: true,
              title: const Text(
                'Characters List',
                style: TextStyle(
                  fontWeight: FontWeight.bold,
                  fontSize: 24,
                  color: Colors.black,
                ),
              ),
              actions: [
                Text(
                  viewModel.status ? "Online" : "Offline",
                  style: const TextStyle(color: Colors.black),
                )
              ],
            ),
        )
Once the status is true, the background color will turn green; when it’s false, it turns red. In addition to that, we introduce a text box that shows either Online or Offline based on the connection status at that point.
In the body of the Scaffold widget, check if the connection status is false. If it is, we display a text box to the user telling them there is no internet connection. If isn’t, we then display our data.
viewModel.status == false
                  ? const Center(
                      child: Text(
                        'No Internet Connection',
                        style: TextStyle(fontSize: 24),
                      ),
                    )
                  : Column()
Once this is done, go ahead and create the UI to display the details drawn from the Superhero API. You can check it out in this GitHub Gist.
Let’s run the app and see how it all comes together.
Finally, we are fully monitoring the internet connection on the home view. You’ve done really well getting to this point! You’ve successfully learned how to set up your connectivity service, link it to the view model for the screen you want to control, and how to communicate the view state in your application to your users.
Check out the complete source code for the sample app. If you have any questions or inquiries, feel free to reach out to me on Twitter: @Blazebrain or LinkedIn: @Blazebrain.
Install LogRocket via npm or script tag. LogRocket.init() must be called client-side, not
server-side
$ npm i --save logrocket

// Code:

import LogRocket from 'logrocket';
LogRocket.init('app/id');
// Add to your HTML:

<script src="https://cdn.lr-ingest.com/LogRocket.min.js"></script>
<script>window.LogRocket && window.LogRocket.init('app/id');</script>

I migrated 20 production-style components from Tailwind to StyleX. Here’s what the data showed about LOC, CSS bundle size, build time, and type safety.

A guide for using JWT authentication to prevent basic security issues while understanding the shortcomings of JWTs.

Discover how to build, render, and automate product demo videos with Remotion, replacing traditional screen recordings with reusable React code.

Chrome’s Modern Web Guidance embeds modern web platform skills into AI coding agents, helping them choose native HTML, CSS, and browser APIs over legacy patterns.
Would you be interested in joining LogRocket's developer community?
Join LogRocket’s Content Advisory Board. You’ll help inform the type of content we create and get access to exclusive meetups, social accreditation, and swag.
Sign up now

