Testing is crucial in the development of any application. Cutting corners during the testing phase can lead to false confidence and, ultimately, a faulty app.

In this tutorial, we’ll demonstrate how to test Vue components using Vue Testing Library. While there are countless other testing libraries we could use, I’m a proponent of testing your application the way your users would use it, and that’s precisely what Vue Testing Library aims to do.
Vue Testing Library a member of the Testing Library family, which includes React Testing Library, DOM Testing Library, and more. It builds upon Vue Test Utils, the official testing library for Vue, and DOM Testing Library, which enables it to use features from the Testing Library family.
To follow along with this tutorial, you should have:
Since we’ll be creating and testing single-file components, you’ll need to create a new Vue project using the Vue CLI.
Run the command below to set up a new Vue project.
vue create testing-vue-components.
We can stick to the default Vue configurations since we’ll be installing any additional dependencies by ourselves.
Vue Testing Library can be used with a lot of testing frameworks, but we’ll use Jest for this tutorial.
Install jest and Vue Testing Library.
npm i --save-dev jest @testing-library/vue
Since we’ll be writing ES6, we need to use Babel to handle the compilation for us. Vue already ships with a Babel configuration, so we just need to install babel-jest and configure Jest to transform .js files using Babel.
npm i --save-dev babel-jest
Again, because we’re writing single-file components, we need to configure Jest to load .vue files. The vue-jest package helps with that.
npm install --save-dev [email protected]
Finally, update the package.json to contain the necessary configuration.
"jest": {
    "moduleFileExtensions": [
      "js",
      "json",
      "vue"
    ],
    "transform": {
      "^.+\\.js$": "babel-jest",
      ".*\\.(vue)$": "vue-jest"
    }
  },
When a user loads a page, they should be able to see the component, so the first thing to test should be that the component renders.
Consider this simple Counter component, which provides two buttons for counting and shows the number of counts:
// Counter.vue
<template>
  <div>
    <h3>Count: {{ counter }}</h3>
    <div class="button-container">
      <button @click="increment">Add</button>
      <button @click="decrement">Subtract</button>
    </div>
  </div>
</template>

<script>
export default {
  name: 'Counter',
  data() {
    return {
      counter: 0,
    };
  },
  methods: {
    increment() {
      this.counter++;
    },
    decrement() {
      this.counter--;
    },
  },
};
</script>
To test the component, create a Counter.js file in the tests directory.
import Counter from '../Counter.vue';
import { render } from '@testing-library/vue';
test('It renders correctly', () => {
  const { getByText } = render(Counter);
  getByText('Count: 0');
});
The getByText helper checks that there is a text with the specified argument in the document. In our counter component, the initial state of counter is set to 0, so without clicking any button, we should have Count: 0 rendered to the document.
Other actions that a user might perform include clicking on both buttons, so we need to test those as well.
import Counter from '../Counter.vue';
import { render, fireEvent } from '@testing-library/vue';

test('It correctly responds to button clicks', async () => {
  const { getByText } = render(Counter);
  // Check initial state
  getByText('Count: 0');

  // Get buttons.
  const addButton = getByText('Add');
  const subtractButton = getByText('Subtract');

  // Click the Add button.
  await fireEvent.click(addButton);
  // Counter should be updated.
  getByText('Count: 1');

  // Click the subtract button.
  await fireEvent.click(subtractButton);
  // Counter should be updated.
  getByText('Count: 0');
  // Further clicks
  await fireEvent.click(addButton);
  await fireEvent.click(addButton);
  await fireEvent.click(addButton);
  await fireEvent.click(addButton);
  getByText('Count: 4');
  await fireEvent.click(subtractButton);
  await fireEvent.click(subtractButton);
  getByText('Count: 2');
});
Using getByText, we can get the buttons and click them just as a normal user would.
As the name implies, fireEvent is used to dispatch different events on elements. We’re awaiting events here because Vue updates the DOM asynchronously, hence all the events dispatched from fireEvent returns a promise which will get resolved on the next tick.
Consider the component below. It stores what sets up a two-way data binding using the V-model and displays what the user types in the input field on the screen.
// Repeater.vue
<template>
  <section>
    <label for="item">Start Typing</label>
    <input type="text" v-model="item" id="item" />
    <div>You typed: {{ item }}</div>
  </section>
</template>
<script>
export default {
  data() {
    return {
      item: '',
    };
  },
};
</script>
<style></style>
To test this component as the user would use it, we need to think like the user. A user would come to the page, see the “Start typing” label, and type something into the input field. The user would expect the output to be displayed in the output div. Our test should assert those accordingly.
import Repeater from '../Repeater.vue';
import { render, fireEvent } from '@testing-library/vue';

test('User can type and see output on the screen', async () => {
  const { getByLabelText, getByText, debug } = render(Repeater);
  // Get input associated with label.
  const input = getByLabelText('Start Typing');
  // Update the input field.
  await fireEvent.update(input, 'Sample text');
  // Assert that the update is successful.
  getByText('You typed: Sample text');

  // View the current state of the dom.
  debug();
});
Using the getByLabelText method, we can get the input field associated with a specific label.
To ensure that the V-model works properly, typing into the input field should display in the output area. For that reason, we should update the input field with Sample text and assert that we can find that on the DOM.
Some complex forms have validations, which are computed properties. Let’s walk through how to test those with Vue Testing Library.
// Form.vue

<template>
  <form action="">
    <label for="name">Name</label>
    <input type="text" name="name" id="name" v-model="name" />
    <label for="email">Email</label>
    <input type="email" name="email" id="email" v-model="email" />
    <button type="submit" :disabled="!hasValidFields">Submit</button>
  </form>
</template>
<script>
export default {
  name: 'AppForm',
  data() {
    return {
      name: '',
      email: '',
    };
  },
  computed: {
    hasValidFields() {
      return Boolean(this.email && this.name);
    },
  },
};
</script>
<style></style>
This simple form component validates the user input by making sure the submit button can’t be clicked unless both fields contain valid values.
As usual, to test this component, we’ll interact with it as a user would.
import Form from '../Form.vue';
import { render, fireEvent } from '@testing-library/vue';
test('User interaction with form', async () => {
  const { getByLabelText, getByText } = render(Form);
  const nameField = getByLabelText('Name');
  const emailField = getByLabelText('Email');
  const submitBtn = getByText('Submit');
  expect(submitBtn.disabled).toBe(true);
  // Update the name field.
  await fireEvent.update(nameField, 'James John');
  expect(submitBtn.disabled).toBe(true);
  // Add email.
  await fireEvent.update(emailField, '[email protected]');
  expect(submitBtn.disabled).toBe(false);
});
As our tests shows, the submit button should be disabled until all required fields have been provided.
You’re sure to encounter more complex components that depend on external data, either through props or by fetching the data via an AJAX request.
Props and other items, such as slots, can be passed to the component being rendered via a second argument to the render method.
Consider this input component, which is to be used throughout the app:
// AppInput.vue
<template>
  <div>
    <slot name="label"></slot>
    <input type="text" :name="name" :id="inputId" />
  </div>
</template>
<script>
export default {
  props: {
    name: {
      required: true,
      type: String,
    },
    inputId: {
      required: true,
      type: String,
    },
  },
};
</script>
The corresponding test for this would be:
import AppInput from '../AppInput.vue';
import { render } from '@testing-library/vue';
test('It renders label', () => {
  const { getByLabelText } = render(AppInput, {
    props: {
      name: 'username',
      inputId: 'username',
    },
    slots: {
      label: `<label for="username">Enter Username</label>`,
    },
  });
  // Get input field by label text.
  getByLabelText('Enter Username');
});
Occasionally, tests will fail, and it’s important to get a clear view of what went wrong to avoid similar mistakes in the future. This is where Vue Testing Library really shines.
test('It renders label', () => {
  const { getByLabelText} = render(AppInput, {
    props: {
      name: 'username',
      inputId: 'username',
    },
    slots: {
      // Note wrong attribute value.
      label: `<label for="user">Enter Username</label>`,
    },
  });
  getByLabelText('Enter Username');
});
The above tests fails because getByLabelText cannot find an associated input field for the label. Here’s what the error message looks like:
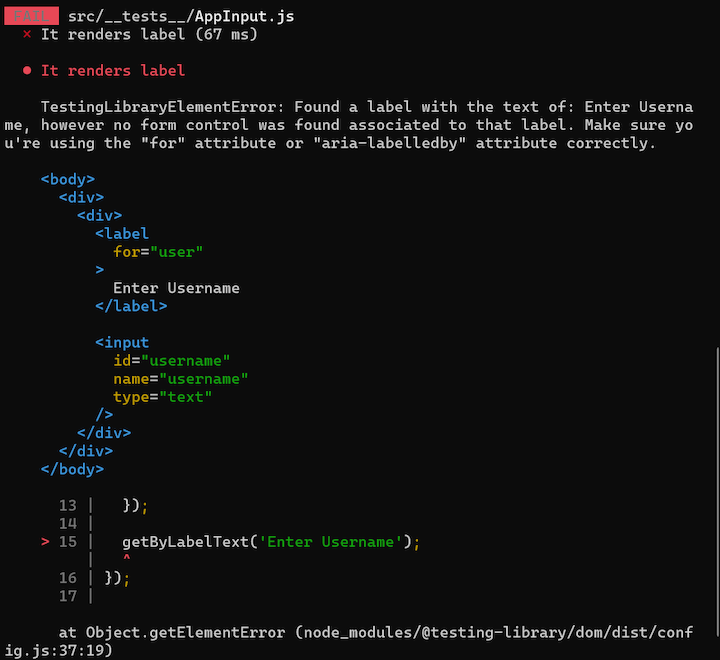
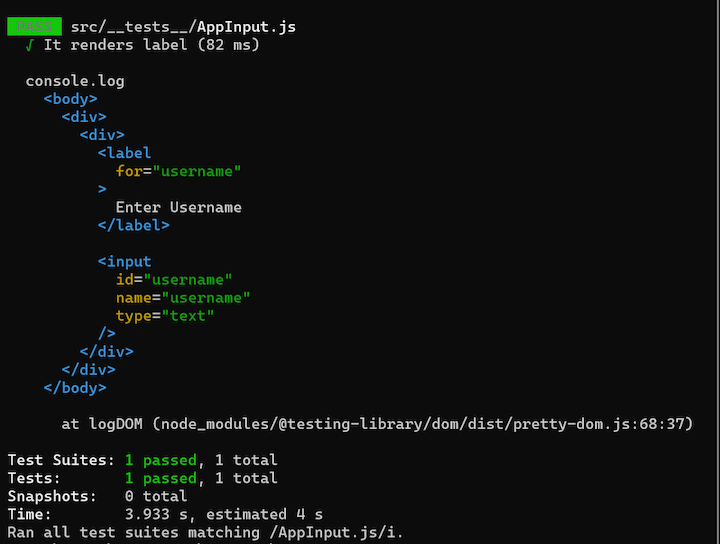
We can also view the state of the DOM at different points in time. Let’s debug the AppInput component to see what got rendered to the DOM.
import AppInput from '../AppInput.vue';
import { render } from '@testing-library/vue';
test('It renders label', () => {
  const { getByLabelText, debug } = render(AppInput, {
    props: {
      name: 'username',
      inputId: 'username',
    },
    slots: {
      label: `<label for="username">Enter Username</label>`,
    },
  });
  getByLabelText('Enter Username');

  // Logs a representation of the dom at this state.
  debug();
});
Running this test will result in the following.
In this tutorial, we demonstrated how to test different components using Vue Testing Library. I hope the concepts we went over inspire you to foster better testing habits. Most importantly, I hope this tutorial has shed some light on the benefits of testing your components in the context of how your users interact with them.
Debugging Vue.js applications can be difficult, especially when users experience issues that are difficult to reproduce. If you’re interested in monitoring and tracking Vue mutations and actions for all of your users in production, try LogRocket.

LogRocket lets you replay user sessions, eliminating guesswork by showing exactly what users experienced. It captures console logs, errors, network requests, and pixel-perfect DOM recordings — compatible with all frameworks.
With Galileo AI, you can instantly identify and explain user struggles with automated monitoring of your entire product experience.
Modernize how you debug your Vue apps — start monitoring for free.
Hey there, want to help make our blog better?
Join LogRocket’s Content Advisory Board. You’ll help inform the type of content we create and get access to exclusive meetups, social accreditation, and swag.
Sign up now
Learn how to integrate MediaPipe’s Tasks API into a React app for fast, in-browser object detection using your webcam.

Integrating AI into modern frontend apps can be messy. This tutorial shows how the Vercel AI SDK simplifies it all, with streaming, multimodal input, and generative UI.

Interviewing for a software engineering role? Hear from a senior dev leader on what he looks for in candidates, and how to prepare yourself.

Set up real-time video streaming in Next.js using HLS.js and alternatives, exploring integration, adaptive streaming, and token-based authentication.


2 Replies to "Testing Vue components with Vue Testing Library"
This is intelligent James….. 👍👍
Great article!
For anyone who is using vue.js 3 change:
– `@testing-library/vue` to `@testing-library/vue@next`
– `[email protected]` to `@vue/vue3-jest`