Editor’s note: This article was last validated for accuracy on 15 November 2022.

JavaScript is a fantastic programming language that is extending its scope beyond browsers into APIs, mobile development, desktop applications, and much more. However, with all of its powerful features, continuous improvements, and rising potential, JavaScript is missing a crucial feature that helps with code organization and efficiency, types.
For example, consider the code below:
let someText = "Hello World!";
someText = 123;
someText = [123, 'hello', { isThisCorrect: true }]
In most programming languages, the code above wouldn’t work, however, JavaScript allows it. We can create a variable as a string, then assign a number, object, or even an array to it. But, doing so has its pros and cons.
As an application scales, project dependencies increase and systems become more complex. It can be difficult for developers to understand the variables, properties, and methods in their full context, particularly when working with frameworks and external dependencies.
Wouldn’t it be nice if, while programming, our IDE could suggest and autocomplete the properties of an object, even if this object is the result of a remote fetch operation? Or, we could inspect a variable to see all its methods easily?
TypeScript resolves this problem by adding types to variables. In this article, we’ll explore types in React by covering the following:
To begin, let’s set up our app in TypeScript and preconfigure webpack, Babel, and our dependences using Create React App with the following command:
npx create-react-app my-app --template typescript
To start the project, run:
cd my-app
npm start
Notice that the site looks similar to a JavaScript version. However, when we start looking at the code, you’ll notice a few differences.
Let’s take a closer look at the components and tests, starting with the App.tsx file. The first thing you may have noticed is its file extension. All the component files are now tsx instead of js or jsx, and, likewise, files like setupTests.js are now setupTests.ts. But why?
At the time of writing, web browsers and Node.js don’t offer direct support for TypeScript. They only understand JavaScript, and therefore, we need to convert our TypeScript files into JavaScript files. The TypeScript compiler is responsible for performing this task.
The compiler needs to know which files are pure JavaScript and which ones to compile, therefore, the different file extensions mentioned above are used.
JavaScript is not typed, meaning you can’t assign a data type to a variable, but JavaScript still understands the difference between a number, a string, and an object. At runtime, JavaScript will do its best to infer the type of the variable by the value it contains.
Let’s take a look at the following example:
let helloWorld = "Hello World";
Because the value contained in the helloWorld variable is a string, that variable is now of type string, and you can perform any operation that you normally would on a string. However, if that variable changes at a later point, the type of the variable will also change.
TypeScript takes this same approach, assigning a variable its type depending on its value at the moment of declaration. Therefore, the same line of code will work in TypeScript. The difference will depend on what happens when you want to assign a new value of a different type to the variable.
We already saw that JavaScript would allow you to do it, but let’s see what would happen if we try the same thing with TypeScript:
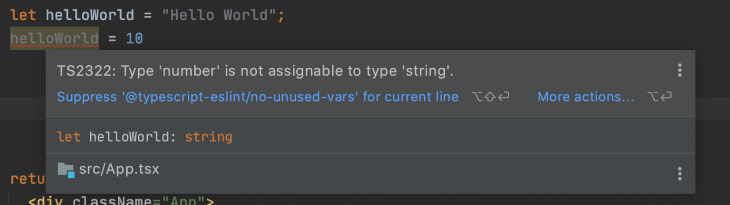
let helloWorld = "Hello World";
helloWorld = 10;
Interestingly enough, your IDE, whether you’re using VS Code, WebStorm, or any other IDE with support for TypeScript, will have already detected an issue, highlighted the variable in red, and given you information about it:
Moreover, the compilation process will result in errors, and you won’t be able to run your application:

So far, we’ve let TypeScript decide on the variable data type, which is called type by inference. However, on other occasions, we may want to manually assign a type to a variable, perhaps because we still don’t have its value or because the variable could have more than one type.
Let’s declare a variable using explicit types:
let helloWorld:string = "Hello World";
Easily enough, we can pass the type during declaration right after the variable name.
React works well with JavaScript on its own, however, we have a lot to gain by using TypeScript. TypeScript reduces bugs and errors, makes codebases more predictable, and improves component utilization.
Let’s develop a simple search application for GitHub that allows users to search repositories using GitHub’s search API. The gif below shows an example of the application we’ll create:

You can check out the full code for the application on GitHub.
Run the command below to spin up a new TypeScript-compatible React application with Create React App:
npx create-react-app my-app --template typescript
or
yarn create-react-app my-app --template typescript
Next, start the project with the following commands:
cd my-app
npm start
We need to fetch data from our API, so we’ll need an object to store it, and that object must be mapped to a type. Let’s define our API data types by analyzing the response and building a custom type. Below is a sample response for reference:
{
  "total_count": 40,
  "incomplete_results": false,
  "items": [
    {
      "id": 3081286,
      "node_id": "MDEwOlJlcG9zaXRvcnkzMDgxMjg2",
      "name": "Tetris",
      "full_name": "dtrupenn/Tetris",
      "owner": {
        "login": "dtrupenn",
        "id": 872147,
        "node_id": "MDQ6VXNlcjg3MjE0Nw==",
        "avatar_url": "https://secure.gravatar.com/avatar/e7956084e75f239de85d3a31bc172ace?d=https://a248.e.akamai.net/assets.github.com%2Fimages%2Fgravatars%2Fgravatar-user-420.png",
        "gravatar_id": "",
        "url": "https://api.github.com/users/dtrupenn",
        "received_events_url": "https://api.github.com/users/dtrupenn/received_events",
        "type": "User"
      },
      "private": false,
      "html_url": "https://github.com/dtrupenn/Tetris",
      "description": "A C implementation of Tetris using Pennsim through LC4",
      "fork": false,
      "url": "https://api.github.com/repos/dtrupenn/Tetris",
      "created_at": "2012-01-01T00:31:50Z",
      "updated_at": "2013-01-05T17:58:47Z",
      "pushed_at": "2012-01-01T00:37:02Z",
      "homepage": "",
      "size": 524,
      "stargazers_count": 1,
      "watchers_count": 1,
      "language": "Assembly",
      "forks_count": 0,
      "open_issues_count": 0,
      "master_branch": "master",
      "default_branch": "master",
      "score": 1.0
    }
  ]
}
Our application is very simple, so we don’t need to map all those fields, but let’s see how it would work. Create a Types/GitHub.ts file in the src directory. In this file, we’ll define a custom data type to represent the JSON response.
TypeScript has two main options for defining types, interfaces and types. Each has its own properties and rules. We won’t go into too much detail on them in this article, but I recommend reading up on Types vs. interfaces in TypeScript if you want to learn more. As a general rule, you’ll want to use interfaces for props and types to represent objects.
In our case, we are representing an object, so we’ll use the types syntax to declare our GitHubSearchResultType, which is composed of the total_number of repositories found, an incomplete_results flag, returning true or false, and a list of items or repositories.
The first two properties are very simple. Each corresponds to a TypeScript basic type, so we can reference them immediately:
export type GitHubSearchResultType = {
    total_count: number;
    incomplete_results: boolean;
}
However, when it comes to the items properties, the situation is a bit more complicated. We know it’s an array of objects, so we could use the any keyword from TypeScript, which defaults the variable to the JavaScript behavior, ignoring types. It would look something like the code below:
export type GitHubSearchResultType = {
    total_count: number;
    incomplete_results: boolean;
    Items: Array<any>;
}
Note that the syntax for defining the array is a bit different since we have two types in one definition, the main type, Array, and the type of the elements of the array, which belong in between <>.
Although this works, it’s not ideal. In most projects, the use of any is forbidden and monitored by lint rules. Basically, you’d be ignoring the reason you’re using TypeScript to begin with. A better approach is to define a second custom type and map the array to this type, like in the snippet below:
typescript
export type GitHubSearchResultType = {
    total_count: number;
    incomplete_results: boolean;
    items: Array<GitHubRepository>
}
It’s clear what items are and what properties each item would have. Now, we’re only missing the definition for GitHubRepository:
export type GitHubRepository = {
    id: string;
    full_name: string;
    html_url: string;
}
Now, we can build our components. We’ll start with a very simple component that will receive a list of repositories and draw them on the screen. We’ll name this component ListRepositories.tsx and store it in the src/Components folder.
TypeScript-based React components have two main differences from JavaScript React components:
Let’s start by understanding how to define props with TypeScript. Our component needs access to the list of repositories that we’ll receive through props, so let’s define that by using the interface syntax:
interface Props {
    repositories?: Array<GitHubRepository>;
}
Similar to types, interfaces define the objects’ properties in the body between the brackets, and the properties are defined in the same way.
In our particular example, we introduced a new concept called optional properties, which are denoted by adding a ? right after the name of the property. These optional properties can be undefined, null, or a value of the given type.
The interface we created was called Props. Still, it could be anything, like ListRepositoryProps or ListRepositoryPropsType.
Therefore, we must tell React what name was given to the Props type when we declare our component. We achieve that by using React.FC as follows:
const ListRepositories: React.FC<Props> = (props) => {
In one line, we created a functional component and told React that our props are of Props type. Because it’s a functional component, we can do cool things like object destructuring. Now, our modified declaration looks like the following:
const ListRepositories: React.FC<Props> = ({ repositories = [] }) => {
You might be wondering why we set the repositories property to optional if we always require a value. The parent of this component may pass an undefined, and if that’s the case, we can assume an empty list.
Below is the full code for the component:
import React from 'react';
import {GitHubRepository} from "../Types/GitHub";

interface Props {
    repositories?: Array<GitHubRepository>;
}

const ListRepositories: React.FC<Props> = ({ repositories = [] }) => {
    return (
        <ul>
            {repositories.map(repository => (
                <li key={repository.id}>
                   <a href={repository.html_url} target="_blank">{repository.full_name}</a>
                </li>
            ))}
        </ul>
    );
}

export default ListRepositories;
Next, we’ll build a new component that will be responsible for capturing the user input and initiating the search operation. Since we’re already experts at React and TypeScript, I’ll present the full code for the form and then talk about the critical elements below:
import React from 'react';

interface Props {
    search(query: string): void;
}

const SearchForm: React.FC<Props> = (props) => {
    function handleSubmit(e: React.FormEvent) {
        e.preventDefault();
        const formData = new FormData(e.target as HTMLFormElement);
        props.search((formData.get('query') || '') as string);
    }

    return (
        <form onSubmit={handleSubmit}>
            <label>
                Query:
                <br />
                <input type="text" name="query" />
            </label>
            <button>Search</button>
        </form>
    );
}

export default SearchForm;
Like our previous component, we’re using an interface to define our props. However, we don’t have properties, but a method instead.
TypeScript allows us to define function types. We can do so by specifying a function name, its params, types, and its return type. It also has support for function expressions and arrow functions, as seen in the code below:
//function expression
functionName(param1: type, …): type;

//arrow function
functionName: (param1: type, ...) => type;
Examples:
interface Props {
    search(query: string): void;
}

interface Props {
    search: (query: string) => void;
}
In this form, we have another special use of TypeScript, casting:
props.search((formData.get('query') || '') as string);
Why do we need to cast? The formData.get function is a union type, meaning that it can be one of the multiple types, in this case, string, File, or undefined. We know that for our purpose, the only option is a string, and therefore, we cast.
Now that we have all of our pieces ready, we need to combine them on the App.tsx component and add the functionality to fetch the remote data from the GitHub API.
Before we reveal the code, it’s important to clarify that we’re using Axios to fetch the data from the API. Run the following command to install Axios:
npm install axios
Now, we’ll run the code below:
import React from 'react';
import axios from 'axios';
import {GitHubRepository, GitHubSearchResultType} from "./Types/GitHub";
import SearchForm from "./Components/SearchForm";
import ListRepositories from "./Components/ListRepositories";

function App() {
    const [repositories, setRepositories] = React.useState<Array<GitHubRepository>>();

    // Performs the search
    async function search(query: string) {
         const result = await axios.get<GitHubSearchResultType>(`https://api.github.com/search/repositories?q=${query}`);
         setRepositories(result.data.items);
    }

    return (
        <div>
            <SearchForm search={search}/>
            <ListRepositories repositories={repositories}/>
        </div>
    );
}

export default App;
The code above is pretty much standard React code, except for two instances that use TypeScript generics.
Generics allow for definitions to have blank types to be completed at a later time. A perfect example of this in React is the React.useState function. useState will define a getter and setter that we can use in our code to store information in React’s state. But, how would React know the type of this getter and setter? The answer is generics. Basically, a function like useState would be declared as follows:
function useState<S = undefined>(): [S | undefined, Dispatch<SetStateAction<S | undefined>>];
S can be of any type, and it’s specified during the function call as follows:
const [repositories, setRepositories] = React.useState<Array<GitHubRepository>>();
Or, by using implicit type designation:
const [someText, setSomeText] = React.useState('Hello World!');
The second instance using generics is when we use Axios:
const result = await axios.get<GitHubSearchResultType>(`https://api.github.com/search/repositories?q=${query}`);
         setRepositories(result.data.items);
In this case, the GET function will return the JSON response data mapped into the given type.
In this tutorial, we learned how to leverage the power of TypeScript to build scalable and maintainable React applications. I hope you enjoyed reading this article as much as I enjoyed writing it, and as I always say, once you go TypeScript, you never go back. Thanks for reading!

LogRocket lets you replay user sessions, eliminating guesswork by showing exactly what users experienced. It captures console logs, errors, network requests, and pixel-perfect DOM recordings — compatible with all frameworks, and with plugins to log additional context from Redux, Vuex, and @ngrx/store.
With Galileo AI, you can instantly identify and explain user struggles with automated monitoring of your entire product experience.
Modernize how you understand your web and mobile apps — start monitoring for free.
Install LogRocket via npm or script tag. LogRocket.init() must be called client-side, not
server-side
$ npm i --save logrocket

// Code:

import LogRocket from 'logrocket';
LogRocket.init('app/id');
// Add to your HTML:

<script src="https://cdn.lr-ingest.com/LogRocket.min.js"></script>
<script>window.LogRocket && window.LogRocket.init('app/id');</script>

Debug RSC hydration mismatches in production with Next.js instrumentation, Suspense isolation, HTML diffing, and CI smoke tests.

Explore why npm dependencies are a major supply chain security risk and how to protect JavaScript apps from compromised packages and transitive threats.

Enabled React Compiler v1.0 on a production Next.js app. Here’s every warning, breakage, and silent opt-out I documented — and what actually worked.

We built the same app in TanStack Start RSC and Next.js RSC. TanStack shipped 40% less JS and built 4x faster — but Next.js is still the safer production bet.
Hey there, want to help make our blog better?
Join LogRocket’s Content Advisory Board. You’ll help inform the type of content we create and get access to exclusive meetups, social accreditation, and swag.
Sign up now

