Editor’s note: This post was updated by Ikeh Akinyemi on 3 October 2024 to cover looping through API response interfaces, how to handle default values in TypeScript interfaces, and more.

In TypeScript, interfaces are a powerful feature that allows developers to define the structure of objects, providing a way to enforce type checking and improve code reliability. Interfaces can be seen as contracts that describe the shape of data, making it easier to work with both simple and complex objects and ensure consistency across your codebase.
Here are a few key reasons why working with TypeScript interfaces is recommended within the community:
Check out this video for an in-depth guide to interfaces in TypeScript:
Interfaces in TypeScript: What are they and how do we use them?
Learn more about interfaces in TypeScript. In this video, we will be going over what they are and how to use them.
Now, let’s explore how to use interfaces in TypeScript, focusing on the interface keyword, and how its functionality.
The Replay is a weekly newsletter for dev and engineering leaders.
Delivered once a week, it's your curated guide to the most important conversations around frontend dev, emerging AI tools, and the state of modern software.
To define an interface in TypeScript, use the interface keyword followed by the interface name and its properties:
interface User {
  id: number;
  name: string;
  email: string;
  age?: number; // Optional property
}
In this example, we’ve defined a User interface with three required properties (id, name, and email) and one optional property (age). You can then use this interface to type-check objects:
function printUserInfo(user: User) {
  console.log(`User ${user.name} (ID: ${user.id}) - Email: ${user.email}`);
  if (user.age) {
    console.log(`Age: ${user.age}`);
  }
}

const user: User = {
  id: 1,
  name: "John Doe",
  email: "[email protected]"
};

printUserInfo(user); // Valid
If you try to use an object that doesn’t match the interface, TypeScript will raise a compile-time error:
const invalidUser: User = {
  id: "2", // Error: Type 'string' is not assignable to type 'number'
  name: "Jane Doe",
  email: "[email protected]"
};
This quick demo offers a concise introduction to TypeScript interfaces, highlighting their key benefits and basic usage. For the remainder of this tutorial, we will delve into more advanced topics, starting with duck typing.
Duck typing, or structural subtyping, is a type system focused on the shape and structure of an object rather than its explicit type or class. Duck typing is crucial in type checking.
TypeScript checks if an object or value has the required properties and methods at compile time rather than relying on predefined class hierarchies or interfaces.
Here’s how you can implement duck typing in TypeScript through interfaces to give you an overview of the significance of type checking:
interface Animal {
  name: string;
  makeSound(): void;
}

class Dog implements Animal {
  name: string;

  constructor(name: string) {
    this.name = name;
  }

  makeSound(): void {
    console.log('Woof!');
  }
}

class Cat implements Animal {
  name: string;

  constructor(name: string) {
    this.name = name;
  }

  makeSound(): void {
    console.log('Meow!');
  }
}

function playWithAnimal(animal: Animal): void {
  console.log(`Playing with ${animal.name}`);
  animal.makeSound();
}

const dog = new Dog('Max');
const cat = new Cat('Mittens');

playWithAnimal(dog); // Output: Playing with Max
playWithAnimal(cat); // Output: Playing with Mittens
Here, the Animal interface defines the minimum requirements for an animal. Animals must have a name property and a makeSound() method. The Dog and Cat classes implement the Animal interface, ensuring they have the necessary properties and methods for functions that accept an Animal argument.
The playWithAnimal function demonstrates duck typing. It doesn’t check the specific class of the animal parameter — it only checks if the object has the name property and the makeSound() method. Therefore, you can pass the Dog and Cat objects without errors.
It’s important to note that duck typing doesn’t replace explicit type checking. Explicit type checking provides valuable benefits, including catching type errors at compile time and improving code readability.
Although you can use interfaces and types to define shapes and structures, there are differences in their usage and scenarios where one outperforms the other.
Here’s a summary of the key differences between interfaces and types in defining shapes:
| Feature | Interfaces | Types |
|---|---|---|
| Primary purpose | Define object contracts | Represent various constructs, including shapes |
| Implementation details | No implementation | Can include implementation details |
| Flexibility | They are less flexible in terms of what they can represent | They are more flexible in terms of what they can represent |
| Contract enforcement | Enforce a strict contract for object properties | Don’t enforce a strict agreement, but can provide type information |
Interfaces are ideal for describing the shape of objects and classes, enforcing contracts, and maintaining consistency in class structures. At the same time, types excel at crafting complex types, handling non-object data, and defining types for external libraries.
Choosing between interfaces and types in TypeScript depends on your specific needs and the nature of the data or structures you are working on within your project. You can use both in your TypeScript codebases to leverage their strengths in parts of your application.
Function interfaces (function types) allow you to define the shape of functions. This can be helpful when you want to specify expected parameter types and return types for functions.
Here’s how you can define and use a function interface:
interface Calculator {
  (a: number, b: number): number;
}

const add: Calculator = (a, b) => a + b;
const subtract: Calculator = (a, b) => a - b;

console.log(add(5, 3));      // 8
console.log(subtract(10, 4)); // 6
The Calculator interface describes a function that takes two parameters of type number and returns a number. You can use this interface to enforce the shape of functions like add and subtract.
Function interfaces are valuable for ensuring that functions adhere to specific signatures, enhancing code readability, and making it easier to catch type-related errors early in development.
Interfaces do a great job of making sure entities are implemented as expected. However, there may be cases where not all properties need to be defined in the interface. These are called optional properties and are represented in the interface like this:
interface TeslaModelS {
    length: number;
    width: number;
    wheelbase: number;
    seatingCapacity: number;
    getTyrePressure?: () => number;
    getRemCharging: () => number;
}
Note the ? in the getTyrePressure property. The question mark suggests that the property getTyrePressure is optional and is not mandatory for entities to implement this functionality in all models. The compiler won’t complain even if you don’t specify this property in the teslaObj parameter.
The compiler also checks for excess properties that are not defined in the interface. Let’s say the teslaObj contains an excess property turningCircle, which is not specified in the TeslaModelS interface:
buildTeslaModelS({
    length: 196,
    width: 86,
    wheelbase: 116,
    getTyrePressure: function () {
        let tyrePressure = 20 // Evaluated after doing a few complex computations!
        return tyrePressure
    },
    getRemCharging: function () {
        let remCharging = 20 // Evaluated after doing a few complex computations!
        return remCharging
    },
    turningCircle: 10
})
The compiler will throw the following error:
Argument of type
{ length: number; width: number; wheelbase: number; getTyrePressure: () => number; getRemCharging: () => number; turningCircle: number; }is not assignable to parameter of typeTeslaModelS. Object literal may only specify known properties, andturningCircledoes not exist in typeTeslaModelS.
Read-only properties cannot be changed once they are initialized. For example, the properties length, width, wheelbase, and seatingCapacity should never be modified in any case after they are initialized with some fixed value.
Let’s define a TeslaModelS interface with read-only properties. This will define the structural and behavioral specifications of a Tesla Model S car:
interface TeslaModelS {
    readonly length: number;
    readonly width: number;
    readonly wheelbase: number;
    readonly seatingCapacity: number;
    getTyrePressure?: () => number;
    getRemCharging: () => number;
}
Note the use of the readonly keyword with the name of the properties. It suggests that these properties cannot be modified after they are initialized with some value.
While interfaces in TypeScript are excellent for defining the shape of objects, they cannot directly specify default values for properties. However, we can use a combination of optional properties and factory functions to achieve a similar effect.
First, let’s define an interface with some optional properties:
interface Config {
  debug?: boolean;
  timeout?: number;
  retries?: number;
}
In this interface, all properties are optional. This allows us to create objects that might not specify all of these properties.
To handle default values, we can create a factory function that creates objects based on this interface:
function createConfig(config: Config): Config {
  return {
    debug: config.debug ?? false,
    timeout: config.timeout ?? 3000,
    retries: config.retries ?? 3
  };
}
This factory function uses the nullish coalescing operator (??) to assign default values when properties are not provided. This operator was introduced in TypeScript 3.7 (together with optional chaining) and provides a more concise way to handle default values compared to older methods. Optional chaining allows you to safely access nested properties that might be undefined:
const debugMode = config?.debug ?? false;
Now we can use this factory function to create Config objects with default values:
const defaultConfig = createConfig({});
console.log(defaultConfig); // { debug: false, timeout: 3000, retries: 3 }

const customConfig = createConfig({ debug: true, timeout: 5000 });
console.log(customConfig); // { debug: true, timeout: 5000, retries: 3 }
In the first example, we pass an empty object, so all default values are used. In the second example, we override some of the defaults while keeping others.
While not directly related to interfaces, we can use parameter properties when creating classes that implement interfaces with default values:
class ConfigImpl implements Config {
  constructor(
    public debug: boolean = false,
    public timeout: number = 3000,
    public retries: number = 3
  ) {}
}
Indexable properties, as the name suggests, are used for defining types that are indexed into a unique number or a string. For example, we can define a type CustomArray as:
interface CustomArray {
    [index: number]: string
}

let cars: CustomArray = ['Hatchback', 'Sedan', 'Land Rover', 'Tesla Model S']
console.log('Element at position 1', cars[1]) // 'Sedan'
Note that the cars variable is not an ordinary array, so you cannot use array inbuilt functions like push, pop, filter, etc. You might argue that it is better to define ordinary arrays instead of using indexable types. Indexable types are helpful when you have to define custom properties and functions that should operate on a range of values of the same data type.
We can demonstrate a practical use case of indexable properties by simulating a review process, where we submit the specifications of the Tesla Model S to a reviewing committee to go through each of the models and test them for performance and other factors:
interface TeslaModelSMap {
    engineer: string,
    model: TeslaModelS,
    readonly rating: number
}
interface TeslaModelSReview {
    [id: number]: TeslaModelSMap
}

const TeslaModelSReviewQueue: TeslaModelSReview = [
    {
        engineer: 'John',
        model: modelByJohn1, // modelByJohn1 is of type `TeslaModelS`
        rating: 2
    },
    {
        engineer: 'Ray',
        model: modelByRay1, // modelByRay1 is of type `TeslaModelS`
        rating: 3
    },
    {
        engineer: 'John',
        model: modelByJohn2, // modelByJohn2 is of type `TeslaModelS`
        rating: 4
    },
    // ... other 97 models
]
The TeslaModelSReview interface indexes the group of properties — engineer, model, and rating — are associated with a particular model into a unique numeric index. The TeslaModelSReviewQueue is of type TeslaModelSReview. It lists the Tesla models built by different engineers.
From the code above, we can see that John has built two models: modelByJohn1 and modelByJohn2, which are rated as 2 and 4, respectively.
The type of indexer can either be a string or a number. We can also define other properties in TeslaModelSReview interface but these properties should return a subtype of TeslaModelS type.
The indices of TeslaModelSReview can be made read-only to prevent modifying its values while it is in the review process. We’ll have to change our TeslaModelSReview interface like this:
interface TeslaModelSReview {
    readonly [id: number]: TeslaModelS
}
An interface can also be used to define the structure of a function. As we saw earlier, the functions getTyrePressure and getRemCharging are defined as properties on the TeslaModelS interface. However, we can define an interface for functions like this:
interface Order {
    (customerId: number, modelId: number): boolean
}

let orderFn: Order = function (cId, mId) {
    // processing the order
    return true // processed successfully!
}
The orderFn function is of type Order. It takes two parameters of type number and returns a value of type boolean.
You don’t need to redefine the parameter types again in the orderFn function. The TypeScript compiler automatically maps the arguments from the interface to the function declaration, ensuring type consistency between them.
The compiler infers that cId maps to customerId with a type of number, and mId maps to modelId, also with a type of number. Even the return type for orderFn function is inferred from its definition in the interface.
So far, we’ve learned how a function implements an interface. Now let’s build a class for the TeslaModelS interface:
class TeslaModelSPrototype implements TeslaModelS {
    length: number;
    width: number;
    wheelbase: number;
    seatingCapacity: number;
    private tempCache: string;

    constructor (l, w, wb, sc) {
        this.length = l;
        this.width = w;
        this.wheelbase = wb;
        this.seatingCapacity = sc;
    }

    getTyrePressure () {
        let tyrePressure = 20 // Evaluated after doing a few complex computations!
        return tyrePressure
    }

    getRemCharging () {
        let remCharging = 20 // Evaluated after doing a few complex computations!
        return remCharging
    }
}

let teslaObj = new TeslaModelSPrototype(196, 86, 116, 4)
console.log('Tyre Pressure', teslaObj.getTyrePressure())
The class TeslaModelSPrototype has defined all the properties of an interface. Note that the interface defines only the public properties of a class. As can be seen from the code above, the property tempCache has an access modifier private and so it is not defined in the interface TeslaModelS.
A class has three different types of variables:
Please note that interfaces only deal with the instance part of the class. For example, the constructor function comes under the static part. The interface TeslaModelS does not specify anything related to the constructor or the static part.
An interface can extend any other interface and import its properties. This helps in building small and reusable components. For example, we can create different interfaces to handle the different components of the Tesla Model like this:
interface Wheel {
    wheelBase: number;
    controls: Array<string>,
    material: string;
}

interface Charger {
    adapter: string;
    connector: string;
    location: string;
}

interface TeslaModelS extends Wheel, Charger {
    // ... All other properties
}
The TeslaModelS interface extends the properties of Wheel and Charger. Instead of dumping all of the properties in a single interface, it is good practice to make separate interfaces for handling different components.
Type aliases are used to give a name to a combination of different types in TypeScript. For example, we can create a type of either string or null:
type StringOrNull = string | null;
Type aliases and interfaces are often used interchangeably in TypeScript. The shape of the TeslaModelS object can also be defined using type like this:
type TeslaModelS {
    length: number;
    width: number;
    wheelbase: number;
    seatingCapacity: number;
    getTyrePressure: () => number;
    getRemCharging: () => number;
}
Similar to how interfaces extend other interfaces and type aliases using the keyword, type aliases can also extend other types and interfaces using the intersection operator. Type aliases can also be implemented by a class.
Type aliases are generally used in cases where we have to define a merge of different types. For example, consider the function renderObject:
function renderObject (objShape: Square | Rectangle | Triangle) {\
    // ...
}
The renderObject function takes an input parameter objShape. Square, Rectangle, and Triangle are types, and | is called the union operator. objShape can be of type Square, Rectangle, or Triangle. However, the union of shapes cannot be expressed using an interface.
Interfaces are used to define a contract regarding the shape of an object; hence they cannot be used with the union of multiple shapes. Even a class cannot implement a type that describes a union of shapes. This is one of the important functional differences between interfaces and type aliases.
When we define two interfaces with the same name, both of them are merged into one. The resulting interface will have properties from both interfaces. However, the compiler will complain if we try to define multiple types with the same name.
In JavaScript, functions are also considered objects and it is valid to add properties even on function literals like this:
function manufactureCar (type) {
    const model = function getModel (type) {
        console.log('inside getModel function')
        // get the model of type as mentioned in the argument
    }
    model.getCustomerDetails = function  () {
        console.log('inside customer details function')
        // get the details of the customer who has purchased this model
    }
    model.price = 100000
    model.trackDelivery = function () {
        console.log('inside trackDelivery function')
        // track the delivery of the model
    }
    return model
}

let tesla = manufactureCar('tesla')
tesla() // tesla is a function
tesla.getCustomerDetails() // getCustomerDetails is a property defined on function
As you can see from the code above, the variable model is assigned a value of function and additional properties like getCustomerDetails and trackDelivery are attached to it.
This is a common pattern in JavaScript. How do we define this pattern with TypeScript interfaces?
interface CarDelivery {
    (string): TeslaModelS,
    getCustomerDetails (): string,
    price: number,
    trackDelivery (): string
}

function manufactureCar (type: string): CarDelivery {
    const model = <CarDelivery> function (type: string) {
        // get the model of type as mentioned in the argument
    }
    model.getCustomerDetails = function () {
        // get the details of the customer who has purchased this model
        return 'customer details'
    }
    model.price = 100000
    model.trackDelivery = function () {
        // track the delivery of the model
        return 'tracking address'
    }
    return model
}
let tesla = manufactureCar('tesla')
tesla() // tesla is a function
tesla.getCustomerDetails() // getCustomerDetails is a property defined on function
The object of type CarDelivery is returned from the manufactureCar function. The interface CarDelivery helps maintain the shape of the object returned from the manufactureCar function. It makes sure that all the mandatory properties of the model — getCustomerDetails, price, and trackDelivery — are present in the model.
TypeScript generics are used when we have to create generic components that can work on multiple data types. For example, we don’t want to restrict our function to accept only number as its input parameter. It should scale according to the use case to accept a range of types.
Let’s write code for implementing a stack that handles generic data types:
interface StackSpec<T> {
    (elements: Array<T>): void
}

function Stack<T> (elements) {
    this.elements = elements
    this.head = elements.length - 1

    this.push = function (number): void {
        this.elements[this.head] = number
        this.head++
    }

    this.pop = function <T>(): T {
        this.elements.splice(-1, 1)
        this.head--
        return this.elements[this.head]
    }

    this.getElements = function (): Array<T> {
        return this.elements
    }
}

let stacksOfStr: StackSpec<string> = Stack
let cars = new stacksOfStr(['Hatchback', 'Sedan', 'Land Rover'])
cars.push('Tesla Model S')

console.log('Cars', cars.getElements()) // ['Hatchback', 'Sedan', 'Land Rover', 'Tesla Model S']
The interface StackSpec takes in any data type and puts it in the definition of the function. T is used to define type. The function Stack takes an array of elements as the input.
The Stack class provides several key methods that enable interaction with the elements stored in the stack:
push: Adds a new element of type T in the original elements arraypop: Removes the top-most element of the elements arraygetElements: Returns all the elements of type TWe’ve created a stack of strings called stacksOfStr, which takes in string and accordingly replaces T with string. We can reuse this stack implementation to create stacks of number and other data types.
We can also create a stack of Tesla Models:
let stacksOfTesla: StackSpec<TeslaModelS> = Stack
let teslaModels = [
    {
        engineer: 'John',
        modelId: 1,
        length: 112,
        //...
    },
    // ...
]
let teslaStack = new stacksOfTesla(teslaModels)
console.log(teslaStack) // prints the value of `teslaModels`
Please note that we are using the same stack implementation for an array of type TeslaModelS. Using generics with interfaces in TypeScript is a powerful feature.
Now that we’ve covered generics in interfaces, let’s explore a common real-world use case: working with API responses.
Interfaces are particularly useful when dealing with data from external sources, as they help ensure type safety and extendability in your API calls. Let’s see an example of how to define an interface for an API response and safely loop through the results:
interface ApiResponse<T> {
  data: T[];
  totalCount: number;
  page: number;
  pageSize: number;
}

interface User {
  id: number;
  name: string;
  email: string;
}
In this example, we’ve created a generic ApiResponse interface that can work with any type of data and a User interface to represent the structure of each user object.
Now, let’s simulate an API call and demonstrate how to safely loop through the response:
function fetchUsers(): Promise<ApiResponse<User>> {
  // Simulating an API call
  return Promise.resolve({
    data: [
      { id: 1, name: "Alice", email: "[email protected]" },
      { id: 2, name: "Bob", email: "[email protected]" },
      { id: 3, name: "Charlie", email: "[email protected]" },
    ],
    totalCount: 3,
    page: 1,
    pageSize: 10,
  });
}

async function processUsers() {
  const response = await fetchUsers();

  // Using forEach
  response.data.forEach((user: User) => {
    console.log(`User: ${user.name}, Email: ${user.email}`);
  });

  // Using map
  const userNames = response.data.map((user: User) => user.name);
  console.log("User names:", userNames);

  // Using for...of loop
  for (const user of response.data) {
    console.log(`User ID: ${user.id}`);
  }
}

processUsers();
In this example, we’ve demonstrated three common ways to loop through the API response:
forEach: This method is useful when you want to perform an action for each item without creating a new arraymap: This method is ideal when you want to transform each item in the array and create a new array with the results or populate HTML elements with the array items and display them in Reactfor...of loop: This is a more traditional loop that can be useful when you need more control over the iteration processBy using interfaces, TypeScript can provide type checking and autocompletion for the properties of each user object, reducing the likelihood of runtime errors and improving the development process.
It’s worth noting that when using these methods with TypeScript, you often don’t need to explicitly specify the type (:User) as TypeScript can infer it from the ApiResponse<User> type. However, adding explicit types can improve code readability and catch potential errors if the inferred type is not what you expect.
TypeScript does a great job of handling the weird parts of JavaScript. However, the browser doesn’t understand TypeScript so it has to be compiled down to JavaScript.
The TypeScript compiler compiles the above TeslaModelSPrototype class as:
var TeslaModelSPrototype = /** @class */ (function () {
    function TeslaModelSPrototype(l, w, wb, sc) {
        this.length = l;
        this.width = w;
        this.wheelbase = wb;
        this.seatingCapacity = sc;
    }
    TeslaModelSPrototype.prototype.getTyrePressure = function () {
        var tyrePressure = 20; // Evaluated after doing a few complex computations!
        return tyrePressure;
    };
    TeslaModelSPrototype.prototype.getRemCharging = function () {
        var remCharging = 20; // Evaluated after doing a few complex computations!
        return remCharging;
    };
    return TeslaModelSPrototype;
}());
var teslaObj = new TeslaModelSPrototype(196, 86, 116, 4);
console.log('Tyre Pressure', teslaObj.getTyrePressure());
I’m using the TypeScript Playground to see the compiled code. The instance variables — length, width, wheelBase, and seatingCapacity — are initialized in the function TeslaModelSPrototype. The methods getTyrePressure and getRemCharging are defined on the prototype of the function TeslaModelSPrototype.
The above code is plain JavaScript, so it can run in the browser.
As you have already learned, interfaces help define a concrete plan for the implementation of an entity. Apart from that, interfaces also help the performance of JavaScript engines.
This section assumes that you have some understanding of JavaScript engines. We’re going to dig deeper into the workings of JavaScript engines and understand how interfaces help with performance.
Let’s understand how the Compiler sitting on V8 (JavaScript engine on Chrome) stores objects.
The interfaces in TypeScript exist only until compile time. As you can see in the code that was generated by the TypeScript compiler, there is no mention of interfaces. The properties of TeslaModelS interface (length, width, wheelBase, and seatingCapacity) are added in the TeslaModelSPrototype constructor while the function types are attached to the prototype of TeslaModelSPrototype function. The JavaScript engines don’t know anything related to interfaces.
If we instantiate thousands of TeslaModelSPrototype cars, we will have to deal with thousands of objects of type TeslaModelS. Each of these objects will have a structure similar to that of the interface.
How does the JavaScript engine store these thousands of objects of the same shape? Does it make thousands of copies of these objects? Making thousands of copies of similar shapes is definitely a waste of memory.
The JavaScript engines make just one shape of type TeslaModelS and each of the objects stores corresponding values of the properties as defined in the TeslaModelS interface:
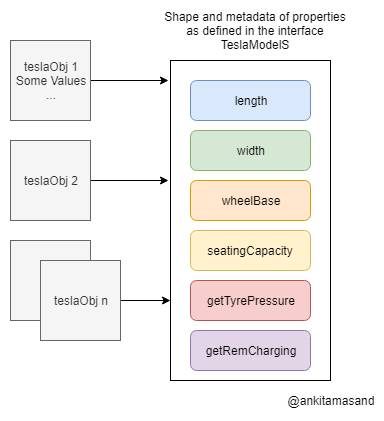
Objects share the same shape. This is a great performance benefit on the side of JavaScript engines.
If the objects have different shapes, the engines will have to create different shapes for these objects and handle them accordingly. Interfaces help in keeping the shapes of similar objects intact.
Callable interfaces allow us to use type functions to catch issues such as passing functions expecting the wrong arguments or returning the wrong value.
For example, take the following code:
const generateANumber: Function = (factor: number, genFunc: Function) => {
return genFunc(factor)
}
console.log(generateANumber(5, (a:number) => a)) // 5
console.log(generateANumber(5, () => "Cheese")) //Cheese
Let’s assume we wanted the getFunc argument to be a function that takes a number and returns a number. With the code above, that is not enforced and we can see that we pass a function that takes no arguments and returns a string. No type errors will be raised.
We could solve the problem like so:
// Callable Interface
interface NumberGenerator {
    (num: number): number
}
interface GenANum {
    (num: number, gen: NumberGenerator): number
}
const generateANumber: GenANum = (factor: number, genFunc: NumberGenerator) => {
    return genFunc(factor)
}
console.log(generateANumber(5, (a:number) => a)) // 5
console.log(generateANumber(5, () => "Cheese")) // Type Error
We have two interfaces that impose a signature for generateANumber and its genFunc argument. This will pass () =>" Cheese " to the generateANumber function and give us a type error, thereby making our code more type-safe. Callable interfaces essentially allow us to type our functions.
You can view the code for this section here.
Let’s build a simple use case for displaying a list of Pokemon using React and TypeScript interfaces.
Here’s the main App component that renders the Pokemon list in the div container with an ID of root:
import React, { Component, Fragment } from 'react';
import { render } from 'react-dom';
import PokemonList from './pokemon-list';
import './style.css';

const App = () => {
  return (
    <Fragment>
        <h2>Pokemon List</h2>
        <PokemonList />
      </Fragment>
  )
}

render(<App />, document.getElementById('root'));
The App component renders PokemonList. Let’s check the implementation of the PokemonList component:
import React, { Component } from 'react';
import { PokemonListModel } from './pokemon-model';

interface PokemonProps {}
interface PokemonState {
  pokemonList: PokemonListModel | null;
}

class PokemonList extends Component<PokemonProps, PokemonState> {

  constructor (props) {
    super(props);
    this.state = {
      pokemonList: null
    }
  }

  getPokemonList = () => {
    fetch ('https://pokeapi.co/api/v2/pokemon/?limit=50')
      .then (response => {
        return response.json();
      })
      .then (response => {
        this.setState({ pokemonList: response });
      })
  }

  render () {
    let { pokemonList } = this.state;
    return (
      <div className='pokemon-list'>
        {
          pokemonList && pokemonList.results.map (pokemon => {
            return (
              <div className='row' key={pokemon.name}>
                <span>{pokemon.name}</span>
              </div>
            )
          })
        }
      </div>
    )
  }

  componentDidMount () {
    this.getPokemonList()
  }
}

export default PokemonList
The PokemonList component fetches the list of Pokemon using the open source Pokemon API project. It stores the results of the Pokemon API in the state of the component. The component uses interfaces PokemonProps and PokemonState for defining its props and state. The interface PokemonListModel defines the structure of an object as returned from the Pokemon API.
Here’s the PokemonListModel interface:
export interface PokemonListModel {
  count: number;
  next: string | null;
  previous: string | null;
  results: Array
}

interface Pokemon {
  name: string;
  url: string;
}
Notice the type of results property. It uses the interface Pokemon to define the structure of results. Here’s the demo of the Pokemon application on Stackblitz:
react-ts-pokemon – StackBlitz
List of Pokemon
Now, let’s dive into interfaces in Angular. Because Angular is a TypeScript-based framework, the interfaces in Angular work similarly but are still worth a discussion. Let’s examine the following Angular codebase for its use of interfaces.
First, we’ll look at /src/app/types.ts. In this file, we can define any interfaces and types we plan on using throughout the application:
export interface Post {
  title: string
  content: string
}
Here, we define the interface for a single Post, having two properties for title and content. We plan on being able to retrieve a list of posts and being able to add posts. We will want to encapsulate this data management into a service, which we can find in /src/app/post.service.ts:
import { Injectable } from '@angular/core';
import { Post } from './types';
@Injectable({
  providedIn: 'root'
})
export class PostService {
  #posts:[Post] // private property of posts
  constructor() {
    this.#posts = [{title: "Post 0", content: "content for post 0"}]
   }
  // method for adding a post
  addPosts(newPost: Post){
    this.#posts.push(newPost)
  }
  // method for getting all posts
  getPosts(){
    return this.#posts
  }
}
In this service call, we used our Post interface to define a private property, an array of posts, and then instantiate the array with an initial post. We also give this service two methods:
addPosts: Takes a Post as an argument and then pushes it into the this.#posts arraygetPosts: Returns the array of Post objectsWe can then inject this service into any component that needs access to this list of posts, like our App component in src/app/app.component.ts:
import { Component } from '@angular/core';
import { PostService } from './post.service';
import { Post } from './types';
@Component({
  selector: 'app-root',
  templateUrl: './app.component.html',
  styleUrls: ['./app.component.css'],
})
export class AppComponent {
  title = 'sampleproject';
  postService: PostService;
  posts: [Post]
  // initiate PostService in component
  constructor(postService: PostService) {
    this.postService = postService;
    this.posts = this.postService.getPosts()
  }
  addPost() {
    // Create new post
    const newPost: Post = {
      title: `Post ${this.posts.length}`,
      content: 'this is the content for this post',
    };
    // update list of posts in service and component
    this.postService.addPosts(newPost)
    this.posts = this.postService.getPosts()
  }
}
In the Component class, we use our service and post type to define two properties of the class:
this.postService: The instance of the PostService we defined earlierthis.posts: The copy of the arrays of Post objects local to this componentIn the constructor, we use dependency injection to instantiate a PostService in the constructor arguments. We assign postService, the argument with the PostService object, to this.postService and then immediately use its getPosts() method to fill the array with existing posts.
We added a local addPost method to the component that programmatically adds a new post and updates the service and local version of the array. With all of this built out, we can now build the interface for this component in src/app/app.component.html:
<h1> Posts </h1>
<button (click)="addPost()">Add Post</button>
<div *ngFor="let post of posts; index as i">
  <h2>{{post.title}}</h2>
  <p>{{post.content}}</p>
</div>
Here, we have the div loop over the this.posts array from the component and generate an h2 and p element for each post. We also have a button that will trigger the addPost method and add a new post.
Throughout all of this, we’ve been using the Post interface. If we make any mistakes, like writing a Post property as Title instead of title, we’d get the type error so we can fix the problem long before the application is run, ultimately avoiding runtime errors.
In this tutorial, we explored the power of interfaces in TypeScript, which allow developers to define contracts for objects, functions, and classes, ensuring type safety and consistency. We covered:
By understanding interfaces, developers can improve code readability, maintainability, and performance in JavaScript engines.

LogRocket lets you replay user sessions, eliminating guesswork by showing exactly what users experienced. It captures console logs, errors, network requests, and pixel-perfect DOM recordings — compatible with all frameworks, and with plugins to log additional context from Redux, Vuex, and @ngrx/store.
With Galileo AI, you can instantly identify and explain user struggles with automated monitoring of your entire product experience.
Modernize how you understand your web and mobile apps — start monitoring for free.

TSRX adds first-class control flow, conditional hooks, and scoped styles to React via a TypeScript compiler extension — no new framework required.

Learn how to build a full React Native auth system using Better Auth and Expo — with email/password login, Google OAuth, session persistence, and protected routes.

Compare the top AI development tools and models of June 2026. View updated rankings, feature breakdowns, and find the best fit for you.

Learn how Bloom filters reduce database lookups for username availability checks while preserving correctness at scale.
Would you be interested in joining LogRocket's developer community?
Join LogRocket’s Content Advisory Board. You’ll help inform the type of content we create and get access to exclusive meetups, social accreditation, and swag.
Sign up now

