Node.js and Python are two of the most popular tools for developing software. Each has its pros and cons, and sometimes it can be difficult to choose from them, depending on the task at hand. For example, the Node.js runtime is fast and has a large community with millions of packages, but it pales in comparison to Python when it comes to data science and machine learning packages.
Depending on your problem, you might find yourself needing both Node.js and Python; however, the languages are distinct from one another and do not have any mechanism to communicate.
To remedy this, JSPyBridge was created to allow Node.js and Python to interoperate. Language interoperation allows Node.js and Python to work together as if they are part of the same system and share data structures. With JSPyBridge, you can import and use Python API methods in Node.js as if they are native, and vice versa.
In this tutorial, we will use JSPyBridge to interoperate between Node.js and Python. In the first half, we will look at how to access and use Node.js functions, packages, classes, and arrays in Python. In the second half, we will look at how to use Python functions, modules, classes, and arrays in Node.js.
Jump ahead:
To get the most from this tutorial, you should have:
JSPyBridge is a bridge that allows Node.js and Python to interoperate. You can think of it as a literal bridge that sits between two programming languages, taking data or objects from one language and transforming them so that the language on the other side can parse them.
Some of the objects that can be shared between Python and Node.js are functions, classes, iterables, and callbacks. When using JSPyBridge, for example, you can import a function from Python into Node.js, invoke it, and access the return value in Node.js.
Here is a brief overview of JSPyBridge’s features:
For more features, see the Bridge feature comparison table.
In this section, we’ll look at how we can access Node.js functions, packages, classes, and arrays in Python. To do this, we will create a project directory and download the javascript module, which is a dependency of JSPyBridge.
First, create the project directory and change into the directory with the following command:
mkdir python_demo && cd python_demo
Since this is a Python directory, create a virtual environment for the project:
python3 -m venv venv
Activate the virtual environment:
source venv/bin/activate
With the virtual environment created, install the javascript module:
pip3 install javascript
Now that we have our environment set up, we will begin interoperating Node.js with Python.
Let’s create and call a JavaScript function in Python. The function will format an integer value into the currency of your choosing. You’ll then import the JavaScript function in Python, pass arguments into it, and print the return value.
Open the formatCurrency.js file in your editor and add the following:
function formatCurrency(value, type) {
  format = new Intl.NumberFormat("en-US", {
    style: "currency",
    currency: type,
  }).format;
  return format(value);
}
module.exports = { formatCurrency };
In the preceding code block, we defined a formatCurrency() function, which takes two arguments:
value, the amount of moneytype, the currency we want the amount to be formatted toWithin the function, we create an Intl.NumberFormat instance, which takes the language en-US as the first argument, and an object containing formatting options as a second argument.
The object has two properties: style and currency. The style property accepts the formatting style, which is the currency string here. The currency property accepts the currency name in short form, which is stored in the type variable.
Upon creating the Intl.NumberFormat instance, a function is returned and stored in the format variable. Next, you invoke the format() function with the value parameter as the argument. Once the format() function runs, the formatCurrency() function returns the result. Finally, we export the function formatCurrency() so that it can be used in Python.
Now that the function has been defined, we will reference it in Python. Open and create the format_currencies.py file in your editor and add the following:
from javascript import require

data = require("./formatCurrency.js")

value = 2000000

print(data.formatCurrency(value, "USD"))
print(data.formatCurrency(value, "EUR"))
First, we import the require method from the javascript module. Next, we call the require() method with the path to the JavaScript file formatCurrency.js. After that, we define an integer and store it in the value variable. In the last two lines, we call the formatCurrency() with the value variable and the currency we want.
Now, run the format_currency.py file:
python3 format_currencies.py
Upon running the file, you’ll see output that looks like this:
$2,000,000.00
€2,000,000.00
This shows that Python called the JavaScript function, retrieved the return value, and logged it in the terminal.
Node.js has numerous packages that you can use in your projects, and JSPyBridge allows you to import and use them in Python. You don’t even have to install them using npm — when you invoke the require() method with the package name, JSPyBridge will automatically fetch the package for you.
In this section, we will use the sqlstring npm package in Python. The sqlstring module can be used to escape and format SQL statements for MySQL.
Open the generateSQL.py file in your text editor:
from javascript import require

sqlString = require("sqlstring")

name = input("What is your name?n")
sql = sqlString.format("SELECT *  FROM customers WHERE name = ?", [name])

print(sql)
First, we import the require method from the javascript module. Second, we call the require() method with the sqlstring as the argument. Next, we call Python’s input() method to get user input, and after that, we invoke the format() method of the sqlstring module, which takes an SQL query as the argument. Finally, we print the formatted SQL query.
Now run the file and enter a name when the prompt shows up:
python3 generateSQL.py
Running the file produces an output that looks like the following:
 Installing 'sqlstring' version 'latest'... This will only happen once.

added 1 package, and audited 2 packages in 502ms

found 0 vulnerabilities

 OK.
What is your name?
john

SELECT *  FROM customers WHERE name = 'john'
Notice in the output that when you first run the file, JSPyBridge downloaded the package. Once downloaded, the module was used to generate a SQL statement, which Python logged in the terminal.
In this section, we will import an ECMAScript 2015 (ES6) class, instantiate it, and then call the instance method in Python.
Create a new file named person.js:
class Person {
  constructor(firstName, lastName) {
    this.firstName = firstName;
    this.lastName = lastName;
  }

  getFullName() {
    return `${this.firstName} ${this.lastName}`;
  }
}

module.exports = { Person };
The Person class takes two arguments: firstName and lastName. It also has a getFullName() method that concatenates the firstName and the lastName arguments to produce a full name.
To use the class in Python, we export it using module.exports. Now, create another file create_person.py file in your editor and add the following contents:
from javascript import require

data = require("./person.js")
person_one = data.Person.new("John", "Doe")
print(person_one.getFullName())
Here, we import require() and reference the JavaScript file person.js. Next, we create an instance of the class Person by invoking the new() method, which takes the first name and the last name as the arguments. Finally, we invoke the getFullName() method of the Person class and print the return value in the terminal.
Save your file and run person.py:
python3 create_person.py
Running the file will yield the following output:
John Doe
The output shows that the name first name and last name have been concatenated. This confirms that we can invoke and use JavaScript ES2015 classes in Python.
Let’s create an array in Node.js, export it, and iterate over it in Python. We will build upon the formatCurrency.js program and make use of the formatCurrency() function to format multiple values and append them to an array. The array will be exported and iterated in Python.
Create the following file formatValues.js with the following contents:
values = [200, 40000000, 2938, 80999];
usd_values = [];
function formatCurrency(value, type) {
  format = new Intl.NumberFormat("en-US", {
    style: "currency",
    currency: type,
  }).format;
  return format(value);
}

for (let i = 0; i < values.length; i++) {
  usd_values.push(formatCurrency(values[i], "USD"));
}

module.exports = { items: usd_values };
We create a values array that contains numbers to be formatted as currency. Next, we define an empty array, usd_values values, and the formatCurrency() function that formats the given value in the currency of your choice.
Following this, we iterate over the values array, and during each iteration, we call the formatCurrency() function and push the formatted value into the usd_values array. Once the loop finishes, we export an object that has an items property, whose value is the usd_values array.
Next, we will import the array in Python. Create the list_currencies.py file with the following contents:
from javascript import require

data = require("./formatValues.js")
for item in data.items:
    print(item)
First, we reference the formatValues.js file. Next, we iterate over the Node.js array and print the value during each iteration.
Now, run the file using the python3 command:
python3 list_currencies.py
When you run the command, you will see an output that resembles the following:
$200.00
$40,000,000.00
$2,938.00
$80,999.00
The output confirms that we can iterate over a JavaScript array in Python.
So far, we looked at how to import functions, classes, and iterables from Node.js, and run them in Python within the same project directory. In this section, we will import a Node.js array that resides in another directory into Python and loop through each element.
First, move out of the project directory:
cd ..
Next, create a new project directory and move into the directory:
mkdir currency_app && cd currency_app
Initialize the directory as an npm project:
npm init -y
Next, install the [uuid](https://www.npmjs.com/package/uuid) package, which generates a Universal Unique Identifier (UUID) that you can use to uniquely identify objects:
npm install uuid
Next, create a new file, formatValues.js, and add the following:
const { v4: uuidv4 } = require("uuid");

values = [200, 40000000, 2938, 80999];
usd_values = [];
function formatCurrency(value, type) {
  format = new Intl.NumberFormat("en-US", {
    style: "currency",
    currency: type,
  }).format;
  return format(value);
}

for (let i = 0; i < values.length; i++) {
  usd_values.push({
    id: uuidv4(),
    currency: formatCurrency(values[i], "USD"),
  });
}

console.log(usd_values);

module.exports = { items: usd_values };
The file reuses a lot of code we had in the previous section; however, there are new changes. First, we import the UUID module. In the for loop, instead of pushing only the values, we create an object with the following properties: id and currency.
The id property is assigned a UUID, generated by calling the uuidv4() function of the UUID module. The currency property is assigned a value returned from calling the formatCurrency() function. Finally, we have a console.log() method that logs the usd_values array in the console.
With that, run the file using the node command:
node formatValues.js
You will see an output that looks like the following:
[
  { id: 'bfdb0bd6-0e9a-4275-812f-dd1b81dde930', currency: '$200.00' },
  {
    id: '31b0d44a-8987-4f50-a683-99f4af477e6d',
    currency: '$40,000,000.00'
  },
  { id: 'ab9f0e76-875d-4e77-8bb9-61015b8a1a46', currency: '$2,938.00' },
  {
    id: 'f035883d-952a-4642-8c66-379858601f5f',
    currency: '$80,999.00'
  }
]
The output shows confirm that the objects are being created with the UUIDs.
Now, remove the console.log() method in the formatValues.js file. We don’t need it anymore, since the array contents will be displayed in Python.
Now that we know the program runs successfully, we will import the array into the main project directory, python_demo.
Return to the main project directory:
cd .. && cd python_demo
In the project directory, create a list_usd_values_with_uuid.py file in your editor with the following:
from javascript import require

data = require("./../currency_app/formatValues.js")
for item in data.items:
    print(f'ID: {item.id}')
    print(f'Amount in USD: {item.currency}')
    print("n")
In the code block, we reference formatCurrencies.js, which resides in another directory. Next, we iterate over all elements in the array, and print the item UUID and the formatted currency in the console.
Now, run the list_usd_values_with_uuid.py file:
python list_usd_values_with_uuid.py
Running the code yields the following:
ID: 35295372-eedc-44bd-8e19-360a990a1a44
Amount in USD: $200.00


ID: c446ae79-3904-4c8b-8e74-31d4184612ca
Amount in USD: $40,000,000.00


ID: 13ce5e1a-7f0a-4d81-bfd4-d18229a1b159
Amount in USD: $2,938.00


ID: 755e1f39-3cad-4128-b806-4681acccd7d7
Amount in USD: $80,999.00
As you can see in the output, we can successfully iterate over an array that is in another project directory.
Now that you know how to use JSPyBridge to access Node.js API in Python, we’re going to access the Python API in the next section.
In this section, we will access Python modules, local Python files, functions, classes, and iterables in Node.js. To do this, we will create another directory that will contain our Node.js code, as well as the Python files.
First, move out of the current directory and go back to the home directory:
cd ..
Now, in the home directory, create a new directory and change into it:
mkdir node_demo && cd node_demo
Since this is a Node.js directory, initialize npm:
npm init -y
Next, install the pythonia package, which is a bridge for Node.js:
npm install pythonia
Next, add the "type": "module" line at the end of your package.json to allow Node.js to use ES2015 modules:
{
  ...
  "license": "ISC",
  "dependencies": {
    "pythonia": "^1.0.0"
  },
  "type": "module"
}
With that, you are now set to use JSPyBridge in Node.js. Next, we will import a Python function and invoke it in Node.js.
In this section, we will create a function in Python, import it, and then run the function in Node.js. The function will make use of the random module in Python.
Create a random_choices.py file and add the following:
import random


def get_random_word():
    colors = ["red", "green", "blue", "yellow"]
    return random.choice(colors)
In the first line, import the random module from Python. We then define a function, get_random_word(), which shuffles and returns a random value in the colors array.
Next, create the pickRandomValue.js file with the following code:
import { python } from "pythonia";
const rand = await python("./random_choices.py");
console.log(await rand.get_random_word());
python.exit();
Import the python function from the pythonia package. Next, call the python() function with the random_choices.py path as the argument, which then starts a Python process.
In Node.js, JSPyBridge requires that every Python API call be prefixed with the await keyword. Following this, we call the get_random_word() function and log the result into the terminal. Finally, we exit the process.
Now, run the file with the node command:
node pickRandomValue.js
When you run the command, you will see output that looks similar to this:
red
The output shows red. Yours might show a different color because, after all, the package returns random values.
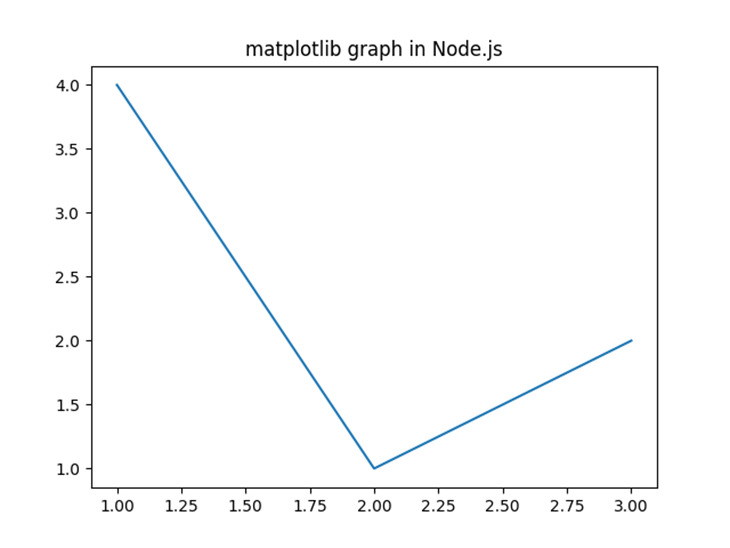
In this section, we will work with third-party Python modules in Node.js. Our program will use Matplotlib and NumPy to create a graph.
First, deactivate the current virtual environment:
deactivate
Create a new virtual environment in the directory:
python3 -m venv venv
Activate the virtual environment:
source venv/bin/activate
Next, install the following modules with the following command:
pip3 install numpy matplotlib
To use the modules in JavaScript, create a plot_graph.js file and add the following:
import { python } from 'pythonia'
const np = await python('numpy')
const plt = await python('matplotlib.pyplot')


const x = await np.array([1, 2, 3])
const y = await np.array([4, 1, 2])

await plt.plot(x, y)

await plt.title('matplotlib graph in Node.js')

await plt.savefig('graph.png')
python.exit()
First, we import the python() function from pythonia. In the next two lines, we call the python function to import NumPy and Matplotlib modules.
Next, we define arrays using the np.array() method, which are stored in the x and y variables. Following this, we invoke plt.plot(), which takes the arrays in x and y variables as arguments. After that, we use the plt.title() method to define the title of the graph. We then invoke plt.savefig() to save the graph as an image in the directory. Finally, we exit the Python process.
Now, run the file:
node plot_graph.js
When the command runs, you will have an image, graph.png, in your directory that looks like this:
In this section, we will define a class in Python and instantiate it in Node.js.
Create the person.py file with the following contents:
class Person:
    def __init__(self, firstName, lastName):
        self.firstName = firstName
        self.lastName = lastName

    def getFullName(self):
        return f"{self.firstName} {self.lastName}"
The Python class is analogous to the ES2015 Person class we defined earlier. The class takes two arguments: firstName and lastName. It also has a getFullName() method that returns the full name of the person.
To use the Person class in Node.js, import the createPerson.js file:
import { python } from "pythonia";
const data = await python("./person.py");
const person1 = await data.Person("John", "Doe");
console.log(await person1.getFullName());
python.exit();
First, we import the Python function from pythonia and then reference the person.py file. Second, we create an instance by calling Person class with the first name and the last name as the arguments. We call getFullName() method, which returns the full name, which we then print in the console. Finally, as always, we exit the Python process.
Now, run the file using node:
node createPerson.js
It will yield an output that looks like the following:
John Doe
This shows that we can successfully use Python classes in Node.js.
In this section, we will create a list in Python, and loop through each element in Node.js.
First, create get_dir_contents.py with the following:
import os

dir_files = os.listdir("./node_modules")
We begin by importing the os module. Next, we call listdir() method of the os module which returns a list of all the files in the given directory node_modules.
Now that we have the list in Python, we will import it and call it in Node.js.
First, create the listDir.js file and add the following:
import { python } from "pythonia";
const obj = await python("./get_dir_contents.py");
const dirFiles = await obj.dir_files;

for await (const file of dirFiles) {
  console.log(file);
}

python.exit();
First, we reference the listDir.py file using the python() function that we imported in the first line. Next, we unpack the dir_files array and store it in the dirFiles variable.
After that, we define a for await loop to loop through all the elements and log each file in the console during each iteration. JSPyBridge does not recommend using other loops when looping through an array from Python.
Next, run the listDir.js file:
node listDir.js
When the command runs, you will see output resembling the following:
ansi-styles
color-name
has-flag
ws
pythonia
chalk
.package-lock.json
caller
supports-color
color-convert
This shows that Node.js can loop through Python arrays.
In this article, we learned how to use JSPyBridge to interoperate Node.js and Python. In the first half, we looked at how to use JSPyBridge in Python. We learned how to import and use the following:
| Node.js in Python | Python in Node.js |
|---|---|
|
|
To learn more about JSPyBridge, visit the JSPyBridge documentation. You can also check out more examples in their GitHub repo. If you want to learn how to use Python in the frontend, see the PyScript tutorial.
 Monitor failed and slow network requests in production
Deploying a Node-based web app or website is the easy part. Making sure your Node instance continues to serve resources to your app is where things get tougher. If you’re interested in ensuring requests to the backend or third-party services are successful, try LogRocket.

LogRocket lets you replay user sessions, eliminating guesswork around why bugs happen by showing exactly what users experienced. It captures console logs, errors, network requests, and pixel-perfect DOM recordings — compatible with all frameworks.
LogRocket's Galileo AI watches sessions for you, instantly identifying and explaining user struggles with automated monitoring of your entire product experience.
LogRocket instruments your app to record baseline performance timings such as page load time, time to first byte, slow network requests, and also logs Redux, NgRx, and Vuex actions/state. Start monitoring for free.
There’s no doubt that frontends are getting more complex. As you add new JavaScript libraries and other dependencies to your app, you’ll need more visibility to ensure your users don’t run into unknown issues.
LogRocket is a frontend application monitoring solution that lets you replay JavaScript errors as if they happened in your own browser so you can react to bugs more effectively.

LogRocket works perfectly with any app, regardless of framework, and has plugins to log additional context from Redux, Vuex, and @ngrx/store. Instead of guessing why problems happen, you can aggregate and report on what state your application was in when an issue occurred. LogRocket also monitors your app’s performance, reporting metrics like client CPU load, client memory usage, and more.
Build confidently — start monitoring for free.
Would you be interested in joining LogRocket's developer community?
Join LogRocket’s Content Advisory Board. You’ll help inform the type of content we create and get access to exclusive meetups, social accreditation, and swag.
Sign up now
Learn how OpenAPI can automate API client generation to save time, reduce bugs, and streamline how your frontend app talks to backend APIs.

Discover how the Interface Segregation Principle (ISP) keeps your code lean, modular, and maintainable using real-world analogies and practical examples.

<selectedcontent> element improves dropdowns

Learn how to implement an advanced caching layer in a Node.js app using Valkey, a high-performance, Redis-compatible in-memory datastore.


