GitHub Pages offers a simple and free way to host static websites, making it an excellent option for deploying React applications. This guide will walk you through the process of deploying a Create React App project to GitHub Pages, customizing your domain, and automating deployments with GitHub Actions.

The Replay is a weekly newsletter for dev and engineering leaders.
Delivered once a week, it's your curated guide to the most important conversations around frontend dev, emerging AI tools, and the state of modern software.
If you already have a Create React App project and GitHub repository set up, you can deploy your app with these three quick steps:
npm install gh-pages --save-dev
{
  "homepage": "https://yourusername.github.io/your-repo-name",
  "scripts": {
    "predeploy": "npm run build",
    "deploy": "gh-pages -d build",
    // other scripts...
  }
}
npm run deploy
That’s it! Your app will be available at https://yourusername.github.io/your-repo-name.
Note: This guide focuses on Create React App projects. If you’re using Vite, Next.js, or another framework, the deployment process will be different. For Vite projects, check the official Vite deployment guide. For Next.js, refer to the Next.js deployment documentation.
For a complete walkthrough, troubleshooting common issues, and advanced deployment options, continue reading below.
To follow along, you should have:
Editor’s note: This blog was updated by Ikeh Akinyemi in April 2025 to include quickstart directions, narrow the focus to only apps built in Create React App, and address common GitHub Pages errors such as blank pages and 404s on refresh.
GitHub Pages is a service from GitHub that enables you to add HTML, JavaScript, and CSS files to a repository and create a hosted static website.
The website can be hosted on GitHub’s github.io domain (e.g., https://username.github.io/repositoryname) or your custom domain. A React app can be similarly hosted on GitHub Pages.
To deploy your React application to GitHub Pages from scratch, follow these steps:
For a working example of this entire process, check out the react-gh-pages-example repository, which provides the source code you will see later in this article.
Let’s get started by creating a new React application. For this tutorial, we’ll be using create-react-app with React 18 and Node 20+.
Open the terminal on your computer and navigate to your preferred directory:
cd desktop
Create a React application using create-react-app:
npx create-react-app "your-project-name"
In just a few minutes, create-react-app will have finished setting up a new React application! Now, let’s navigate into the newly created React app project directory:
cd "your-project-name"
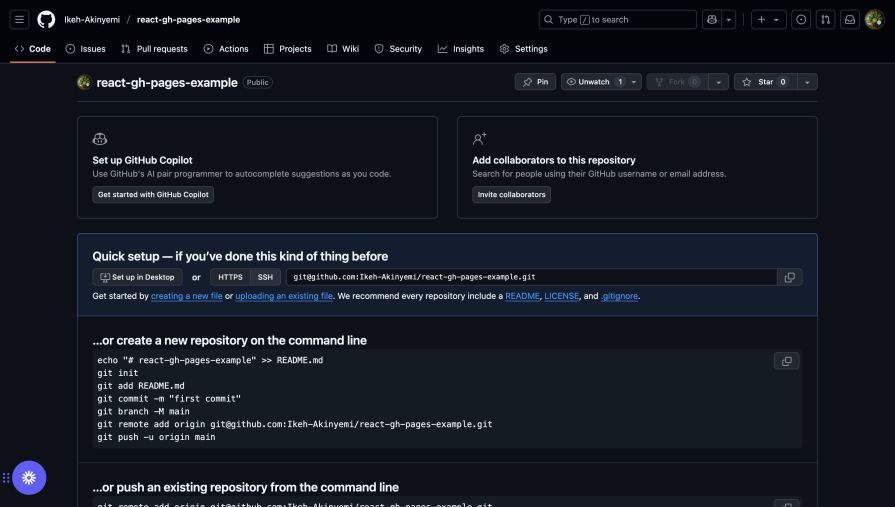
The next step is to create a GitHub repository to store our project’s files and revisions. In your GitHub account, click the + icon in the top right and follow the prompts to set up a new repository:
![]()
After your repository has been successfully created, you should see a page with commands to push your existing repository:
Now, initialize Git in your project:
git init
Add your files, commit, and push to your GitHub repository:
git add .
git commit -m "first commit"
git branch -M main
git remote add origin https://github.com/yourusername/your-repo-name.git
git push -u origin main
Next, we’ll install the gh-pages package (version 6.0.0 or later) in our project. This package allows us to publish build files into a gh-pages branch on GitHub, where they can then be hosted:
npm install gh-pages --save-dev
Now, let’s configure the package.json file to point our GitHub repository to the location where our React app will be deployed.
Add a homepage property that follows this structure: http://{github-username}.github.io/{repo-name}. For example:
{
  "name": "your-project-name",
  "version": "0.1.0",
  "homepage": "https://yourusername.github.io/your-repo-name",
  // ...
}
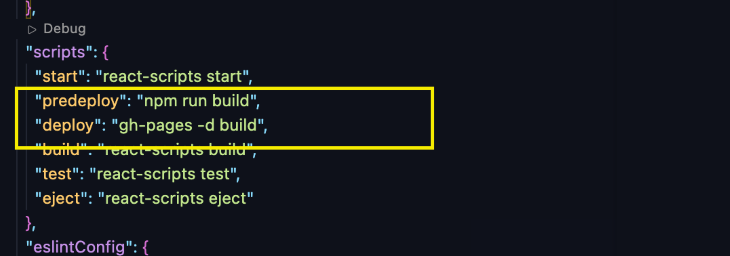
Now, add the predeploy and deploy scripts to the scripts section of your package.json:
{
  // ...
  "scripts": {
    // ...
    "predeploy": "npm run build",
    "deploy": "gh-pages -d build"
  },
  // ...
}
The predeploy script will build your React app, and the deploy script will publish the build folder to the gh-pages branch of your GitHub repository.
Now that everything is set up, commit your changes and push them to your GitHub repository:
git add .
git commit -m "setup gh-pages"
git push
Finally, deploy your React application by running:
npm run deploy
This command will create a bundled version of your React application and push it to a gh-pages branch in your remote repository on GitHub.
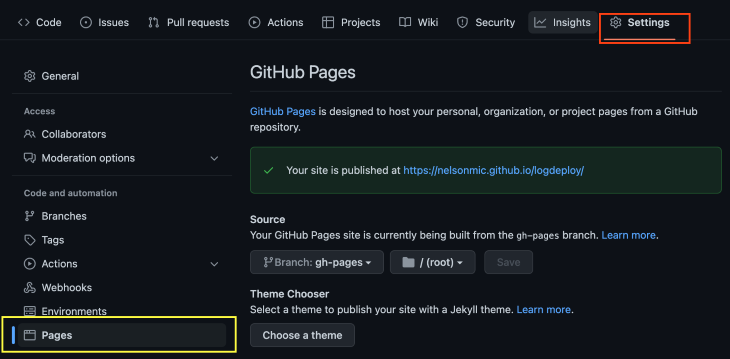
To view your deployed React application, navigate to the Settings tab in your GitHub repository, click on the Pages menu, and you should see a link to the deployed app:
When deploying React apps to GitHub Pages, you might encounter some common issues. Here’s how to diagnose and fix them:
If you see a blank page instead of your app:
1. Check your homepage URL — Ensure your homepage property in package.json exactly matches your GitHub Pages URL format (https://username.github.io/repo-name)
2. Check browser console for errors — Open the developer tools in your browser to see if there are any errors related to failed resource loading
3. Verify file paths — If you’re using relative paths for assets, they might break in production. Update them to use the PUBLIC_URL environment variable:
<img src={`${process.env.PUBLIC_URL}/logo.png} alt="Logo" />
If your app works on the homepage but shows a 404 when refreshing or accessing direct routes:
1. Use HashRouter instead of BrowserRouter — GitHub Pages doesn’t support the browser history API. Update your index.js file to use HashRouter:
import { HashRouter as Router } from "react-router-dom";root.render();
This will change your URLs from /about to /#/about but will resolve the 404 issues.
2. Create a 404.html redirect — Alternatively, you can add a custom 404.html file that redirects to your index.html with the original URL parameters preserved.
If images, fonts, or other assets aren’t loading:
Common repository configuration issues include:
If your deployment fails during the build process:
node_modules folder and package-lock.json file, then run npm install againWe can deploy our React app to GitHub’s domain for free, but GitHub Pages also supports custom subdomains and apex domains. Here are examples showing what each type of subdomain looks like:
| Supported custom domain | Example |
|---|---|
| www subdomain | www.logdeploy.com |
| Custom subdomain | app.logdeploy.com |
| Apex domain | logdeploy.com |
Right now, if we navigate to https://yourusername.github.io/your-repo-name/, we’ll see our recently published website. But we could also use a custom subdomain or an apex domain instead. Here are the steps to set those up:
CNAME file at the root of your repository: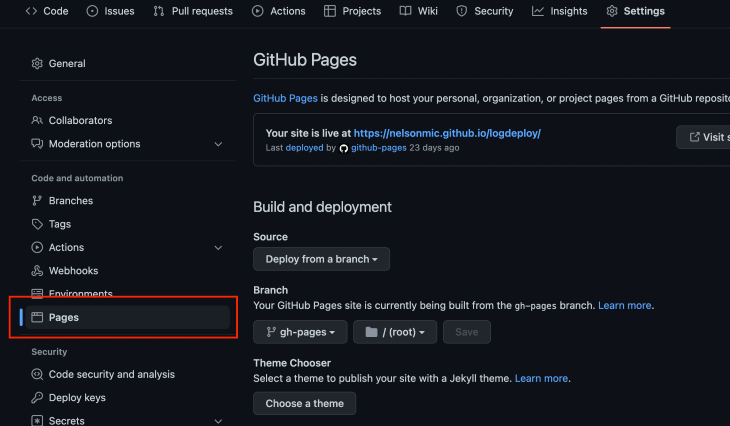
CNAME record on your domain service provider points to the GitHub URL of the deployed website (in this case, yourusername.github.io). To do so, navigate to the DNS management page of the domain service provider and add a CNAME record that points to username.github.io where username is your GitHub usernameTo deploy to an apex domain, follow the first two steps above for deploying to a custom subdomain, but substitute the third step with the following:
ALIAS record or ANAME record that points your apex domain to your GitHub Pages IP addresses, as shown:If you’ve previously deployed a React app that uses React Router for routing to Netlify, you’re aware that you need to configure redirects for your URLs. Without redirects, users will get a 404 error when they try to navigate to different parts of your application.
Netlify makes it simple to configure redirects and rewrite rules for your URLs. All you need to do is create a file called _redirects (without any extensions) in the app’s public folder.
Then, simply add the following rewrite rule within the file:
/* /index.html 200
No matter what URL the browser requests, this rewrite rule will deliver the index.html file instead of returning a 404.
If we want to handle page routing when we deploy to GitHub Pages, we’ll need to do something similar. Let’s configure routing for our previously deployed project.
First, we need to install a router. Start by installing React Router in the project directory, like so:
npm install react-router-dom
Then, follow the next steps.
HashRouter to the application to enable client-side routing:import React from ‘react’;import ReactDOM from 'react-dom/client';
import './index.css';
import App from './App';
import reportWebVitals from './reportWebVitals';
import { HashRouter as Router } from "react-router-dom";
const root = ReactDOM.createRoot(document.getElementById('root'));
root.render();
// If you want to start measuring performance in your app, pass a function
// to log results (for example, reportWebVitals(console.log))
// or send to an analytics endpoint. Learn more: https://bit.ly/CRA-vitals
reportWebVitals();
Our index.js file should look like the above code block. Because GitHub Pages does not support browser history, we’re employing a HashRouter. Our existing path does not assist GitHub Pages in determining where to direct the user (because it is a frontend route).
To solve this issue, we must replace our application’s browser router with a HashRouter. The hash component of the URL is used by this router to keep the UI in sync with the URL.
2. Create the routes:

Create a routes folder and the required routes. These routes can be configured in the app.js file. But first, let’s create a Navbar component that can be visible on all pages.
Navbar component:import { Link } from "react-router-dom"
const Navbar = () => {
return (
<div>
<Link to="/">Home</Link>
<Link to="/about">About</Link>
<Link to="/careers">Careers</Link>
</div>
)
}
export default Navbar;
Now we can add the Navbar component alongside the configured routes in the app.js file.
app.js file:import './App.css';
import { Routes, Route} from "react-router-dom";
import About from "./routes/About";
import Careers from "./routes/Careers";
import Home from "./routes/Home";
import Navbar from './Navbar';
function App() {
return (
<>
} />
} />
} />
</>
);
}
export default App;
Now that we’re done with the setup, let’s push our code, like so:
git add .
git commit -m "setup gh-pages"
git push
Next, we simply deploy, and our app should route properly:
npm run deploy
Once these steps are completed, our deployed application will correctly route the user to any part of the application they desire.
When we configure Netlify deployments, we’re given a preview link to view our deployment before it is merged into the main branch. Let’s create the same for GitHub Pages.
We’ll use a simple tool called Livecycle for this, which saves us the trouble of having to do this using GitHub Actions. Every time we make a pull request in our repository, Livecycle assists us in creating a preview environment.
To create a preview environment, follow these steps:
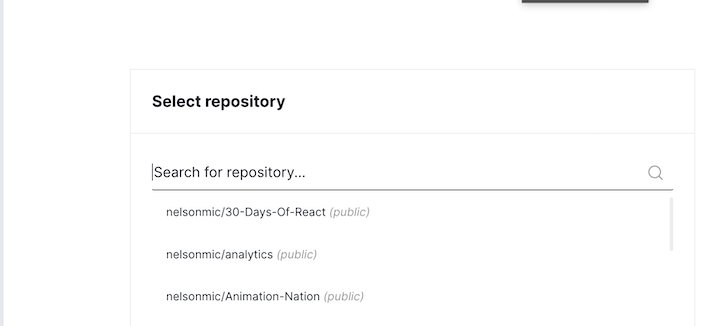
create-react-app: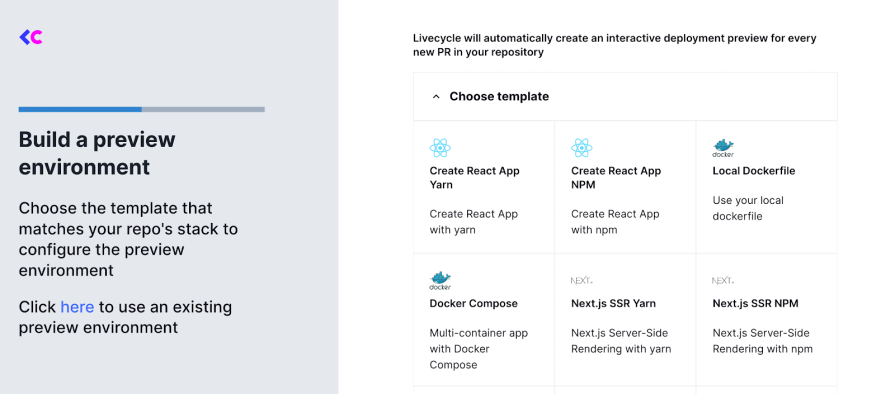
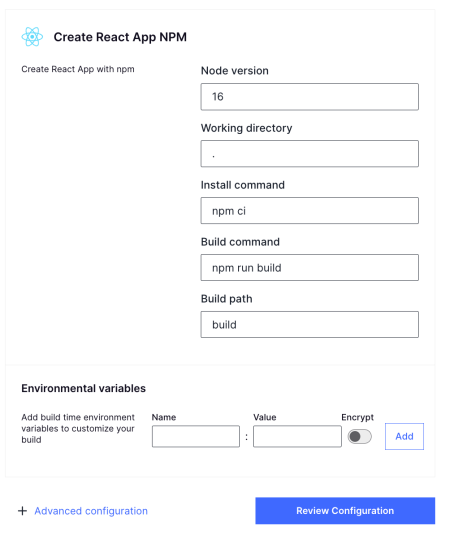
Once deployment is successful, anytime we make a PR or push a commit to that PR, we’ll get a preview link.
We would proceed to integrate GitHub Actions for automated deployments. This streamlines the deployment process and enhances efficiency. Before we can deploy the app using this approach, we’ll create a workflow file in .github/workflows/deploy.yml:
name: Deploy to GitHub Pages

on:
  push:
    branches:
      - main
  workflow_dispatch:

permissions:
  contents: write
  pages: write
  id-token: write

jobs:
  build-and-deploy:
    runs-on: ubuntu-latest
    steps:
      - name: Checkout Repository
        uses: actions/checkout@v4

      - name: Setup Node
        uses: actions/setup-node@v4
        with:
          node-version: "20"
          cache: "npm"

      - name: Install Dependencies
        run: npm ci

      - name: Build
        run: npm run build

      - name: Deploy
        uses: JamesIves/github-pages-deploy-action@v4
        with:
          folder: build
          branch: gh-pages
This workflow file is used by GitHub Actions to determine how to run the jobs. The workflow does the following:
Next, run this:
git add . && git commit -m "Adds Github Actions" && git push
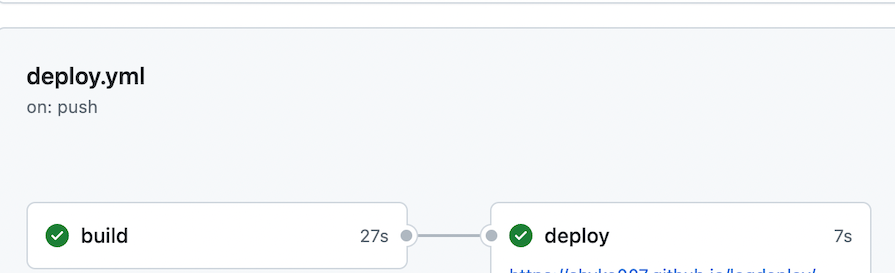
This will start the pipeline and proceed to deploy the built files to pages:

If you get an error: Branch "main" is not allowed to deploy to github-pages due to environment protection rules, follow these steps:
This should allow deployments from the main branch to your github-pages environment:
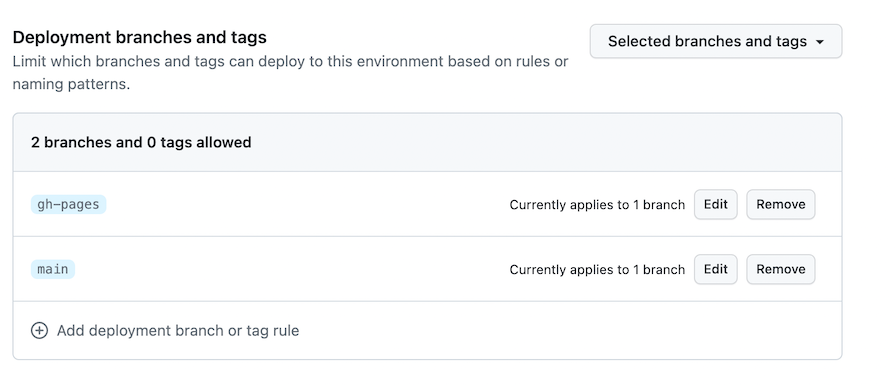
After adding this, retry the deploy stage, and this time it should pass successfully:
Sometimes, we need to add sensitive data to applications. But to do it securely, we don’t want to hardcode it directly into the application. Let’s see how to do this with the help of GitHub Actions.
To demonstrate this, we’ll update the About.js pages to include an environment variable, add a React environment variable to GitHub as a secret, and finally add this sensitive data securely to the workflow file:
To add a new secret to GitHub, go to:
Create New repository secret buttonREACT_APP_API_KEY as the secret name, and 12345 as the secret valueAdd Secret button: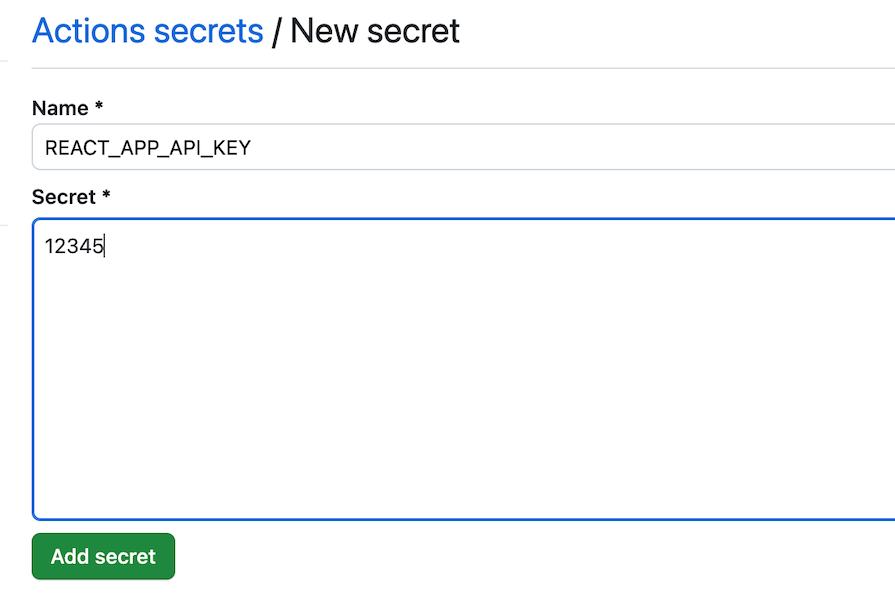
Next, modify the workflow file to include this environment variable. This enables the variable REACT_APP_API_KEY to be available to pages within the app:
name: Deploy to GitHub Pages

on:
  push:
    branches:
      - main
  workflow_dispatch:

permissions:
  contents: write
  pages: write
  id-token: write

jobs:
  build-and-deploy:
    runs-on: ubuntu-latest
    steps:
      - name: Checkout Repository
        uses: actions/checkout@v4

      - name: Setup Node
        uses: actions/setup-node@v4
        with:
          node-version: "20"
          cache: "npm"

      - name: Install Dependencies
        run: npm ci

      - name: Build
        run: npm run build
        env:
          REACT_APP_API_KEY: ${{ secrets.REACT_APP_API_KEY }}

      - name: Deploy
        uses: JamesIves/github-pages-deploy-action@v4
        with:
          folder: build
          branch: gh-pages
Finally, update the About.js page to this:
const apiKey = process.env.REACT_APP_API_KEY;
const About = () => {
  return <h1>About page 1.0, Secret: {apiKey}</h1>;
};
export default About;
Once deployed, we can see the environment variable displayed on the page:

GitHub Pages offers a simple, free hosting solution that makes it an ideal choice for developers at all experience levels.
Throughout this guide, we’ve discussed the complete process of deploying Create React App projects to GitHub Pages, from basic setup and configuration to advanced techniques like custom domains, routing solutions, and automated deployments with GitHub Actions. We’ve also addressed common pitfalls you might encounter and provided solutions to ensure a smooth deployment experience.
If you’re looking for an easy, cost-effective way to share your React applications with the world, GitHub Pages provides excellent integration with your existing GitHub workflow, making it particularly well-suited for open-source projects and personal portfolios.
Install LogRocket via npm or script tag. LogRocket.init() must be called client-side, not
server-side
$ npm i --save logrocket

// Code:

import LogRocket from 'logrocket';
LogRocket.init('app/id');
// Add to your HTML:

<script src="https://cdn.lr-ingest.com/LogRocket.min.js"></script>
<script>window.LogRocket && window.LogRocket.init('app/id');</script>

Learn what context rot is, why AI agent sessions degrade over time, and how to fix it with compaction, prompt anchoring, context files, plan files, and RAG.

Learn about TypeScript v6’s breaking changes, new ES2025 features, and deprecated options. A complete migration guide from v5 to prepare for v7.

Learn how Vite+ unifies Vite, Vitest, Oxlint, Oxfmt, Rolldown, and Node.js management in one CLI.

AI companies are buying developer tools as coding agents turn runtimes, package managers, and linters into strategic infrastructure.
Would you be interested in joining LogRocket's developer community?
Join LogRocket’s Content Advisory Board. You’ll help inform the type of content we create and get access to exclusive meetups, social accreditation, and swag.
Sign up now

