Continuous integration/continuous deployment is a software engineering practice that helps teams to collaborate better and improve their overall software. With GitHub Actions, you can easily integrate this into your GitHub project without using an external platform.

In this tutorial, we see how you can use GitHub Actions to set up a CI/CD pipeline to your project.
To use this tutorial, you will need the following:
Before we delve into GitHub Actions for CI/CD, let’s understand what continuous integration and what continuous deployment is.
Continuous integration (CI) is the software engineering practice that requires frequent commits to a shared repository. You may have gotten so used to this practice that you may wonder why there’s a term for it.
To understand this better, let us consider the opposite of CI. Before CI, people would work on feature branches for weeks or months and then try to merge this branch to a main branch. Think about all that could go wrong during such merge — merge conflicts and failing tests, just to mention a few.
Continuous integration tries to prevent all of these by encouraging small and frequent code updates. When a code is committed to a repository, it can be built and tested against setup workflows to ensure that the code does not introduce any errors.
Continuous deployment means code changes are automatically deployed/released to a testing or production environment as soon as they are merged. This is often interchanged with continuous delivery and that’s because they are very similar. The only difference is that in continuous delivery, human intervention (e.g., the click of a button) is needed for the changes to be released. However, in continuous deployment, everything happens automatically. For the rest of this post, we refer to CD as continuous deployment.
Let’s outline some advantages of CI/CD.
Here are more advantages in addition to those already mentioned above:
Now, let’s consider how we can use GitHub Actions to configure a CI/CD pipeline for a Node.js project. Before we jump into the code, let us get a brief overview of GitHub Actions.
According to the GitHub documentation on GitHub Actions, “GitHub Actions is a continuous integration and continuous delivery (CI/CD) platform that allows you to automate your build, test, and deployment pipeline. You can create workflows that build and test every pull request to your repository, or deploy merged pull requests to production.”
This means that with GitHub Actions, you can set up CI/CD pipelines that run when certain actions are taken on a repository. You can decide to run tests for every pull request (PR) created or merged, you can automatically deploy merged PR, and you can even set up a workflow to add the appropriate labels when a PR is created.
So how does it work? We will use an example to explain how to set it up for a repository.
Actions tab. You will see this screen. A simple workflow with the minimum necessary structure is already suggested, and you have the option to set up a workflow yourself.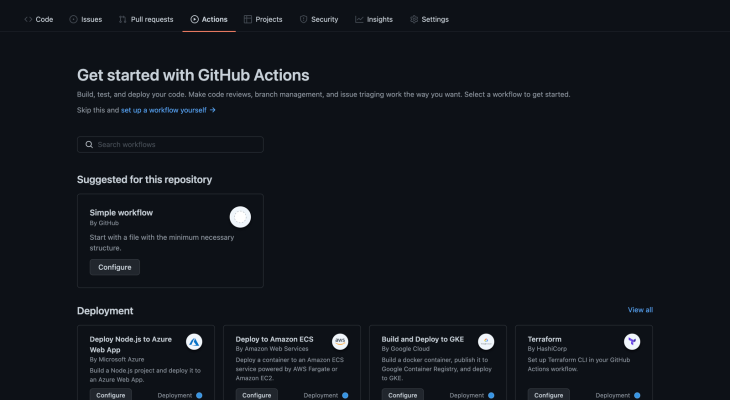
Click on the Configure button for the Simple workflow. You will see this page. Let us try to understand what is going on here.
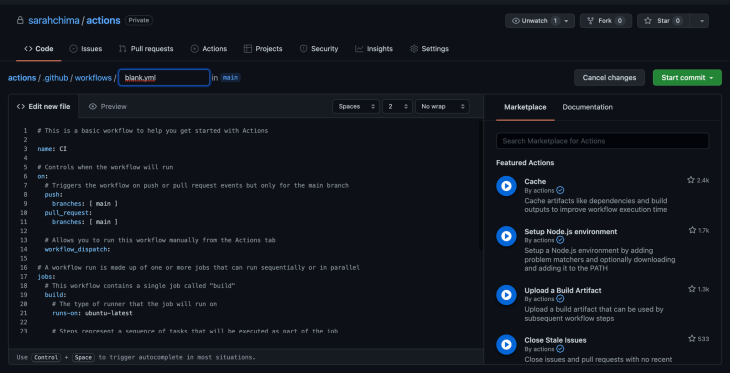
Take note of the directory in which the file is created: .github/workflows. A workflow is a configurable automated process that runs one or more jobs. You can see the workflow file created here is a YAML file. A workflow is defined by a YAML file in your .github/workflows
directory and it is triggered by an event defined in the file.
The file created contains the code below. We will use this to explain other components of GitHub Actions, the workflow being one component:
# This is a basic workflow to help you get started with Actions

name: CI

# Controls when the workflow will run
on:
  # Triggers the workflow on push or pull request events but only for the main branch
  push:
    branches: [ main ]
  pull_request:
    branches: [ main ]

  # Allows you to run this workflow manually from the Actions tab
  workflow_dispatch:

# A workflow run is made up of one or more jobs that can run sequentially or in parallel
jobs:
  # This workflow contains a single job called "build"
  build:
    # The type of runner that the job will run on
    runs-on: ubuntu-latest

    # Steps represent a sequence of tasks that will be executed as part of the job
    steps:
      # Checks out your repository under $GITHUB_WORKSPACE, so your job can access it
      - uses: actions/checkout@v2

      # Runs a single command using the runners shell
      - name: Run a one-line script
        run: echo Hello, world!

      # Runs a set of commands using the runners shell
      - name: Run a multi-line script
        run: |
          echo Add other actions to build,
          echo test, and deploy your project.
In every workflow created, you need to specify a specific event that triggers the workflow:
# Controls when the workflow will run
on:
  # Triggers the workflow on push or pull request events but only for the main branch
  push:
    branches: [ main ]
  pull_request:
    branches: [ main ]
This snippet from the sample workflow indicates that the workflow will be run whenever a push or pull request is made to the main branch. A workflow can also be scheduled to run at certain times, like a cron job. You can read about it here.
A job is a set of steps that a workflow should execute on the same runner. This could either be a shell script or an action. Steps are executed in order in the same runner and are dependent on each other. This is good because data can be shared from one step to another.
Jobs are run in parallel, but you can also configure a job to depend on another job. For instance, you may want to deploy a merged PR only when the build succeeds or tests have passed.
Runners
This indicates the server the job should run on. It could be Ubuntu Linux, Microsoft Windows, or macOS, or you can host your own runner that the job should run on.
In the sample workflow, we want the job to run on the latest version of Ubuntu:
# The type of runner that the job will run on
    runs-on: ubuntu-latest
An action performs a complex, repetitive task. It is a custom application for the GitHub Actions platform. Actions are really important to reduce the amount of code you need to set up a workflow. You can either write an action or use an already existing action from the GitHub Marketplace.
Here’s a snippet of an action that is used in the sample workflow:
# Checks-out your repository under $GITHUB_WORKSPACE, so your job can access it
- uses: actions/checkout@v2
For our application, we will need to use a Node.js action to build our Node application and a Heroku action to deploy our application. We will get back to this later.
For now, rename the file to a name of your choice. I’ll rename mine to main.yml and refer to it later. Commit this workflow (click on the Start commit button), then merge and clone our repository into our local machine.
To see GitHub Actions at work, let us create a very simple Node application in the project we just cloned. If you want to add GitHub Actions to an existing project, you may skip this part.
Let’s install the dependencies we need. We will be using Express for our application and Jest and SuperTest for testing the application:
npm install express
npm install jest supertest --save-dev
Next, we add index.js and app.js files to an src directory. In your terminal, run the following commands:
mkdir src
cd src
touch index.js app.js app.test.js
Open the created app.js file and add the following code.
const express = require("express");
const app = express();

app.get("/test", (_req, res) =>  {
  res.status(200).send("Hello world")
})
module.exports = app;
In the index.js file, add this code:
const app =  require( "./app");
const port = process.env.PORT || 3000;

app.listen(port, () =>
  console.log('Example app listening on port 3000!'),
);
Let’s also add a test for the endpoint we just created. In the app.test.js, add the following code:
const app = require("./app")
const supertest = require("supertest")
const request = supertest(app)

describe("/test endpoint", () => {
    it("should return a response", async () => {
        const response = await request.get("/test")
        expect(response.status).toBe(200)
        expect(response.text).toBe("Hello world");
    })
})
In the package.json file, add the start and test scripts to the scripts:
"scripts": {
    "start": "node src",
    "test": "jest src/app.test.js"
}
Run npm start and npm test to ensure that everything works as expected.
Let us get back to our GitHub workflow we pulled from our repository: the main.yml file, or whatever you named yours. We will modify this file to build the application and run tests whenever a pull request is merged to the main branch, and deploy this application to Heroku.
So in that file, change:
# Controls when the workflow will run
on:
  push:
    branches: [ main ]
  pull_request:
    branches: [ main ]
To this:
on:
  push:
    branches: [ main ]
Since we are building a Node application, we need an action to set up Node.js for build. We do not need to build this from scratch since this action is already available in the GitHub Marketplace. So we go to GitHub Marketplace to find an action we can use.
On GitHub, click on Marketplace in the top navigation. Search for Node and you see a Setup Node.js Environment action under Actions.
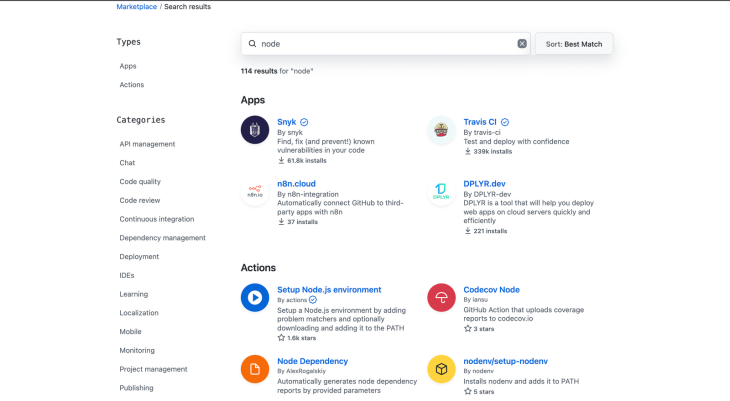
Click on it to see a description of the action and how to use it. You will see this screen with a description.
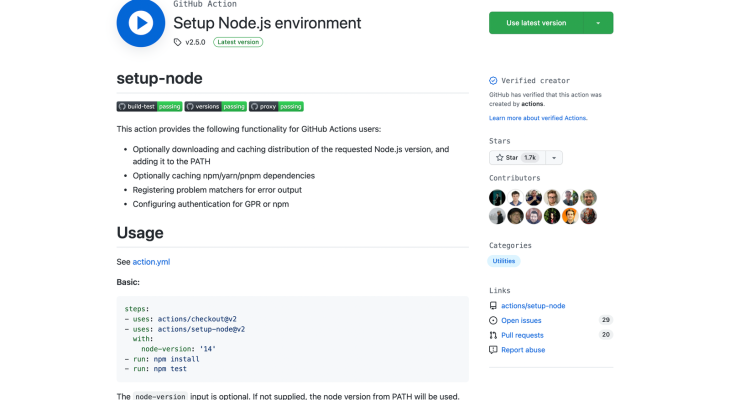
We are going to replace the steps in our workflow with the steps here.
So we replace this code:
  # Steps represent a sequence of tasks that will be executed as part of the job
    steps:
      # Checks-out your repository under $GITHUB_WORKSPACE, so your job can access it
      - uses: actions/checkout@v2

      # Runs a single command using the runners shell
      - name: Run a one-line script
        run: echo Hello, world!

      # Runs a set of commands using the runners shell
      - name: Run a multi-line script
        run: |
          echo Add other actions to build,
          echo test, and deploy your project.
With this:
steps:
  - uses: actions/checkout@v2
  - uses: actions/setup-node@v2
    with:
      node-version: '14.x'
  - run: npm install
  - run: npm test
We can make it more understandable by adding names to the steps:
steps:
    - uses: actions/checkout@v2
    - name: Use Node.js
      uses: actions/setup-node@v2
      with:
        node-version: "14.x"

    - name: Install dependencies
      run: npm install

    - name: Run test
      run: npm test
At this point, if we push this to our main branch, we will see this action run. But because we want to go a step further to add automatic deployment to Heroku, we will add a second job to our workflow.
Once again, we do not need to build the action for this deployment from scratch. The GitHub Marketplace saves the day. So we will go back to the marketplace and search for Deploy to Heroku. You can decide to use an action of your choice for this depending on your needs. If you run your app in a Docker container, you may want to use the ones for Docker.
We will use the first action “Deploy to Heroku” by AkhileshNS because we are deploying a simple Node.js application. Let’s click on it to see how to use it.
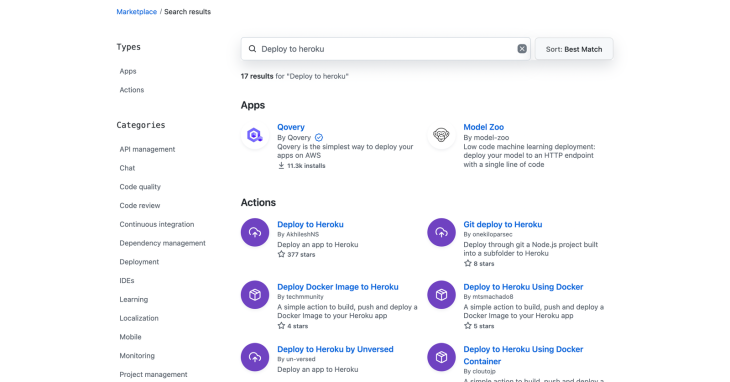
Under the Getting Started section, there are details on how to use the action.
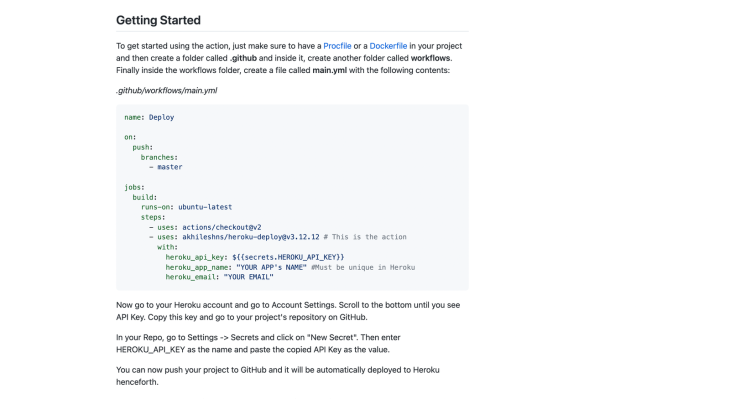
We will copy the sample code there in the build part, add it to the jobs, and modify it to suit our needs. So, add this to the main.yml file:
 build:
    runs-on: ubuntu-latest
    steps:
      - uses: actions/checkout@v2
      - uses: akhileshns/[email protected] # This is the action
        with:
          heroku_api_key: ${{secrets.HEROKU_API_KEY}}
          heroku_app_name: "YOUR APP's NAME" #Must be unique in Heroku
          heroku_email: "YOUR EMAIL"
Since we already have a build job, we will rename this job to deploy. Also, we need this job to run only when the tests run successfully, so to prevent it from running in parallel to the build job, we will add that it depends on the build.
The code above will be modified to this:
 deploy:
    runs-on: ubuntu-latest
    needs: [build]
    steps:
      - uses: actions/checkout@v2
      - uses: akhileshns/[email protected]
        with:
          heroku_api_key: ${{secrets.HEROKU_API_KEY}}
          heroku_app_name: "YOUR APP's NAME" #Must be unique in Heroku
          heroku_email: "YOUR EMAIL"
Now notice that for this job to run, we need a Heroku account. That is where you will get HEROKU_API_KEY and a Heroku app name. If you do not have an account, you can sign up here. After signing up, or if you already have an account, you can get your HEROKU_API_KEY from your account settings. Click on the image on the top right part of the navigation to get to your account settings. Scroll down to API Key to copy your API key.
For our workflow to have access to this key, we need to add it to the Secrets of our repository. So in your Github repo, go to Settings > Secrets and click on New Secret. Enter HEROKU_API_KEY as the name and paste the copied API key from Heroku as the value.
After that, to ensure that our Heroku app name is unique and to prevent our deployment from failing, we can create a new app on Heroku. On your dashboard, click on New and follow the steps to create the app.

Copy the app name and update the workflow with your created app name and your Heroku email address.
We are ready to test our workflow now. To ensure that everything is in place, here is what the main.yml file should contain. Since this is a YAML file, ensure that it is spaced correctly:
name: Main
on:
  push:
    branches: [ main ]
  workflow_dispatch:
jobs:
  build:
    runs-on: ubuntu-latest

    steps:
      - uses: actions/checkout@v2
      - name: Use Node.js
        uses: actions/setup-node@v2
        with:
          node-version: "14.x"
      - name: Install dependencies
        run: npm install
      - name: Run test
        run: npm test

  deploy:
    runs-on: ubuntu-latest
    needs: [build]
    steps:
      - uses: actions/checkout@v2
      - uses: akhileshns/[email protected]
        with:
          heroku_api_key: ${{secrets.HEROKU_API_KEY}}
          heroku_app_name: "sarah-oo"
          heroku_email: "[email protected]"
Let’s commit this and push to our main branch.
If you go to the Actions, you will see that your push triggered a workflow run.

You can click on the workflow to get details about its progress.
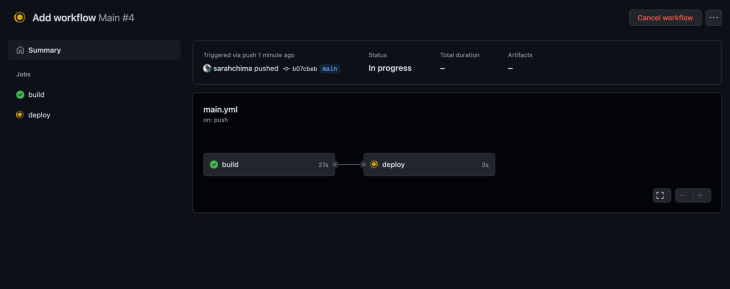
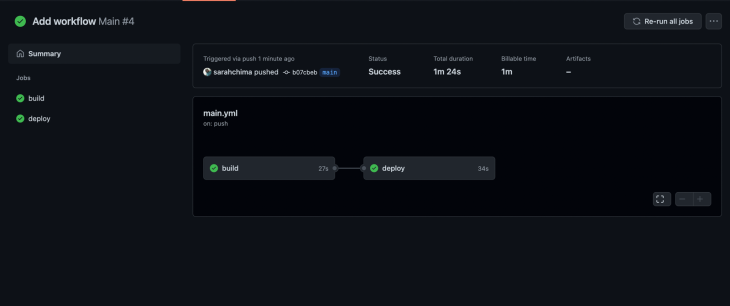
You can see from the image above that the build was successful and the deployment is ongoing. Also notice that the deploy job ran only after the build job completed. If all goes well, you will get a successful deployment like the one below.
Now let’s view our deployed app. Go to <Name of your app>.herokuapp.com/test and you should see “Hello, world!” on the screen.
Great work for making it this far.
In this article, we have discussed what CI/CD is and its advantages. We also discussed GitHub Actions and used a simple workflow to show how you can set up a CI/CD pipeline with it. You can create multiple workflows for the needs of your repository. For instance, if you work on a repository with many contributors, you can decide to create a workflow that runs when a pull request to the main branch is created, and another that runs when the pull request is merged.
One good thing about GitHub Actions is that you do not have to build all the actions needed for your workflows from scratch. The marketplace already has a lot of actions you can use or customize to suit your needs. You can also build custom actions that are specific to the needs of your organization. All of these make GitHub Actions an exciting tool to use to build a CI/CD pipeline.
Thanks for reading and I really hope this tutorial serves as a good guide to get started with GitHub Actions.
For further reading, you can reference the official documentation on GitHub Actions.
 Monitor failed and slow network requests in production
Deploying a Node-based web app or website is the easy part. Making sure your Node instance continues to serve resources to your app is where things get tougher. If you’re interested in ensuring requests to the backend or third-party services are successful, try LogRocket.

LogRocket lets you replay user sessions, eliminating guesswork around why bugs happen by showing exactly what users experienced. It captures console logs, errors, network requests, and pixel-perfect DOM recordings — compatible with all frameworks.
LogRocket's Galileo AI watches sessions for you, instantly identifying and explaining user struggles with automated monitoring of your entire product experience.
LogRocket instruments your app to record baseline performance timings such as page load time, time to first byte, slow network requests, and also logs Redux, NgRx, and Vuex actions/state. Start monitoring for free.
Hey there, want to help make our blog better?
Join LogRocket’s Content Advisory Board. You’ll help inform the type of content we create and get access to exclusive meetups, social accreditation, and swag.
Sign up now
Not sure if low-code is right for your next project? This guide breaks down when to use it, when to avoid it, and how to make the right call.

Compare Firebase Studio, Lovable, and Replit for AI-powered app building. Find the best tool for your project needs.

Discover how to use Gemini CLI, Google’s new open-source AI agent that brings Gemini directly to your terminal.

This article explores several proven patterns for writing safer, cleaner, and more readable code in React and TypeScript.
2 Replies to "CI/CD in Node.js with GitHub Actions"
Thank You so much for the article, I loved it! 😀
Nice