Editor’s Note: This post was updated in August 2021 with relevant information and updated code.
Ready to make the jump to a GraphQL API? If you already have a MySQL database, you have an excellent starting point for creating a scalable API. In this tutorial, we will cover how to create models based on your database, create a Node GraphQL API that reads the data from the database, and learn how to make relations in your GraphQL API between different tables.
In this tutorial, we will build a small GraphQL endpoint for a ticketing system. We want to create an endpoint where we can read tickets and get their associated data such as user, status, and priority.
The building blocks we will be using are:
Don’t worry if you don’t know every piece I just noted, I will describe every step along the way. If you want to code along, you can check out this repository and clone the start of the tutorial release with this command:
git clone <https://github.com/DirkWolthuis/graphql-express-migrating-mysql> --branch start
First, we’ll assume that we’re working with an existing database. I’ve created an SQL file that you can import into a MySQL database. I like running my MySQL database inside a Docker container. You can use the docker-compose.yaml file (inside the repository) to start a MySQL container.
The database has four tables: tickets, priorities, status, and users. The tables have the following structure:
Tickets
| Field               | Type             | Null | Key | Default           | Extra          |
+---------------------+------------------+------+-----+-------------------+----------------+
| id                  | int(11) unsigned | NO   | PRI | NULL              | auto_increment |
| subject             | varchar(256)     | NO   |     | NULL              |                |
| priority_id         | int(11)          | NO   |     | NULL              |                |
| status_id           | tinyint(4)       | NO   |     | NULL              |                |
| user_id             | int(11)          | NO   |     | NULL              |                |
| assigned_to_user_id | int(11)          | YES  |     | NULL              |                |
+---------------------+------------------+------+-----+-------------------+----------------+
Users
| Field | Type             | Null | Key | Default | Extra          |
+-------+------------------+------+-----+---------+----------------+
| id    | int(10) unsigned | NO   | PRI | NULL    | auto_increment |
| name  | varchar(256)     | NO   |     | NULL    |                |
| email | varchar(256)     | NO   |     | NULL    |                |
+-------+------------------+------+-----+---------+----------------+
Priorities
| Field | Type             | Null | Key | Default | Extra          |
+-------+------------------+------+-----+---------+----------------+
| id    | int(10) unsigned | NO   | PRI | NULL    | auto_increment |
| slug  | varchar(64)      | NO   |     | NULL    |                |
| name  | varchar(256)     | NO   |     | NULL    |                |
+-------+------------------+------+-----+---------+----------------+
Status
| Field | Type             | Null | Key | Default | Extra          |
+-------+------------------+------+-----+---------+----------------+
| id    | int(10) unsigned | NO   | PRI | NULL    | auto_increment |
| slug  | varchar(64)      | NO   |     | NULL    |                |
| name  | varchar(256)     | NO   |     | NULL    |                |
+-------+------------------+------+-----+---------+----------------+
Create your own database with the schematics above or import the SQL file into your MySQL database. We are ready to start coding. You can find the SQL file inside the repository in the directory tutorial_assets.
For this tutorial, webpack is set up to compile the app.js file inside the dist directory. It serves as a basic Express Hello World app. After cloning the project, you need to run npm install to install the dependencies.
Finished installing? You can run npm run start to start the app. It will serve as an endpoint on http://localhost:5000.
Let’s start building our GraphQL API!
Virtually every framework uses models to interact with a database. To interact with our MySQL database, we’re using Sequelize as the ORM (Object-Relational Mapping) package. Let’s start by adding the packages (the mysql2 package is necessary to connect to the MySQL database) with either npm:
npm install sequelize mysql2
Or with Yarn:
yarn add sequelize mysql2
Now we can do one of two things: we can either create the database models by hand or auto-generate them with an extra package. For this tutorial, creating the models by hand would not be a problem because we have just four small tables in our database. But when you are migrating a bigger database, you might want something more automated. Luckily, there is a package to generate Sequelize database files based on an existing database. The package is named Sequelize-Auto and can be installed globally with npm:
npm install -g sequelize-auto MySQL
Here’s the install for Yarn:
yarn global add sequelize-auto MySQL
In order to migrate the database in a more automated way, we can use the sequelize-auto command. We need to insert our MySQL database credentials in the command to generate the models. If you are using the provided MySQL dump from step 1, I’ve created a config JSON file that you need to use.
The sequelize-auto-settings.json is located in the tutorial_assets directory. If you’re using your own database for this tutorial, check out this settings page from the Sequelize API documentation to find out what settings you need.
sequelize-auto -h <host> -d <database> -u <user> -x [password] -p [port] --dialect [dialect] -c [/path/to/config] -o [/path/to/models]
So, in my case:
sequelize-auto -h localhost -d graphql-mysql-tutorial -u graphql -x 123456 -p 8006 --dialect mysql -c /Users/wolthuis/Documents/websites/tutorials/graphql-migrating-mysql/tutorial_assets/sequelize-auto-settings.json -o /Users/wolthuis/Documents/websites/tutorials/graphql-migrating-mysql/app/models
And there we go! Four files appeared in the app/models directory. In our file, let’s start with importing Sequelize and setting up some variables.
We now need to implement the database models. In the app directory, create a database.js file. In this file, we import the database models and export them so we can use them anywhere in our app.
import Sequelize from 'sequelize';

var db = {}

const sequelize = new Sequelize(
    'DATABASE_NAME',
    'DATABASE_USER',
    'DATABASE_PASSWORD',
    {
        host: 'DATABASE_HOST',
        port: 'DATABASE_PORT',
        dialect: 'mysql',
        define: {
            freezeTableName: true,
        },
        pool: {
            max: 5,
            min: 0,
            acquire: 30000,
            idle: 10000,
        },
        // <http://docs.sequelizejs.com/manual/tutorial/querying.html#operators>
        operatorsAliases: false,
    },
)

let models = []

// Initialize models
models.forEach(model => {
    const seqModel = model(sequelize, Sequelize)
    db[seqModel.name] = seqModel
})

// Apply associations
Object.keys(db).forEach(key => {
    if ('associate' in db[key]) {
        db[key].associate(db)
    }
})

db.sequelize = sequelize
db.Sequelize = Sequelize

export default db;
Now we need to fill in our MySQL database credentials and import the freshly created models. Normally you would use environment variables to safely pass around sensitive data, but for tutorial purposes, I’m just going to hard code some values inside the database.js file.
The database.js file with credentials in imports looks something like this:
import Sequelize from 'sequelize';

var db = {}

const sequelize = new Sequelize('graphql-mysql-tutorial', 'graphql', '123456', {
    host: 'localhost',
    port: '8006',
    dialect: 'mysql',
    define: {
        freezeTableName: true,
    },
    pool: {
        max: 5,
        min: 0,
        acquire: 30000,
        idle: 10000,
    },
    // <http://docs.sequelizejs.com/manual/tutorial/querying.html#operators>
    operatorsAliases: false,
})

let models = [
    require('./models/priorities.js'),
    require('./models/status.js'),
    require('./models/tickets.js'),
    require('./models/users.js'),
]

// Initialize models
models.forEach(model => {
    const seqModel = model(sequelize, Sequelize)
    db[seqModel.name] = seqModel
})

// Apply associations
Object.keys(db).forEach(key => {
    if ('associate' in db[key]) {
        db[key].associate(db)
    }
})

db.sequelize = sequelize
db.Sequelize = Sequelize

export default db;
Great, we can now import the db variable anywhere in our app and access all of our models. In the next steps, we are going to use that variable to access our data.
Apollo is a company that offers many services and developer tools for the GraphQL ecosystem. It helps developers build fast and reliable GraphQL services with many packages such as Apollo Federation, Apollo Client, and Apollo Server.
Apollo Server is a spec-compliant and production-ready JavaScript GraphQL server that helps to create GraphQL APIs with many Node.js frameworks. It is a simple but powerful package that is easy to implement, simple to use, and is production-ready.
To start, we first need to add two packages:
npm install apollo-server-express graphql
Or with Yarn:
yarn add apollo-server-express graphql
After installing, we need to do some setup inside app.js to couple Apollo and Express. We start by importing ApolloServer:
import { ApolloServer } from 'apollo-server-express';
Then we create a new instance of the Apollo server:
const server = new ApolloServer({
        modules: []
})
The last step is to apply the Apollo server as middleware on the existing Express app:
server.applyMiddleware({ app })
We can’t start our app yet because without any modules, the Apollo server will throw an error. So, we are going to implement our database entities into a GraphQL endpoint so that we can reach them with a GraphQL query.
In GraphQL, you need types and resolvers. Types describe the data you can either fetch or write via a GraphQL endpoint. Resolvers are the logic to resolve a request from a user.
Inside the GraphQL directory, we create a new file, tickets.js. Inside this file, we will include a variable from the apollo-server-express package that we’ll use to create GraphQL type definitions, including our db variable and two empty objects for our type GraphQL definitions and GraphQL resolvers.
import { gql } from 'apollo-server-express'
import * as db from '../database'

export const typeDefs = gql`

`
export const resolvers = {
}
First we’re filling the typeDefs variable. You can see that we are using the gql variable from the apollo-server-express package. The gql variable lets us write type definitions that are readable for the package.
In the typeDefs variable, we need to extend the Query type and create a new type called Ticket. The reason that we need to extend the Query type is because GraphQL always works with a top-level type called Query. Inside that type are other types nested, and that’s how GraphQL knows with types are available in your GraphQL API.
Let’s extend the Query type:
export const typeDefs = gql`
    extend type Query {
        tickets: [Ticket]
        ticket(id: ID!): Ticket
    }
    type Ticket {

    }
`
As you can see, we let GraphQL know we want to extend the Query with two new entities: ticket and tickets.
Tickets returns an array of tickets:
tickets: [Ticket]
Ticket returns a single type of Ticket. The ticket type will receive an argument called id, of type ID, and it can’t be null (so in other words, the argument is required). The exclamation mark in a GraphQL type symbolizes that a value can’t be null:
ticket(id: ID!): Ticket
For now our Ticket type is empty, so let’s fill in this type:
export const typeDefs = gql`
    extend type Query {
        tickets: [Ticket]
        ticket(id: ID!): Ticket
    }
    type Ticket {
        id: ID!
        subject: String
        priority_id: Int
        status_id: Int
        user_id: Int
        assigned_to_user_id: Int
    }
`
Here, we described which types the ticket type is composed of. It is a 100% match with our database model. This is true for now but will change in the future when we are going to add relations between our types/models.
Now that we have created our Ticket entity, let’s create our resolver. The resolver needs to more or less reflect our types. Inside the resolver object, we also start with a top-level Query object.
export const resolvers = {
    Query: {},
}
Inside the Query type, we’re going to create two ticket types: ticket and tickets. We use our db (database) variable to resolve the data from the database.
export const resolvers = {
    Query: {
        tickets: async () => db.tickets.findAll(),
        ticket: async (obj, args, context, info) =>
            db.tickets.findByPk(args.id),
    },
}
A resolver receives a couple of arguments we can use to resolve the delete request. The obj is the root object, we will use this root object to make relations. The args are the function arguments we defined in the types.
For our tickets query, we’re going to receive an id as an argument and pass it to our findByPk function to fetch a specific Ticket. If you want to read more about obj, args, context, and info, check out the Apollo Docs.
We’ve created a module and now we just need to import it into our application inside app.js. To do so, add the module:
const server = new ApolloServer({
    modules: [require('./GraphQL/tickets')],
})
Now do the same for priorities, users, and status, and also import these modules:
const server = new ApolloServer({
    modules: [
        require('./GraphQL/tickets'),
        require('./GraphQL/status'),
        require('./GraphQL/users'),
        require('./GraphQL/priorities'),
    ],
})
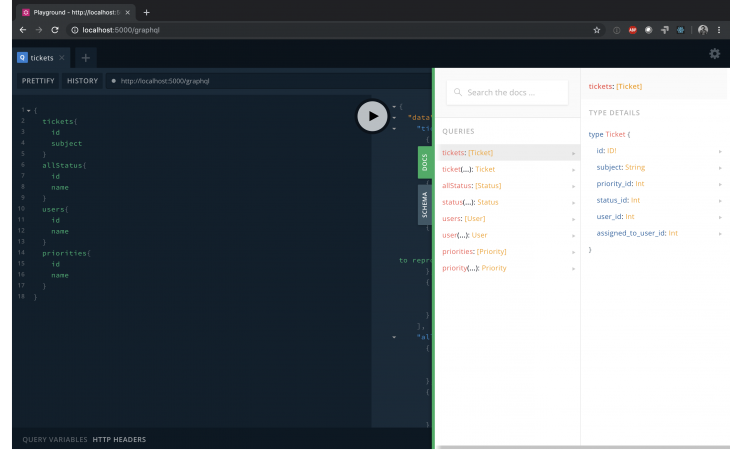
After starting the app again, go to localhost:5000/graphql and you will go into the Apollo GraphQL query builder environment. In this environment, you can test your API and create queries that you will use later in other applications.
Also, you can explore your API with the docs button on the right side. Because GraphQL is typed, you automatically have API documentation. Pretty cool!
It would be nice to automatically get the user’s name when getting a specific Ticket. For this step, we’re going to create a relation between a Ticket and a user.
So first let’s edit the Ticket type. We need to let GraphQL know that we want to request a user of the type user:
export const typeDefs = gql`
    extend type Query {
        tickets: [Ticket]
        ticket(id: ID!): Ticket
    }
    type Ticket {
        id: ID!
        subject: String
        priority_id: Int
        status_id: Int
        user_id: Int
        user: User
        assigned_to_user_id: Int
    }
`
Next, we need to add a nested resolver that will resolve the user inside the ticket. In the resolver object, we are going to add the key Ticket.That’s how GraphQL knows to resolve nested queries when we request a type inside another type.
In this case resolver, the User type, inside the Ticket type:
export const resolvers = {
    Query: {
        tickets: async () => db.tickets.findAll(),
        ticket: async (obj, args, context, info) =>
            db.tickets.findByPk(args.id),
    },
    Ticket: {
        user: async (obj, args, context, info) => db.users.findByPk(obj.user_id),
    },
}
You see we are using the obj to access the ticket data. In the ticket data the user_id is set, so we can get the right user from the database.
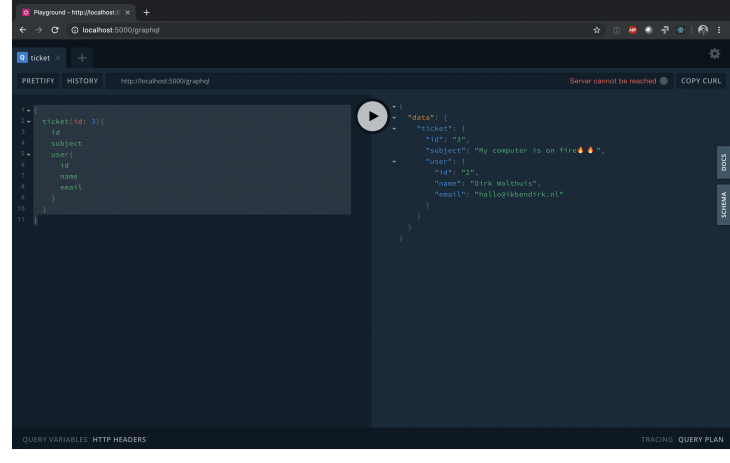
So let’s see if our code works. I’ve created this query to see if I can get the nested user data. Take note that you also need to specify which fields you want from the user type, in my case the id, name, and email fields.
{
  ticket(id: 3){
    id
    subject
    user{
      id
      name
      email
    }
  }
}
Great, it works! This is what Apollo returns:
Now add the other relationships the same way: priority, status, and assigned_to_user. After finishing adding the other nested resolver, your tickets.js file will look something like this:
import { gql } from 'apollo-server-express'
import * as db from '../database'
export const typeDefs = gql`
    extend type Query {
        tickets: [Ticket]
        ticket(id: ID!): Ticket
    }
    type Ticket {
        id: ID!
        subject: String
        priority_id: Int
        priority: Priority
        status_id: Int
        status: Status
        user_id: Int
        user: User
        assigned_to_user_id: Int
        assigned_to_user: User
    }
`
export const resolvers = {
    Query: {
        tickets: async () => db.tickets.findAll(),
        ticket: async (obj, args, context, info) =>
            db.tickets.findByPk(args.id),
    },
    Ticket: {
        user: async (obj, args, context, info) =>
            db.users.findByPk(obj.user_id),
        priority: async (obj, args, context, info) =>
            db.priorities.findByPk(obj.priority_id),
        status: async (obj, args, context, info) =>
            db.status.findByPk(obj.status_id),
        assigned_to_user: async (obj, args, context, info) =>
            db.users.findByPk(obj.assigned_to_user_id),
    },
}
Go to localhost:5000/graphql and construct a query that gets all the tickets with their status, priorities, and users. With this query:
{
  tickets{
    subject
    status{
      slug
    }
    priority{
      slug
    }
    user{
      name
    }
    assigned_to_user{
      name
    }
  }
}
I get the following tickets and their attributes:
{
  "data": {
    "tickets": [
      {
        "subject": "My computer is on fire🔥🔥",
        "status": {
          "slug": "open"
        },
        "priority": {
          "slug": "high"
        },
        "user": {
          "name": "Dirk Wolthuis"
        },
        "assigned_to_user": null
      },
      {
        "subject": "MS Word is not starting, can someone help?",
        "status": {
          "slug": "doing"
        },
        "priority": {
          "slug": "low"
        },
        "user": {
          "name": "Chris Vogt"
        },
        "assigned_to_user": {
          "name": "Dirk Wolthuis"
        }
      },
      {
        "subject": "There is a bug in the 🛒 of the webshop, steps to reproduce are included",
        "status": {
          "slug": "doing"
        },
        "priority": {
          "slug": "high"
        },
        "user": {
          "name": "Andrew Clark"
        },
        "assigned_to_user": {
          "name": "Dirk Wolthuis"
        }
      },
      {
        "subject": "404 error: website not found - website down?💀",
        "status": {
          "slug": "closed"
        },
        "priority": {
          "slug": "high"
        },
        "user": {
          "name": "Andrew Clark"
        },
        "assigned_to_user": {
          "name": "Dirk Wolthuis"
        }
      }
    ]
  }
}
We’ve created a usable GraphQL API that you can customize any way you want. You can add multiple layers of relationships between entities. And, after creating a new database table, you can easily create the required Sequelize models for your application.
For the sake of this tutorial, we’ve created a read-only database. Just want to check out the code? You can find it in this repository. If you want to learn more about how to manipulate data in the database, you can check out Designing Mutations or read this post about mutations. The setup of the server is a little bit different, but the logic is the same.
While GraphQL has some features for debugging requests and responses, making sure GraphQL reliably serves resources to your production app is where things get tougher. If you’re interested in ensuring network requests to the backend or third party services are successful, try LogRocket.


LogRocket lets you replay user sessions, eliminating guesswork around why bugs happen by showing exactly what users experienced. It captures console logs, errors, network requests, and pixel-perfect DOM recordings — compatible with all frameworks.
LogRocket's Galileo AI watches sessions for you, instantly aggregating and reporting on problematic GraphQL requests to quickly understand the root cause. In addition, you can track Apollo client state and inspect GraphQL queries' key-value pairs.

A guide for using JWT authentication to prevent basic security issues while understanding the shortcomings of JWTs.

Discover how to build, render, and automate product demo videos with Remotion, replacing traditional screen recordings with reusable React code.

Chrome’s Modern Web Guidance embeds modern web platform skills into AI coding agents, helping them choose native HTML, CSS, and browser APIs over legacy patterns.

Learn how to use Fallow to analyze AI-generated code, detect dead code, duplicate logic, and complexity issues, and integrate automated code quality checks into your AI-assisted development workflow.
Hey there, want to help make our blog better?
Join LogRocket’s Content Advisory Board. You’ll help inform the type of content we create and get access to exclusive meetups, social accreditation, and swag.
Sign up now

