Since Docker’s release in 2013, the use of containers has been on the rise, and it’s now become a part of the stack in most tech companies out there. Sadly, when it comes to front-end development, this concept is rarely touched.

Therefore, when front-end developers have to interact with containerization, they often struggle a lot. That is exactly what happened to me a few weeks ago when I had to interact with some services in my company that I normally don’t deal with.
The task itself was quite easy, but due to a lack of knowledge of how containerization works, it took almost two full days to complete it. After this experience, I now feel more secure when dealing with containers and CI pipelines, but the whole process was quite painful and long.
The goal of this post is to teach you the core concepts of Docker and how to manipulate containers so you can focus on the tasks you love!
Let’s start by defining what Docker is in plain, approachable language (with some help from Docker Curriculum):
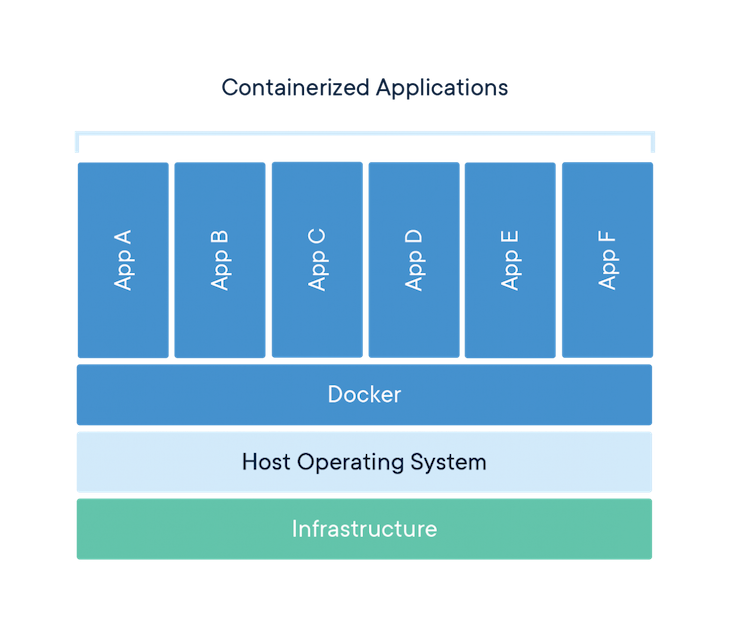
Docker is a tool that allows developers, sys-admins, etc. to easily deploy their applications in a sandbox (called containers) to run on the host operating system.
The key benefit of using containers is that they package up code and all its dependencies so the application runs quickly and reliably regardless of the computing environment.
This decoupling allows container-based applications to be deployed easily and consistently regardless of where the application will be deployed: a cloud server, internal company server, or your personal computer.

In the Docker ecosystem, there are a few key definitions you’ll need to know to understand what the heck they are talking about:
Image: The blueprints of your application, which forms the basis of containers. It is a lightweight, standalone, executable package of software that includes everything needed to run an application, i.e., code, runtime, system tools, system libraries, and settings.Containers: These are defined by the image and any additional configuration options provided on starting the container, including but not limited to the network connections and storage options.Docker daemon: The background service running on the host that manages the building, running, and distribution of Docker containers. The daemon is the process that runs in the OS the clients talk to.Docker client: The CLI that allows users to interact with the Docker daemon. It can also be in other forms of clients, too, such as those providing a UI interface.Docker Hub: A registry of images. You can think of the registry as a directory of all available Docker images. If required, you can host your own Docker registries and pull images from there.To fully understand the aforementioned terminologies, let’s set up Docker and run an example.
The first step is installing Docker on your machine. To do that, go to the official Docker page, choose your current OS, and start the download. You might have to create an account, but don’t worry, they won’t charge you in any of these steps.
After installing Docker, open your terminal and execute docker run hello-world. You should see the following message:
➜ ~ docker run hello-world
Unable to find image 'hello-world:latest' locally
latest: Pulling from library/hello-world
1b930d010525: Pull complete
Digest: sha256:6540fc08ee6e6b7b63468dc3317e3303aae178cb8a45ed3123180328bcc1d20f
Status: Downloaded newer image for hello-world:latest

Hello from Docker!
This message shows that your installation appears to be working correctly.
Let’s see what actually happened behind the scenes:
docker is the command that enables you to communicate with the Docker client.docker run [name-of-image], the Docker daemon will first check if you have a local copy of that image on your computer. Otherwise, it will pull the image from Docker Hub. In this case, the name of the image is hello-world.Hello from Docker!The “Hello, World!” Docker demo was quick and easy, but the truth is we were not using all Docker’s capabilities. Let’s do something more interesting. Let’s run a Docker container using Node.js.
So, as you might guess, we need to somehow set up a Node environment in Docker. Luckily, the Docker team has created an amazing marketplace where you can search for Docker images inside their public Docker Hub. To look for a Node.js image, you just need to type “node” in the search bar, and you most probably will find this one.

So the first step is to pull the image from the Docker Hub, as shown below:
➜ ~ docker pull node
Then you need to set up a basic Node app. Create a file called node-test.js, and let’s do a simple HTTP request using JSON Placeholder. The following snippet will fetch a Todo and print the title:
const https = require('https');

https
  .get('https://jsonplaceholder.typicode.com/todos/1', response => {
    let todo = '';

    response.on('data', chunk => {
      todo += chunk;
    });

    response.on('end', () => {
      console.log(`The title is "${JSON.parse(todo).title}"`);
    });
  })
  .on('error', error => {
    console.error('Error: ' + error.message);
  });
I wanted to avoid using external dependencies like node-fetch or axios to keep the focus of the example just on Node and not in the dependencies manager.
Let’s see how to run a single file using the Node image and explain the docker run flags:
➜ ~ docker run -it --rm --name my-running-script -v "$PWD":/usr/src/app -w /usr/src/app node node node-test.js
-it runs the container in the interactive mode, where you can execute several commands inside the container.--rm automatically removes the container after finishing its execution.--name [name] provides a name to the process running in the Docker daemon.-v [local-path: docker-path] mounts a local directory into Docker, which allows exchanging information or access to the file system of the current system. This is one of my favorite features of Docker!-w [docker-path] sets the working directory (start route). By default, this is /.node is the name of the image to run. It always comes after all the docker run flags.node node-test.js are instructions for the container. These always come after the name of the image.The output of running the previous command should be: The title is "delectus aut autem".
Since this post is focused on front-end developers, let’s run a React application in Docker!
Let’s start with a base project. For that, I recommend using the create-react-app CLI, but you can use whatever project you have at hand; the process will be the same.
➜ ~ npx create-react-app react-test
➜ ~ cd react-test
➜ ~ yarn start
You should be able to see the homepage of the create-react-app project. Then, let’s introduce a new concept, the Dockerfile.
In essence, a Dockerfile is a simple text file with instructions on how to build your Docker images. In this file, you’d normally specify the image you want to use, which files will be inside, and whether you need to execute some commands before building.
Let’s now create a file inside the root of the react-test project. Name this Dockerfile, and write the following:
# Select the image to use
FROM node

## Install dependencies in the root of the Container
COPY package.json yarn.lock ./
ENV NODE_PATH=/node_modules
ENV PATH=$PATH:/node_modules/.bin
RUN yarn

# Add project files to /app route in Container
ADD . /app

# Set working dir to /app
WORKDIR /app

# expose port 3000
EXPOSE 3000
When working in yarn projects, the recommendation is to remove the node_modules from the /app and move it to root. This is to take advantage of the cache that yarn provides. Therefore, you can freely do rm -rf node_modules/ inside your React application.
After that, you can build a new image given the above Dockerfile, which will run the commands defined step by step.
➜ ~ docker image build -t react:test .
To check if the Docker image is available, you can run docker image ls.
➜ ~ docker image ls
REPOSITORY TAG IMAGE ID CREATED SIZE
react test b530cde7aba1 50 minutes ago 1.18GB
hello-world latest fce289e99eb9 7 months ago 1.84kB
Now it’s time to run the container by using the command you used in the previous examples: docker run.
➜ ~ docker run -it -p 3000:3000 react:test /bin/bash
Be aware of the -it flag, which, after you run the command, will give you a prompt inside the container. Here, you can run the same commands as in your local environment, e.g., yarn start or yarn build.
To quit the container, just type exit, but remember that the changes you make in the container won’t remain when you restart it. In case you want to keep the changes to the container in your file system, you can use the -v flag and mount the current directory into /app.
➜ ~ docker run -it -p 3000:3000 -v $(pwd):/app react:test /bin/bash

root@55825a2fb9f1:/app# yarn build
After the command is finished, you can check that you now have a /build folder inside your local project.
This has been an amazing journey into the fundamentals of how Docker works. For more advanced concepts, or to cement your understanding of the discussed concepts in this article, I advise you to check out the references linked below.
Let’s keep building stuff together 👷
Install LogRocket via npm or script tag. LogRocket.init() must be called client-side, not
server-side
$ npm i --save logrocket

// Code:

import LogRocket from 'logrocket';
LogRocket.init('app/id');
// Add to your HTML:

<script src="https://cdn.lr-ingest.com/LogRocket.min.js"></script>
<script>window.LogRocket && window.LogRocket.init('app/id');</script>
Hey there, want to help make our blog better?
Join LogRocket’s Content Advisory Board. You’ll help inform the type of content we create and get access to exclusive meetups, social accreditation, and swag.
Sign up now
This guide walks you through creating a web UI for an AI agent that browses, clicks, and extracts info from websites powered by Stagehand and Gemini.

This guide explores how to use Anthropic’s Claude 4 models, including Opus 4 and Sonnet 4, to build AI-powered applications.

Which AI frontend dev tool reigns supreme in July 2025? Check out our power rankings and use our interactive comparison tool to find out.

Learn how OpenAPI can automate API client generation to save time, reduce bugs, and streamline how your frontend app talks to backend APIs.