Try to imagine today’s digital landscape with no kind of opportunity to filter data. Unthinkable, right?

A search bar is one example of implementing such a filter. If you think of any app on your mobile phone right now, many examples of search bars should pop into your head.
In this tutorial, we’ll go through creating a search bar from scratch in React Native. React Native is a JavaScript-based framework, which makes it pretty easy to build cross-platform (iOS and Android) mobile applications.
Watch the video below to get the first impression of this small project! As you can see, the example app will contain one screen with a list of programming languages on which you can apply the filter.
I use Expo when developing React Native apps, so you should install the Expo client by running this code on your machine:
npm install --global expo-cli
Everything in this tutorial should still work if you are not using Expo, except for the Expo vector icons we’ll use later. If you’re not using Expo, I’d recommend replacing those icons with React Native Vector Icons.
Apart from using Expo, I can recommend working with Visual Studio Code or something similar. Some basic knowledge in JavaScript and React/React Native will help you follow this tutorial.
First, let’s dive into the actual code! First, go to the directory where you want to store your project. Inside this directory, run expo init my-project in order to initialize the Expo project. You can replace my-project with whatever name you like.
Then, go to the newly created directory with cd my-project and run expo start to start the development server. Expo lets you decide to choose on which kind of device you want to work with; the device I used in the demo and the video above is an iPhone 12 Pro Max.
If you want to get the app running right away, just clone the code from the GitHub repo and run npm install inside the app directory.
Below, I summarize the terminal commands:
# cd into the directory where to store your project
 $ cd dir

# initialize the expo project
$ expo init my-project

# navigate inside the newly created project
$ cd my-project

# run the development server
$ expo start
In order to keep things clear, I always add a screens folder and components folder to my React Native projects. Here, the screens folder will only contain one file because we only need to view one screen where the search bar will be in action.
The components folder will contain any React Native components, which can be outsourced to a separate file. In this example app, we will have two files in this folder called List.js and SearchBar.js.
We’ll first look at the SearchBar.js file.
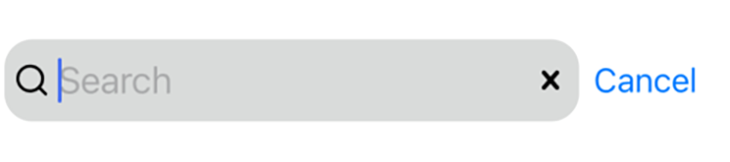
SearchBar.jsBelow, you’ll find the content within our SearchBar.js file. This component does not contain any filtering logic yet — it is only responsible for displaying the search bar itself.
// SearchBar.js
import React from "react";
import { StyleSheet, TextInput, View, Keyboard, Button } from "react-native";
import { Feather, Entypo } from "@expo/vector-icons";

const SearchBar = ({clicked, searchPhrase, setSearchPhrase, setCLicked}) => {
  return (
    <View style={styles.container}>
      <View
        style={
          clicked
            ? styles.searchBar__clicked
            : styles.searchBar__unclicked
        }
      >
        {/* search Icon */}
        <Feather
          name="search"
          size={20}
          color="black"
          style={{ marginLeft: 1 }}
        />
        {/* Input field */}
        <TextInput
          style={styles.input}
          placeholder="Search"
          value={searchPhrase}
          onChangeText={setSearchPhrase}
          onFocus={() => {
            setClicked(true);
          }}
        />
        {/* cross Icon, depending on whether the search bar is clicked or not */}
        {clicked && (
          <Entypo name="cross" size={20} color="black" style={{ padding: 1 }} onPress={() => {
              setSearchPhrase("")
          }}/>
        )}
      </View>
      {/* cancel button, depending on whether the search bar is clicked or not */}
      {clicked && (
        <View>
          <Button
            title="Cancel"
            onPress={() => {
              Keyboard.dismiss();
              setClicked(false);
            }}
          ></Button>
        </View>
      )}
    </View>
  );
};
export default SearchBar;

// styles
const styles = StyleSheet.create({
  container: {
    margin: 15,
    justifyContent: "flex-start",
    alignItems: "center",
    flexDirection: "row",
    width: "90%",

  },
  searchBar__unclicked: {
    padding: 10,
    flexDirection: "row",
    width: "95%",
    backgroundColor: "#d9dbda",
    borderRadius: 15,
    alignItems: "center",
  },
  searchBar__clicked: {
    padding: 10,
    flexDirection: "row",
    width: "80%",
    backgroundColor: "#d9dbda",
    borderRadius: 15,
    alignItems: "center",
    justifyContent: "space-evenly",
  },
  input: {
    fontSize: 20,
    marginLeft: 10,
    width: "90%",
  },
});
As you can see in lines 2-4, we don’t need to import too much to create a custom search bar. The most interesting imports here are the @expo/vector-icons, which we’ll use in order to implement some good-looking icons.
Beginning in line 9, we define the actual search bar. In subsequent lines (67-83), you’ll notice that I used conditional styling to delineate between two “versions” of the search bar: an unclicked search bar, and a clicked search bar.
If you look at the following code snippet, this will become more clear:
<View
        style={
          clicked
            ? styles.searchBar__clicked
            : styles.searchBar__unclicked
        }
      >
If clicked is set to be true, then the styles.searchBar__clicked will be applied. Otherwise, the styles.searchBar__unclicked will be applied.

Whether the bar was clicked is determined through clicked. We’ll come to this state later in the tutorial when we look at the home screen, where all the props are managed.
Inside of the <View>, which contains the search bar, we can also find the search icon (lines 17-22), the text input (lines 24-32), and the cross icon (lines 35-38). Let’s review these in the following section.
The text input here contains some interesting props. Let’s start with the onChangeText property.
With this feature, you can add a listener that will trigger every time the text in the TextInput-field changes. In our case, we call the setSearchPhrase function. This way, we can pass the text input from our child component (SearchBar.js) to its parent component (Home.js).
This text input is then passed to the value property of the TextInput component through searchPhrase. This property defines the actual value to be shown for the text input, hence the name.
Finally, we define the onFocus property so that it will tell the app what to do if the search bar is clicked. Both the cross (line 34) and the cancel button (line 41) are only rendered when clicked is set to true.
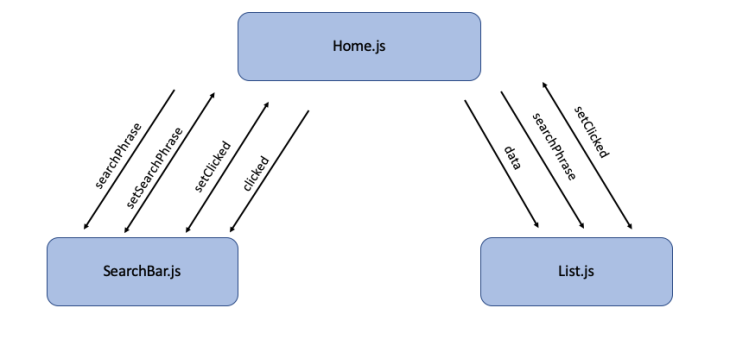
If you’re asking yourself why we even need to pass this data to the parent component, know that we will not only need the search phrase and other data in the SearchBar.js component, but also in the List.js component, where we’ll actually filter the data.
The following graphic illustrates the connections regarding the data passed between the different components:
List.jsIn order to render the data, I’m using a React Native component called FlatList. If you look at the lines 41-45 of List.js, you’ll notice that in our case FlatList takes data, renderItem, and keyExtractor as properties.
// List.js
import React from "react";
import {
  StyleSheet,
  Text,
  View,
  FlatList,
  SafeAreaView,
} from "react-native";

// definition of the Item, which will be rendered in the FlatList
const Item = ({ name, details }) => (
  <View style={styles.item}>
    <Text style={styles.title}>{name}</Text>
    <Text style={styles.details}>{details}</Text>
  </View>
);

// the filter
const List = ({ searchPhrase, setCLicked, data }) => {
  const renderItem = ({ item }) => {
    // when no input, show all
    if (searchPhrase === "") {
      return <Item name={item.name} details={item.details} />;
    }
    // filter of the name
    if (item.name.toUpperCase().includes(searchPhrase.toUpperCase().trim().replace(/\s/g, ""))) {
      return <Item name={item.name} details={item.details} />;
    }
    // filter of the description
    if (item.details.toUpperCase().includes(searchPhrase.toUpperCase().trim().replace(/\s/g, ""))) {
      return <Item name={item.name} details={item.details} />;
    }
  };

  return (
    <SafeAreaView style={styles.list__container}>
      <View
        onStartShouldSetResponder={() => {
          setClicked(false);
        }}
      >
        <FlatList
          data={data}
          renderItem={renderItem}
          keyExtractor={(item) => item.id}
        />
      </View>
    </SafeAreaView>
  );
};

export default List;

const styles = StyleSheet.create({
  list__container: {
    margin: 10,
    height: "85%",
    width: "100%",
  },
  item: {
    margin: 30,
    borderBottomWidth: 2,
    borderBottomColor: "lightgrey"
  },
  title: {
    fontSize: 20,
    fontWeight: "bold",
    marginBottom: 5,
    fontStyle: "italic",
  },
});
The first thing we need to define in line 11 is the Item, which will display the name and the details of the programming language. In another step, beginning in line 20, we define what actually happens with this Item. That’s the place where we actually filter the list of the programming languages according to the text input.
In the renderItem function, we define how the item we just defined before should be rendered in the FlatList component. In our case, we differentiate three cases. In the first one (line 22), we refer to the case that no input is given ((searchPhrase === "")). Here, we simply render all available items in the list.
With (item.name.toUpperCase().includes(searchPhrase.toUpperCase().trim().replace(/\s/g, ""))) in line 26, we filter the name of the programming languages. We convert both the input and the names to uppercase and remove all blank spaces.
There are three checks listed in the renderItem function, which are the actual filters. In line 27 of List.js, we check if the name of the item (the programming language) contains the text input (searchPhrase). This will be done for every item in our data and if the check turns out to be true, then the item will be rendered.
In line 30, we do the same, only we apply it to the descriptions of the programming languages.
There are many ways to implement the filtering logic, so feel free to try out some things on your own!
Now, that we prepared everything for FlatList, let’s take a look at what we actually return from this List component (lines 35-50). In line 37, you will see that I wrapped the FlatList in a View. That’s because I wanted to implement a functionality that ensures that when we tap or click anywhere outside of the search bar, the keyboard will be closed and clicked will be set to false. onStartShouldSetResponder={() => { setClicked(false) }} implements this logic.
The data in the data property from FlatList (line 43) will be provided by its parent component. renderItem will be set to our const renderItem from line 20. For the keyExtractor, we’ll use the id of the respective item.
The keyExtractor extracts a unique key for an item. This is important for caching and efficiently re-ordering the items in the FlatList.
In the next step, I’ll go through the Home.js component, where it all comes together! So hang on, you almost made it!
Home.js fileBelow is what our Home.js file will look like:
// Home.js
import React, { useState, useEffect } from "react";
import {
  StyleSheet,
  Text,
  SafeAreaView,
  ActivityIndicator,
} from "react-native";
import List from "../components/List";
import SearchBar from "../components/SearchBar";

const Home = () => {
  const [searchPhrase, setSearchPhrase] = useState("");
  const [clicked, setClicked] = useState(false);
  const [fakeData, setFakeData] = useState();

  // get data from the fake api endpoint
  useEffect(() => {
    const getData = async () => {
      const apiResponse = await fetch(
        "https://my-json-server.typicode.com/kevintomas1995/logRocket_searchBar/languages"
      );
      const data = await apiResponse.json();
      setFakeData(data);
    };
    getData();
  }, []);

  return (
    <SafeAreaView style={styles.root}>
      {!clicked && <Text style={styles.title}>Programming Languages</Text>}
      <SearchBar
        searchPhrase={searchPhrase}
        setSearchPhrase={setSearchPhrase}
        clicked={clicked}
        setClicked={setClicked}
      />
      { : (

          <List
            searchPhrase={searchPhrase}
            data={fakeData}
            setClicked={setClicked}
          />

      )}
    </SafeAreaView>
  );
};

export default Home;

const styles = StyleSheet.create({
  root: {
    justifyContent: "center",
    alignItems: "center",
  },
  title: {
    width: "100%",
    marginTop: 20,
    fontSize: 25,
    fontWeight: "bold",
    marginLeft: "10%",
  },
});
First, we import our custom components List and SearchBar in lines 9 and 10. Below that, we define three different states, two of which (clicked and searchPhrase) should be familiar to you. The third one, fakeData, will be used in the useEffect Hook in line 18.
To keep this example as realistic as possible, I simulated we fetched data from an API endpoint. Inside the useEffect Hook, we define an asynchronous function called getData, where we fetch data from the fake API and store the data in the const called fakeData. After defining the function, we then immediately call it in line 26. I didn’t define any dependencies in line 27 so that this Hook will only be executed once the component is rendered.
The header “Programming Languages” is implemented with {!clicked && <Text style={styles.title}>Programming Languages</Text>} and will be rendered conditionally, depending on the value of clicked. This means the text ‘Programming Languages’ will only be rendered if the searchBar is not clicked.
As a next step, we render our SearchBar component with the props searchPhrase, setSearchPhrase, clicked, and setClicked.
Fetching data can take several seconds, so we’ll want something to render during this time. Let’s render a loading spinner in this case. So as long as fakeData is undefined, we’ll render that loading spinner with !fakeData ? (<ActivityIndicator size="large" />) and otherwise the List component will be rendered.
And that is pretty much it! In the end, you just need to import this Home.js file in your App.js file like this:
import React from 'react';
import { StyleSheet, Text, View } from 'react-native';
import Home from './screens/Home';

export default function App() {
  return (
    <View style={styles.root}>
      <Home />
    </View>
  );
}
In this post, we reviewed how to create your own custom React Native search bar without the need to install any external libraries! Data was fetched from a fake API endpoint and was displayed with a FlatList component. Additionally, we went over how to implement conditional styling.
Feel free to use this code as a foundation for further development. For example, you could implement the filtering of the data on the server side, and not the client side, as we did here. The source code for this project can be found on my GitHub.

LogRocket's Galileo AI watches sessions for you and and surfaces the technical and usability issues holding back your React Native apps.
LogRocket also helps you increase conversion rates and product usage by showing you exactly how users are interacting with your app. LogRocket's product analytics features surface the reasons why users don't complete a particular flow or don't adopt a new feature.
Start proactively monitoring your React Native apps — try LogRocket for free.

Learn how to set up Meilisearch, index documents, and build keyword, semantic, and hybrid search with AI-powered retrieval.

Compare pnpm and npm across security defaults, disk usage, dependency strictness, and workspace policy to decide which package manager fits your project.

I migrated 20 production-style components from Tailwind to StyleX. Here’s what the data showed about LOC, CSS bundle size, build time, and type safety.

A guide for using JWT authentication to prevent basic security issues while understanding the shortcomings of JWTs.
Hey there, want to help make our blog better?
Join LogRocket’s Content Advisory Board. You’ll help inform the type of content we create and get access to exclusive meetups, social accreditation, and swag.
Sign up now

